Cardo Systems cardo BK-1 User manual

USER
MANUAL
version 1.22

2|cardo BK-1
© 2013 Cardo Systems, Inc.
The Bluetooth® word mark and logos are owned by the Bluetooth SIG, Inc. and any use of such marks by Cardo Systems, Inc. is under license. Other
trademarks and trade names are those of their respective owners.
The contents of this User Manual, including all text, illustrations and drawings are the exclusive intellectual property of Cardo Systems, Inc. (the “Company”)
and are protected by copyright laws. They are not in the public domain. Any partial or total reproduction, translation and or dissemination, without the prior
written authorization by the Company are strictly prohibited. Any rights not expressly granted herein are reserved.

ENGLISH
cardo BK-1 |3
CONTENTS
1. INTRODUCTION.................................................................... 4
2. CHARGING THE CARDO BK1. . . . . . . . . . . . . . . . . . . . . . . . . . . . . . . . . . . . . . . . . . . . . . . . . . . . . . . . . 6
3. SOFTWARE UPGRADES ............................................................. 6
4. GETTING STARTED ................................................................. 7
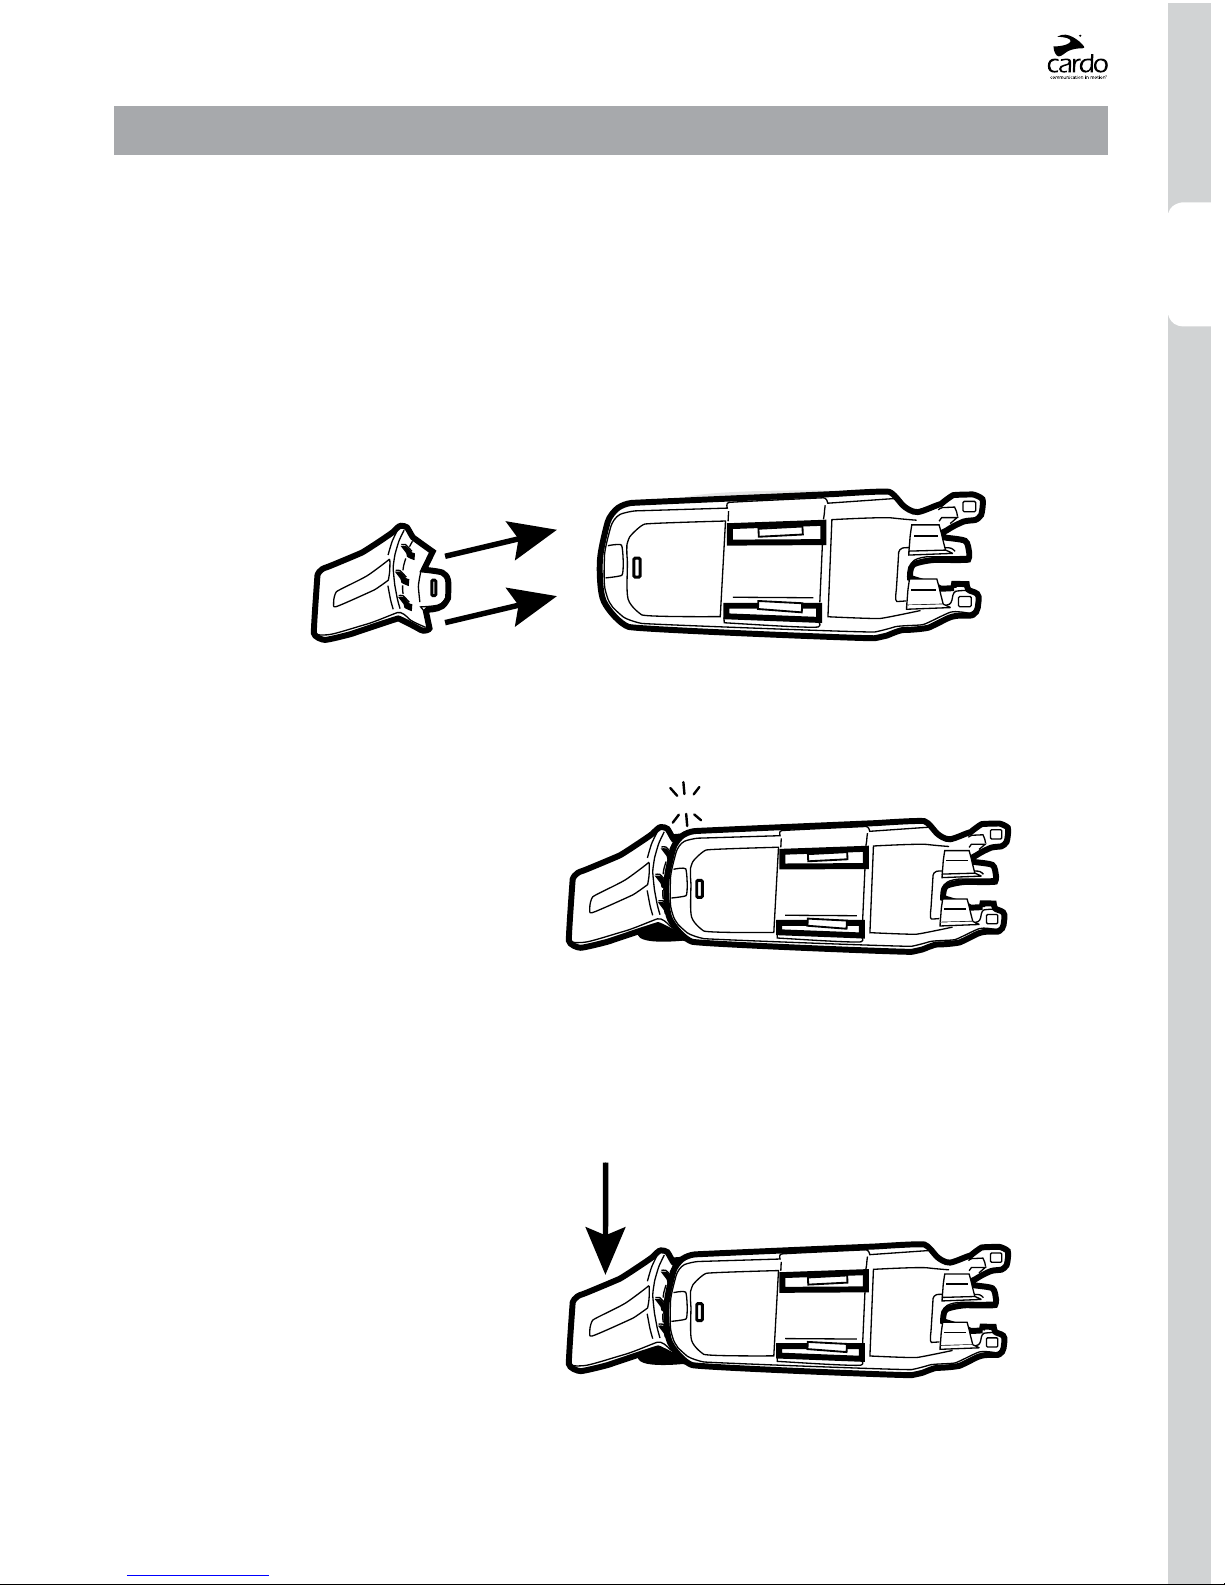
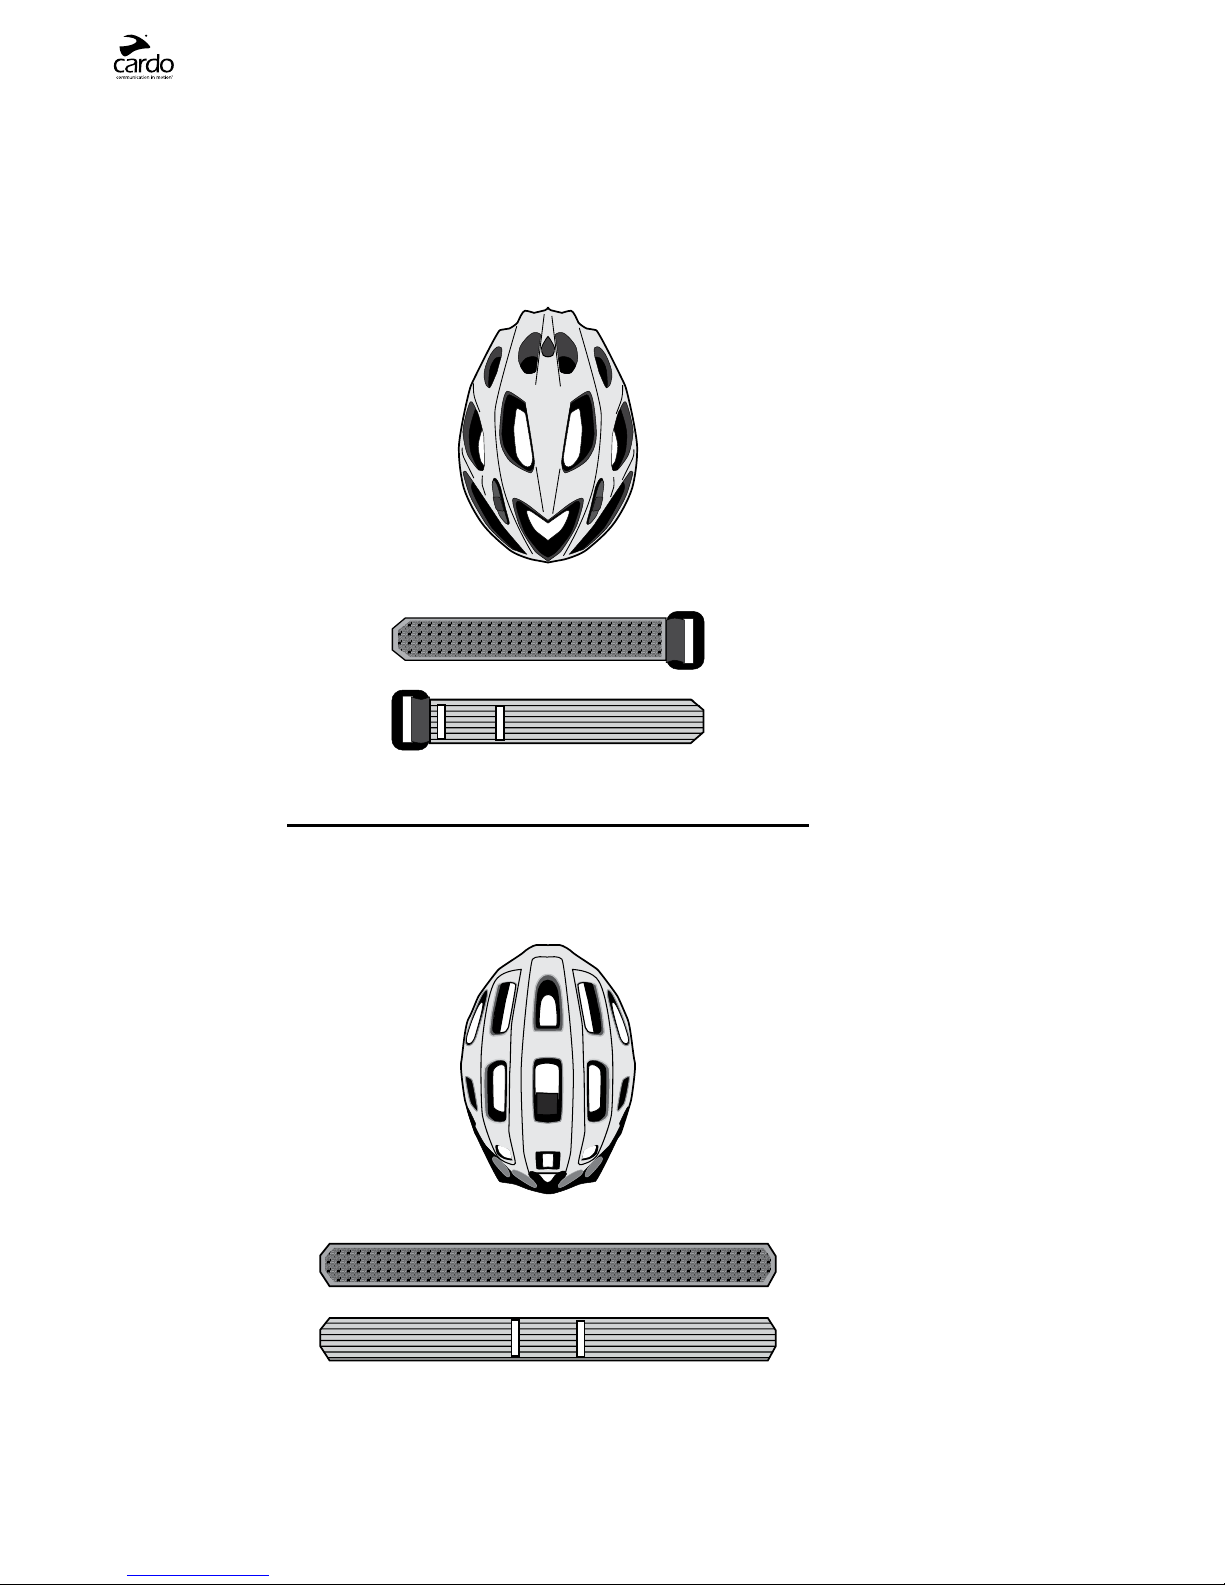
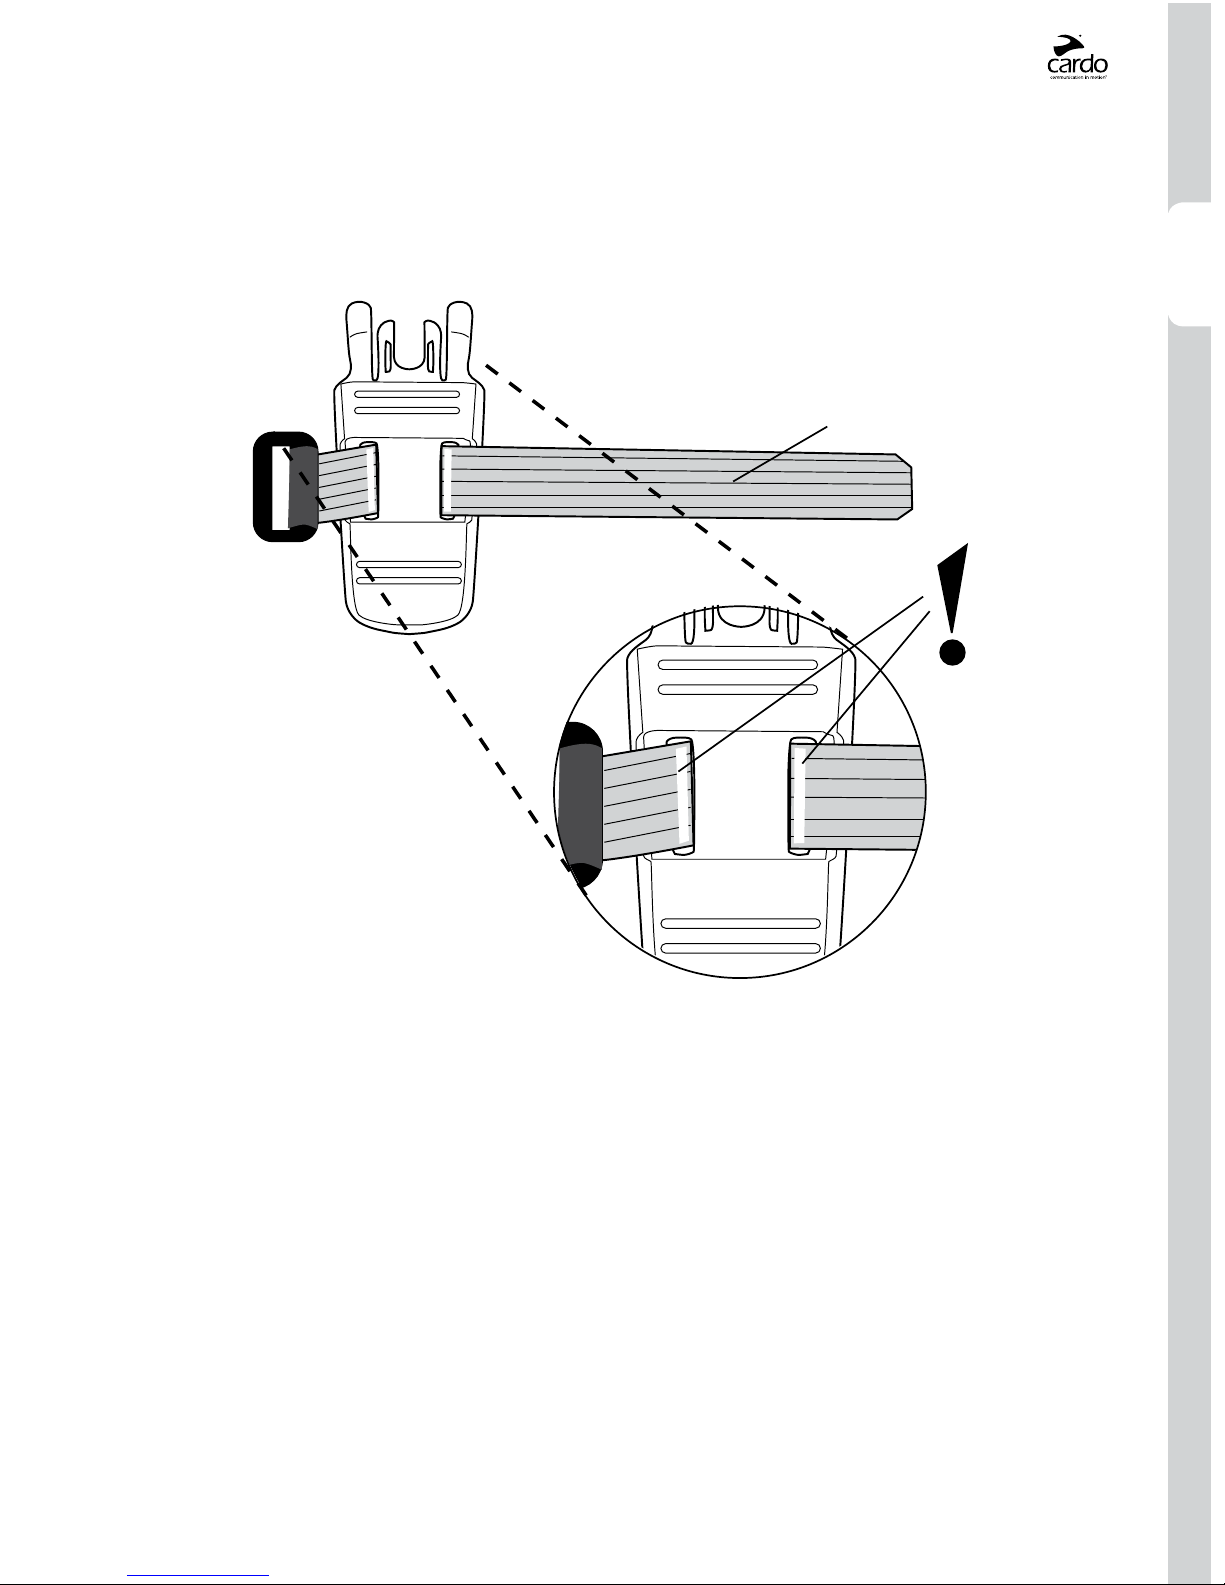
4.1. MOUNTING THE CARDO BK1 TO YOUR HELMET . . . . . . . . . . . . . . . . . . . . . . . . . . . . . . . . . . . . . . . . . 7
4.2. GENERAL FUNCTIONS ...............................................................18
4.3. STATUS LIGHTS AND SOUND .........................................................18
4.4. AUDIO SOURCES AND PRIORITIES .....................................................18
5. INTERCOM CONFIGURATION: .......................................................19
5.1. CONFIGURING THE INTERCOM ........................................................19
5.1a. TWO-WAY INTERCOM / INTERCOM TOGGLING MODE ...............................20
5.1b. THREE-WAY INTERCOM .........................................................21
5.2. USING THE INTERCOM...............................................................22
5.2a. MAKING INTERCOM CALLS ......................................................22
5.2b. RECEIVING INTERCOM CALLS ....................................................22
5.2c. VOX SETTINGS .................................................................23
6. BLUETOOTH DEVICES: MOBILE PHONE, GPS OR MP3 (A2DP) DEVICE OPERATIONS ............23
6.1. MOBILE PHONE AND GPS DEVICE OPERATIONS ..........................................24
6.1a. PAIRING A MOBILE PHONE.......................................................24
6.1b. PAIRING A GPS DEVICE..........................................................24
6.1c. MAKING AND RECEIVING PHONE CALLS............................................25
6.2 MUSIC STREAMING (A2DP) ..........................................................25
6.2a. PAIRING AN A2DP MUSIC PLAYER ................................................25
6.2b. LISTENING TO MUSIC: A2DP BLUETOOTH AUDIO SOURCES ............................26
6.3 CABLE-CONNECTED MP3 PLAYERS.....................................................26
6.3a. CONNECTING YOUR MP3 PLAYER OR OTHER EXTERNAL AUDIO SOURCES ...............26
6.3b. LISTENING TO MUSIC: MULTIPORT ..............................................26
7. CLICK-TO-LINK®: SPONTANEOUS INTERCOM............................................27
7.1. ENABLE/DISABLE CLICKTOLINK ......................................................27
7.2. USING CLICKTOLINK ...............................................................27
8. TROUBLESHOOTING CONNECTIONS ...................................................27
9. SUPPORT ........................................................................28
10. NOTICES .........................................................................28

4|cardo BK-1
1. INTRODUCTION
Thank you for choosing the cardo BK-1 Bluetooth communication and entertainment system for
bicycle helmets. This manual will help you set up, congure and operate both the cardo BK-1 and the
cardo BK-1 DUO. The retail box of the cardo BK-1 DUO contains two factory-paired cardo BK-1 units.
Key product highlights include:
INTERCOM
• 2 or 3 way bike-to-bike intercom conference mode at a range of up to 1,640 ft. / 500 m* (Channel A + B)
• Intercom toggling between up to 5 cyclists at a range of up to 1,640 ft. / 500m* (Channel A / B / C / D)
• Click-to-Link®: For spontaneous intercom conversations with any cardo BK-1 user nearby
MULTIPLE DEVICE CONNECTIVITY
• Bluetooth Mobile phone / GPS
• Wireless A2DP/ MP3 connectivity for stereo music (cable option also provided)
UPGRADEABLE SOFTWARE
• Users can download software upgrades, enhancements and new features
ADVANCED TECHNOLOGY
• VOX technology:
• Make/Receive/Reject mobile calls by voice command
• Make intercom calls by voice command
• Echo cancellation for increased audio clarity
• AGC technology (Automatic Gain Control) automatically adjusts the volume according to ambient noise
and riding speed
• DSP Digital Signal Processing Technology
• Volume Per Mode: Volume is set and saved at dierent levels for each audio function
We wish you a great cardo BK-1 experience and encourage you to write us at support@cardosystems.com
with any questions, suggestions or comments you may have.
* Under tough environmental conditions (dense forest, narrow buildings, heavy trac), intercom range will decrease signicantly. Once
conditions improve, the range will increase again.
IMPORTANT:
This is version 1.22 of the User Manual. Please note, that our manual is periodically updated on the Cardo website to
include the very latest features and functions of your new cardo BK-1.
Please visit www.cardosystems.com/download/manuals to check if the manual you are holding is the most
updated version and to download the manual in your preferred language.

ENGLISH
cardo BK-1 |5
CONTENTS OF RETAIL BOX
BK-1
Channel B Button
• Connects to Channel B / D
Volume Down / Rewind Button
Multi-Port
(Charging / Software Upgrade / Aux Line-in)
Mobile Button – Receive / Reject / Pairing
Volume Up / Forward Button
Channel A Button
• Connects to Channel A / C
• MP3 Button
Cradle
Audio Kit
Velcro helmet
mount
Audio Kit Connector
Two Speakers
Noise canceling microphone
Spoiler 4 Large Velcro pads
Long strap 4 Small Velcro pads
Short buckle strap 4 Adhesive pads (to hold the
speaker wires on the helmet lining)
Wall charger plug MP3 cable
USB adapter cable Microphone sponge
Pre-moistened Alcohol Pad
Alcohol
Pad
IMPORTANT: If you purchased the cardo BK-1 DUO, your Retail Box will include two sets of each component listed
above except for the User Guide.

6|cardo BK-1
2. CHARGING THE CARDO BK-1
Make sure that your cardo BK-1 unit is fully charged for at least three hours before initial use.
1. Open the silicone cover protecting the Multi-Port.
2. Insert the USB cable into the wall charger plug or a computer’s USB port.
3. Insert the other end of the USB cable to the Multi-Port of the cardo BK-1.
Channel“B”/
Channel“D”
Channel “A” / Channel“C”
4. While charging, the RED light turns on. When charging is complete, the RED light will turn o.
IMPORTANT:
The cardo BK-1 has been certied as waterproof and dustproof (IP67). However, when in use, the silicon cover lid
of the Multi-Port should be kept tightly closed to prevent moisture from entering the unit.
3. SOFTWARE UPGRADES
To maximize the benets oered by your cardo BK-1, make sure it is running the latest software. To download
the latest software version visit www.cardoupgrades.com and get access to updated software and the
ability to customize device settings from your computer.
Make sure to have your product serial number ready which can be found on the white label on the back of
the unit.
Minimum requirement: Windows® XP / Mac OS X® 10.5

ENGLISH
cardo BK-1 |7
4. GETTING STARTED
4.1 MOUNTING THE CARDO BK1 ON YOUR HELMET
➊
➋
Cradle
Spoiler
Cradle
Spoiler
Optional Spoiler
Deflect branches or other objects
CLICK!
Press here
Connect the Spoiler
Remove the Spoiler

8|cardo BK-1
Assembly of the cardo BK-1
Helmet Type 1: O-center vents
Short Buckle Strap
Long Strap
Velcro Side
Smooth Side
Velcro Side
Smooth Side
Helmet Type 2: Center vents
Front
Front
Back
Back

ENGLISH
cardo BK-1 |9
Helmet Type 1
Cradle
(Bottom)
Short Buckle Strap
Smooth Side

10 |cardo BK-1
➋
➊
Back
Front
Front
Back
Velcro Side
Cradle (Top)
FLIP THE CRADLE
Continue on page 14

ENGLISH
cardo BK-1 |11
➋
➊
Back
Front
Front
Back
Velcro Side
Cradle (Top)
FLIP THE CRADLE
Continue on page 14
➊
Helmet Type 2
Back
Front
Cradle
(Top)
Long Strap
Smooth Side

12 |cardo BK-1
➋
➌
Front
Back
Front
Back

ENGLISH
cardo BK-1 |13
➍
Front
Back

14 |cardo BK-1
➊
Alcohol
Pad
Back
Large Velcro Pads
Wait TEN
minutes
Preview: Final Audio Kit Position
Cradle
Audio Kit
Connector
Inner helmet view
Front
Position the Audio Kit
R L
Small Velcro Pads
(optional)
R
Position the velcro pads
Alcohol Pad
(optional)
INSTRUCTIONS:
1. Remove any existing
stickers.
2. Optional: Use the Alcohol
Pad to clean the exact spot
on the helmet.
3. Position and attach the
adhesive Velcro Pads.

ENGLISH
cardo BK-1 |15
➋
➌
Spare Velcro Pads
Back
Inner helmet view
Front
Back
Inner helmet view
Front
Audio Kit
Audio Kit
R L
R L
RIf needed, use the
adhesive pads
to hold the speaker
wires in a
comfortable
location

16 |cardo BK-1
➍
➏
➎
Connect the Audio Kit
CLICK!

ENGLISH
cardo BK-1 |17
1
2
1
Release the Audio Kit
Attach the Headset Release the
Headset
CLICK!

18 |cardo BK-1
4.2. GENERAL FUNCTIONS
GENERAL FUNCTIONS
Power ON Press and hold the Mobile Button for 2 seconds
• Light: 3 BLUE ashes
• Sound: Ascending tone
Power OFF Press and hold the Mobile Button for 2 seconds
• Light: 3 RED ashes
• Sound: Descending tone
Volume:
Adjust and set volume of current audio source
Tap the Volume Up or Volume Down Button
Mute speakers Tap Volume Up and Volume Down buttons simultaneously
Battery level indicator Press and hold the Volume Up Button for 2 seconds
Light:
• BLUE = Full charge
• PURPLE = Half charge
• RED = Almost empty
Enable/Disable AGC (Automatic Gain Control):
AGC automatically adjusts the volume according to
ambient noise and riding speed.
NOTE:By default, AGC is ENABLED.
With the cardo BK-1 in Standby Mode, press and hold the
Volume Down Button for 5 seconds
Light:
• Enabled: BLUE ash for 2 seconds
• Disabled: RED ash for 2 seconds
4.3. STATUS LIGHTS AND SOUNDS
Status LED and Audio Indication
cardo BK-1 is OFF None
Standby mode No active audio sources 1 BLUE ash every 3 seconds
Active mode–Call in progress / music or other audio source is ON 2 BLUE ashes every 3 seconds
Standby mode–Battery is low 1 RED ash every 3 seconds
Low-battery Beep every 3 minutes
Active mode – Battery is low 2 RED ashes every 3 seconds
Low-battery Beep every 3 minutes
Charging Solid RED
4.4. AUDIO SOURCES AND PRIORITIES
If two connected audio sources try to play audio simultaneously, the cardo BK-1 automatically determines
which audio source to play through the speakers based on the priority of the connected devices.
Higher Priority 1. Mobile phone audio or GPS instructions*
2. Intercom/Click-to-Link (CTL)
3. A2DP (Stereo Bluetooth) audio
4. Multi-Port–(for corded connection i.e. Music Players)
*GPS instructions from Smartphone GPS Apps are prioritized like A2DP audio
Lower Priority

ENGLISH
cardo BK-1 |19
For example:
• Incoming mobile phone calls will interrupt ongoing intercom calls
• Incoming intercom calls will interrupt the A2DP audio source
Click-to-Link®calls and Intercom calls have the same priority:
A Click-to-Link request cannot interrupt an Intercom call in progress, and vice-versa.
IC (Intercom) Busy Tone: If you are on a mobile call, Click-to-Link call, or receiving GPS instructions and
Cyclist A or Cyclist B try to connect to you for an IC Call, you will both hear a busy tone (double beep).
5. INTERCOM CONFIGURATION
5.1. CONFIGURING THE INTERCOM
The cardo BK-1 Intercom allows Bicycle-to-Bicycle full duplex communication at a range of up to
1,640 ft. / 500 m (subject to terrain).
Intercom communication (one on one) is possible between up to ve users, i.e you and four other cardo BK-1
users, through the four available channels (“A”, “B”, “C” or “D”).
Intercom conferencing is available between 3 cyclists via Channels “A” and “B” only, as described in section
5.1b “Three-Way Intercom”.
Intercom Conferencing mode Toggling mode
Channel A
Channel C
Channel B
Channel D
Pairing with another cardo BK-1 unit
To chat with another cardo BK-1 user via Intercom, rst pair the cardo BK-1 devices to each other. Pairing
is a one-time process. Once paired, the cardo BK-1 units will automatically recognize each other whenever
they are within range.
NOTE: The retail package of the “DUO” version contains two factory-paired units.

20 |cardo BK-1
5.1a.TWOWAY INTERCOM / INTERCOM TOGGLING MODE
If you have purchased the cardo BK-1 DUO, both units are factory-paired and congured to communicate via
their respective Channel “A” Buttons. Ifforanyreasonyou havetopairthemagain, ORif youpurchasedasingle cardoBK-1
and wish to pair with a second unit to make Intercom calls, proceed as follows:
First BK-1 Unit
Use Channel
“A”,“B”,“C”or“D”
Second BK-1 Unit
BASIC INTERCOM PAIRING:
1.Checkthat both BK-1 devices areturned ON and in Standby mode.(single BLUE ash every3 seconds)
2. Choose an available channel to pair the rst BK-1 (Channel “A”, “B”, “C” or “D”).
NOTES: • Selecting a Channel that is already in use will override the existing paired cardo BK-1
on that Channel with the newly paired cardo BK-1.
NOTES: • Intercom Conferencing is allowed via Channels “A” and “B” only
3. Place the device into Intercom Pairing mode by pressing and holding the correct Button(s) on the rst
BK-1 for at least 5 seconds until the BLUE / RED / PURPLE Light begins ashing rapidly (See Table below).
4. Immediately repeat Step 2-3 for the second cardo BK-1. Both units will now be in Intercom Pairing mode.
5. After a few seconds, both cardo BK-1 devices will show a solid light for 2 seconds, indicating that
they are now paired, connected and ready to use.
NOTE: If Pairing is not completed within two minutes, the cardo BK-1 will return to Standby mode.
INTERCOM PAIRING CHANNELS AND PAIRING LED INDICATIONS
INTERCOM CHANNEL PAIRING / BUTTON PAIRING MODE LED INDICATORS
Channel “A” Channel “A” Button Rapid RED ashing
Channel “B” Channel “B” Button Rapid BLUE ashing
Channel “C” Channel “A” + Volume Up Buttons Rapid PURPLE ashing
Channel “D” Channel “B” + Volume Down Buttons Rapid PURPLE ashing
Other manuals for cardo BK-1
2
This manual suits for next models
1
Table of contents
Other Cardo Systems Bicycle Accessories manuals