Carrera Digital 124 Wireless+ User manual

Montage- und Betriebsanleitung
Assembly and operating instructions
Instructions de montage et d’utilisation
Instrucciones de uso y montaje
Instruções de montagem e modo de utilização
Istruzioni per il montaggio e l’uso
Montage- en gebruiksaanwijzing
Monterings- och bruksanvisning
Asennus- ja käyttöohjeet
Montajse- og bruksanvisning
Ősszeszerelési és használati útmutató
Instrukcja obsługi i montażu
Návod na montáž a pre prevádzkuo
Návod na montáž a pro provoz
Ръководство за монтаж и експлоатация
Οδηγίες συναρμολόγησης και λειτουργίας
Instrucţiuni de montaj şi de utilizare
Monterings- og driftsvejledning
安装和使用说明
取扱説明書取扱説明書の内容は予
조립과 작동 방법
Montaj ve işletme kılavuzu
Инструкция по монтажу и эксплуатации
30355 LAP COUNTER

2
Aufbauvorschlag · Assembly proposal · Suggestion de montage · Propuesta de montaje
Sugestão de montagem · Suggerimento per il montaggio · Opbouwvoorstel · Monteringsförslag
Kokoamisehdotus · Oppbygningsforslag · Felépítési javaslat · Propozycja montażu
Návrh postavenia · Návrh na uspořádání · Предложение за монтаж · Πρόταση σύνδεσης
Propunere de asamblare · Opbygningsforslag · 建造指南 · 組立方法 · 조립방법
· Kurma önerisi · Предложение по монтажу

7
Table of contents
Safety instructions 7
Important information 7
Contents of package 7
Description 7
Functions 7
Connection 7
Setting up the Lap Counter 7
Display summary 7
Preparation of start 8
False start 8
Training mode 8
Lap Races 8
Display - lap race Position Tower 8
Time Racing 8
Display - time race Position Tower 9
Display settings 9
Reset function 9
Maintenance and care 9
Troubleshooting/Driving tips 9
Technical specifications 9
Welcome
Welcome to the Team Carrera!
The operating instructions contain important information regarding
setting up and operating your Carrera DIGITAL 124/132 electronic
Lap Counter. Please read them carefully and keep them in a safe
place afterwards.
If you have any queries, please do not hesitate to contact our dis-
tributor or visit our websites:
carrera-toys.com · carreraclub.com
Please check the contents for completeness and possible transport
damage. The packaging contains important information and should
also be retained.
Please note that the electronic Lap Counter will only function in con-
junction with the 30352 Carrera DIGITAL 124/132 Control Unit. The
Lap Counter can be used for Carrera DIGITAL 124/132 cars.
Should you need information on operating the 30352 Carrera DIGI-
TAL 124/132 Control Unit, please refer to the operating instructions
for the Control Unit.
We hope you will have a lot of pleasure with your Carrera DIGITAL
124/132 electronic Lap Counter.
Safety instructions
• WARNING! Not suitable for children under 36 months. Danger of
suffocation due to small parts which may be swallowed. Warning:
risk of pinching caused by function.
• Regularly check the track and cars for damage to cables, plugs
and housings! Replace defective parts.
• The car racetrack is not suitable for outdoor operation or operation
in wet locations! Keep away from liquids.
• Do not place any metal parts onto the track to avoid short-circuits.
Do not place the track in the immediate vicinity of delicate objects,
as these could be damaged by cars hurled from the track.
• Pull the plug before cleaning the racetrack! Only use a damp cloth
for cleaning, no solvents or chemicals. When it is not in use, store
the track in a dry and dust-protected location, preferably in the origi-
nal cardboard box.
• Do not operate race track at face- or eye-level – risk of injury due
to cars being catapulted off the track.
Important information
Carrera DIGITAL 124/132
EXCLUSIV
EVOLUTION
Carrera DIGITAL 124/132 EXCLUSIV
EVOLUTION
Please note that Exclusiv/Evolution (analog system) and Carrera
DIGITAL 124/132 (digital system) involve two separate and com-
pletely independent systems. We hereby expressly indicate that
both systems must be kept separate when setting up the track, i.e.
no connecting rail from Exclusiv/Evolution may be used together
with the connecting rail and Black Box of the Carrera DIGITAL 124/132,
even if only one of the two connecting rails (Exclusiv/Evolution con-
necting rail or Carrera DIGITAL 124/132 connecting rail and Black
Box) is attached to the current supply. Furthermore, no other Car-
rera DIGITAL 124/132 components (switches, electronic lap counter,
pit stop) may be built into an Exclusiv/Evolution course, i.e. via ana-
log operation.
Non-compliance with the above information may result in damage or
destruction of the respective Carrera DIGITAL 124/132 components.
In this case no warranty may be claimed.
Contents of package
1x
2x
1x
1 Lap Counter including connection cable
2 Feet
1 Instructions
Please check the contents for completeness and possible transport
damage. The packaging contains important information and should
also be retained.
Description
The Lap Counter 30355 is exclusively for use with the Control Unit
30352 and makes lap counting and time recording possible for up to
8 vehicles of which 6 may be actively controlled. Autonomous Car
and Pace Car can be shown in addition.
Note: when several autonomous cars are running, they will all be
counted together at position 7 and all pace cars together at posi-
tion 8.
When the Pit Lane 30356 is used, lap counting and time recording
can also be done in the Pit Lane. For further information on this, see
also operating instructions for the Control Unit 30352.
Factor settings:
• Lap races = 50
• Time races = 5 minutes
• Contrast = 20
• Brightness = 20
Functions
• Training mode
• Lap races max. 9999
• Time races max. 49:59’59’’
• F1 or slot mode selectable for the end of the race
• Position indicator on the display
The Lap Counter has a memory function. As soon as the factory
settings are altered, the new values are retained until they in turn
are reset.
Connection
2
1
No special track section is required for the Lap Counter 2. The unit
is connected directly to the socket “PC UNIT” on the Control Unit 1
and it is immediately ready for operation.
Setting up the Lap Counter
1 1
22
The slots for fitting the feet are located on the rear of the casing.
According to how you want to set them, they can be placed in posi-
tion 1 or 2. To fit the feet, push them fully into the slots until they
latch in place. To remove the feet, simply pull them out of the slots.
Display summary
1
A
B
C
2
46
3
5 7
1 Complete display
2 Race mode
3 Position indicator
4 Fastest lap time
5 Previous lap time
6 Distance behind the leader
7 Number of laps completed
A - C operating keys

8
Preparation of start
Before the Lap Counter is used, all vehicles must be coded. To
code the individual vehicles, refer to the operating instructions for
the Control Unit.
False start
If the hand controller of a car is moved during the starting lights
phase, this will be treated as a false start. The vehicle causing the
false start moves forwards a short distance and the LED on the re-
spective car/hand controller flashes. The race or training will not be
given the „all clear“ and the starting procedure must be repeated.
Training mode
The training mode is used for training and for determining the grid
position for the race; it can be started without lap or time settings.
For setting the training mode, proceed as follows:
1. Switch the Control Unit on with the ON/OFF switch.
2. After about a second, the middle LED on the Control Unit will light
continuously and a short acoustic signal is given.
3. The Carrera DIGITAL 124/132 electronic Lap Counter switches
automatically into training mode.
4. Press once on the start key on the Control Unit - all LEDs will
light up continuously.
5. Place the vehicle(s) already coded on the connecting track sec-
tion.
6. Then press the start key once again and the starting sequence is
initiated, LEDs light up and acoustic signals are given.
7. The training session begins on completion of the start sequence
and the overall time (“TIME”) begins to count down.
During and after a training session, you can switch over to the indi-
vidual cars by pressing key A. In the position indicator a vertical line
will now be shown under the car selected. The following details will
then be shown for the respective car on the display:
• fastest lap time
• time of the last lap
• distance behind the leading vehicle in time and in laps
• number of laps completed.
To finish the training session press key C (“ESC”) once while the
cars are running. To return to the main menu, key C (“ESC”) must
now be pressed once again.
Note:
when the training mode is ended, all data are lost.
Individual lap times of over 09:59:999 cannot be shown in the dis-
play.
Lap Races
To set up a lap race, press key C (“ESC”) in the main menu. The
display will now switch to selection mode.
The word “TRAINING” will flash and the letters “CHA” for change and
“SEL” for select will be shown on the display. The mode is changed
by repeatedly pressing key A (“CHA”) until “LAP RACE” flashes.
The selection is confirmed by pressing key B (“SEL”) and you are
taken to the next input.
In the next step, the number of laps will be selected. Basically the
unit is selected first, then the “tens”, then the “100s” and finally the
“1000s” - the respective figure in the display will flash. To increase
the number, press key A (“UP”). To move on to the next figure, press
key B (“SEL”) and set the value as described above. If the number
of laps previously set is not to be changed, confirm by pressing the
key B (“SEL”) until the lap number display disappears.
Once you have set the number of laps, you must next specify the
mode for the end of the race. Use the respective key to select either
“F1” or “SLOT”.
F1 mode
After the leading car has completed the prescribed number of laps,
for the remaining cars only the current lap will be registered.
Slot mode
All cars must complete the prescribed number of laps before the
race is finished.
Once the mode is selected the display switches over to “Ready”
mode and waits for the start signal.
Press once on the start key on the Control Unit and place the vehi-
cles on the connecting track section. Then press the start key once
again. The starting sequence is initiated, and the time on the Lap
Counter starts to run.
During and after a lap race you can switch over to the individual cars
by pressing key A. In the position indicator a vertical line will now
be shown under the car selected. The following details will then be
shown for the respective car on the display:
• fastest lap time
• time of the last lap
• distance behind the leading vehicle in time and in laps
• number of laps completed.
When a car has finished the race, this is shown in the corresponding
position by flashing on the display. At the end of the race an acoustic
signal is given and the display indicator starts to flash.
To stop a lap race which is in progress, press key C (“ESC”) while
cars are running.
Display - lap race
Position Tower
When the Lap Counter is used in conjunction with the Position Tow-
er 30357, the number of laps set is shown in the uppermost display
segment. During the race this will count down to zero, until the race
is finished by the leading car.
The two-position lap indicator can show a maximum of 250 laps us-
ing the display segment. The “hundreds” positions are represented
by the dots at the bottom right in the respective segment.
21
1 a
1 b
1 Two-digit LED-segment display to indicate the number of laps
1 a Display 100 laps
1 b Display 200 laps
2 One-digit LED-segment display to indicate race position of 6
cars maximum
When a number of laps in excess of 250 is set, two ticks are shown
in the upper display segment. The display only starts to count down
to zero when there are 250 laps left to run.
Time Racing
To set up a time race, press key C (“ESC”) in the main menu. The
display will now switch to selection mode. The mode is changed
by repeatedly pressing key A (“CHA”) until “TIME RACE” flashes
in the display.
Confirm the selection by pressing key B (“SEL”) to go to the time
input.

9
After this selection the seconds field will flash. Basically the sec-
onds are selected first, then the minutes and finally the hours - the
display cursor will flash in the respective field. To increase the num-
ber, press key A (“UP”). To move on to the next field, press key B
(“SEL”) and set the desired time as described above.
If the previously-set race time is not to be changed, confirm by re-
peatedly pressing the key B (“SEL”) until the time display disap-
pears.
Once the time is input the display switches over to “Ready” mode
and waits for the start signal.
Press once on the “START” key on the Control Unit and place the
vehicles on the connecting track section. Then press the start key
once again. The starting sequence is initiated, and the overall time
on the Lap Counter starts to count down.
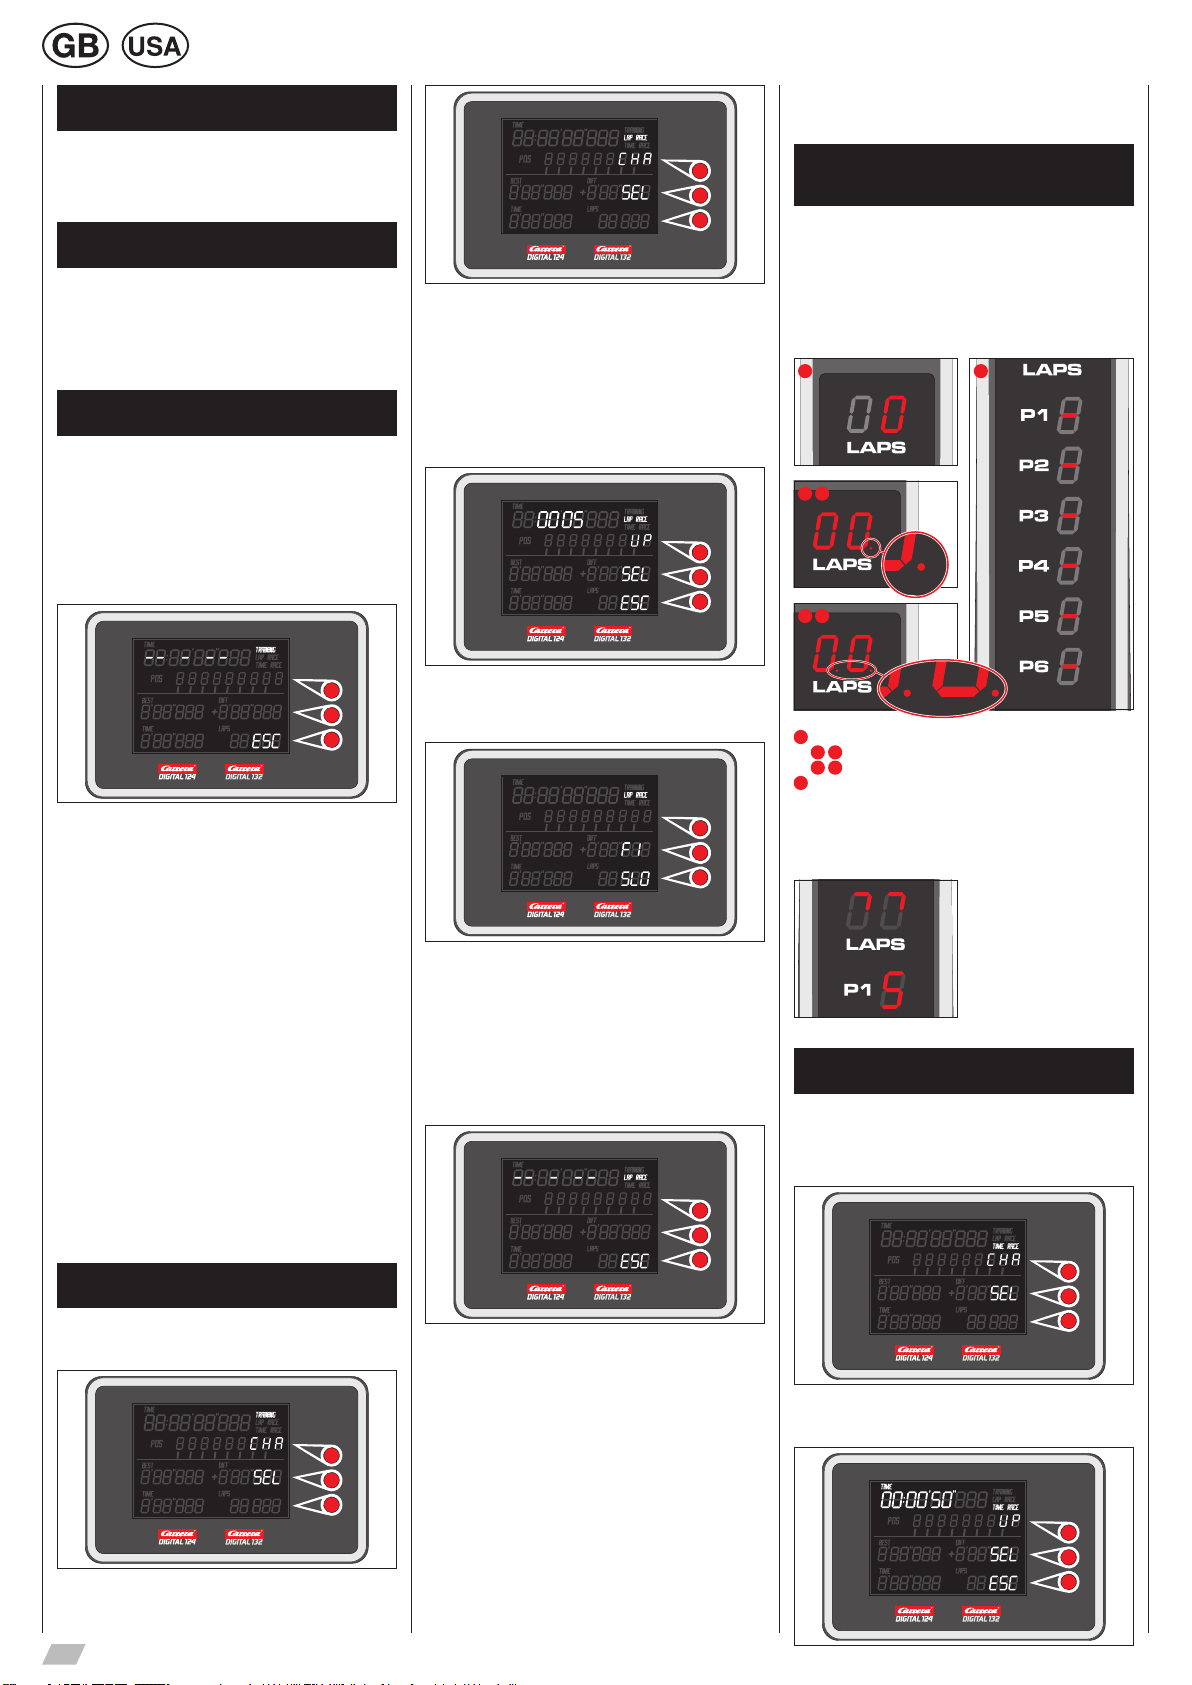
During and after a time race you can switch over to the individual
cars by pressing key A. In the position indicator a vertical line will
now be shown under the car selected. The following details will then
be shown for the respective car on the display:
• fastest lap time
• time of the last lap
• distance behind the leading vehicle in time and in laps
• number of laps completed.
When the overall time has elapsed, the race is over and an acoustic
signal will be given and the positions of all cars will flash on the
display. In the uppermost line “TIME” the overall time of the leading
car will be shown.
To stop a time race which is in progress, press key C (“ESC”) once
while cars are running.
Display - time race
Position Tower
When the Lap Counter is used in conjunction with the Position
Tower 30357, the time still to run is shown in the uppermost display
segment. During the race this will count down to zero, until the race
is finished by the leading car.
For a time race, a maximum time of 49:59’59’’ can be set. The
hours are signalled by two dots in the display segment. When the
hours have elapsed the minutes remaining are shown by the dot in
the right-hand display segment. At the start of the final minute of the
race, the display starts to count down to zero in seconds without
a dot.
Hour indicator
Minute indicator Second indicator
Display settings
To improve legibility, the contrast of the display can be adjusted
in 20 steps. For this, switch off the Control Unit. Now, while switch-
ing on the Control Unit, hold key A down until the indicator display
changes to match the corresponding illustration. The uppermost line
then shows the respective software version.
The contrast of the display can be altered in max. 20 steps by
using “CHA ” and “CHA “. To store the value selected, press
key C (“SEL”).
To improve legibility, the background brightness of the display can
be adjusted in 20 steps. For this, switch off the Control Unit. Now,
while switching on the Control Unit, hold key C (“ESC”) down until
the indicator display changes to match the corresponding illustra-
tion. The uppermost line then shows the respective software ver-
sion.
The background brightness of the display can be altered in max. 20
steps by using “CHA ” and “CHA “. To store the value selected,
press key C (“SEL”).
Reset function
To reset all Lap Counter settings, while switching on the Control
Unit, hold down key B of the Lap Counter. Hold the key down until
the training display reappears. All data will then be reset to the fac-
tory settings. (see description)
Maintenance and care
1
To ensure a proper operation of the motor-racing circuit, all race-
track components should be regularly cleaned. Pull the plug prior
to cleaning.
1 Racetrack: Keep the track surface and track slots clean with a
dry cloth. Do not use any solvents or chemicals for cleaning. When
it is not in use, store the racetrack in a clean and dust-protected
location, preferably in the original cardboard box.
Troubleshooting
Driving tips
Troubleshooting:
In case of any malfunctions, please check the following:
• Has the connection to the power supply been established correctly?
• Have transformer and speed controllers been connected
correctly?
• Are the track connections faultless?
• Are the racetrack and track slots clean and free of any foreign
objects?
• Are the sliding contacts in order and do they make contact with
the track slot?
• Are the cars correctly coded to the according speed controller?
• The track‘s current feed will be switched off automatically for 5
seconds, if there is an electrical short circuit: this will be notified by
audible and visual signals.
• Are the cars placed on the track in running direction? In case of
non-functioning push the running direction switch which is on the
car´s bottom.
Note:
During operation small car parts as spoilers or mirrors may get off or
brake due to being original detailed parts of the car model. To avoid
this it is possible to remove them before operation.
Driving technique:
• You can drive fast along the straight track but you should brake
before the curve and then accelerate again when coming out of the
curve.
• Do not fasten or block the vehicles when the motor is running:
overheating or damage to the motor could result otherwise.
Note: When using track systems which are not manufactured by
Carrera the existing guide keel has to be replaced by the special
guide keel (#85309). While using the Carrera crossing (#20587) or
high banked curve 1/30° (#20574) slight driving noise might occur
which is due to the full-scale genuineness and does not affect flaw-
less operation.
All Carrera spare parts are available in the webshop:
carrera-toys.com
Delivery exclusively to Germany, Austria, Netherlands, Belgium and
Luxembourg.
Technical specifications
Output voltage: Toy transformer
18 V 54 VA (Carrera DIGITAL 124)
14,8 V 51,8 VA (Carrera DIGITAL 132)
Electricity modes:
1.) Operating mode = cars are operated via speed controllers
2.) Idle mode = speed controllers not activated, no game
3.) Stand-by mode = after approx. 20 minutes idle mode the
connecting section switches to stand-by mode. LED flashes at
long intervals. CURRENT CONSUMPTION < 1 watt / 1w
By operating the speed controller the stand-by mode is finished,
the racetrack returns to idle-mode again.
4.) Off-state = power supply unit disconnected from mains supply
This device is marked by “selective sort throught” symbol related to
sort through domestic, electric and electronic, waste. This means
the product must be treated by a specialized “sorting/collecting” sys-
tem in accordance with European directive 2002/96/CE, to reduce
the impact upon environment. For more precise information, please
contact your local administration. Electronical product which are not
going through special collecting, are potentially dangerous for envi-
ronment and human health, because of dangerous substance.
Output voltage: Toy transformer
18 V 54 VA (Carrera DIGITAL 124)
14,8 V 51,8 VA (Carrera DIGITAL 132)
Electricity modes:
1.) Operating mode = cars are operated via speed controllers
2.) Idle mode = speed controllers not activated, no game
3.) Stand-by mode = after approx. 20 minutes idle mode the
connecting section switches to stand-by mode. LED flashes at
long intervals. CURRENT CONSUMPTION < 1 watt / 1w
By operating the speed controller the stand-by mode is finished,
the racetrack returns to idle-mode again.
4.) Off-state = power supply unit disconnected from mains supply

Stadlbauer Marketing + Vertrieb GmbH · Rennbahn Allee 1 · 5412 Puch / Salzburg · Austria
carrera-toys.com·carreraclub.com
7.80.12.29.00· 01/2013
Other manuals for Digital 124 Wireless+
15
This manual suits for next models
1
Table of contents
Other Carrera Cash Counter manuals
Popular Cash Counter manuals by other brands

3B SCIENTIFIC
3B SCIENTIFIC PHYSICS 1003122 instruction sheet

Trumeter
Trumeter 898X manual

Apator Metra
Apator Metra E-ITN 30 Installation and service manual

Cashmaster
Cashmaster Sigma 105 user manual

Lighthouse
Lighthouse solair 3100 operating manual

DIEBOLD NIXDORF
DIEBOLD NIXDORF DN 250 Series Operator's manual