CARRYGOLF LEOPARD User manual

carrygolf
carrygolf.net
1
INSTRUCTIONS: CARRYGOLF LEOPARD
LEOPARD

carrygolf
carrygolf.net
2
CONTENTS
1. In The Box
2. Assembly Instructions
3. Control Panel Functions
4. Driving With Remote Control
5. How To Manage Without Remote Control
6. Battery
7. Electric Brake. "Brake System"
8. Driving Without Electric Motor
9. Maintenance
10. Transport
11. Technical Service
12. Warranty

carrygolf
carrygolf.net
3
INSTRUCTIONS: CARRYGOLF - LEOPARD
Please read and follow these instructions carefully and your cart will be
ready to run in minutes.

carrygolf
carrygolf.net
4
BOX CONTENTS
A) Metal frame and motor.
B) 2 wheels, rims and rear tires.
C) 24 V Lithium battery with box.
D) Battery Charger.
E) three additional quick clamping gums.
F) Remote control .
G) Anti rollover tire.
H) Wheels transport bag.
I) Battery transport bag.
J) Grass cleaning brush .
K) Card holder.
L) Support for umbrella.
M) Silicone capss to protect the car.
N) Towel to clean irons.

carrygolf
carrygolf.net
5
Figure 1

carrygolf
carrygolf.net
6
ASSEMBLY INSTRUCTIONS
Unpack all components carefully and keep the package for a reasonable
time. (Essential in case of refund)
1) Mount the wheels checking the tire tread and still points in the direction
of travel. Take as reference the tire tread of the front wheel or follow the
pattern of Figure 1 (p. 5). The wheels have left –right position.
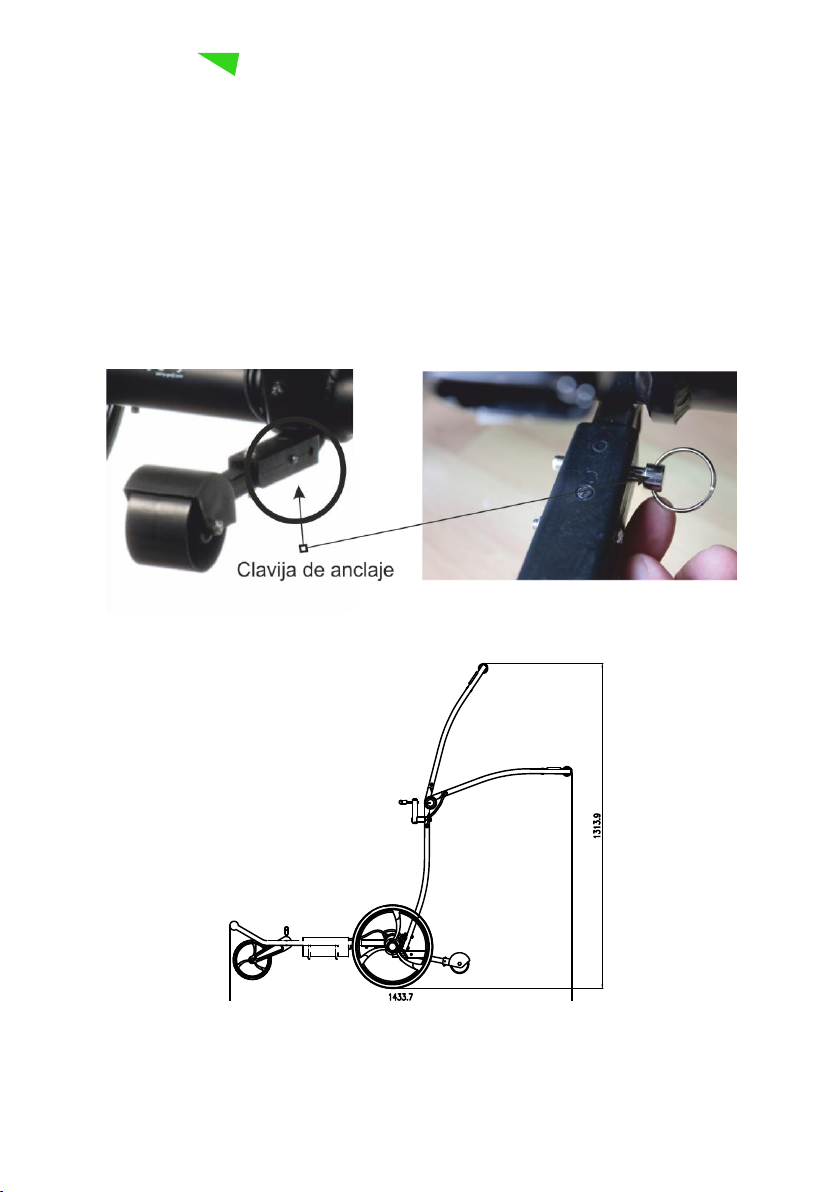
Insert each wheel in axis, pressing the pivot located on the same wheel. The
shaft has two lace. The exterior, is intended only for use with full manual
cart, in case of a power failure, battery depletion or failure. The inner
socket, is used to engage the four Allen screws inside the wheel, into the
four holes that brings the motor, so the motor moves the wheels.

carrygolf
carrygolf.net
7
2) The anti rollover rear wheel has an anchoring(and safety) pin that shall be
pressed, for insertion or removal of its position.
3) Position and fix the horizontal arm at the desired position.

carrygolf
carrygolf.net
8
4) Install the battery in the cart and plug the power cord into the power
outlet of the motor, gently pressing the anchor pivot. (Remember that for
removal one must also press the anchoring piece)
To fit into the socket, press the pivot anchor
5) Fix the battery to the cart by a quick clamping rubber band (Photo B). The
purpose of this fixing is to avoid unnecessary wear on the painting produced
by continuous friction. At the same time, get the battery un moved in case
we detach or dump the cart.
Photo A Photo B
All rubber clamps (photo A) has an adjustment function. To work properly
tensioned, make a knot to the desired size.
.

carrygolf
carrygolf.net
9
CONTROL PANEL FUNCTIONS
3.1 ON / OFF Press for two seconds, your Carrygolf is connected or
disconnected.
3.2 LED power indicator. To verify that your car is on or off, the indicator
light provided. Remains green as available battery charge. Red when the
battery status is low.
3.3 TIMER, scheduled movement 10, 20 or 30 meters. Depending on the
number of times the button (1, 2 or 3 times) is pressed, the preset distance
Carrygolf advance 10, 20 0 30 m.
3.4 POTENCIOMETER, power regulator according to the terrain. A steeper,
will require more power.

carrygolf
carrygolf.net
10
RIDING WITH REMOTE CONTROL
The remote control is a command transmitter to the receiver installed on
the golf cart.
2 AAA batteries (1.5 V) are necessary
IMPORTANT:
For a proper carriage driving with remote control, turn your Carrygolf on
and hold down the potenciometer knob.
Strange as it may seem, the button should remain in the stop position.
The potentiometer is only used for driving without a remote control.
You may need 2 or 3 games to master, driving with remote control

carrygolf
carrygolf.net
11
Basic functions of the remote control.
63
2
8
5
4
1
7
Button 1 - on or off button ON / OFF.
Button 2 - Led - Witness
Button 3 - Go Forward
Button 4 –Go BackWards
Button 5 - Right
Button 6 - Left.
Button 7 - Move & scheduled stop at 10, 20 or 30 meters
Button 8 - Emergency Stop
The remote control is a command transmitter, receiving it the receiver
installed on the golf cart.
To better understand the operation have given a different number to each
button. The functions performed by the command are:

carrygolf
carrygolf.net
12
Button 1 –on/off - Your remote control has a button to start or end use.
Button 2 -LED battery charge indicator or possible failure of command.
Button 3 - Forward. This key and the following have more features than at
first they may seem.
A) Go ahead. Directs the cart in forward direction.
B) Change of electrical gear. The G5R-T is equipped with an Electronic 5-
speed gear box. Once the cart is started each time you press this key
activates a higher gear and will be getting more speed.
starting in 1st. Gear if every 3 to 4 seconds press this key to a total of 4
times, the cart will circulate with 5th gear.
To slow intermittently have to click the Button 4 (Back) and it will go from
5th gear to 4th, 4th to 3rd and so on until the cart stops. When the cart is in
2nd gear you can press the emergency brake (Button 8) and stop smoothly
without damaging the mechanism, because the abruptness is minimal.
Button 4 - Back. It has 2 functions as with Button3 (forward).
A) Back. With the car stopped, pressing this button runs the cart backwards.
B) Change of electrical gear. When the cart is moving and want to be able to
reduce your speed, you must press this button intermittently. Each press
will reduce speed.
To understand it better with a simple example will be enough. Imagine going
in forward with 5th gear. The car is about to reach its destination. To stop
the cart in the desired location you can use button 8 that is the emergency
brake or reducing speed until it stops by itself, because it goes to “P”
position like a car with automatic transmission .

carrygolf
carrygolf.net
13
If you stop the car with button 8, this is going to stop abruptly, but the
mechanisms that get stop the cart , suffer a "punch" that as time goes by,
will cause one or more faults.
If you drive with a slow gear, sharply this is much softer and the
mechanisms absorb well this order by button 8. Therefore in this case you
can safely use button 8 called "emergency stop".
When the car runs with fast speeds, you should use button 4 and shifting
down. Check that the cart gently and quickly stops to reaches the “P”
position .
Button 5 - Right. Press this button to move the cart to the right.
Button 6 - Left. Directs the cart to the left.
Button 7 –Move & stop scheduled in 10, 20 or 30 meters.
This button allows us (sometimes that is not often) move a distance of 10,
20 or 30 meters. Any press is 10 meters long, two and three times moves 20
and 30 meters. It is an option that is rarely used.
Button 8 - Emergency stop. Pressing this button stops the cart at one. Used
to stop the cart when going at a slow gear or in an emergency, such as a
possible hit to another player or a possible entry into a lake.
PRECAUTIONS
Never store the remote control in pants pocket without prior use of the
disconnect button. It is extremely easy to activate the cart and move it to
the right or left by pressing a key without you knowing it. It is obviously
dangerous to the safety of persons and the maintenance of equipment.

carrygolf
carrygolf.net
14
VERY IMPORTANT The cable that serves as the handle of the control, is also
the transmitting antenna. NEVER CUT THE ANTENNA.
The distance of control coverage is determined by the remaining power in
the battery, the terrain and the deployment of the antenna. Keep yourself
relatively close to the cart when scroll the field.
D) Recommendations
On winding roads or pavements with solid materials (concrete, asphalt,
tiles), feeder lines and difficult terrain, it is advisable to drive your cart
manually.
INSTRUCTIONS TO RUN WITHOUT REMOTE CONTROL
Active start button (p. 9 ref. 3.1) and manually turn the Potenciometer (page
9, ref. 3.4) adjusting it to your liking.
Stop your cart turning the potentiometer to its initial position of inactivity.
NO
YES

carrygolf
carrygolf.net
15
Use the TIMER button (p. 9 ref. 3.3) on the control panel for a scheduled
progress of 10, 20 or 30 meters. Depending on the number of times the
button (1, 2 or 3 times) is pressed will move the desired 10, 20 or 30 meters.
BATTERY
Your Carry golf has LITHIUM battery 24 Volt 10 Amp (24V / 10 Ah). In an
optimal and fully charged state, allows to run a distance of approximately 36
holes, depending on the terrain and route field. Our recommendation is to
charge the battery every 18 holes to playing golf with complete disregard
for the state of charge of the battery. If you wish playing 27 or 36 holes in a
row, the battery is ready to supply the necessary energy.
No memory effect, allowing you to charge the battery without having to
wait until it is in a low state of charge. Conventional lead-acid battery HAS
memory effect.
- Lifetime. Approximately 800 cycles or charges.
A comparison that serves to understand how these batteries work, is to
think that a "smart phone", is also equipped with a lithium battery. A golf
course with steep slopes is comparable to a phone that makes a number of
phone calls.
More calls mean more battery consumption and steeper courts more
battery consumption.
Know your battery
Lithium batteries require no special maintenance, just charge it every three
months to keep it in optimum condition.

carrygolf
carrygolf.net
16
Charge your battery using the supplied charger. Most chargers are 12 V or
24 V, if you by mistake or distraction use a 24 V charger for a 12 V battery,
will damage the battery.
The waiting time for full charge is 4-5 hours.
Admits the possibility of connection in any state of charge.
The charger will end its function, once the maximum load detected.
Remember to keep your battery charged before starting the tour with golf
cart.
In case of running out of battery power, change the position of the wheels
to manual position. (See page 6).
Recommendations:
a) Recharge the battery before it runs out
b) After the recharge, disconnect the battery charger.
ELECTRIC BRAKE. "BRAKE SYSTEM".
This mechanism makes us to be apart from most manufacturers. we are
sure, you will be pleasantly surprised, as soon as you test our cart!
Carrygolf incorporates in all its electric carts, a smart engine brake that
automatically detects and reduces inertia generated when descending a
slope, maintaining a gentle walking pace.
Smart electric brake of your Carrygolf adjusts the speed drops and therefore
the player will not need to keep the momentum of the cart.

carrygolf
carrygolf.net
17
DRIVING WITHOUT ELECTRICAL MOTOR.
If you need to use your car without using the motor, move the wheels to the
outer anchorage axis position (see p. 7).
MAINTENANCE
Your Carrygolf has a minimal maintenance. Here we detail various aspects to
consider:
1) Cleaning
To keep clean your cart, remove the battery and use a cloth dampened with
water.
Carefully dry the delicate parts.
Do not use water or other liquids around control panel in the upper handle,
the outer compartment of the motor as well as motor and battery
connections.
Do not use cleaning machines or pressure water hoses, as irretrievably
damage electronic components, bearings, axles, engine and rear wheel
clutches.
Moisture in electronic parts can cause malfunctions and short circuits.
2) Grease
Grease periodically spraying the front wheel bearing, both rear axles where
the wheels are placed. (Remember to keep the left / right position of the
rear wheels, as they are not interchangeable).

carrygolf
carrygolf.net
18
3) Adjust, front wheel alignment.
It is an easy task, although it seems not.
The front wheel alignment is important to ensure that the car is traveling in
a straight line. If necessary, adjust the direction using two wrenches number
14.
Loosen the nut opposite to the direction you want to correct. For example, if
our cart is going to the right, with the help of the two wrenches, loosen the
left nut. Then with the help of a nylon hammer move the axis forward with
small hits onto it.
Repeat if you have not got a perfect alignment.
4) Various
Tighten periodically visible bolts around the cart.
Keeping your tires in good condition will give greater grip on the field. When
worn, you can find parts in our store and website.

carrygolf
carrygolf.net
19
TRANSPORT THE CART
Carrying your golf cart is convenient and easy. The folding system reduces
the size of LEOPARD for you to carry it in any small space in your vehicle.
3 rubber grommets are provided to stop the car, once folded, unfold while
carrying by hand or in your car.
Adjust to the desired size for rubber, with a simple knot.
Your Carrygolf, brings two caps for axes. Their functions are:
- Prevent grease stains inside of your vehicle or your golf cloths as we
proceed to place or remove the wheels.
- Prevent the shaft ends, tear any fabric during transport .
We strongly recommend you to use them.

carrygolf
carrygolf.net
20
OFFICIAL TECHNICAL SERVICE:
CARRYGOLF, SL
Crtra. Sils C-63, Km 23
Santa Coloma de Farners 17430
Tel 972 843 084
WARRANTY
Conditions and terms
These products are warranted for CARRYGOLF, SL. the legal guarantee
covered by Royal Legislative Decree 1/2007 November 16, revised text of
the General Law for the Defence of Consumers and Users and other
complementary laws.
To access the security is essential to prove the purchase of the product by
presenting of a bill or proof of purchase, and this warranty certificate.
The warranty is extended to all countries where the product is distributed
by Carrygolf SL. . This warranty is subject to the laws in force in Spain.
Warranty Coverage
1 -. The warranty is for a period of 2 years from the time of delivery, except
for the battery, that is for a period of 1 YEAR.
Table of contents
Other CARRYGOLF Golf Trolley manuals