Stewart Golf F1-S REMOTE Guide

F1-S REMOTE
OWNER’S MANUAL & USER GUIDE

2www.STEWARTGOLF.com
IMPORTANT INFORMATION
EUROPEAN UNION DECLARATION OF CONFORMITY
:
Herby, Stewart Golf Limited, declares that the ‘Radio transmitter and receiver’ is in compliance with the
essential requirements and other relevant provisions of
Directive 1999/05/EC. The declaration of conformity may
be consulted at www.stewartgolf.com
UNITED STATES FCC RULES
This device complies with Part 15 of the FCC Rules.
Operation is subject to the following two conditions:
1. This device may not cause harmful interference, and
2. This device must accept any interference received,
including 22 interference that may cause undesired
operation.
OTHER IMPORTANT INFORMATION
This machine is designed solely for the transportation of golf equipment on a golf course (as pictured,
right).
Warning and important safety instructions appearing in this manual are not meant to cover all possible
conditions and situations that may occur. Common sense, caution and care must be exercised when
operating or cleaning this equipment
Always contact Stewart Golf or your local dealer or distributor about problems or conditions that you do
not understand.
DESIGN PROTECTION
The design of the Stewart Golf F1-S Remote
(formerly the F1 Lithium) is protected as European
Community Design Registration 921374, United States
(US29/326,584), China (200830248093.5) & Canada.
For a full register of Stewart Golf intellectual property
please visit stewartgolf.com/ip
WARNING SYMBOL
This WARNING symbol will be used from time to time in this manual.
It indicates a potentially hazardous situation which, if not avoided,
could result in serious injury or death. WARNING

3www.STEWARTGOLF.com
WELCOME
Congratulations on becoming the owner of a
Stewart Golf F1-S Remote.
Wasting your energy on pushing, pulling and
carrying your clubs stops here. Now you can
use walk and focus on your next shot.
The F1-S Remote has been described as “The
best electric trolley ever designed” by Today’s
Golfer. There are a number of innovative features
that you may not have experienced before, so
please read this manual fully before using the
machine.
WELCOME TO THE CLUB
BEFORE YOU GET TOO EXCITED
Your F1-S Remote has a number of features that you should familiarise yourself with. Please try to avoid
the temptation of going straight out on the course with your F1-S Remote, and read this manual first. It
contains both important safety information and also tips on how to get the best from the machine.
The first thing that you should do is remove the battery and charger from the packaging and put the
battery on charge. The battery is supplied only partially charged, so will need to complete a full charge
prior to use. Please refer to instructions in this manual.
The first time you use your F1-S Remote, practice in an area of open grass and with a full cart bag (as you
would use on the golf course). The speeds and steering characteristics of the F1-S Remote will change on
dierent surfaces. Factors such as the weight of your golf bag, terrain type and battery condition can all
vary the performance of the F1-S Remote.
Last but not least, please complete the information below. The serial number is located on the front of the
chassis. Should you ever need to contact us, it is very helpful if you can provide all these details.
OWNER’S NAME:
SERIAL NUMBER:
DELIVERY DATE:
PLACE OF PURCHASE:
H
A
N
D
B
U
I
L
T
Register your
warranty online at:
stewartgolf.com/warranty

4www.STEWARTGOLF.com
THE F1-S REMOTE CHASSIS & GOLF BAG
The F1-S Remote is like no other golf trolley you will have owned before. Our engineers have cleverly
integrated a rigid structure in to the golf bag which removes the need for the golf trolley to support it.
Pease use these pages to familiarise yourself with the features of the machine.
1
2
3
4
5
6
7
1.
2.
3.
4.
5.
6.
7.
8.
9.
10.
Stabiliser Feet
Stabiliser
LCD Screen
Front Wheels
Rear Wheels
Chassis Cover
On/O Switch
Aerial
Handle
Handle Clip
The stabiliser has three soft feet which it stands on when folded.
Folds out to prevent the F1-S from toppling over on hills.
Displays essential information, usually the remaining battery capacity.
There are two front wheels to aid stability.
The quick release rear wheels also have a freewheel function
Conceals the electronics system and motors.
When the battery is in place, this switch turns the F1-S on and o.
The flexible aerial receives all signals from the remote control handset.
The handle houses a scorecard holder and several ports for accessories.
Holds the handle in place when in use.
8
910
The F1-S golf bag has been specifically designed to work with the F1 chassis. When you life the handle, the
tie bar automatically rotates the two securing fins out from the base of the bag. These engage into two
corresponding slots in the chassis, locking the bag into position.
Please be aware that the remote handset will not fit inside the golf bag whilst connected to the cradle.
Therefore before stowing the handle, the remote handset must be removed.

5www.STEWARTGOLF.com
YOUR F1-S REMOTE HANDSET
H
A
N
D
B
U
I
L
T
IMPORTANT INFORMATION
Ensure that you practice in an open area away from other people or objects. This will allow you
to familiarise yourself with the remote control with risk of damage or injury. When using your F1-S
Remote, it is vital that you remain in full control at all times. Never allow the F1-S Remote to run out of
your sight, never aim the F1-S Remote at other people or objects.
Be aware of your surroundings. Ensure that you know whereabouts of other players, trees, streams,
bunkers and other objects.
WARNING
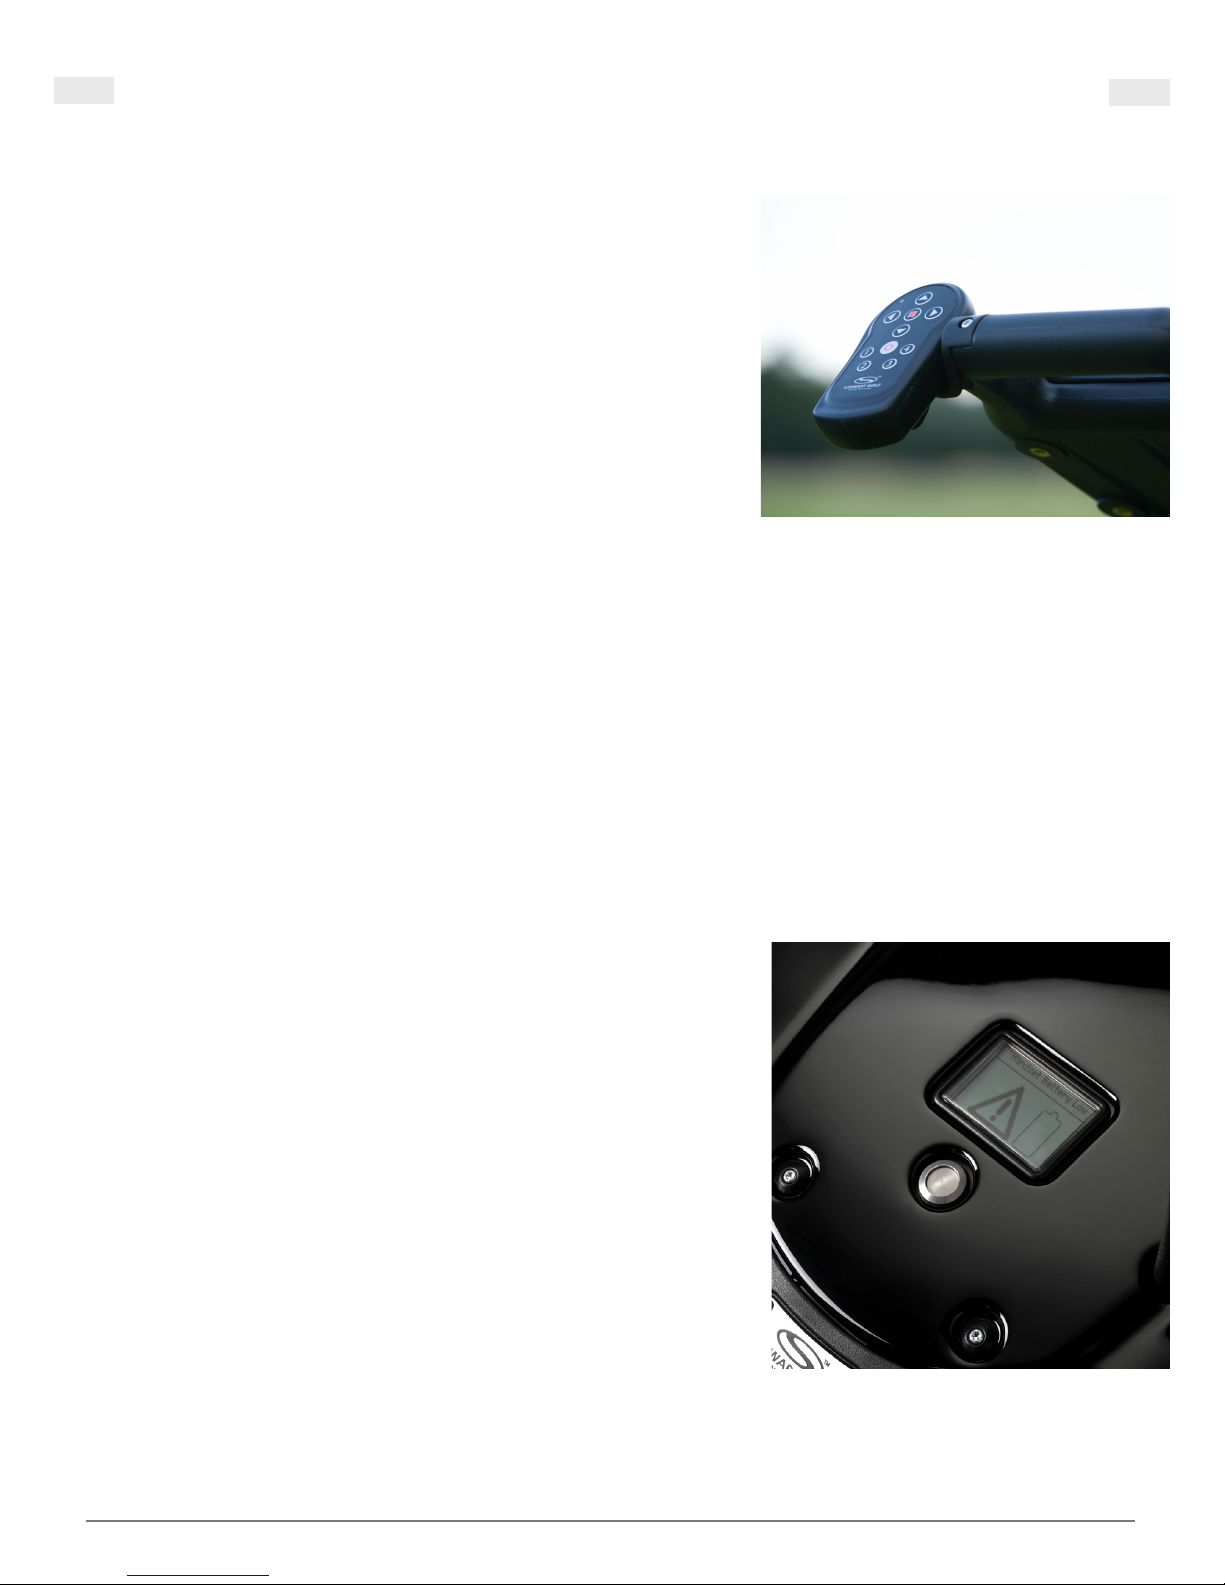
The handset buttons are as follows:
1. Forward/Speed Up.
2. Indicator Light. This will flash every few seconds during operation
3. Left Button (the right button is opposite)
4. Emergency Stop
5. Reverse / Slow Down
6. Glide Stop
7. Cruise Control Speeds (1,2,3 & 4)
OPERATION
To start your F1-S Remote moving forwards, press either the
forward button or any of the cruise control buttons. Once in motion,
you can vary the speed by coninually pressing either the foward or
reverse buttons. Reverse the F1-S Remote by pressing the reverse
button from stationary.
The most important button on the handset is the emergency stop.
Press and release to bring the F1-S Remote to an immediate stop.
It is not recommended that you use the emergency stop in normal
use as it may cause the F1-S Remote to skid. Pressing the guide
stop button will cut the power to the motors and bring the F1-S
Remote to a gradual stop. Use this function for normal stopping &
to conserve energy.
To steer the F1-S Remote, press and release either the left or right
buttons. When moving forwards this will change the direction
slightly and then continue. A prolonged press will tighten the turn.
At high speeds the steering is less sensitive, therefore, if you wish to
make large turns it is recommended that you reduce the speed of
the trolley, and the make the turn.
CRUISE CONTROL AND TRIM
The cruise control speeds are factory set for your convenience. For
notes on how to use these, and setting your own speeds, please see
page 11. If your F1-S Remote does not travel in a straight line when
moving forwards, please also refer to page 11 for instructions on
how to adjust the motor bias, or trim.
1
2
3
4
5
6
7

6www.STEWARTGOLF.com
HINTS & TIPS
When in the car park, crossing a road or negotiating a tight path,
the handset should be clipped to the handle by using the handset
controller clip. You will need to steer the F1-S Remote manually,
whilst controlling the speed with your thumb (you may want to set
one of the Cruise Control speeds to a slow walking speed).
The F1-S Remote handset is plash and rain resistant, but never allow
it to be submerged in water (i.e dropped in a puddle).
The F1-S Remote is designed to have an operating range of up to
50 metres. This may be aected by factors such as atmospheric
conditions, and the condition of the handset battery. It is not
recommended that you attempt to operate the F1-S Remote
outside this range.
If you find that the F1-S Remote is at the edge of its range and not responding to signals, you can increase
the range by holding your handset higher and vertically (this is more eective than ‘pointing’ it at the
trolley). Press the emergency stop to halt your F1-S Remote, walk back in to range and resume normal use.
HANDSET STORAGE AND MAINTENANCE
However you choose to store your handset, you should ensure that nothing can come in to contact with
the keypad. If a button is pressed while the handset is stored it could either set of the F1-S or cause a rapid
drain of the battery.
During play the ideal place to leave the handset is either on the supplied cradle, or to your belt or pocket
using the provided belt clip. You should avoid putting it in your pocket during play.
If the battery in the handset is running down, the LCD screen
will show a warning message indicating the need to change your
handset battery. The handset uses a standard 9V battery.
To change the battery:
1. Remove the two screws in the back of the handset.
2. Remove the rear half of the handset.
3. Press all the buttons on the handset with the battery
disconnected.
4. Connect the new battery.
5. Apply a bead of sealant around the lip of the rear half.
6. Carefully place the two halves together ensuring that the battery
lead is not obstructing location
7. Replace the screws, being careful not to over tighten them.
8. Test the handset to ensure it controls the F1-S.

7www.STEWARTGOLF.com
H
A
N
D
B
U
I
L
T
THE F1-S REMOTE ELECTRONICS SYSTEM
The microprocessor controlled 36V electronics system of the F1-S Remote is hidden under the colour
coded cover. This quick guide will help you understand how it works, and also how it can help you should
you ever suer a fault with your machine.
IMPORTANT INFORMATION
The electronics enclosure contains no user serviceable parts. The enclosure is sealed to reduce risk of
water ingress. Breaking this seal increases the risk of moisture entering the case, and can reduce the
reliability of your F1-S Remote. Never remove the aerial from the box as this forms part of the seal.
No attempt should be made to open the enclosure; doing so will invalidate the warranty.
WARNING
Insert the battery into the chassis until it ‘clicks’ in to place. Connection is automatic; you don’t have to
connect any wires at all. The system will automatically run through a start up routine, during which time
the LCD screen will display a ‘WELCOME’ message, then the Union flag. The start up routine will occur if
even if the switch is switched o.
For the majority of the time the LCD screen will display an image of a battery which represents the
power left in the main Lithium Ion battery pack. However, when necessary the screen will also show other
essential information to you, such as:
1. The need to change your handset battery.
2. Signal received from the handset.
3. Machine overheated. Please leave to cool down.
4. Machine overloaded. Check for any obstructions and operate at low speed.
5. Fault. Please contact Stewart Golf
6. When the main battery is flat.

8www.STEWARTGOLF.com
SETTING UP & PUTTING AWAY
SETTING UP
Your F1-S Remote has been designed to be very quick and simple
to set up. Follow these instructions and it is possible to set up your
F1-S Remote in just 30 seconds.
1. Start with the F1-S Remote chassis in the folded position, and
standing vertically on the floor.
2. Insert the battery in to the F1-S Remote chassis. When properly
engaged, the battery should click in to place.
3. With your F1-S Remote chassis still folded and standing vertically,
grab the front chassis (the part with the small front wheels) and
slowly pull it towards you as shown (right). Holding any other part
of the chassis while unfolding may cause you to trap your fingers
or hand, so please take care when setting up the machine.
4. The F1-S Remote chassis will now fold out in its three parts so
that it can be sat on all 4 wheels. If the stabiliser does not unfold
automatically then pull it in to place by hand. Again take care not to
trap your fingers or hand.
5. Life the F1-S golf bag by the carry handle at the front of the bag
(do not lift by any other part of the bag), and rest it on the location
ball on the front chassis. The location ball will help align the golf bag
correctly on the chassis.
6. Allow the bag to sit backwards until it comes to rest. You can now
let go of the carry handle.
7. With the bag correctly aligned, completely undo the two long zips
at the back of the golf bag to reveal the handle.
8. Fold the handle from the bag until the clip locks in to place. If the
clip doesn’t fully drop into position, simply press it down until it is
fully engaged.
9. Do up the long zips on the pocket handle.
10. Ensure that the trolley is switched on and that both rear wheels
are in the drive position, and your F1-S Remote is ready for your
round.

9www.STEWARTGOLF.com
H
A
N
D
B
U
I
L
T
PUTTING AWAY
At the end of your round the F1-S Remote is just as quick and simple
to pack away. Follow these step by step instructions and you shoud
be able to complete the process in under a minute.
1. Remove the handset from the cradle (if fitted), then lower both
handle pocket zips.
2. Whilst holding the handle (to make sure it does not drop), life the
handle clip to release.
3. Slowly fold the handle into the F1-S Remote golf bag. Once
lowered, do up both the handle pocket zips.
4. Lift the golf bag away from the trolley, remembering to only lift
the bag by the handle at the front of the bag.
5. To fold the chassis, lift by the central ‘lifting handle’ as pictured. As
you lift the chassis, both the stabiliser and front wheels will fold in to
each other. Once folded, the chassis can stand vertically.
7. Ensure that the trolley is switched o and disconnect the battery.
To remove the battery, hold down the clip on the battery case and
pull it vertically out of the chassis.
8. Lift the F1-S Remote chassis into your car. Only lift the F1-S chassis
by the central lifting handle.
SOME IMPORTANT TIPS:
Never lift the F1-S Remote from the chassis cover as this may cause
unintended damage.
It is recommended to use the travel bag to make sure that teh F1-S
Remote chassis is protected during transit. The bag is not designed
to be used as a flight case.
IMPORTANT INFORMATION
You should never use any form of hosepipe or pressure washer to clean your F1-S. By using water to
clean the trolley, you increase the risk of water ingress to the motors and electronics.
When cleaning you F1-S, you need only use a soft damp cloth to remove dust or dirt. If your golf club
has a low-pressure air line, you can use this to remove dust and leaves.
WARNING

Your F1-S Remote is supplied with a specially designed Lithium-Ion
battery pack.
Please read and use the following instructions to obtain optimum
usgae from the battery. Failure to follow these may cause heat, fire,
rupture and damage or capacity deterioration of the battery.
CHARGING THE BATTERY
The F1-S battery has a BMS (battery management system) inside
that is there to protect the battery and increase its life. Part of this
protection is the sleep mode, which it will go in to if the battery is
not used for 24 hours.
Therefore the charging advice is as follows:
1. After playing, plug the battery in to charger and wait for the light
to go green. A complete charge cycle should take a maximum of 6
hours.
2. Disconnect the charger and battery and store. If left for more than
24 hours it will now go to sleep.
3. The night before you play, or in the morning, wake up the battery by plugging in to the charger for 30
seconds. Test with the trolley to ensure it is awake, then you’re good to play.
4. Indicated by either a red or orange light.
Press the on/o switch* which is located below the screen. Then insert the battery into the chassis.
*Pressing the on/o switch before inserting the battery into the trolley ensures that the battery guage is
reset.
Always keep an eye on the screen as it will provide various messages as to what the trolley is doing,
including when to change the battery in the handset.
Other Tips:
1. Protect the battery and charger against moisture and water.
2. Store the battery in an ambient temperature between 5oC and 25oC, and relative humidity between 45%
and 85%.
3. Never drop the battery as this can cause internal damage.
4. When the battery pack is not in use, keep it away from other metal objects such as coins or other
objects that could possibly make a connection from one terminal to another.
5. Recharge the battery only with the provided Stewart Golf charger.
6. Do not charge a frozen battery.
7. When not in use, do not leave the battery connected to the trolley.
8. For long-term storage (over 6 months), charge the battery at least once every three months.
10 www.STEWARTGOLF.com
F1-S REMOTE BATTERY AND CHARGER
IMPORTANT INFORMATION
The Lithium Ion battery pack contains no user serviceable parts and should not be opened under and
circumstances. Doing so will invalidate your warranty. Please recycle the battery. Lithium Ion batteries
must be fully discharged before disposal.
WARNING

11www.STEWARTGOLF.com
H
A
N
D
B
U
I
L
T
OTHER F1-S REMOTE FEATURES
QUICK RELEASE REAR WHEELS
To remove the wheel, press and hold the quick release button
while pulling the wheel towards you.
FREEWHEEL
To remove a wheel, tilt the F1-S Remote so that one rear wheel is
o the floor. Hold the centre of the wheel with your thumb on the
black button. Press the button down and simultaneously pull the
wheel towards you and away from the F1-S Remote.
CRUISE CONTROL SPEEDS
Your F1-S Remote has 4 Cruise Control speeds; buttons 1, 2, 3 &
4. Speed 1 should be used on paths, in car parks or other areas
where you should be careful to steer the handle. Speeds 2 and 3
are set for normal use, and 4 should be used sparingly.
The F1-S Remote steering is optimsed for use on speeds 2 and
3, so it is advised that speed 4 is only used when the machine is
travelling in a straight line.
You can also set these buttons with your own speeds as follows:
1. Press and hold the emergency stop button, and then the
numbered cruise control button you would like to program
together, until the F1-S Remote starts moving forward.
2. Adjust the speed using the speed up and slow down buttons.
3. Press the emergency stop button to store the speed.
TRIM ADJUSTMENT
Your F1-S Remote has been factory set to travel in a straight line,
however if the motors wear unevenly it may develop a bias. If this
happens, you can adjust the trim by following these steps:
1. Ensure that your F1-S Remote is on a flat surface.
2. Hold down the emergency stop and glide stop buttons for three
seconds until the F1-S Remote sets o forwards.
3. Use the left and right buttons to fine tune the direction of the
F1-S Remote until it is travelling in a straight line.
4. Press the emergency stop button to store the new setting. The
F1-S Remote will now operate as normal.

12 www.STEWARTGOLF.com
FREQUENTLY ASKED QUESTIONS
HOW DO I USE A REMOTE CONTROLLED TROLLEY?
If you have not used a remote trolley before, try following these tips:
1. With the handset in your handset in your hand, position the F1-S Remote
approx. 10m-15m in front of you and on the line of your ball. This will allow
you to walk with your head up and consider your next shot.
2. When you get your ball, park the F1-S Remote to the right of your ball (if
you are right handed, park to the left if you are left handed).
3. If you are going to talk any distance away from your F1-S, take the
handset with you and clip it on to your belt or pocket. You can then drive
the F1-S to you rather than having to walk back to it.
CAN THE F1-S BE USED WITHOUT THE HANDSET?
No. The F1-S Remote can only be controlled from the handset, but if you
prefer to steer manually it can be clipped on to the handle using the
controller clip provided.
HOW DOES IT COPE WITH HILLS AND ROUGH TERRAIN?
The F1-S Remote has been designed with a central centre of gravity, and the
chassis has an integrated rear stabiliser should the F1-S ever tip up on a hill.
The F1-S Remote is designed to cope with the rough as well as the fairway;
however it is not a 4x4! As a general rule, don’t ask the F1-S to go anywhere
you wouldn’t plat your ball from.
Your F1-S Remote has sensors that may cause it to cut out on some steep
slopes or heavy rough, this is a safety feature. If this happens then wait a
few seconds for the screen to reset and then start the F1-S Remote again
on a slower speed. If necessary use the handle to steer the trolley manually
until you are on more regular ground.
HOW MUCH WEIGHT CAN IT TAKE?
Your F1-S Remote has been designed to work with the purpose built F1-S
golf bag with a full set of clubs. Overloaing the golf bag will increase the
wear on the motors, decrease battery life and aect steering characteristics.
HOW MANY HOLES WILL THE BATTERY LAST FOR?
The battery supplied is guaranteed to complete even the toughest 18 holes
and should last for much longer.
If you keep your bag light and do not ‘zigzag’ around the golf course you
will find that you can increase eciency, as the steering action is the largest
consumer of battery power.
Accelerating slowly (i.e. not straight to top speed) will also use much less
power, much like driviing s car.

13www.STEWARTGOLF.com
H
A
N
D
B
U
I
L
T
FREQUENTLY ASKED QUESTIONS
WHAT SHOULD I DO IF MY DISPLAY SCREEN HAS MISTED UP DURING USE?
Certain moisture, temperature and humidity conditions can result in localised misting within the display
screen. This will not aect the trolley functionality, nor cause any damage and will return to normal when
adverse conditions subside.

13 www.STEWARTGOLF.com
WARRANTY
Your Stewart Golf F1-S Remote is guaranteed to be free from defects in materials or workmanship for a
standard period of two (2) years from delivery.
If you think there may be a problem with your F1-S Remote, the first thing to check is the troubleshooting
guide on the following page of this manual. If this does not solve your issue, please contact us for further
advice.
Conditions of warranty:
If notice is received of any breach of this warranty during the relevant period, then we shall at our own
expense and within reasonable time, repair, or at our option, replace the goods or such parts as are
defective or otherwise remedy such defect. If your address is in the UK and you agree to use a carrier
nominated by us, we shall bear the associated carriage costs.
If you are outside the UK, please contact your place of purchase or your local distributor or dealer. If your
address is outside the UK but you do not have a local distributor, we may still be able to arrange collection
but you shall bear the associated costs.
Stewart Golf will authorise the repair, or at our option, replacement of any part found to be defective due
to faulty workmanship or materials. We reserve the right to inspect these parts. We will not bear any costs
incurred (including carriage) due to an item being returned with a suspected fault, and after inspection no
fault can be found, or it is found that the customer has not fully understood all of the functions of the F1-S
Remote or the part in question.
Exclusions to the warranty include, but are not limited to: damage during shipment if not packed in a
Stewart Golf designated box or according to Stewart Golf instructions; wear & tear; results of neglect,
misuse or accidents; damage howsoever caused; or utilisation for any purpose other than carrying a golf
bag on a golf course. F1-S Remote units, which have been fitted with non-genuine Stewart Golf parts, or
have been modified from the manufacturers specifications, are excluded. Stewart Golf products used for
commercial or rental purposes are excluded. The warranty is not transferable to a third party.
The battery is covered by a two (2) year warranty against faulty workmanship and materials. Loss of
battery performance owing to external damage (howsoever caused), misuse and/or abuse, incorrect
charging or other failures not attributable to a manufacturing defect are specifically excluded from this
warranty. The battery must be charged only with the charger recommended by Stewart Golf, and the
instructions must be followed exactly.
Register your
warranty online at:
stewartgolf.com/warranty

14www.STEWARTGOLF.com
TROUBLESHOOTING GUIDE
H
A
N
D
B
U
I
L
T
PROBLEM POSSIBLE CAUSE WHAT TO TRY
The F1-S Remote is not
responding when I press a
button on the handset.
1. Main battery not connected.
2. The trolley is switched o.
3. The handset battery is flat.
4. The main battery is flat.
5. You may be out of range.
1. Connect the main battery to
the electronics enclosure.
2. The trolley is switched on
and o by pressing the silver
button, located just below the
LCD screen.
3. Replace the 9V battery.
4.Allow the charger to
complete an entire cycle.
5. The F1-S has a range of up
to 50m, but the range can
also be aected by numerous
other factors.
I can hear the motors working
but the trolley is not moving.
Rear wheels may be in
freewheel mode
Use the quick release
mechanism to engage
the wheels into the ‘drive’
position.
I find it dicult to push my
F1-S Remote.
Freewheel mode is not
engaged.
Use the quick release
mechanism to set the rear
wheels to the ‘freewheel’
position.
I have lost my handset. Contact Stewart Golf to
purchase a replacement.
The F1-S Remote moves in
circles when pressing forward
buttons.
One wheel in freewheel, one
wheel in drive.
Ensure both wheels are in the
‘drive’ position.
The F1-S Remote does not
travel in a straight line.
Motors may have become
inbalanced.
Follow the instructions on
‘trim adjustment’ on P11.
The range of the remote has
dropped.
Left & right commands are
not working consistently.
No LED is appearing on
the handset when I press a
button.
Handset battery may be
losing power or is flat.
Aerial not fitted correctly.
Replace the handset battery
with a NEW battery. See page
6 for instructions.
Screw the aerial fully in to the
electronics enclosure.

www.STEWARTGOLF.com
Contact:
Online: www.STEWARTGOLF.com
Email: info@stewartgolf.com
Tel: 0333 800 1818
H
A
N
D
B
U
I
L
T
Table of contents
Other Stewart Golf Golf Trolley manuals

Stewart Golf
Stewart Golf R1-S PUSH Guide

Stewart Golf
Stewart Golf X3R User manual

Stewart Golf
Stewart Golf X9 FOLLOW Guide

Stewart Golf
Stewart Golf X3R Guide

Stewart Golf
Stewart Golf X9 FOLLOW Operating instructions

Stewart Golf
Stewart Golf R1-S PUSH User manual

Stewart Golf
Stewart Golf X7 Lithium Guide

Stewart Golf
Stewart Golf X7 Lithium User manual

Stewart Golf
Stewart Golf X Series User manual

Stewart Golf
Stewart Golf X9 FOLLOW Guide