Caryaire CZHW-40 User manual

USER GUIDE
FOR WALL MOUNTED FAN COIL UNIT

INTRODUCTION 1
REMOTE 3
OPERATIONAL INSTRUCTIONS 4
WORK LIMITS 2
SAFETY AWARENESS 6
INDEX
TROUBLE SHOOTING 8
GENERAL DIMENSIONS 10
TECHNICAL DATA 10
INSTALLATION INSTRUCTIONS 11
INSTALLATION INSTRUCTIONS 12
INSTALLATION INSTRUCTIONS 13

INTRODUCTION
Pay particular attention to the instructions for use accompanied by the writing
“DANGER” or “CAUTION”, as failure to comply with these instructions could
cause damage to the appliance or property and injury to persons.
For any malfunctioning not contemplated in this guide, immediately contact an
authorised after-sales service centre.
1. Do not store or unpack the unit in a wet area or expose to rain or water, it may
cause the unit short circuit and may result electric shocks or f re.
2. Do not install in a place where f ammable gas may leak, it may cause f re.
3. This unit is designed for domestic and commercial use only, if used in cer-
tain enviroments, such as manufacturing workplace, the air conditioner may not
function eff ciently
The manufacturer cannot be held liable for any damage or injury caused
by misuse of the appliance or by partial or superf cial knowledge of the
information contained in this guide.
- Installations must be performed by a qualif ed technician.
- Before carrying out installation, put proper individual protection device.
- This air conditioner must be properly installed in accordance with the Instal-
lation Manual.
- Check all local codes and ordinances that could affect installation of this unit.
- Refer to rating plate on each unit for the correct voltage, frequency and cur-
rent.
- Be sure that the power supply corresponds to the specif ed rating in the na-
meplate.
- Do not use the extension cables. In the case extended cables are needed use
terminal block.
- Refer to dimensional drawings for location of refrigerant tubing, condensate
drain, and electrical connections before setting in place.
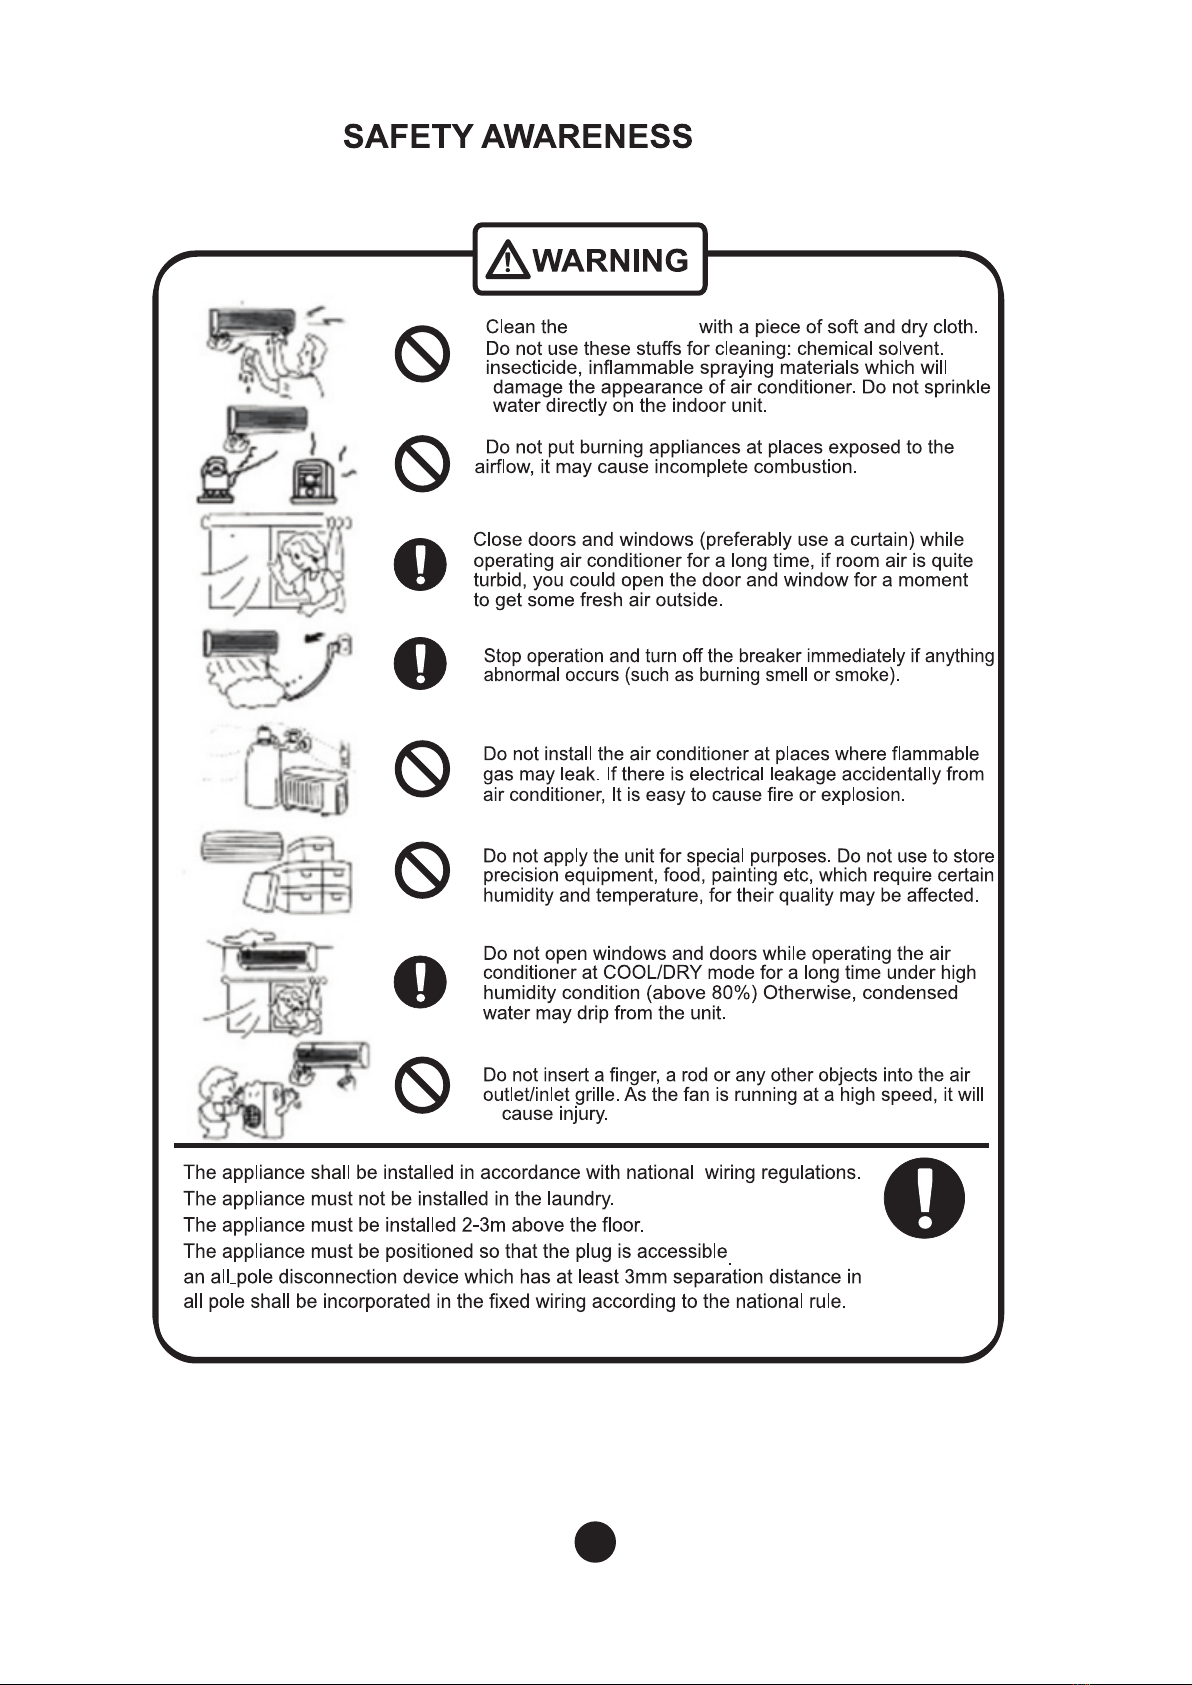
- The appliance shall be installed in accordance with national wiring regula-
tions.
RECOMMENDATIONS
1

SUMMER (COOLING)
Minimum inlet water temperature +4°C
Maximum operating pressure 15 bar
Maximum room air temperature +35°C
Maximum room air humidity 80%
WINTER (HEATING)
Maximum inlet water temperature +70°C
Maximum operating pressure 15 bar
Minimum room air temperature +4°C
Maximum room air humidity 80%
Maximum room air temperature +35°C
Maximum room air humidity 80%
WORK LIMITS Select the location of fan coil unit with following consideration:
2

1.
2. Up(+) 6. Mode 10. Timer On
3. On/ Off 7. Swing 11. Timer Off
4. Fan Speed 8. Hr/Min 12. Set
Down (-) 5. Turbo 9. Sleep 13. Clock Button
Note :
1. The operating range for the remote handset is 6 meters.
2. The unit will beep once it receives signal from the remote control.
3. User has to refer the photo of same remote, mentioned above, what he has get with
the AC.
4. The keys indicated with NA(not applicable) are not in use.
Remote
6
8
4
3
12
1
10
9
7
2
11
5
NA
TEMP
T.ON T.OFF
MIN
13
LCD
3

POWER
Press the ON/OFF key on the control panel or remote control to turn the unit On/Off.
The AC starts with the previous settings.
MODE
The unit can be operated in any one of the followings modes :
1) FAN : Only fan will be ON and fan speed can
be changed by pressing fan speed key on the control panel. 0
2)
Cool : The temperature setting is adjustable between 16C and 30C.
This controls room temperature by +/- 1 C of the set temperature.
This mode to be selected when source of water supply is chilled water
4) DRY : This mode removes excess humidity from the room by condensing excess
moisture. The fan speed is automatically set to Low speed so as to allow
condensation of moisture.
FAN SPEED
Pressing the Fan Speed key will change fan speed with the sequence below :
• Low-Med-High-Auto
• Auto Speed is only activated in AC Mode
While increasing room temperature : 0
a) Low fan change to medium when room temperature > set temperature + 2C
0
b) Medium fan change to high when room temperature > set temperature + 4C
while decreasing room temperature 0
a) High fan change to medium when room temperature < set temperature + 2C
b) Medium fan change to low when room temperature < set temperature.
SWING
Press the Swing key on Remote Control or Control Panel to activate automatic swing of
the horizontal louvers. Swing key again will stop the louver swing.
0
0
Operational Instructions
0
3)
Heat : The temperature setting is adjustable between 16C and 30C.
This controls room temperature by +/- 1 C of the set temperature.
This mode to be selected when source of water supply is hot water
0
0
4
4

SLEEP
This feature by per hour for 2 hours
sleep Indicator will be “ON” on Remote Control LCD display.
CLOCK
Press the "CLOCK” key on remote Handset. This will bring "clock" in edit mode. Adjust
the Clock by "Temp. up & down Button", use "HR/MIN" key to toggle between Hour &
Minute setting. Then press "SET" button to confirm.
TIMER
ON TIMER : Press "T ON" Button on the Remote Handset. “ON” time will start blinking.
Adjust the “ON” time setting by "Temp. Up & down" Buttons. Use HR/MIN key to toggle
between Hours & Minute setting and press the "SET" button.
Note : This feature will work only when the unit is Off.
OFF TIMER : Press "T. OFF" Button on the Remote Handset. OFF Time will start blinking.
Adjust the Off time setting by "Temp. up & down "Buttons, Use HR/MIN key to toggle
between Hour & Minute setting and press the "SET" button.
Note : This feature will work only when the unit is On.
TURBO
Turbo function is selectable in Cool & Heat mode only. This function bypass
The delay time and makes the Fan speed high.
This feature is allowed only once until Mode is changed to cool/Heat again or
Power to the unit is reset. Turbo feature can be access from Remote.
SET
Set button is for set the clock & timer.
increases set temperature automatically 1 degree
To cancel “OFF TIMER”
press twice "T. OFF” Button. OFF Timer Indication with OFF Timer’s time will be display
on Remote Control LCD display.
To cancel "ON-TIMER"
press twice "T. ON” Button. ON Timer Indication with ON Timer’s time will be display on
Remote Control LCD display.(When On Timer is active then to view Clock time press
Clock Button on Remote control.)
UP , DN
These buttons are used to Increase and decrease the Temperature/Timer value.
Operational Instructions
5
5

The unit
6

Indoor unit
7

No Cooling /Heating 1. Water flow inadequate 1.Check water source
2. Air lock in system 2. Purge the air through
purge valve attached to coil
3 Wrong operation mode selected 3. Select right mode
No.
1
Error Code
F1/E1
Diagnosis
Room sensor failure
Corrective action
Replace the room
sensor
2F2/E1 Coil sensor failure Replace the coil
sensor
5H6 Feed back Communication loop from
Controller PCB to Motor break Motor not
rotating
Check Connections between
motor & PCB Check reason
for Motor not working.
ERROR CODES INDICATIONS
8

9

10
GENERAL DIMENSIONS
L
P
H
Model 12K 18K 22K
Model no CZHW-40/
CZHW3V-40
CZHW-60/
CZHW3V-60
CZHW-80/
CZHW3V-80
Drain Connection OD 5/8" 5/8" 5/8"
Inlet Pipe Connection 1/2" 5/8" 5/8"
Outlet Pipe Connection 1/2" 5/8" 5/8"
Length (L) 1070 1131 1080
Depth (D) 240 214 245
Hight ( H) 300 361 330
Water flow Volume ( kg/ Hr) 525 806 1060
Dimension (mm)
TECHNICAL DATA

11
INSTALLATION INSTRUCTION
1. After a suitable place for installation has been selected, place the mounting
plate horizontally on the wall. If the unit is not perfectly installed horizontally,
some problems with condensate discharge may occur.
2. Referring to the f gure below, mark the location for the wall plugs and the hole
for the pipings.
PLAN DIMENSIONS FOR MOUNTING PLATE INSTALLATION
OUTLINE UNIT
MOUNTING
PLATE
LEFT
BACKWARD PIPING HOLE
RIGHT
BACKWARD PIPING HOLE
MODEL.
1070 300 235 80
1131 361 121 140
A
C C
B
I
H
ED
GF
J
J
1080 330 108
Ø 70
Ø 70
Ø 70
80
140
40
40
40
40
30 30
25 25
A B C D E F G H I J
CZHW-40/
CZHW3V-40
CZHW-60/
CZHW3V-60
CZHW-80/
CZHW3V-80 130130 45 4540 40
3. Mount the indoor unit on mounting plate.

4. Take out drain hose from hole provide in Wall

12
5. Connect the Inlet/Outlet pipes with specified torque.
FLARING (Ensure flaring as per below)

6. Complete electrical connection as per wiring Diagram.
13
LN CN
INDOOR UNIT
WIRING PANEL
LN
EXTERNAL
ACTUATOR VALVE
POWER SUPPLY
230V 50Hz
LN CN
INDOOR UNIT
WIRING PANEL
LN
INTERNAL
ACTUATOR VALVE
POWER SUPPLY
230V 50Hz
For indoor unit models with internal actuator valve
For indoor unit models with external actuator valve

14
This manual suits for next models
5
Table of contents
Other Caryaire Fan manuals
Popular Fan manuals by other brands

Sonnenkonig
Sonnenkonig CHROM 16 user manual

PennBarry
PennBarry SWP series Operation & maintenance manual

Hunter
Hunter Oceana installation manual

Monte Carlo Fan Company
Monte Carlo Fan Company 3DLR56 Series Owner's guide and installation manual

Kendal Lighting
Kendal Lighting AC-21750 Installation and operation manual

BLAUBERG
BLAUBERG Sileo V2 Operation manual