Casall 1.3R User manual

Casall 1.3R Manual
ROWER MACHINE

- 3 -
zImportant: Please locate your serial number and record in the box below for service support
purposes.
zSerial number here:
Serial number

Infinity 1.3R

- 3 -
EXPLODED DIAGRAM

PartsList
NO Description Specification Q'ty
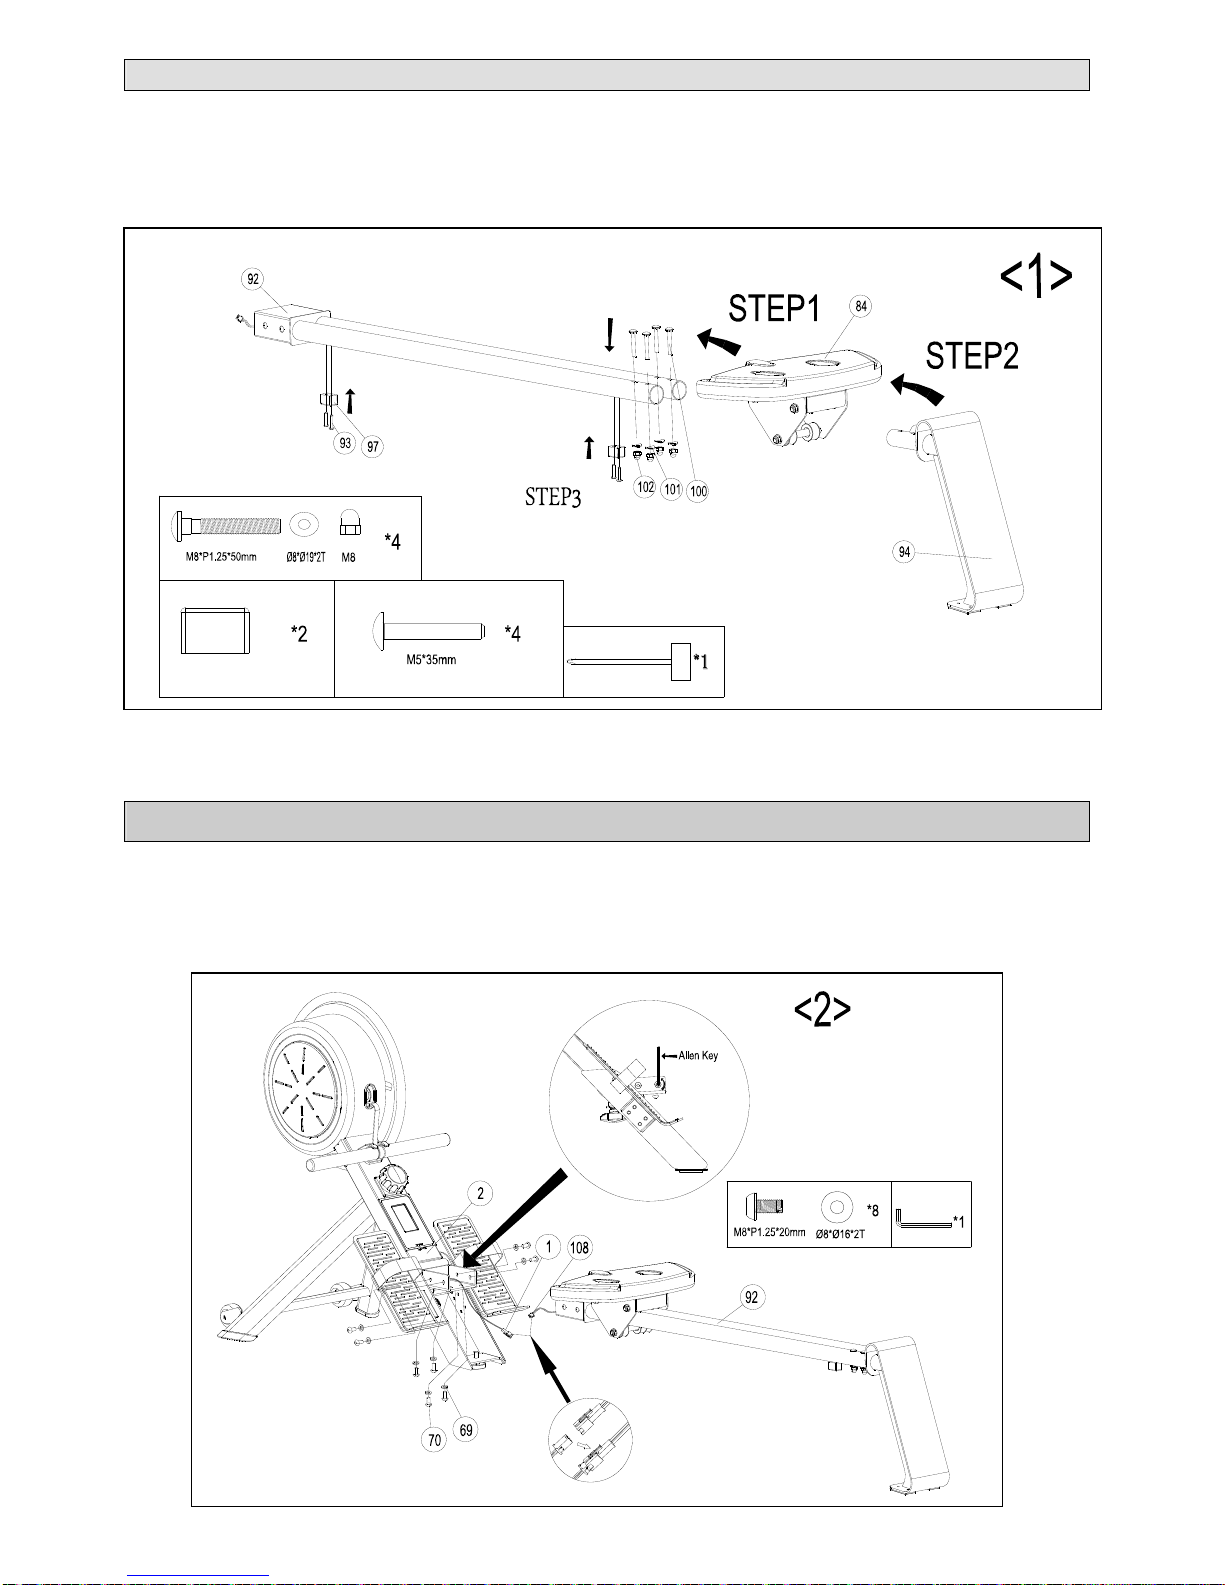
1 Console 1 SET
2 Main frame 1 SET
3 Fixing set for handlebar 1 PCS
4 Screw M4x50L 2 PCS
5 Flat washer φ5xφ13x1t 2 PCS
6 Tension controller 1 PCS
7 Hex. Nut M16 1 PCS
8 Screw M8xP1.25x20L(6m/m) 2 PCS
9 Flat washer φ8xφ16x2t 2 PCS
10 Adjusting knob M16*P1.5*32L 1 PCS
11 Sensor box 1 PCS
12 Flat washer φ17.5xφ25x2t 1 PCS
13 Screw M3x8L 1 PCS
14 Handlebar 1 PCS
15 Foam grip for handlebar 2 PCS
16 End cap for handlebar 2 PCS
17 Inkle 3300mmx14.5Wx1.0T 1 PCS
18 Chain cover (left) 1 PCS
19 Chain cover (right) 1 PCS
20 Sleeve for chain cover 1 PCS
21 Screw M4x40L 3 PCS
22 Screw M5x16L 4 PCS
23 Flat washer φ5xφ13x1t 4 PCS
24 Cover for flywheel 1 PCS
25 Tube for glass flywheel 1 PCS
26 Hexagon socket head bolt M6xP1.0x10L 4 PCS
27 Flat washer φ6xφ13x1t 4 PCS
28 End cap for front tubing(left) 1 PCS
29 End cap for front tubing(right) 1 PCS
30 Transportation wheel 2 PCS
31 C clip φ8 2 PCS
32 Nut M8 2 PCS
33 Hex. Bolt 3/8"x61mm 1 PCS
34 Small pulley (Bearing 6900RS*2PCS) 1 PCS
35 Bushing φ10 2 PCS
36 Flat washer φ10 2 PCS
37 Nylon nut 3/8"x7t 1 PCS
38 Hex. Bolt M6x50L 1 PCS
39 Roller for inkle 1 PCS
40 Bushing φ6.2*φ9*3T 2 PCS
41 Flat washer φ6xφ12x1t 1 PCS
42 Nylon nut M6 1 PCS
43~50 Spring box set 1 SET
51~57 Flywheel set 1 SET
58~64 Glass flywheel set 1 SET

- 3 -
65 End cap for main frame 1 PCS
66 Velcro for handlebar 1 PCS
67 Connector holder 1 PCS
68 Axle for connector φ16*105L 1 PCS
69 Flat washer φ8xφ16x2t 8 PCS
70 Screw M8xP1.25x20L(6m/m) 8 PCS
71 Magnet assembly set 1 PCS
72 Wave washer φ12.5xφ18x0.3t 1 PCS
73 Hex. bolt M6xP1.0*16L(铔)30# 1 PCS
74 Spring washer 1 PCS
75 Flat washer φ6xφ13x1t 1 PCS
76 Magnet set 1 PCS
77 Screw M5x8L 2 PCS
78 Flat washer φ6xφ13x1t 2 PCS
79 Pedal (left) 1 PCS
80 Pad for pedal (R, L) 2 PCS
81 Pedal strap (R, L) 2 PCS
82 Pedal (right) 1 PCS
83 Rolling slider 1 PCS
84 Seat 1 PCS
85 Screw M8x16 4 PCS
86 Star nut 6 PCS
87 Flat washer φ10xφ18x1t 6 PCS
88 Bushing φ10*φ14*19L 3 PCS
89 Roller wheel 6 PCS
90 Bushing φ10xφ14*54L 3 PCS
91 Axle for roller 3 PCS
92 Slippery rail 1 PCS
93,97.100~102 Bolts & nuts pack 1 SET
94 Rear foot 1 PCS
95 End cap for rear foot 2 PCS
96 Screw M5x8L 4 PCS
98 Screw M8xP1.25x16L(6m/m)
8 PCS
99 Flat washer φ8xφ16x2t 8 PCS
103 Hex. Bolt M8x16 2 PCS
104 Bearing 6201 (RS) 1 PCS
105 Bushing φ8.5*φ12.5*5mm 2
PCS
106 Flat washer φ5xφ10x1t 1 PCS
107 Sensor holder 1 PCS
108 Wireless receiver for pulse 1 PCS
109 Screw M4x8L 2
PCS

Assembly step 1:
Step 1: Please remove the M5x35L screw (93) on the slippery rail (92).
Step 2: Slide the seat (84) on the slippery rail (92) and fasten the stopper (97) with the screws (93).
Step 3: Push the back rear foot (94) in the slippery rail (92). Use for this the carriage bolt (100),
curve washers (101) and nuts (102).
Assembly step 2:
Step 1 Please remove the M8xP1.25x20L screw (70) and flat washer (69) on the main frame (2).
Step 2: Connect wireless receiver for pulse wire (108) and console pulse wire (1).
Step 3: Push the slippery rail (92) in the main frame (2). Fasten it with the screws (70) and the flat
washer (69).

- 3 -
Additional: 2 LED Lights:
Activation:
1. Open the protecting cover from the LED light
2. Open the LED light
3. Remove the contact protection between spring and battery
4. Close the LED light
5. Put the lights into the glass flywheel opening

Folding instructions
1. Release the adjusting knob (10) and put out
the rail (92), then pull the rail out.
2. Turn the rail 90 degree then inert the rail
into the notch on the frame
3. Use the knob to lock the rail onto the
frame.
Rise up the rear stabilizer and push the rower machine when you want to move it.
Moving instructions

- 1 -
Installing the batteries
Figure A: Push the catch attached to the bottom of the computer slightly upwards and remove the
console (1) from the holder.
Figure B: The console (1) can use two AA batteries (not 11 included); alkaline batteries are
recommended.
Reattach the computer by first inserting the top part into the holder and then the bottom part
of the computer until you hear the catch click into position (Figure A).
Remove the batteries from the battery compartment if they are empty or if the equipment is
not to be used for a long period of time.
Batteries are hazardous waste and must be disposed of properly.
AB

- 2 -
Instruction Manual of ST3665-64
!!! For simple exercise, it is not always necessary to select a training program or manually set the
TIME,DISTANCE or other values. You can simply start pedaling .
As soon as user install batteries, computer will power on and LCD full display all segments then
enter into the SCAN function mode after one second. Press the MODE key to select function.
When there is pedaling signal transmitted to the console without pressing any key, console starts
to work, all function TIME/COUNT/TOTAL CNT/DISTANCE/CALORIES will start to count up
automatically.
If no buttons are pressed and the pedals have not been moved moved for 4 minutes, the
computer will switch to Standby mode. All setting and exercise data will be saved until user start
exercise again.

- 3 -
【DISPLAY & BUTTON FUNCTIONS】
BUTTON FUNCTION
MODE -Confirm setting
-Select function & lock single function display.
-Clear all values if hold on pressing it for 3 seconds.
SET -To set up workout value for:
.TIME setting range: 0:00~99:00 (Each increment is 1:00)
. CALORIES setting range: 0~9990 (Each increment is 10)
. CNT setting range:0~9990 (Each increment is 10)
. DISTANCE setting range: 0~99.90 (Each increment is 0.1)
. PULSE setting range: 0-40~240
-To adjust TIME/ DISTANCE/CALORIES/PULSE value up when stop
exercising.
-In STOP mode, hold on this button will increase values fast as Hot key.
RESET -Press it for single RESET each function: TIME,DISTANCE,CALORIE and
PULSE.
-Hold on for 3 seconds to reboot the computer along with Bi sound for
prompt at the same time.
Training Data
The computer calculates and displays all values automatically according to user training status.
Operation Instruction
Press MODE button to select function to be set, the following function will be display in
sequence:
* SCAN- Automatically scan through each mode in sequence each 6s. The display loop is
CAN →TIME→COUNT→CALORIES→TOTAL CNT→DISTANCE→PULSEÆSCAN.
*TIME – Press the SET key to set target exercise TIME, each time it will increase by 1:00. With
setting the target value, TIME will count down from your target time to 0, and as 0 is
achieved TIME alarm; W/O setting the target value, TIME will count up. W/O exercise
for 4 minutes, STOP icon will shows up.
* COUNT– When user start to pedal with bike, LCD will display exercising movements. With
setting the target value, COUNT will count down from your target count number to 0,
as 0 is
achieved COUNT alarm; W/O setting the target value, COUNT will count up.
* CALORIES – Press SET key to set target CALORIES, each time it will increase by 10cl.With
setting the target value, calories will count down from your target calorie to 0, and as 0
is achieved calorie alarm; W/O setting the target value, calorie will count up.
(This data is a rough guide for comparison of different exercise sessions, which can
not be used in medical treatment.)
*TOTAL CNT- This function cannot be preset. When user start to pedal with bike, LCD will
display current Total exercise movements. TOTAL COUNT value will be cleared after battery
removed.
* DISTANCE - Press SET key to set target exercise Distance, each time it will increase by 0.5Km.
With setting the target value, distance will count down from your target distance to 0,
Training Values Display Range Setting Range
TIME 00:00 ~99:59 min. 0:00~99:00 min.
COUNT 0 ~9999 0~9990
TOTAL CNT 0 ~9999 /
DISTANCE 0~99.99 KM 0:00~99.90 KM
CALORIES 0~9999 Cal 0~9990 Cal
PULSE 40~240 bpm 0-40~240 bpm

- 4 -
and as 0 is achieved distance alarm; W/O setting the target value, distance will count
up.
* PULSE - The computer will display user’s Heart rate while exercising. When you start
exercising, you have to wear chest belt. After 6-7 seconds, the PULSE figure will
display. Without pulse signal input for 6s,it displays“P”in PULSE window. Pulse will
alarm when over preset target pulse.
Take Note:
* When the display of LCD is weak, it means the batteries need to be changed.
* If there is no signal or improper display on monitor, please check if the cable is well connected.
*Battery spec: 1.5V UM-3 OR AA(2PCS)
Table of contents
Other Casall Home Gym manuals