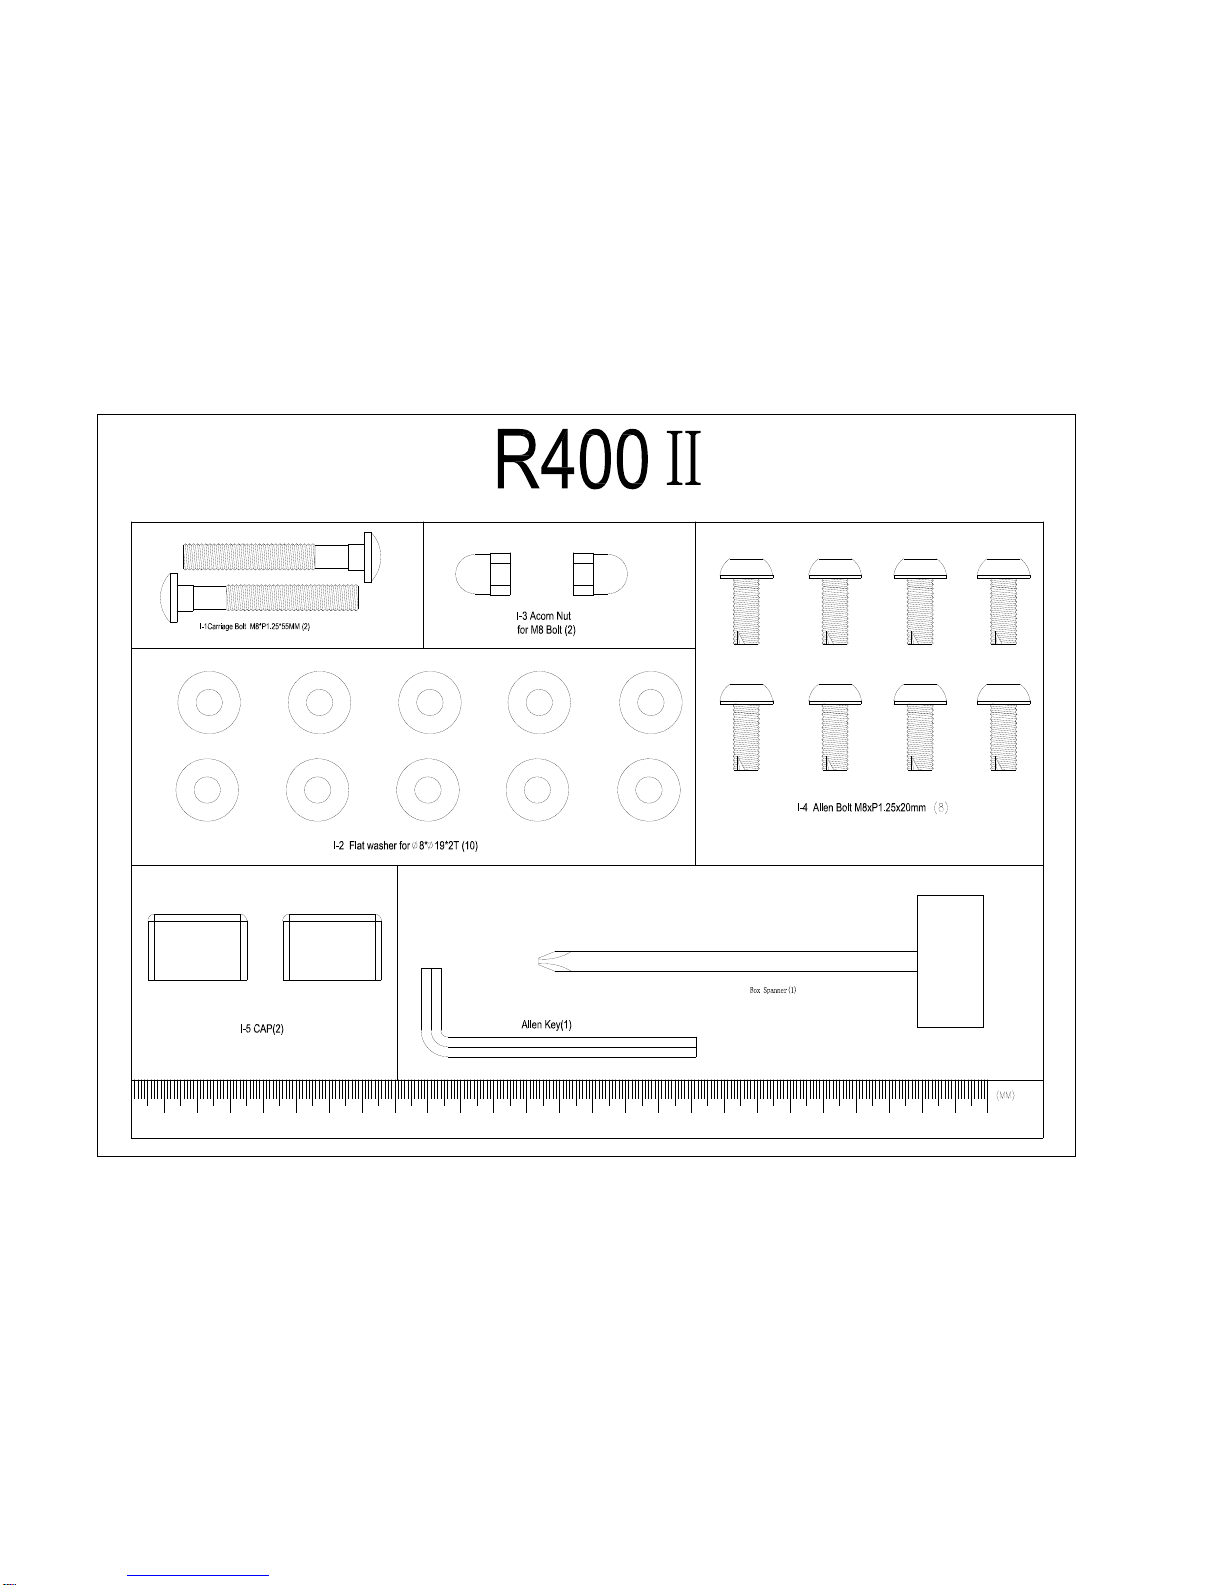
Casall R400 II User manual

Casall R400 II Manual
ROWER MACHINE

- 3 -
Important: Please locate your serial number and record in the box below for service support
purposes.
Serial number here:


Assembly Diagram

- 3 -
EXPLODED DIAGRAM

PartsList
No. Description Quantity
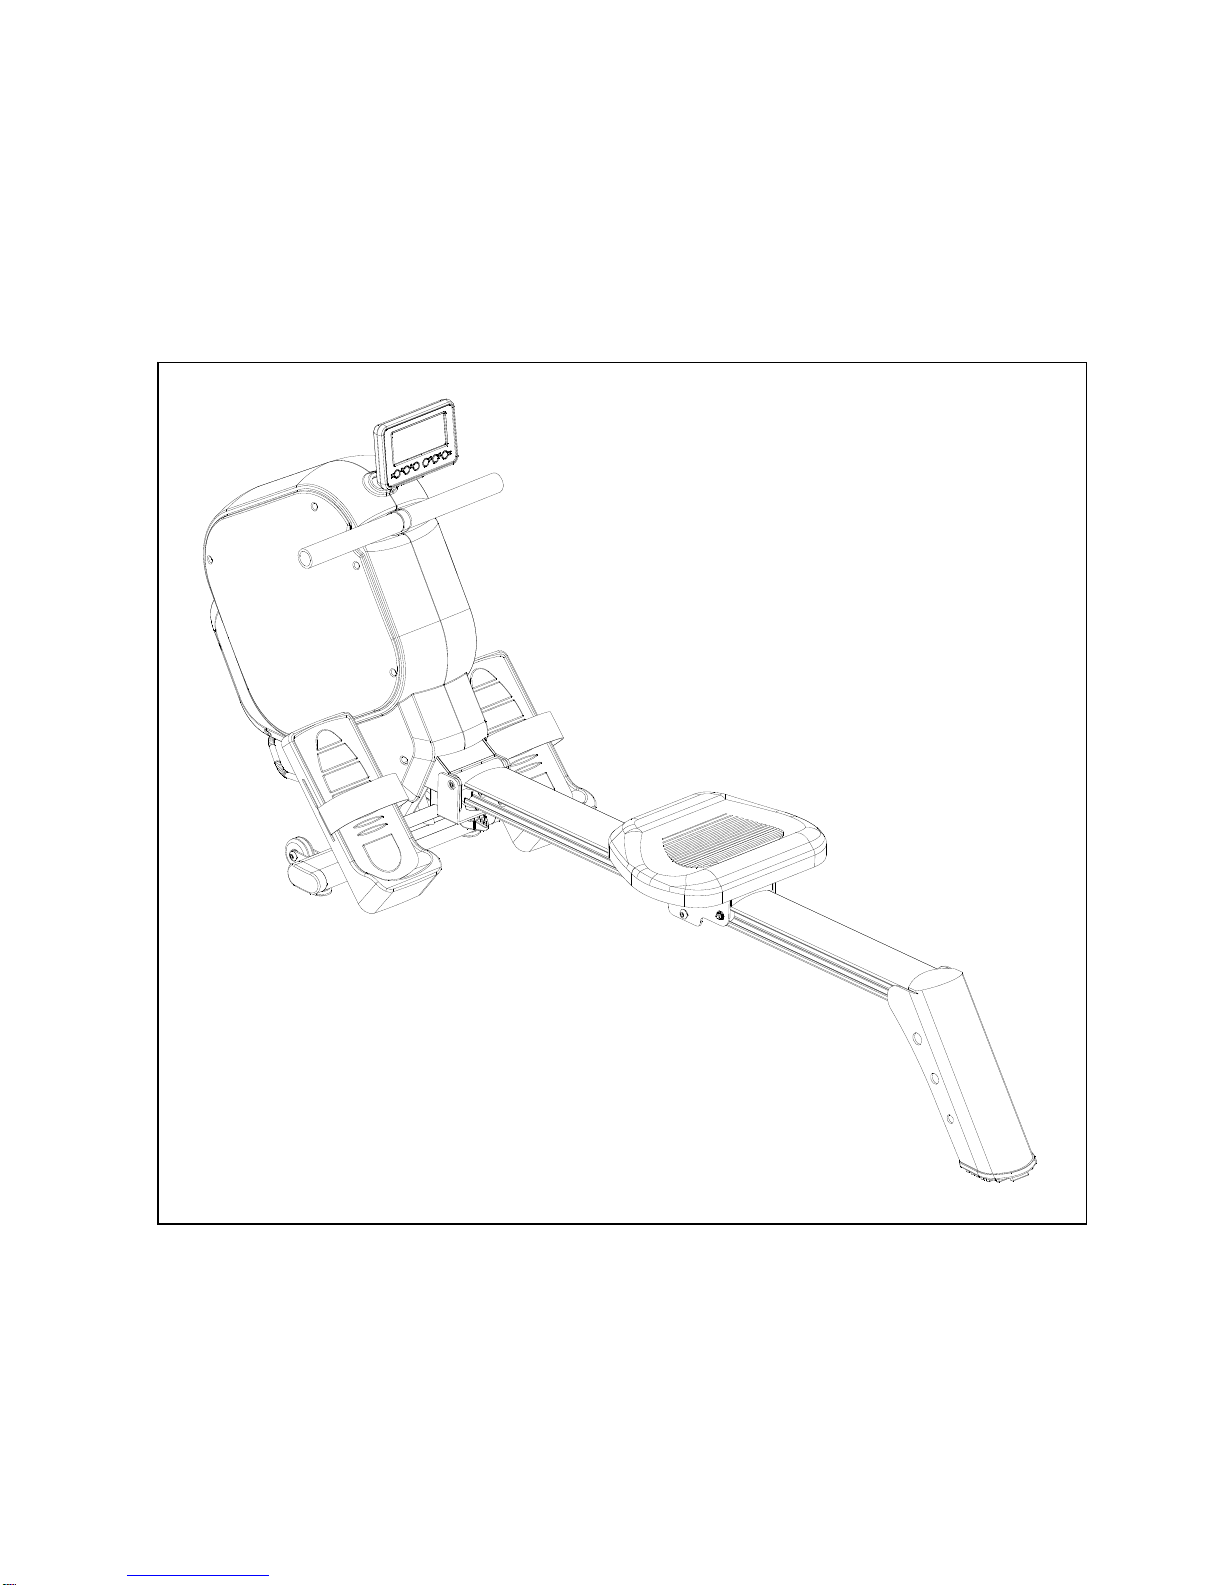
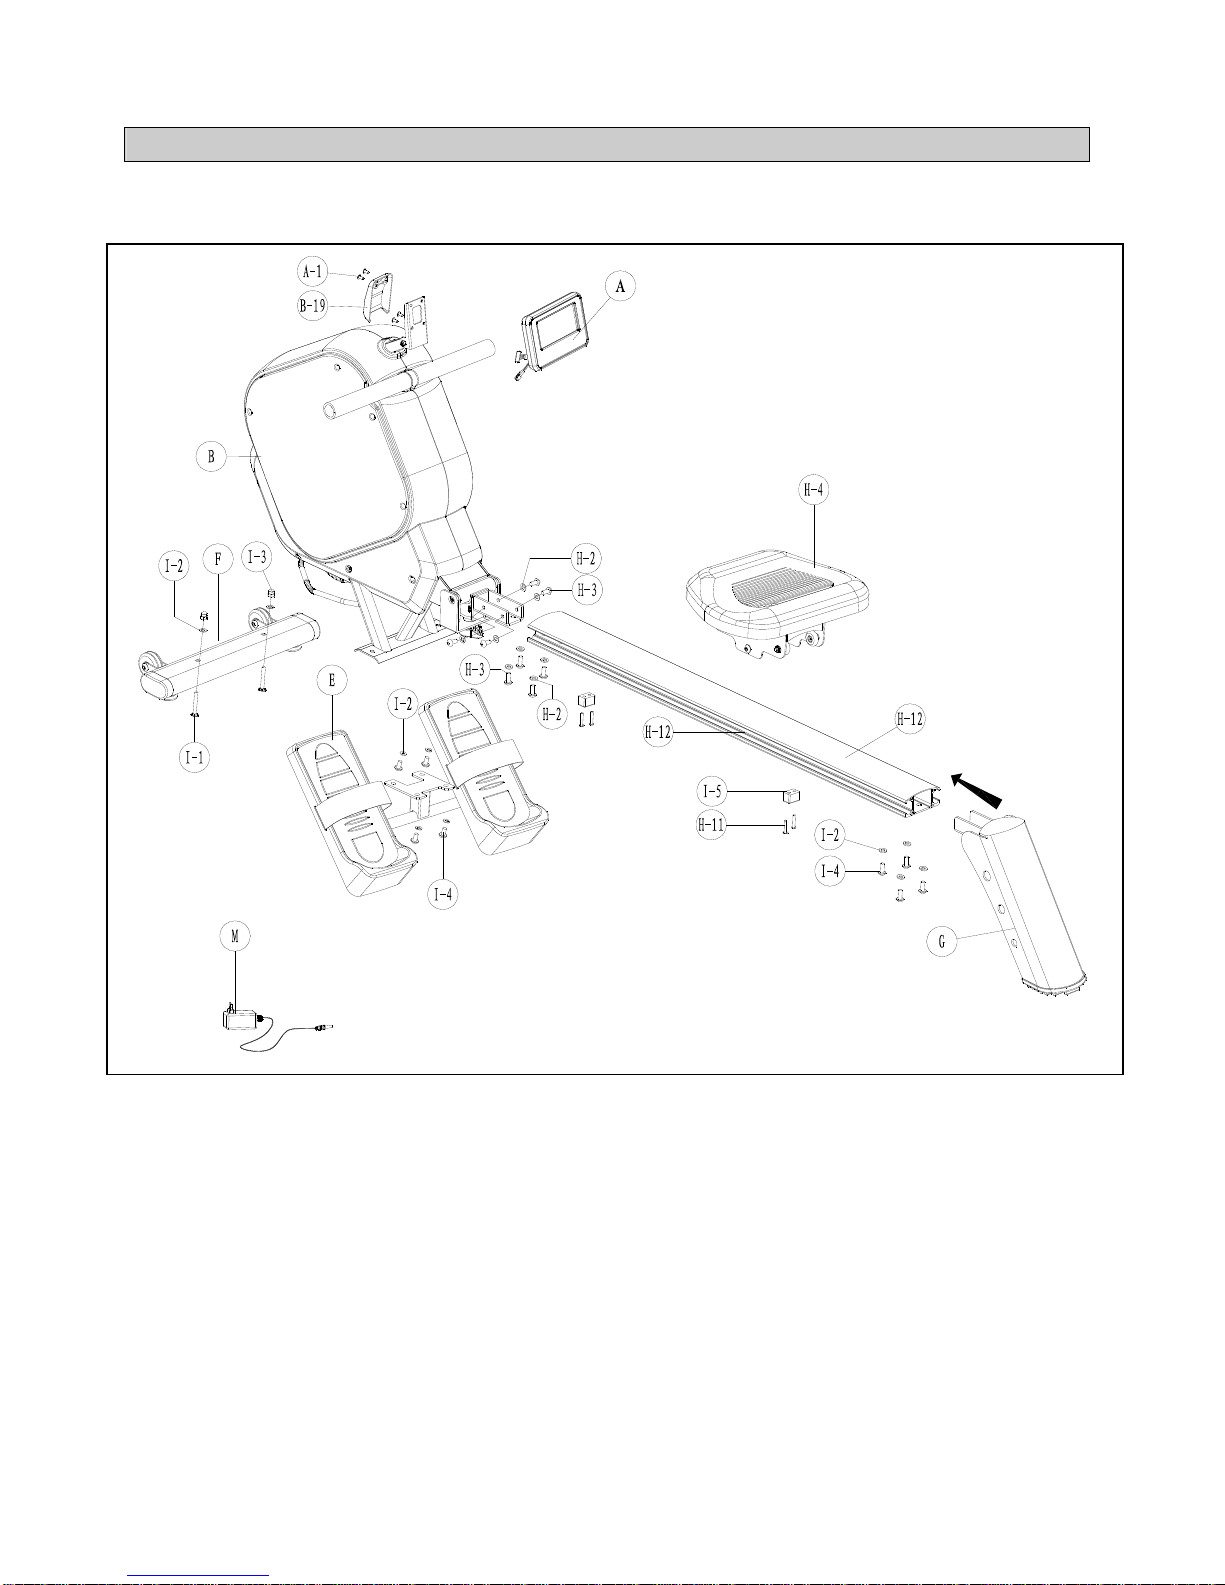
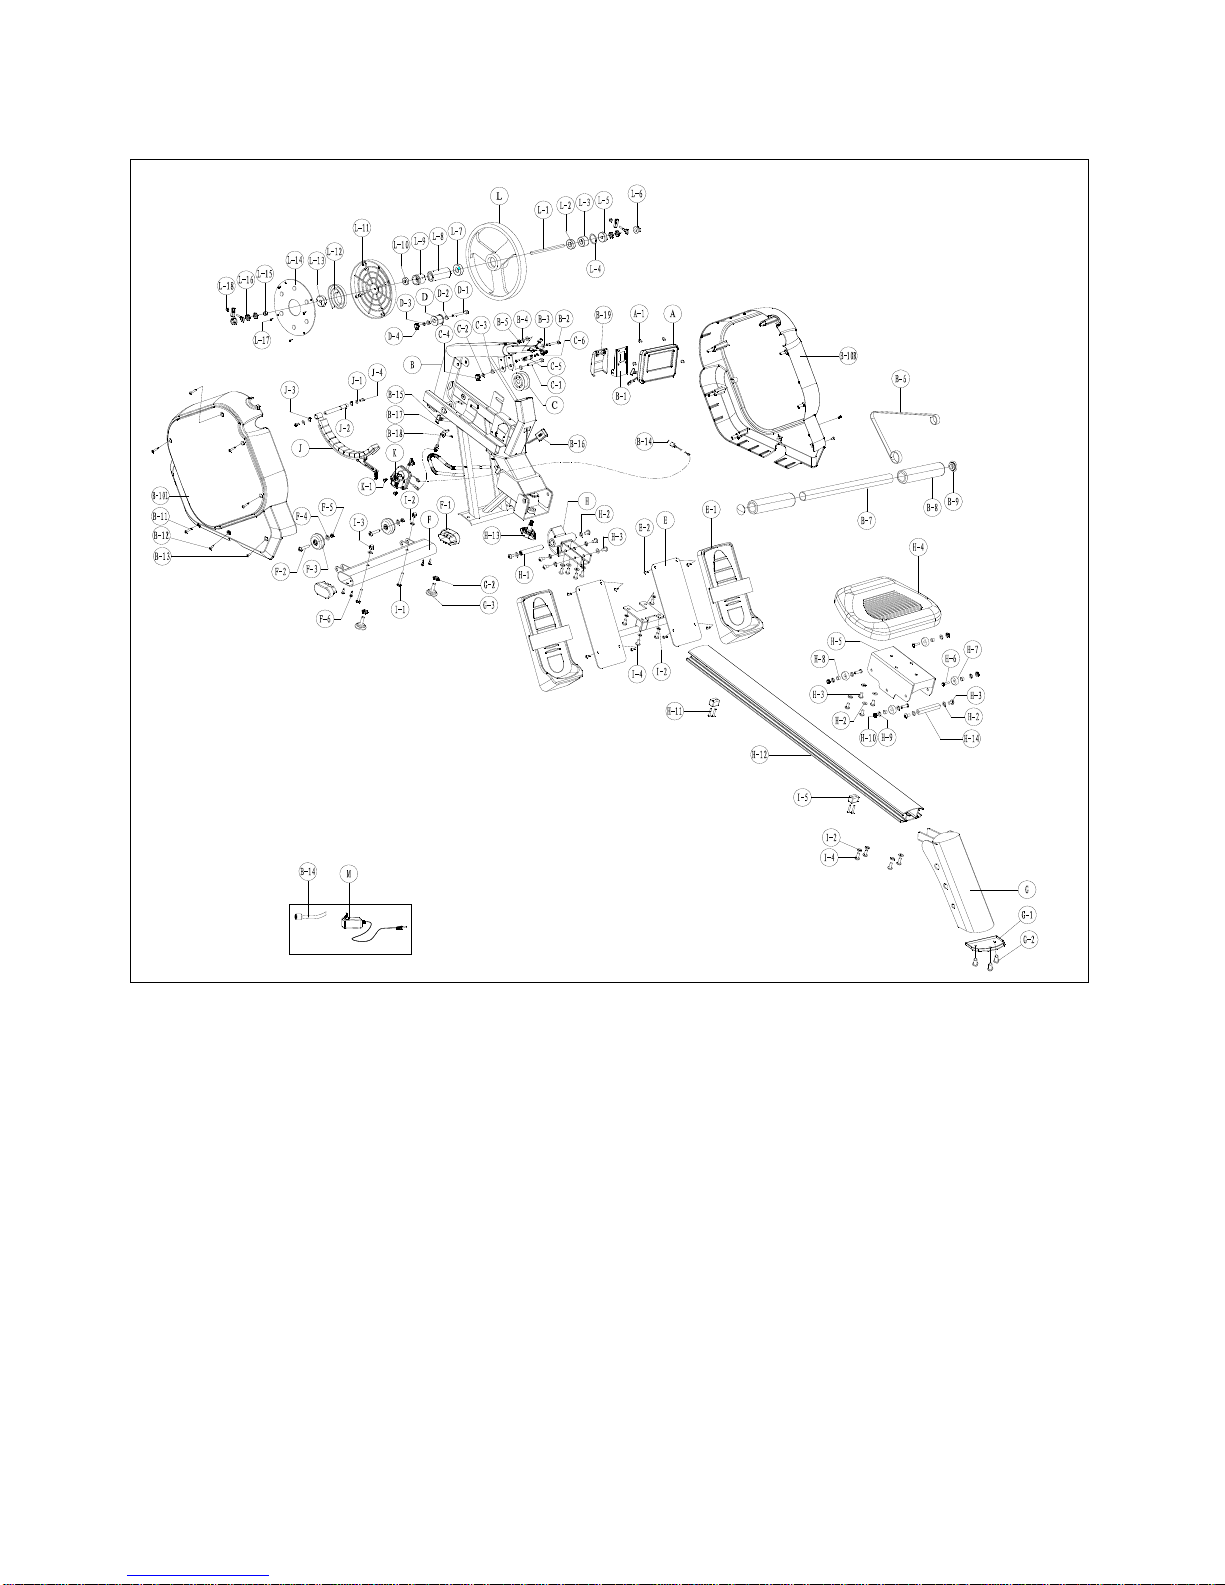
A COMPUTER 1 SET
A-1 SCREW FOR FIXING COMPUTER 4 PCS
B MAIN FRAME 1 SET
B-1 BRACKET FOR FIXING COMPUTER 1 PCS
B-2 SCREW M6xP1.0x57L 1 PCS
B-3 FIXING CAP 2 PCS
B-4 FLAT WASHER φ6xφ16x1t 1 PCS
B-5 NYLON NUT M6 1 PCS
B-6 STRAP 1 PCS
B-7 HANDLABAR 1 SET
B-8 HANDLEBAR FOAM 2 PCS
B-9 CAP 2 PCS
B-10 L LEFT COVER 1 PCS
B-10 R RIGHT COVER 1 PCS
B-11 SCREW M4x40L 5 PCS
B-12 SCREW M5x16L 2 PCS
B-13 SCREW M5x16L 2 PCS
B-14 DC WIRE 1 SET
B-15 UPPER COMPUTER CABLE 1 PCS
B-16 WIRELESS RECEIVER FOR PULSE 1 PCS
B-17 SENSOR BOX 1 PCS
B-18 SCREW M4x10L 1 PCS
B-19 BACK COVER FOR COMPUTER 1 PCS
C DRIVING PULLEY 1 SET
C-1 HEXAGON SCREW 3/8"x61mml 1 PCS
C-2 FLAT WASHERφ10xφ18x2t 1 PCS
C-3 BUSHING φ10xφ14x6mmL 2 PCS
C-4 NYLON NUT 3/8"x7t 1 PCS
C-5 STOPPER FOR STRAP 1 PCS
C-6 SCREW M4x10L 2 PCS
D SMALL PULLEY 1 PCS
D-1 HEXAGON SCREW 3/8"x61mml 1 PCS
D-2 BUSHINGφ10xφ14x3mmL 2 PCS
D-3 FLAT WASHER φ10xφ18x1t 1 PCS
D-4 NYLON NUT 3/8"x7t 1 PCS
E PEDAL HOLDER 1 SET
E-1 PEDAL 1 SET
E-2 SCREW M5xP0.8x12L 8 PCS
F FRONT STABILIZER 1 PCS
F-1 CAP FOR FRONT STABILIZER 2 PCS
F-2 ALLEN BOLT FOR FRONT STABLILZER 2 PCS
F-3 TRANSPORATION WHEEL FOR FRONT STABLILZER 2 PCS
F-4 FLAT WASHERφ8*φ19*2T FOR FRONT STABLILZER 2 PCS
F-5 NUT M8 FOR FRONT STABLILZER 2 PCS
F-6 SCREW 3/16” FOR FRONT STABLILZER 4 PCS

- 3 -
G REAR STABIILIZER 1 PCS
G-1 CAP FOR REAR STABILIZER 1 PCS
G-2 ALLEN BOLT M8xP1.25x12L 3 PCS
H FIXED HOLDER 1 PCS
H-1 SPINDLE OF FIXED HOLDER 1 PCS
H-2 FLAT WASHERφ8xφ16x2t OF FIXED HOLDER 16 PCS
H-3 SCREW M8xP1.25x20L OF FIXED HOLDER 16 PCS
H-4 SEAT 1 PCS
H-5 ROLLING SLIDER 1 SET
H-6 HEXAGON SCREWS M6xP1.0x30L 4 PCS
H-7 PU WHEEL φ30x12W 4 PCS
H-8 BUSHINGφ6.2*φ9.2*7L 4 PCS
H-9 FLAT WASHER φ6xφ12x1t 8 PCS
H-10 NYLON NUT M6 4 PCS
H-11 SCREW M5x35L 4 PCS
H-12 SLIPPERY RAIL 1 PCS
H-13 ADJUSTMENT KNOB 1 PCS
H-14 ROLLER AXLE 1 PCS
I-1 CARRIAGE SCREW M8xP1.25x55L 2 PCS
I-2 FLAT WASHERφ8*φ19*2T 10 PCS
I-3 CAP NUT M8 2 PCS
I-4 SCREW M8xP1.25x20L 8 PCS
I-5 STOPPER FOR SILDER 2 PCS
J~J-4 MAGNETIC SET 1 SET
K GEAR BOX 1 SET
K-1 HEXAGON SCREW M6xP1.0x10L 2 PCS
L~L-5,L-7~L-18 FLYWHEEL SET 1 SET
L-6 NUT PATTER 3/8"-26 2 PCS
M AC ADAPTOR 1 PC

- 4 -
ASSEMBLY STEPS
Steps 1
Fit the front stabilizer (F) to the main frame (B) and secure it with 2 of carriage screws
M8xP1.25x55L (I-1), 2 flat washers (I-2), and two nuts (I-3). Make sure they are securely
tightened.
Steps 2
Fit paddle holder (E) to the main frame (B) and secure it with 4 M8xP1.25x20L screws (I-4) and 4
flat washers (I-2).
Remarks: Do not screw one set of the M8xP1.25x20L Screws and Flat washers too firm at one
time. It is better to fix the four sets firmly at the same time because it helps you to change angles
and to fix easily.

- 5 -
Steps 3
Please remove the M8xP1.25x20L Screws (I-4) and Flat Washers (I-2) on the rear stabilizer (G).
Then fit the rear stabilizer (G) with slippery rail (H-12) by M8xP1.25x20L Screws (I-4) and Flat
Washers (I-2).
Remarks: Do not screw one set of the M8xP1.25x20L Screws and Flat washers too firm at one
time. It is better to fix the four sets firmly at the same time because it helps you to change angles
and to fix easily.
Steps 4
1. Please remove the M5x35L screws (H-11) on the slippery rail (H-12)
2. Pass the slippery rail (H-12) through the slide seat (H-4)
3. Use the M5x35L screws (H-11) to fix the stopper (I-5) on the slippery rail (H-12) .

- 6 -
Steps 5
Please remove the M8xP1.25x20L Screws (H-3) and Flat Washers (H-2) on the frame(B), then
insert the slippery rail (H-12) to the Main Frame (B) and attach by M8xP1.25x20L Screws (H-3)
and Flat Washers (H-2).
Remarks: Do not screw one set of the M8xP1.25x20L Screws and Flat washers too firm at one
time. It is better to fix the eight sets firmly at the same time because it helps you to change angles
and to fix easily.
Steps 6
1. Connect the Computer cables (B-15) & Wireless receiver cable (B-16) to the Computer ( A). Then
attach the Computer (A) to with back cover (B-19) with Screws (A-1).

- 7 -
Steps 6
Plug the Adaptor (M) into the DC hole (B-14) to start the computer

Folding instructions
1. Release the knob (H-15) and put out the
rail (H-12), then pull the rail out.
2. Turn the rail 90 degree then insert the rail
into the notch on the frame
3. Use the knob to lock the rail onto the
frame.
Rise up the rear stabilizer and push the rower machine when you want to move it.
Moving instructions

- 1 -
SM5861-64 INSTRUCTIONAL MANUAL
!!! For simple exercise, it is not always necessary to select a training program or manually set the
TIME, DISTANCE or other values. You can simply start pedaling.

- 2 -
As soon as the computer is connected with power supply, an acoustic signal sounds and all of the
displays are shown on LCD for 2 seconds.
If no button are pressed and the pedals have not been moved for approx. 4 minutes, the
computer will
switch to power saving mode. And display clock, calendar and room Temp. Only.
DISPLAY & BUTTON FUNCTIONS
Training
Values Display
Range Description/ Setting Range
SPM 0~999 -Strokes per minute
TIME/500m 0.0 ~
99:00min.
-User exercising time displaying;
-It will scan in every 6s and display the remain time to finish
500
meters rowing according to current speed.
METERS 0~9999m -Setting range 50~1000
CALORIES 0 ~ 9999 Cal. -Burned calories during rowing.
-Setting range 0~9990
STROKES 0~9999 -The movements when complete rowing.
-Scan and calculate Total strokes in every 6 seconds.
PULSE 30-240 BPM 0-30~240Bpm
Acoustic Signals
All settings made with the computer are confirmed with an acoustic signal:
1 shot beep = setting confirmed
2 shot beeps =It is impossible to make any settings
Training Data
The computer calculates and displays all values automatically according to user rowing status
(see table).
Take note:
BUTTON FUNCTION
UP - Increase resistance level
- Function selection
DOWN - Decrease resistance level
- Function selection
ENTER - Confirm setting or selection.
Reset - Hold on pressing for 2 seconds, computer will reboot.
- Reset all values to zero.
- Reverse to main menu after finishing a workout.
Start/ Stop - Start or Stop rowing training.
Recovery - Track user Heart rate in recovery phase.

- 3 -
* If only a “P” is shown instead of pulse value, it is impossible to measure the HR. Wear the chest
belt properly so that computer can detect your hear rate.
* The profile displayed in the center field depends on the type of exercise that has been set.
The computer provides a number of ways to vary the exercise session and make it more
motivating.
The following exercising are available:
-Manual Training (training without programs)
-Training with Programs (there are 12 programs preset, P01~P12)
-Training with the Heart Rate program (H.R.C)
-Training with competition program (RACE)
-Training with your own program (User program)
Starting exercise immediately (MANUAL)
Then MANUAL-->PROGRAM-->H.R.C.-->RACE-->USER is flashing with 1Hz. Press UP and
DOWN to
choose MANUAL and confirm by pressing ENTER. If you have previously selected a program or
started your workout, press RESET to return to the starting display.
-Press START/STOP button to start workout immediately without entering further settings.
-Press UP and DOWN keys to input your personal settings and press ENTER to confirm. The
following fields will flash in turn:
. Resistance level (1~16)
. TIME (or METERS) (Time and Meters can’t preset at the same time.)
.CALORIES
.PULSE
Use UP & DOWN to set values and confirm your selection by ENTER button.
Press START/STOP to start workout.
As soon as one of the set values reach the preset Target, the computer will alarm with Bi-bi sound
and stop.
-You can adjust the level of resistance on the paddles while rowing by pressing UP and DOWN
keys. The newly set level value will be shown in the profile(default value is Level 1).
-Press START/STOP to end exercising. All exercising value will remain.
-Press RESET to reverse to workout selection menu.
Selecting a Program to do training (PROGRAM)
-Press UP and DOWN keys to scan MANUAL→PROGRAM→H.R.C.→RACE→USER.

- 4 -
-Choose PROGRAM and press ENTER to confirm. The programs are preset with 12 profiles.
Press UP and DOWN to select one from the 12 preset profiles. Set the desired session value
and confirm by ENTER:
. Resistance level (1~16)
.TIME
-Press STATR/STOP to start workout.
-You can adjust the level of resistance on the paddles while rowing by pressing UP and DOWN
keys. The newly set level value will be shown in the profile(default value is Level 1).
-Program profiles:
Interval programs P2- P3- P7- P12
Increasing resistance level programs P6- P9- P11
Increasing and decreasing resistance level programs P1- P4- P5- P8 -P10
The stored training programs are designed especially to enhance aerobic base fitness.
. As a beginner you should start with those programs slowly and set a low paddle resistance.
. You should only graduate to Interval programs once you have been rowing for several times.
-Press START/STOP to end exercising. All exercising value will remain.
-Press RESET to reverse to workout selection menu.
Set program according to heart rate (H.R.C.)
In this program, the rower reacts to your pulse as measured by the chest belt.
This program allows you to rowing efficiently and safely within your required heart rate zone.
In addition, simple graphics also show you whether you need to need to increase or decrease
your stress Level. You can choose between:
HRC55 Here you are rowing in the very efficient range of 55%, ideal for beginners and for
general fat Burning.
HRC75 This range of 75% of the maximum pulse rate is suitable for experienced users and
athletes.
HRC90 The anaerobic range of 90% of the maximum pulse rate is only suitable for competitive
athletes and short sprint exercises.
TAG The computer uses your Age to calculate a target pulse rate, which you can change as

- 5 -
per your willing. Never select a target pulse that is higher than your age-determined
maximum pulse rate.
-Press UP & DOWN to select H.R.C. and enter by pressing MODE. Choose
HRC55-->HRC75-->HRC90-> TARGET. With HRC55, HRC75,HRC90, the max. Heart rate will
be calculated by the computer automatically.
-With the TARGET program, the preset value 100 will be shown. Press UP & DOWN buttons to
set a value between 30~240 and confirm by ENTER. The program has been saved.
-Set the desired session TIME with UP & DOWN buttons and press ENTER button to confirm.
-Press STATR/STOP to start workout.
For this program, it is necessary to wear the chest belt so that computer can detect and display
your heart rate value.
Program sequence:
The computer sets a paddle resistance that keeps you exercising constantly within your target
pulse rate.
.If you are rowing and go below your preset pulse rate, the paddle resistance will automatically
rise by one stress level every 30 seconds.
.If you are exercising and go above your preset pulse rate, the paddle resistance will
automatically decrease by one stress level every 15 seconds. If you have already reached the
lowest level “1” and your pulse rate is still higher than your preset value, then after about 30
seconds an acoustic signal will alarm and computer program will end automatically.
Training with competition mode (RACE)
In this program, you can enjoy rowing just like an competition, while your rival is the computer.
-Press UP & DOWN to select RACE and press ENTER to confirm.
-Press UP & DOWN to set SPM confirm by pressing ENTER.
-Press UP and DOWN to select desired rowing METERS and confirm by ENTER.
-Press UP and DOWN to adjust paddle resistance level.
-Press STATR/STOP to start workout. Computer will display USER & PC workout status.
-Press UP and DOWN to adjust resistance level.
Either PC or User finish the set rowing distance first, computer will stop and show PC win or User
win.

- 6 -
-Press START/STOP to end exercising. All exercising value will remain.
-Press RESET to reverse to workout selection menu.
User-defined profile (USER PROGRAM)
Here you can design your own profile with bars just like the preset program profiles.
-Press UP & DOWN to select USER PROGRAM and press ENTER to confirm. The first bar will
be displayed.
-Press UP & DOWN to set resistance level and confirm by MODE button. The next bar will be
displayed.
-Continue this process till set up 16 bars. The max. resistance level is 16. To finish your setting or
quit setting, hold on pressing ENTER button.
-Set the desired session TIME with UP & DOWN buttons and press ENTER to confirm.
- Press STATR/STOP to start workout.
As soon as one of the set values reach the preset Target, the computer will alarm with Bi-bi
sound and stop.
-You can adjust the level of resistance on the paddles while rowing by pressing UP and DOWN
keys. The newly set level value will be shown in the profile(default value is Level 1).
-Press START/STOP to end exercising. All exercising value will remain.
-Press RESET to reverse to workout selection menu.
Recovery phase
It is recommended to end an intensive rowing session with a recovery phase. During this phase
you should be able to relax and paddle without strong resistance until your pulse slows close to
its usual rate.
-Press REVOCERY button and wear chest belt again. Then only TIME is showing with counting
down from 60 seconds to 0, all other functions are not available.
Once the 60 seconds recovery phase is over, an evaluation of the achieved heart rate will be
shown.

- 7 -
-If your heart rate is still very high after 60s (F is between 4 and 6), you could restart the recovery
program to gradually slow your heart rate further.
Trouble shooting:
E-2:Motor stroke over the normal range. Plug the adaptor again. Repowering on the console and
the motor will back to the normal range.
E-7 : Check if cables were well connected or damaged.
Attention! All preset data will be lost when unplug the power (adaptor) from the "machine".
Table of contents
Other Casall Home Gym manuals