Casall R600 PRO User manual

ROWER MACHINE R600 PRO
Owner’s Manual

2
Important: Please locate your serial number and record in the box below for service support
purposes.
Serial number here:

Hardware chart
M-3 Flat washer Ø 8xØ17x2T (8)
M-2 Screw M4x14L (1)
M-5 Allen Bolt M8xP1.25x25mm (4)
M-6 Curved washer
Ø8xØ19x2T (4)
M-7 Nut for M8 (4)
(MM)
Allen key (1)
R600 PRO
M-1 Stopper (2)
(Pedal Wrench)
Screwdriver (1)
Wrench-14/17mm (1)
M-4 Allen bolt M8xP1.25x20mm (8)

EXPLODED DIAGRAM
D-9
D-8
L
L-1
L-3
L-2
L-4
L-5L-6 L-7
L-8 L-9 L-10
L-11
L-12
L-13
L-14
F
F-1
F-2
F-3
F-4
F-5
F-6
F-7F-8F-9
F-10 G
G-1
G-2
G-3
G-4
G-5
G-6 G-7 G-8
G-9
G-10
D-19
D-20
H
H-1
H-2
H-3
H-4
H-5
H-6
H-7
H-8
H-9
H-10
H-11
H-12
H-13
H-14
H-15
H-16
H-17
H-18
H-19
H-20
E
E-5
E-6
E-7
C-7
C-8
C-11
CC-6
C-1
C-2
C-4
C-3
C-9
C-10
C-5
C-12
C-13
B-1
B-2
M-1
B-3
B-4 B-5
B-7
B-6
D
D-1 D-2
D-3
D-7 D-6 D-5 D-4
I-8 I-7 I-6 I-5 I-4 I-3 I-2 I-1
I-9
KK-1
K-2
K-3
M-5
M-6
M-7
D-21 N
M-3
M-4
A
A-1
L-15
M-4
M-3
B-8
B-6

Parts List
No. Description Q'ty
A,A-1 Computer & screw 1 SET
B-1 Slippery rail 1 PCS
B-2 Screw M5x30L 4 PCS
B-3 Cap for wireless receive wire 1 PCS
B-4 Wireless receiver wire for pulse 1 PCS
B-5 Screw M4x8L 2 PCS
B-6 Screw M5x14L 2 PCS
B-7 Rear cover for slippery rail 1 PCS
B-8 Pedal fixing 1 PCS
C Bracket for roller 1 SET
C-1 Driving pulley 1 SET
C-2 Roller for bracket roller 1 SET
C-3 Screw 3/8"x54mm 1 PCS
C-4 Screw M6x50L 1 PCS
C-5 Nylon nut 3/8"x7t 1 PCS
C-6 Nylon nut M6 1 PCS
C-7 Spring washerφ8*φ14*2T 2 PCS
C-8 Flat washerφ8*φ19*2T 2 PCS
C-9 Bushingφ10xφ14x6mm 2 PCS
C-10 Bushingφ6xφ9x6mm 2 PCS
C-11 Hexagon screw M8xP1.25x16L 2 PCS
C-12 Flat washer φ10*φ18*1T 1 PCS
C-13 Flat washerφ6*φ12*1T 1 PCS
C-14 Bushing φ10xφ14x3mm 1 PCS
D Main frame 1 SET
D-1 Left end cap for main frame stabilizer (front) 1 PCS
D-2 Right end cap for main frame stabilizer (front) 1 PCS
D-3 End cap for main frame stabilizer (rear) 2 PCS
D-4 Screw M6xP1.0x57L 1 PCS
D-5 Fixing cap 2 PCS
D-6 Flat washerφ6xφ16x1t 1 PCS
D-7 Nylon nut M6 1 PCS
D-8 C-type ring φ8 2 PCS
D-9 Speedy nut M8 2 PCS
D-10 Transportation wheel 2 PCS
D-11 Sensor box 1 PCS

6
D-12 Screw M4x10L 1 PCS
D-13 Screw M5x16L 4 PCS
D-14 Sleeve for chain cover 1 PCS
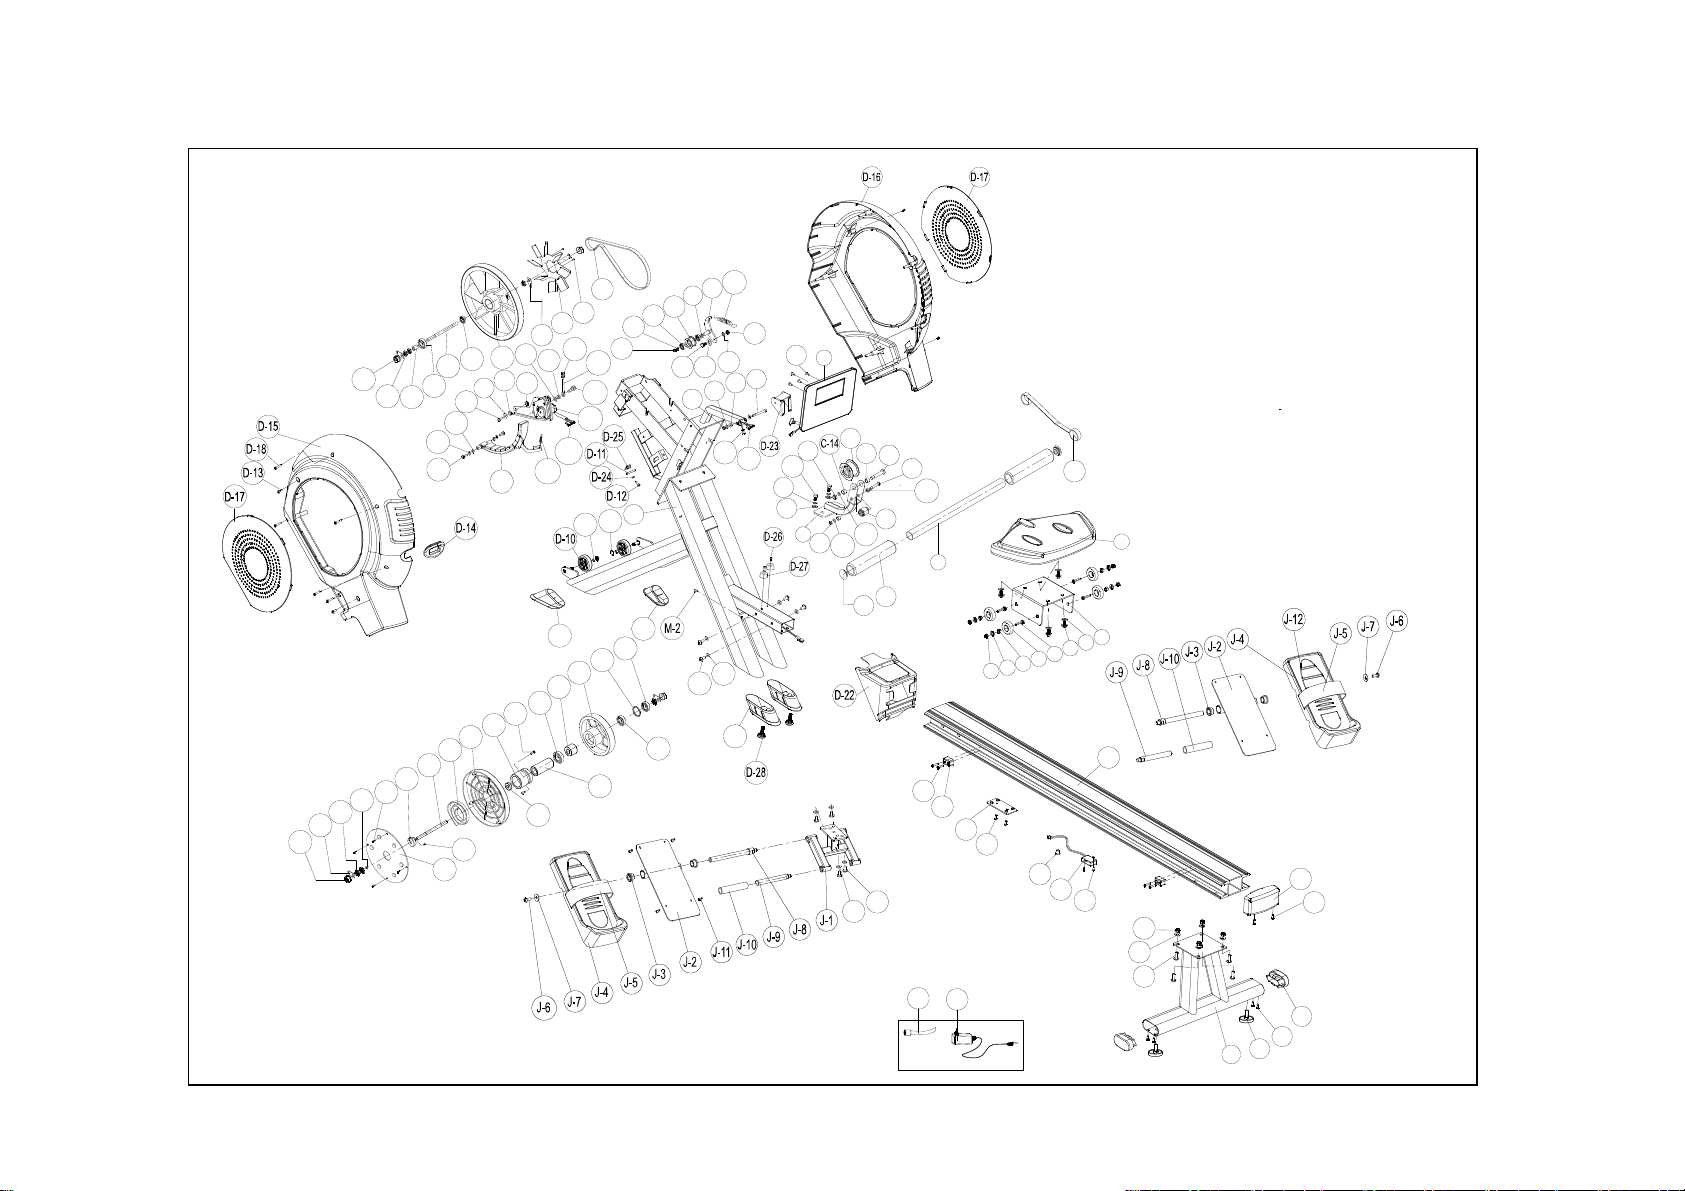
D-15 Left chain cover 1 PCS
D-16 Right chain cover 1 PCS
D-17 Side cover for chain cover 2 PCS
D-18 Screw M4x50L 5 PCS
D-19 Computer cable wire (Upper) 1 PCS
D-20 Pulse wire for wireless receiver 1 PCS
D-21 DC wire 1 PCS
D-22 Front cover for slippery rail 1 PCS
D-23 Computer bracket holder 1 PCS
D-24 Flat washerφ5xφ16x2t 1 PCS
D-25 Sensor holder 1 PCS
D-26 Screw M4xP1.5*16L 2 PCS
D-27 Stopper 2 PCS
D-28 Adjustable cap for end cap 2 PCS
E Handlebar 1 SET
E-5 Foam grip for handlebar 2 PCS
E-6 Cap for handlebar 2 PCS
E-7 Inkle 1 PCS
F~F-5 Flywheel set 1 SET
F-6 Hexagon nut 3/8"-26x4.5t 2 PCS
F-7 Fixing pin 2 PCS
F-8 Fan 1 PCS
F-9 Screw M3x8L 4 PCS
F-10 Driving belt J6 762m/m 1 PCS
G~G-10 Idler wheel set 1 SET
H~H-20 Spring box set 1 SET
I-1 Rolling slider 1 PCS
I-2 Flat washerφ8*φ19*2T 4 PCS
I-3 Screw M8*P1.25*16L 4 PCS
I-4 Screw 3/8"-16x35L 4 PCS
I-5 Roller wheel 4 PCS
I-6 Bushingφ10xφ14x6mm 4 PCS
I-7 Flat washerφ10.5xφ17x2t 4 PCS
I-8 Nylon nut 3/8"x9t 4 PCS

7
I-9 Seat 1 PCS
J-1 Pedal holder 1 PCS
J-2 Pedal fixing plate 1 PCS
J-3 Bushing 4 PCS
J-4 Pedal (R/L) 2 PCS
J-5 Strip for pedal 2 PCS
J-6 Allen bolt M8xP1.25x20L 2 PCS
J-7 Flat washer φ8xφ25x2 2 PCS
J-8 Rotary shaft for pedal 2 PCS
J-9 Stop axle 2 PCS
J-10 Foam for stop axle 2 PCS
J-11 Screw M5xP0.8x10L 8 PCS
J-12 Pedal pad 2 PCS
K Rear stabilizer 1 SET
K-1 Adjustable cap for rear stabilizer 2 PCS
K-2 Screw 3/16”x11/8” 4 PCS
K-3 End cap for rear stabilizer 2 PCS
L~L-3 Magnetic set 1 SET
L-4~L-13,L-15 Gear box 1 SET
L-14 Small spring 1 PCS
M-1~M-7 Bolts & nuts pack 1 SET
N Adaptor 1 PCS

8
ASSEMBLY STEPS
Steps 1
1. Attach the rear stabilizer (K) to the slippery rail (B-1) and secure it with 4 allen bolt (M-5), 4
semi washers (M-6), and 4 nylon nuts (M-7). Make sure they are securely tightened.
Steps 2
1. Please remove the four M5x30L screws (B-2) on the slippery rail (B-1) in left side.
2. Pass the slippery rail (B-1) through the slide seat (I-9)
3. Use the four M5x35L screws (B-2) to fix the stopper (M-1) on the slippery rail (B-1) in left side.
*4
*1
1
B-1
K
M-5
M-6
M-7
No. M-5 No. M-6 No. M-7
*4
*2
*1
2
STEP1
STEP2
STEP1
STEP2
Box Spanner
B-2
M-1 B-1
I-9
B-2

9
Steps 3
1. Assemble the two stop axle (J-9) onto the pedal holder (J-1) in side.
2. Assemble the two pedals (J-4 L/R) onto the pedal holder (J-1) with a screw driver in side.
Remarks: screw the left pedal’s spindle counter-clockwise and the right pedal’s spindle clockwise.
Use a wrench (or screwdriver) to screw the four spindles completely.
Steps 4
1. Slide the front cover (D-22) to the slippery rail (B-1), and then connect wireless receiver for
pulse wire (B-4) and pulse wire (D-20).
2. Insert the rail to the main frame (D) and fasten it with 4 flat washers (M-3) and 4 Allen bolt
(M-4).
3. Fix the front cover (D-22) with screw (M-2).
3
比例25.400
*1
*4 *1
4
M-3
M-4
D-20
B-4
B-1
D
No. M-2
No. M-4 No. M-3

10
Steps 5
1. Fit paddle holder (J-1) to the slippery rail (B-1) and secure it with 4 M8xP1.25x20L screws (M-4)
and 4 flat washers (M-3).
Remarks: Do not screw one set of the M8xP1.25x20L Screws and Flat washers too firm at one
time. It is better to fix the four sets firmly at the same time because it helps you to change angles
and to fix easily.
Steps 6
Connect the adaptor (N) to the DC hole (located on the front of the chain cover).
N
比例25.400
*4 *1
5
B-1
M-4
M-3
J-1
No. M-4 No. M-3

11
SM5879-64 INSTRUCTIONAL MANUAL
!!!Forsimpleexercise,itisnotalwaysnecessarytoselectatrainingprogramormanuallysetthe
TIME,DISTANCEorothervalues.Youcansimplystartpedaling.

12
Assoonasthecomputerisconnectedwithpowersupply,anacousticsignalsoundsandallofthedisplays
areshownonLCDfor2seconds.
Ifnobuttonarepressedandthepedalshavenotbeenmovedforapprox.4minutes,thecomputerwill
switchtopowersavingmode.
DISPLAY&BUTTONFUNCTIONS
TrainingValuesDisplayRangeDescription/SettingRange
SPM0~999‐Strokesperminute
TIME/500m0.0~99:00min.‐Userexercisingtimedisplaying;
‐Itwillscaninevery6sanddisplaytheremaintimetofinish500
metersrowingaccordingtocurrentspeed.
METERS0~9999m‐Settingrange50~1000
CALORIES0~9999Cal.‐Burnedcaloriesduringrowing.
‐Settingrange0~9990
STROKES 0~9999 ‐Themovementswhencompleterowing.
PULSE30‐240BPM0‐30~240Bpm
AcousticSignals
Allsettingsmadewiththecomputerareconfirmedwithanacousticsignal:
1shotbeep=settingconfirmed
2shotbeeps=Itisimpossibletomakeanysettings
TrainingData
Thecomputercalculatesanddisplaysallvaluesautomaticallyaccordingtouserrowingstatus(seetable).
Takenote:
*Ifonlya“P”isshowninsteadofpulsevalue,itisimpossibletomeasuretheHR.Wearthechestbelt
properlysothatcomputercandetectyourhearrate.
*Theprofiledisplayedinthecenterfielddependsonthetypeofexercisethathasbeenset.
Thecomputerprovidesanumberofwaystovarytheexercisesessionandmakeitmoremotivating.
BUTTONFUNCTION
UP‐Increaseresistancelevel
‐Functionselection
DOWN‐Decreaseresistancelevel
‐Functionselection
ENTER‐Confirmsettingorselection.
Reset
‐Holdonpressingfor2seconds,computerwillreboot.
‐Resetallvaluestozero.
‐Reversetomainmenuafterfinishingaworkout.
Start/Stop‐StartorStoprowingtraining.
Recovery‐TrackuserHeartrateinrecoveryphase.

13
Thefollowingexercisingisavailable:
‐ManualTraining(trainingwithoutprograms)
‐TrainingwithPrograms(thereare12programspreset,P01~P12)
‐TrainingwiththeHeartRateprogram(H.R.C)
‐Trainingwithcompetitionprogram(RACE)
‐Trainingwithyourownprogram(Userprogram)
Startingexerciseimmediately(MANUAL)
ThenMANUAL‐‐>PROGRAM‐‐>H.R.C.‐‐>RACE‐‐>USERisflashingwith1Hz.PressUPandDOWNto
chooseMANUALandconfirmbypressingENTER.Ifyouhavepreviouslyselectedaprogramorstarted
yourworkout,pressRESETtoreturntothestartingdisplay.
‐PressSTART/STOPbuttontostartworkoutimmediatelywithoutenteringfurthersettings.
‐PressUPandDOWNkeystoinputyourpersonalsettingsandpressENTERtoconfirm.Thefollowing
fieldswillflashinturn:
.Resistancelevel(1~16)
.TIME(orMETERS)(TimeandMeterscan
’
tpresetatthesametime.)
.CALORIES
.PULSE
UseUP&DOWNtosetvaluesandconfirmyourselectionbyENTERbutton.
PressSTART/STOPtostartworkout.
AssoonasoneofthesetvaluesreachthepresetTarget,thecomputerwillalarmwithBi‐bisoundand
stop.
‐YoucanadjustthelevelofresistanceonthepaddleswhilerowingbypressingUPandDOWNkeys.The
newlysetlevelvaluewillbeshownintheprofile(defaultvalueisLevel1).
‐PressSTART/STOPtoendexercising.Allexercisingvaluewillremain.
‐PressRESETtoreversetoworkoutselectionmenu.
SelectingaProgramtodotraining(PROGRAM)
‐PressUPandDOWNkeystoscanMANUAL→PROGRAM→H.R.C.→RACE→USER.
‐ChoosePROGRAMandpressENTERtoconfirm.Theprogramsarepresetwith12profiles.PressUPand
DOWNtoselectonefromthe12presetprofiles.SetthedesiredsessionvalueandconfirmbyENTER:
.Resistancelevel(1~16)
.TIME
PressSTATR/STOPtostartworkout.

14
‐YoucanadjustthelevelofresistanceonthepaddleswhilerowingbypressingUPandDOWNkeys.The
newlysetlevelvaluewillbeshownintheprofile(defaultvalueisLevel1).
‐Programprofiles:
IntervalprogramsP2‐P3‐P7‐P12
IncreasingresistancelevelprogramsP6‐P9‐P11
IncreasinganddecreasingresistancelevelprogramsP1‐P4‐P5‐P8‐P10
Thestoredtrainingprogramsaredesignedespeciallytoenhanceaerobicbasefitness.
.Asabeginneryoushouldstartwiththoseprogramsslowlyandsetalowpaddleresistance.
.YoushouldonlygraduatetoIntervalprogramsonceyouhavebeenrowingforseveraltimes.
‐PressSTART/STOPtoendexercising.Allexercisingvaluewillremain.
‐PressRESETtoreversetoworkoutselectionmenu.
Setprogramaccordingtoheartrate(H.R.C.)
Inthisprogram,therowerreactstoyourpulseasmeasuredbythechestbelt.
Thisprogramsallowsyoutorowingefficientlyandsafelywithinyourrequiredheartratezone.
Inaddition,simplegraphicsalsoshowyouwhetheryouneedtoneedtoincreaseordecreaseyourstress
Level.Youcanchoosebetween:
HRC55Hereyouarerowingintheveryefficientrangeof55%,idealforbeginnersandforgeneralfat
Burning.
HRC75Thisrangeof75%ofthemaximumpulserateissuitableforexperiencedusersandathletes.
HRC90Theanaerobicrangeof90%ofthemaximumpulserateisonlysuitableforcompetitiveathletes
andshortsprintexercises.
TAGThecomputerusesyourAgetocalculateatargetpulserate,whichyoucanchangeasperyour
willing.Neverselectatargetpulsethatishigherthanyourage‐determinedmaximumpulse
rate.
‐PressUP&DOWNtoselectH.R.C.andenterbypressingMODE.ChooseHRC55‐‐>HRC75‐‐>HRC90‐>
TARGET.
WithHRC55,HRC75,HRC90,themax.Heartratewillbecalculatedbythecomputerautomatically.

15
‐WiththeTARGETprogram,thepresetvalue100willbeshown.PressUP&DOWNbuttonstosetavalue
between30~240andconfirmbyENTER.Theprogramhasbeensaved.
‐SetthedesiredsessionTIMEwithUP&DOWNbuttonsandpressENTERbuttontoconfirm.
‐PressSTATR/STOPtostartworkout.
Forthisprogram,itisnecessarytowearthechestbeltsothatcomputercandetectanddisplayyour
heart
ratevalue.
Programsequence:
Thecomputersetsapaddleresistancethatkeepsyouexercisingconstantlywithinyourtargetpulserate.
.Ifyouarerowingandgobelowyourpresetpulserate,thepaddleresistancewillautomaticallyriseby
onestresslevelevery30seconds.
.Ifyouareexercisingandgoaboveyourpresetpulserate,thepaddleresistancewillautomatically
decreasebyonestresslevelevery15seconds.Ifyouhavealreadyreachedthelowestlevel“1”andyour
pulserateisstillhigherthanyourpresetvalue,thenafterabout30secondsanacousticsignalwillalarm
andcomputerprogramwillendautomatically.
Trainingwithcompetitionmode(RACE)
Inthisprogram,youcanenjoyrowingjustlikeacompetition,whileyourrivalisthecomputer.
‐PressUP&DOWNtoselectRACEandpressENTERtoconfirm.
‐PressUP&DOWNtosetSPMandconfirmbypressingENTER.
‐PressUPandDOWNtoselectdesiredrowingMETERSandconfirmbyENTER.
‐PressUPandDOWNtoadjustpaddleresistancelevel.
‐PressSTATR/STOPtostartworkout.ComputerwilldisplayUSER&PCworkoutstatus.
‐PressUPandDOWNtoadjustresistancelevel.
EitherPCorUserfinishthesetrowingdistancefirst,computerwillstopandshowPCwinorUserwin.
‐
PressSTART/STOPtoendexercising.Allexercisingvaluewillremain.
‐PressRESETtoreversetoworkoutselectionmenu.
User‐definedprofile(USERPROGRAM)

16
Hereyoucandesignyourownprofilewithbarsjustlikethepresetprogramprofiles.
‐PressUP&DOWNtoselectUSERPROGRAMandpressENTERtoconfirm.Thefirstbarwillbedisplayed.
‐PressUP&DOWNtosetresistancelevelandconfirmbyMODEbutton.Thenextbarwillbedisplayed.
‐Continuethisprocesstillsetup16bars.Themaxresistancelevelis16.Tofinishyoursettingorquit
setting,holdonpressingENTERbutton.
‐SetthedesiredsessionTIMEwithUP&DOWNbuttonsandpressENTERtoconfirm.
‐PressSTATR/STOPtostartworkout.
AssoonasoneofthesetvaluesreachthepresetTarget,thecomputerwillalarmwithBi‐bisoundand
stop.
‐YoucanadjustthelevelofresistanceonthepaddleswhilerowingbypressingUPandDOWNkeys.The
newlysetlevelvaluewillbeshownintheprofile(defaultvalueisLevel1).
‐PressSTART/STOPtoendexercising.Allexercisingvaluewillremain.
‐PressRESETtoreversetoworkoutselectionmenu.
Recoveryphase
Itisrecommendedtoendanintensiverowingsessionwitharecoveryphase.Duringthisphaseyou
shouldbeabletorelaxandpaddlewithoutstrongresistanceuntilyourpulseslowsclosetoitsusualrate.
‐PressREVOCERYbuttonandwearchestbeltagain.ThenonlyTIMEisshowingwithcountingdownfrom
60secondsto0,allotherfunctionsarenotavailable.
Oncethe60secondsrecoveryphaseisover,anevaluationoftheachievedheartratewillbeshown.
‐Ifyourheartrateisstillveryhighafter60s(Fisbetween4and6),youcouldrestarttherecovery
program
tograduallyslowyourheartratefurther.
Troubleshooting:
E‐2:Motorstrokeoverthenormalrange.Plugtheadaptoragain.Repoweringontheconsoleandthe
motorwillbacktothenormalrange.
E‐7:Checkifcableswerewellconnectedordamaged.
Attention! All preset data will be lost when unplug the power (adaptor) from the "machine".
Table of contents
Other Casall Home Gym manuals
Popular Home Gym manuals by other brands

V-Lift
V-Lift CYCLONE AIR ROWER Assembly & user manual

BH FITNESS
BH FITNESS HiPower R500 Instructions for assembly and use

Skywalker
Skywalker sjg200 Assembly installation, care maintenance and user instructions manual

ParaBody
ParaBody 897104 Assembly instructions

Weider
Weider Flex Xt2/flex 2000 Plus manual

Sissel
Sissel Hang Up Instructions for use