manuals.online logo
Brands
  1. Home
  2. •
  3. Brands
  4. •
  5. Casio
  6. •
  7. Watch
  8. •
  9. Casio 2742 User manual

Casio 2742 User manual

USER’S GUIDE 2742
1
About This Manual
•All of the displays in this manual show white-on-black.
•Button operations are indicated using the letters shown
in the illustration.
•Each section of this manual provides you with the
information you need to perform operations in each
mode. Further details and technical information can be
found in the “Reference” section.
Animation area
Timekeeping Mode World Time Mode Travel Data Bank Mode Alarm Mode Stopwatch Mode Hand Setting Mode
Press .
DST on indicator
General Guide
•Press Cto change from mode to mode.
•In any mode, press Bto illuminate the display.
•A variety of different animation patterns appear in the animation area of the display
to identify the mode and when the backlight is turned on.
Timekeeping
This watch features separate digital and analog timekeeping. The procedures for
setting the digital time and analog time are different.
•In the Timekeeping Mode, you can press Dto change the time and date format as
shown below.
Animation area
Day of Week Month – Day Hour : Minutes Seconds None
•You can specify the animated pattern you want to play in the Timekeeping Mode.
See “Animated Pattern” for more information.
Digital Time and Date
Use the Timekeeping Mode to set and view a digital display of the current time and
date. When setting the digital time, you can also configure settings for summer time
(Daylight Saving time or DST), your Home City code (the code for the city where you
normally use the watch), and the 12/24-hour format.
•This watch is preset with a number of city codes, each of which represents the time
zone where that city is located. When setting the digital time, it is important that you
select the correct city code for your Home City. If your location is not included in the
preset city codes, select the preset city code that is in the same time zone as your
location.
•Note that all of the times for the World Time Mode city codes are displayed in
accordance with the digital time and date settings you configure in the Timekeeping
Mode.
•After you correctly set your Home City time and date, you can set the watch up for
timekeeping with a different city code simply by changing the Home City code in the
Timekeeping Mode.
To set the digital time and date
1. In the Timekeeping Mode, hold down Auntil the
secoi K start to flash, which indicates the setting
screen.
2. Press Conce to move the flashing to the Home City
code setting (see the illustration below), and then use
Band Dto select the code you want.
•Make sure you select your Home City code before
changing any other setting.
•For full information on city codes, see the “City Code
Table”.
Screen
50
TYO
DST
OFF
P BA:AI
12H
CAAD
G|DA
To do this:
Reset the seconds to 00
Change the Home City code
Toggle between Daylight Saving Time (ON)
and Standard Time (OFF)
Change the hour or minutes
Toggle between 12-hour (12H) and
24-hour (24H) timekeeping
Change the year
Change the month or day
Do this:
Press D.
Use D(east) and B(west).
Press D.
Use D(+) and B(–).
Press D.
Use D(+) and B(–).
5. Press Ato exit the setting screen.
•Resetting the seconds only (without changing the hour, minute, Home City code, or
DST setting) causes the analog minute hand setting to be adjusted automatically. If
you change the hour, minute, Home City code, or DST setting, you should also use
the procedure under “To adjust the analog time” to adjust the analog hands
accordingly.
•See “Digital Time Daylight Saving Time (DST) Setting” below for details about the
DST setting.
•Note that holding down Ain step 1 of the above procedure also changes the
animated pattern selection. See “Animated Pattern” for more information.
Digital Time Daylight Saving Time (DST) Setting
Daylight Saving Time (summer time) advances the digital time setting by one hour
from Standard Time. Remember that not all countries or even local areas use Daylight
Saving Time.
•Note that you cannot switch between Standard Time and Daylight Saving Time
while GMT is selected as your Home City code.
To toggle the Timekeeping Mode digital time between DST and Standard Time
1. In the Timekeeping Mode, hold down Auntil the
seconds start to flash, which indicates the setting
screen.
2. Press Ctwice to display the DST setting screen.
3. Press Dto toggle between Daylight Saving Time (ON
displayed) and Standard Time (OFF displayed).
4. Press Ato exit the setting screen.
•The DST on indicator appears on the display to indicate
that Daylight Saving Time is turned on.
Setting the Analog Time
Perform the procedure below when the time indicated by the analog hands does not
match the time of the digital display.
To adjust the analog time
1. In the Timekeeping Mode, press Cfive times to enter
the Hand Setting Mode.
2. Hold down Auntil the current digital time starts to
flash, which indicates the analog setting screen.
3. Press Dto advance the analog time setting by
20 seconds.
•Holding down Dadvances the analog time setting at
high speed.
•If you need to advance the analog time setting a long way, hold down Duntil the
time starts advancing at high speed, and then press B. This locks the high
speed hand movement, so you can release the two buttons. High-speed hand
movement continues until you press any button. It will also stop automatically
after the time advances 12 hours or if an alarm (daily alarm or Hourly Time
Signal) starts to sound.
4. Press Ato exit the setting screen.
•The watch will automatically adjust the minute hand slightly to match its internal
second count when you exit the setting screen.
•To return to the Timekeeping Mode, press C.
Animated Pattern
You can select from among six different Timekeeping Mode animated patterns, or you
can turn off the animated pattern.
To change the Timekeeping Mode animated pattern
In the Timekeeping Mode, press Ato cycle through the animated pattern settings as
shown below.
Off Space Dice
Screw Aqua Mirror Ball Block
3. Press Cto move the flashing in the sequence shown below to select the other settings.
Seconds Home City Code DST Hour Minutes
Day Month Year 12/24-Hour format
4. When the setting you want to change is flashing, use Band Dto change it as
described below.
MA0304-A
USER’S GUIDE 2742
2
City code
Current time in the zone
of the selected city code
Index mark
DST on indicator
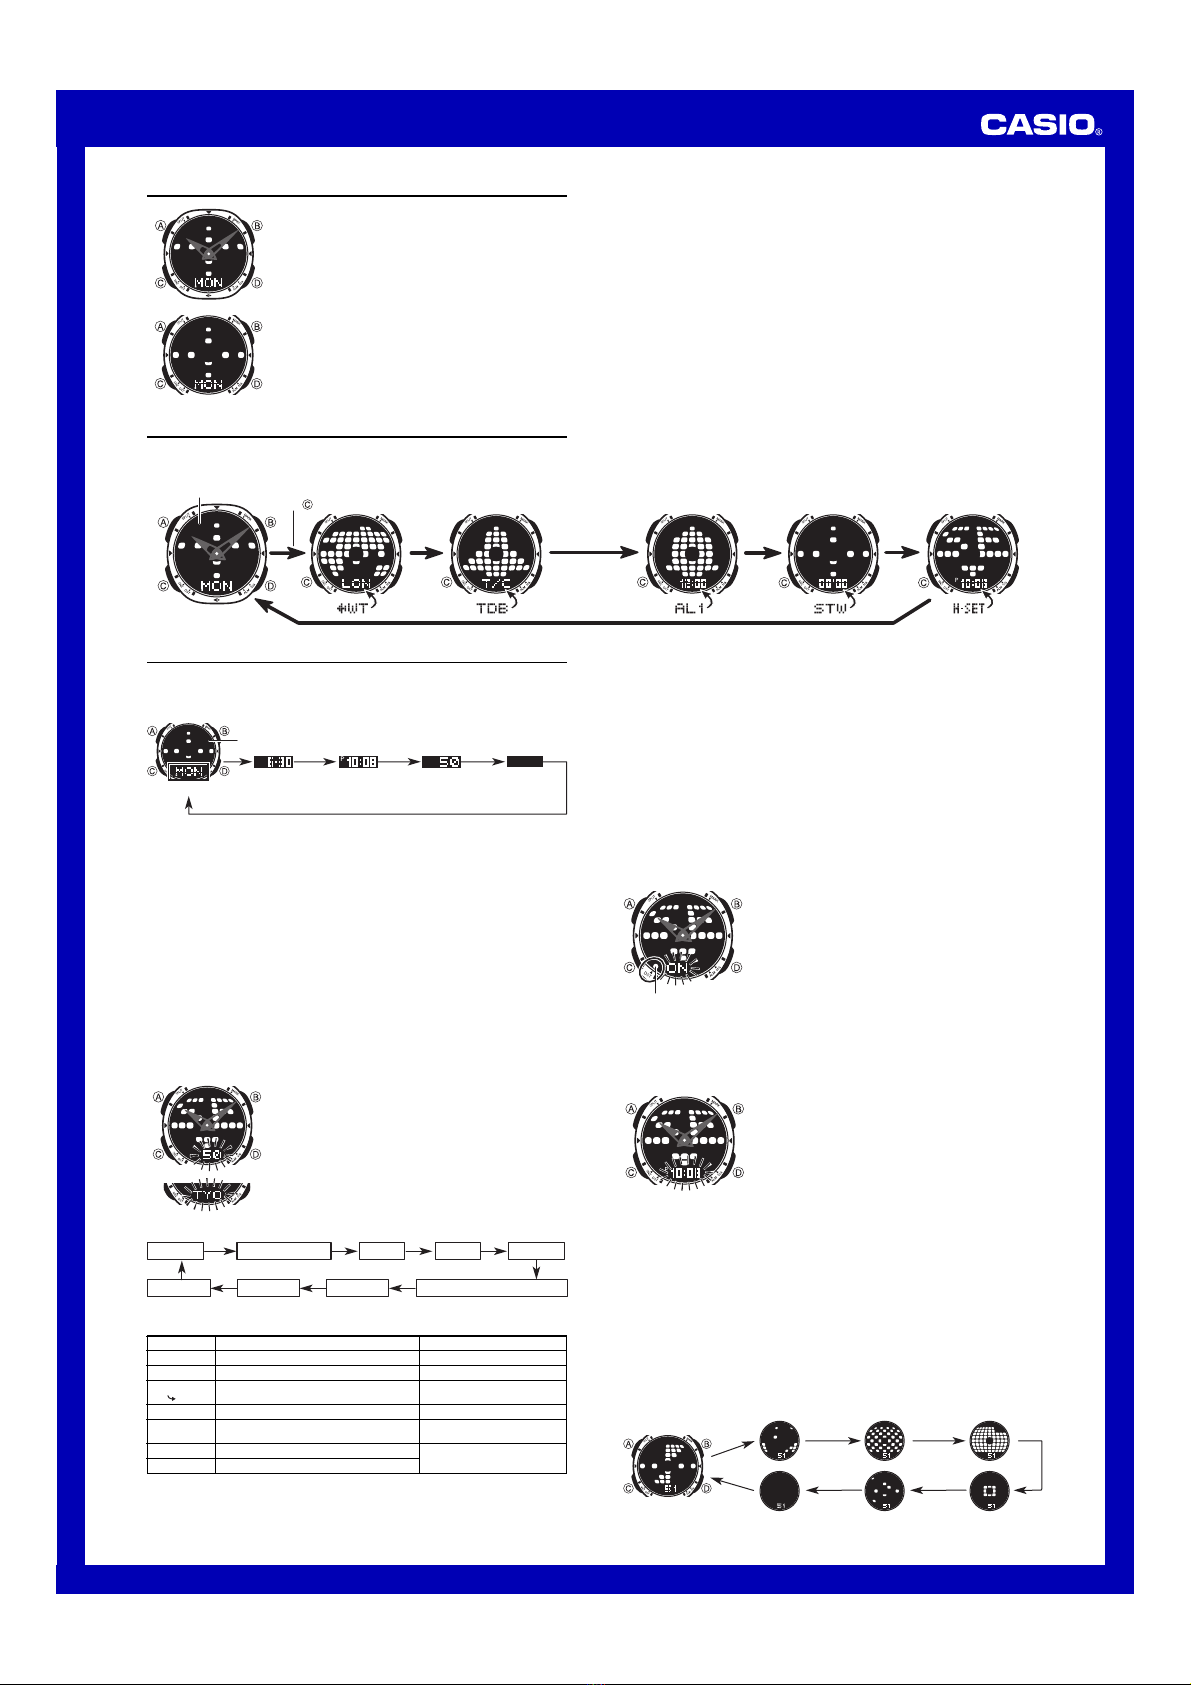
•The initial factory default animation pattern setting and the default setting after
battery replacement is “Screw”.
•
Animated pattern movement becomes faster while the second count goes from 58 to 00.
World Time
World Time digitally displays the current time in 27 cities
(29 time zones) around the world. You can assign an
index mark to city codes that you often use, to make them
easier to find when you need them.
•All of the operations in this section are performed in the
World Time Mode, which you enter by pressing C.
To view the time in another city
In the World Time Mode, press Dto scroll eastwardly
through city codes.
•The city code is displayed for about two seconds, and
then it is replaced with the current time for that city
code.
•Pressing Dwhile the time is displayed in the World Time Mode causes the city
code of the currently selected zone to appear. Pressing Dwhile a city code is on
the display advances to the next sequential city code.
•For full information about city codes, see the “City Code Table”.
•When the currently selected time zone is one that includes mostly ocean, a value
indicating the zone’s Greenwich Mean Time differential appears in place of a city
code.
•If there are no city codes currently marked with an index mark, holding down D
scrolls through city codes at high speed in normal sequence. If there are index
marked city codes, holding down Djumps to the next marked city code. See “To
assign index marks to city codes” below for more information.
•If the current time shown for a city is wrong, it probably means there is a problem
with your Timekeeping Mode digital time and/or Home City code settings. Go to the
Timekeeping Mode and make the necessary adjustments.
To assign index marks to city codes
1. In the World Time Mode, use Dto display the city code
that you want to mark.
2. Press Ato toggle the currently displayed city code
between being marked (index mark displayed) and
unmarked (index mark not displayed).
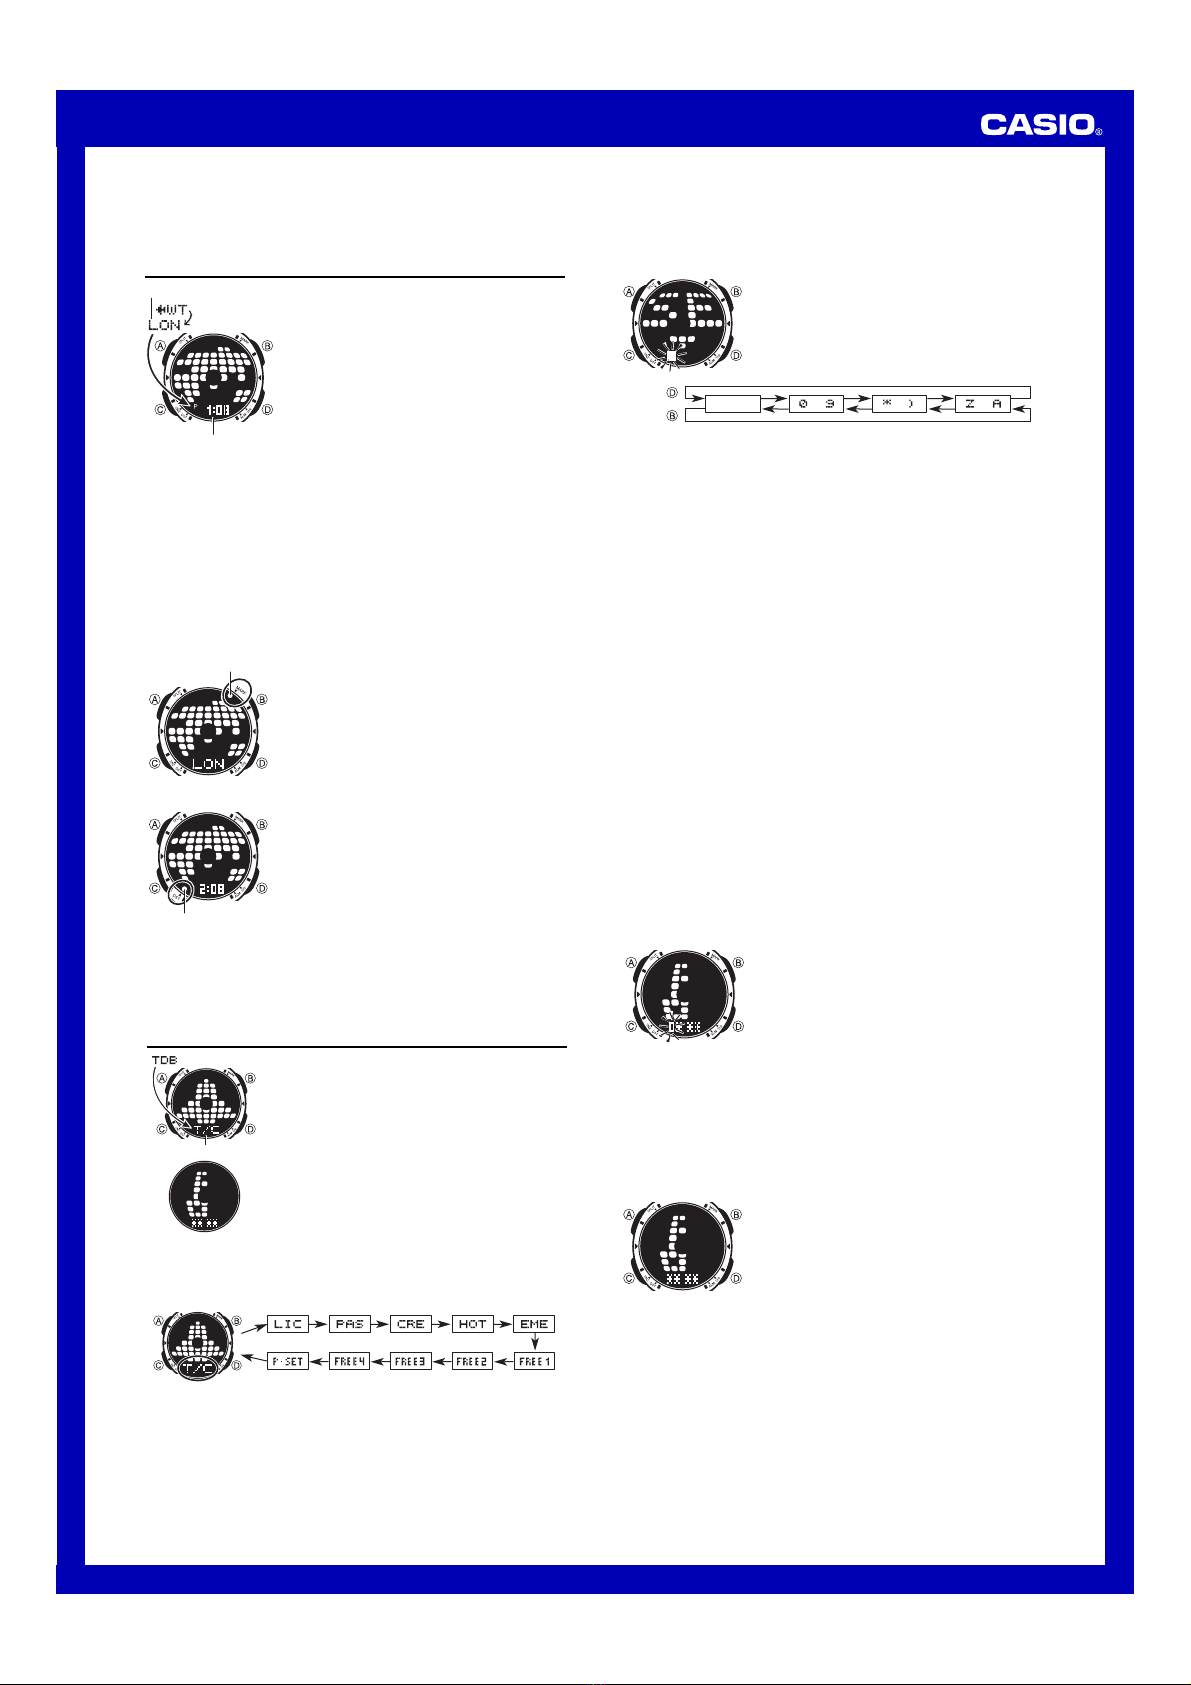
Data label
Password Screen
•If you add text to a data label, the data label appears first when you perform the
above procedure to select it. After that, the input text scrolls on the display, without
the data label.
•See “To input data label text” below for information about inputting.
To input data label text
1. In the Travel Data Bank Mode, use Dto display the
data label where you want to input text.
2. Hold down Auntil the flashing cursor appears on the
display, which indicates the setting screen.
3. Use Dand Bto change the character at the cursor
position. The character changes in the sequence shown
below.
Password Input Screen
Password Screen
To toggle a city code time between Standard Time and Daylight Saving Time
1. In the World Time Mode, use Dto display the city code
whose Standard Time/Daylight Saving Time setting you
want to change.
2. Hold down Afor about two seconds to toggle between
Daylight Saving Time (DST on indicator displayed) and
Standard Time (DST on indicator not displayed).
•The DST on indicator is on the display whenever you
display a city code for which Daylight Saving Time is
turned on.
•Note that the DST/Standard Time setting affects only
the currently displayed city code. Other city codes are
not affected.
•Note that holding down Ain step 2 of the above
procedure also turns the city code’s index mark on or
off. After selecting the Daylight Saving Time setting you
want, be sure to press Aagain to turn the index marker
on or off as you desire.
Travel Data Bank
The Travel Data Bank Mode provides you with a secure
place to store traveler’s check information, your passport
number, and other personal data. You can store both
numbers and text in the Travel Data Bank Mode. Travel
Data Bank Mode information can be protected by a
password, which is defined by you.
•The Travel Data Bank has 10 preset “data labels”, and
you can add text to each data label.
•All of the operations in this section are performed in the
Travel Data Bank Mode, which you enter by pressing
C.
•If \\ \\ appears when you try to enter the Travel Data
Bank Mode, perform the procedure under “To input the
password”.
To view Travel Data Bank Mode data
Each press of Din the Travel Data Bank Mode scrolls through the data labels in the
sequence shown below.
•The following are the meanings of the data labels.
T/C (Traveler’s Check), LICENSE (License), PASSPORT (Passport),
CREDIT (Credit Card), HOTEL (Hotel), EMERGENCY (Emergency), UrTT1
(Free 1), UrTTC (Free 2), UrTTD (Free 3), UrTT@ (Free 4), j|syt (Password
Setting screen).
•The Password Setting screen (j|syt) is for registering, changing, or deleting the
password that protects Travel Data Bank Mode data. For more information about
the password, see “Using a Password to Protect Travel Data Bank Data”.
•If the full text of a data label is unable to fit on the display, the label scrolls from right
to left.
(space) to to to
Press .
Press .
•You can input spaces, numbers, symbols, and alpha characters. For details, see
the “Character List”.
4. When the character you want is at the cursor position, press Cto move the cursor
to the right.
5. Repeat steps 3 and 4 until you have input all of the text you want.
•You can input up to 31 characters for each data label.
6. Press Ato exit the setting screen and display the text you have just input (without
the cursor).
•Only three characters of data label text can be shown at a time, so longer text
scrolls continuously from right to left. Scrolling pauses for about one second when
the first three characters and the last three characters of the text are on the display.
Press Ato stop and restart scrolling.
•Only the input text scrolls on the display, without the data label.
To edit data label text
1. In the Travel Data Bank Mode, use Dto display the data label whose text you
want to edit.
2. Hold down Auntil the flashing cursor appears on the display.
3. Use Cto move the flashing to the character you want to change.
4. Use Dand Bto change the character.
5. After making the changes you want, press Ato store them and display the new
text.
To delete data label text
1. In the Travel Data Bank Mode, use Dto display the data label whose text you
want to delete.
2. Hold down Auntil the flashing cursor appears on the display.
3. Press Band Dat the same time to delete the text.
•The word CLR appears to indicate that the text is being deleted. After the text is
deleted, the cursor appears on the display, ready for input.
4. Input new text or press Ato return to the data label for the text you have just
deleted.
Using a Password to Protect Travel Data Bank Data
You can register a 4-digit password to keep Travel Data Bank data secure.
Important!
Use a 4-digit password that is easy for you to remember, but difficult for others to
decipher. If you forget the password, you will have to have your watch initialized
(which deletes all Travel Data Bank data in memory) in order to access the Travel
Data Bank Mode again. To have the watch initialized, contact the store or dealer
where you purchased it, and ask to have the AC operation performed.
To register a new password
1. In the Travel Data Bank Mode, use Dto display the
Password Setting screen.
•This displays a screen that shows j|syt.
2. Hold down Afor about two seconds until the first
(leftmost) digit of the password starts to flash.
•This is the Password Input screen.
3. Use D(+) and B(–) to scroll through numbers at the
first digit.
4. When the first digit is the number you want, press Cto advance to the next digit.
5. Repeat steps 3 and 4 to input all four digits of the password you want.
6. After all four of the password digits are the way you want, press Cto register them
and return to the Password Setting screen.
•This causes SET to appear on the display indicating that the password is being
saved, and then the Password Setting screen appears.
•After registering a password, you can input, recall, edit and delete text, if you want.
After you exit the Travel Data Bank Mode, you will have to input the password every
time you want to enter the Travel Data Bank Mode again.
To input the password
1. Enter the Travel Data Bank Mode.
2. On the Password screen, press Bor D.
•This causes the first digit of the password to flash,
which indicates the Password Input screen.
3. Input the password.
•Use D(+) and B(–) to scroll through numbers at
each digit.
•Press Cto advance to the next digit.
4. After the password is the way you want, press C.
•If the input password matches the one registered, the word OK!appears, followed
by one of the data label screens.
•If the password does not match, the word NG!appears, followed by the Password
screen. If this happens, perform the above procedure again from step 2.
•If you make a mistake part way through inputting the password, press Ato return to
the Password screen.
To change the password
1. Enter the Travel Data Bank Mode by inputting the current password.
2. Use Dto display the Password Setting (j|syt) screen.
3. Perform the procedure starting from step 2 under “To register a new password” to
specify the new password.
To delete the password
1. Enter the Travel Data Bank Mode by inputting the current password.
2. Use Dto display the Password Setting screen.
USER’S GUIDE 2742
3
Alarm number
Alarm time
(Hour : Minutes)
Snooze
alarm
indicator
Alarm on
indicator
Hourly time signal on
indicator
1/100 second
Minutes Seconds
Alternate at
2-second intervals
3. Hold down Afor about two seconds until the first (leftmost) digit of the password
starts to flash.
4. Press Band Dat the same time to delete the password.
•The word CLR appears to indicate that the password is being deleted. After the
password is deleted, the Password Setting screen appears.
Alarms
You can set five independent Daily Alarms. When an
alarm is turned on, the alarm tone sounds when the alarm
time is reached. One of the alarms is a snooze alarm,
while the other four are one-time alarms.
You can turn on an Hourly Time Signal that causes the
watch to beep twice every hour on the hour.
•There are six screens in the Alarm Mode. Four are for
one-time alarms (indicated by numbers from AL1
through AL4), one is for a snooze alarm (indicated by
SNZ), and one is for the Hourly Time Signal (indicated
by SIG).
•All of the operations in this section are performed in the
Alarm Mode, which you enter by pressing C.
To set an alarm time
1. In the Alarm Mode, use Dto scroll through the alarm
screens until the one whose time you want to set is
displayed.
•To set a one-time alarm, display one of the screens
indicated by an alarm number from AL1 through
AL4. To set the snooze alarm, display the screen
indicated by SNZ.
•The snooze alarm repeats every five minutes.
2. After you select an alarm, hold down Auntil the hour setting of the alarm time
starts to flash, which indicates the setting screen.
•This operation automatically turns on the alarm.
3. Press Cto move the flashing between the hour and minute settings.
4. While a setting is flashing, use D(+) and B(–) to change it.
•When setting the alarm time using the 12-hour format, take care to set the time
correctly as a.m. (no indicator) or p.m. (Pindicator).
5. Press Ato exit the setting screen.
Alarm Operation
The alarm sounds at the preset time for about 10 seconds, regardless of the mode the
watch is in. In the case of the snooze alarm, the alarm operation is performed a total
of seven times, every five minutes, or until you turn the alarm off.
•Alarm and Hourly Time Signal operations are performed in accordance with the
Timekeeping Mode digital time.
•To stop the alarm tone after it starts to sound, press any button.
•Performing any one of the following operations during a 5-minute interval between
snooze alarms cancels the current snooze alarm operation.
Displaying the Timekeeping Mode setting screen
Changing the DST setting of the Home City code in the World Time Mode
Displaying the
SNZ
setting screen
To test the alarm
In the Alarm Mode, hold down Dto sound the alarm.
To turn an alarm on and off
1. In the Alarm Mode, use Dto select an alarm.
2. Press Ato toggle it on and off.
•Turning on a one-time alarm (AL1 through AL4)
displays the alarm on indicator on its Alarm Mode
screen.
•Turning on the snooze alarm (SNZ) displays the alarm
on indicator and snooze alarm indicator on the Alarm
Mode snooze alarm screen.
•In all modes, the alarm on indicator is shown for any
alarm that is currently turned on. When the snooze
alarm is on, the snooze alarm indicator is displayed in
all modes.
•The alarm on indicator flashes while the alarm is
sounding.
•The snooze alarm indicator flashes during the 5-minute intervals between alarms.
To turn the Hourly Time Signal on and off
1. In the Alarm Mode, use Dto select the Hourly Time
Signal (SIG).
2. Press Ato toggle it on and off.
•The Hourly Time Signal on indicator is shown on the
display in all modes while the Hourly Time Signal is
turned on.
To measure times with the stopwatch
Elapsed Time
Start Stop Re-start Stop Clear
Start Split Split release Stop Clear
Start Split Stop Split release Clear
Split Time
Two Finishes
First runner
finishes.
Display time of
first runner.
Second runner
finishes.
Display time of
second runner.
Reference
This section contains more detailed and technical information about watch operation.
It also contains important precautions and notes about the various features and
functions of this watch.
Auto Display Auto Display continually changes the contents of the
digital display.
To turn off Auto Display
Press any button (except for B) to turn off Auto Display.
To turn on Auto Display
Hold down Cfor about two seconds until the watch
beeps.
•Note that Auto Display cannot be performed while a
setting screen is on the display.
Auto Return Feature
•The watch automatically returns to the Timekeeping Mode if you do not perform any
button operation for two or three minutes in the Travel Data Bank, Alarm, or Hand
Setting Mode.
•If you leave a screen with flashing digits or a cursor on the display for two or three
minutes without performing any operation, the watch automatically exits the setting
screen.
Scrolling
The Band Dbuttons are used in various modes and setting screens to scroll
through data on the display. In most cases, holding down these buttons during a scroll
operation scrolls through the data at high speed.
Initial Screens
When you enter the World Time, Travel Data Bank, or Alarm Mode, the data you were
viewing when you last exited the mode appears first.
Timekeeping
•Resetting the seconds to 00 while the current count is in the range of 30 to 59
causes the minutes to be increased by 1. In the range of 00 to 29, the seconds are
reset to 00 without changing the minutes.
•With the 12-hour format, the P(PM) indicator appears on the display for times in the
range of noon to 11:59 p.m. and no indicator appears for times in the range of
midnight to 11:59 a.m.
•With the 24-hour format, times are displayed in the range of 0:00 to 23:59, without
any indicator.
•The day of the week is automatically displayed in accordance with the date (year,
month, and day) settings.
•The year can be set in the range of 2000 to 2099.
•The watch’s built-in full automatic calendar makes allowances for different month
lengths and leap years. Once you set the date, there should be no reason to change
it except after you have the watch’s batteries replaced.
World Time
•The World Time Mode times are calculated from the current Home City time setting
in the Timekeeping Mode, using the Greenwich Mean Time (GMT) differentials
associated with each city code.
•The GMT differential is a value that indicates the time difference between Greenwich
Mean Time and the time zone where a city is located.
•GMT differential is calculated by this watch based on Universal Time Coordinated
(UTC) data.
•Turning on DST in the World Time Mode for the city code that you have selected as
your Timekeeping Mode Home City code also turns on DST for the Home City time.
Backlight Precautions
The backlight uses an EL (electro-luminescent) panel that causes the entire display to
glow for easy reading in the dark. In any mode, press Bto illuminate the display for
about two seconds.
•Animated pattern movement becomes faster while the display is illuminated by the
backlight.
•Note that the backlight does not turn on while a setting screen, or the Travel Data
Bank Mode password screen or password input screen is on the display.
•The electro-luminescent panel that provides illumination loses power after very long
use.
•The illumination provided by the backlight may be hard to see when viewed under
direct sunlight.
•The watch may emit an audible sound whenever the display is illuminated. This is
due to vibration of the EL panel used for illumination, and does not indicate
malfunction.
•The backlight automatically turns off whenever an alarm sounds.
•Frequent use of the backlight shortens the battery life.
Stopwatch
The stopwatch lets you measure elapsed time, split times,
and two finishes.
•The display range of the stopwatch is 59 minutes,
59.99 seconds.
•The 1/100-second value appears while the elapsed time
operation is stopped or while a split time is frozen on the
display.
•The stopwatch continues to run, restarting from zero
after it reaches its limit, until you stop it.
•The stopwatch measurement operation continues even
if you exit the Stopwatch Mode.
•Exiting the Stopwatch Mode while a split time is frozen
on the display clears the split time and returns to
elapsed time measurement.
•All of the operations in this section are performed in the
Stopwatch Mode, which you enter by pressing C.
USER’S GUIDE 2742
4
Character List
*Based on data as of December 2002.
–11 –11 PAGO PAGO
HNL HONOLULU –10 PAPEETE
ANC ANCHORAGE –09 NOME
LAX
LOS ANGELES
–08 SAN FRANCISCO, LAS VEGAS, VANCOUVER, SEATTLE,
DAWSON CITY
DEN DENVER –07 EL PASO, EDMONTON
CHI CHICAGO –06 HOUSTON, DALLAS/FORT WORTH, NEW ORLEANS,
MEXICO CITY, WINNIPEG
NYC NEW YORK –05 MONTREAL, DETROIT, MIAMI, BOSTON, PANAMA CITY,
HAVANA, LIMA, BOGOTA
CCS CARACAS –04 LA PAZ, SANTIAGO, PORT OF SPAIN
RIO
RIO DE JANEIRO
–03 SAO PAULO, BUENOS AIRES, BRASILIA, MONTEVIDEO
–2 –02
–1 –01 PRAIA
GMT +00 DUBLIN, LISBON, CASABLANCA, DAKAR, ABIDJAN
LON LONDON
PAR PARIS +01 MILAN, ROME, MADRID, AMSTERDAM, ALGIERS,
HAMBURG, FRANKFURT, VIENNA, STOCKHOLM, BERLIN
CAI CAIRO +02 ATHENS, HELSINKI, ISTANBUL, BEIRUT, DAMASCUS,
JRS JERUSALEM CAPE TOWN
JED JEDDAH +03
KUWAIT, RIYADH, ADEN, ADDIS ABABA, NAIROBI, MOSCOW
THR TEHRAN +3.5 SHIRAZ
DXB DUBAI +04 ABU DHABI, MUSCAT
KBL KABUL +4.5
KHI KARACHI +05 MALE
DEL DELHI +5.5 MUMBAI, KOLKATA
DAC DHAKA +06 COLOMBO
RGN YANGON +6.5
BKK BANGKOK +07 JAKARTA, PHNOM PENH, HANOI, VIENTIANE
HKG HONG KONG +08 SINGAPORE, KUALA LUMPUR, BEIJING, TAIPEI, MANILA,
PERTH, ULAANBAATAR
TYO TOKYO +09 SEOUL, PYONGYANG
ADL ADELAIDE +9.5 DARWIN
SYD SYDNEY +10 MELBOURNE, GUAM, RABAUL
NOU NOUMEA +11 PORT VILA
WLG WELLINGTON +12 CHRISTCHURCH, NADI, NAURU ISLAND
City Code Table
City City GMT Other major cities in same time zone
Code Differential

Other Casio Watch manuals

Casio 3523 User manual

Casio

Casio 3523 User manual

Casio QW-791 Configuration guide

Casio

Casio QW-791 Configuration guide

Casio 2767 User manual

Casio

Casio 2767 User manual

Casio G-Shock Frogman GW-8230B-9AER User manual

Casio

Casio G-Shock Frogman GW-8230B-9AER User manual

Casio 5455 User manual

Casio

Casio 5455 User manual

Casio 3093 User manual

Casio

Casio 3093 User manual

Casio 5193 User manual

Casio

Casio 5193 User manual

Casio 3452 User manual

Casio

Casio 3452 User manual

Casio 1591 User manual

Casio

Casio 1591 User manual

Casio 5603 User manual

Casio

Casio 5603 User manual

Casio 4754 User manual

Casio

Casio 4754 User manual

Casio QW1382 Configuration guide

Casio

Casio QW1382 Configuration guide

Casio 5230 User manual

Casio

Casio 5230 User manual

Casio 5135 User manual

Casio

Casio 5135 User manual

Casio 2362 User manual

Casio

Casio 2362 User manual

Casio 5175 User manual

Casio

Casio 5175 User manual

Casio 5113 User manual

Casio

Casio 5113 User manual

Casio 5098 User manual

Casio

Casio 5098 User manual

Casio 3408 User manual

Casio

Casio 3408 User manual

Casio Baby-G BG1300-7 User manual

Casio

Casio Baby-G BG1300-7 User manual

Casio 5011 (W3) User manual

Casio

Casio 5011 (W3) User manual

Casio 5665 User manual

Casio

Casio 5665 User manual

Casio Baby-G BG1222G-1V User manual

Casio

Casio Baby-G BG1222G-1V User manual

Casio G-SHOCK DW6900 User manual

Casio

Casio G-SHOCK DW6900 User manual

Popular Watch manuals by other brands

Seiko 7002 instructions

Seiko

Seiko 7002 instructions

ice-watch ICE JUNIOR instruction manual

ice-watch

ice-watch ICE JUNIOR instruction manual

LOKMAT ATTACK 3 user manual

LOKMAT

LOKMAT ATTACK 3 user manual

IROX ER user manual

IROX

IROX ER user manual

MBI Corp Oslo Silver 100 Operating	 instruction

MBI Corp

MBI Corp Oslo Silver 100 Operating instruction

Timex W-90 product manual

Timex

Timex W-90 product manual

FOREVER ForeVigo 2 SW-310 user manual

FOREVER

FOREVER ForeVigo 2 SW-310 user manual

Rip curl SearchGPS quick start guide

Rip curl

Rip curl SearchGPS quick start guide

Trend News W335DD user guide

Trend News

Trend News W335DD user guide

NIXON REASON LS Instruction guide

NIXON

NIXON REASON LS Instruction guide

Seiko H024 instructions

Seiko

Seiko H024 instructions

Shenzhen Xinkeying Technology DT101 user manual

Shenzhen Xinkeying Technology

Shenzhen Xinkeying Technology DT101 user manual

Marathon WW194014 instructions

Marathon

Marathon WW194014 instructions

NIXON THE BASE user manual

NIXON

NIXON THE BASE user manual

Crossbeats S5 user manual

Crossbeats

Crossbeats S5 user manual

Long Boom Electronics LMW12 user manual

Long Boom Electronics

Long Boom Electronics LMW12 user manual

Trevi T-Fit 220 PLUS user manual

Trevi

Trevi T-Fit 220 PLUS user manual

Citizen C080 instruction manual

Citizen

Citizen C080 instruction manual

manuals.online logo
manuals.online logoBrands
  • About & Mission
  • Contact us
  • Privacy Policy
  • Terms and Conditions

Copyright 2025 Manuals.Online. All Rights Reserved.