Operation Guide 2941
4
•The auto light switch on indicator is on the display in all modes while the auto light
switch is turned on.
To specify the illumination duration
1. In the Timekeeping Mode, hold down Auntil the
seconds start to flash, which indicates the setting
screen.
2. Press Bto toggle the illumination duration setting
between 3 seconds ( ) and 1.5 seconds ( ).
3. Press Atwice to exit the setting screen.
|
|
|
|
|
|
|
|
|
|
|
Reference
This section contains more detailed and technical information about watch operation.
It also contains important precautions and notes about the various features and
functions of this watch.
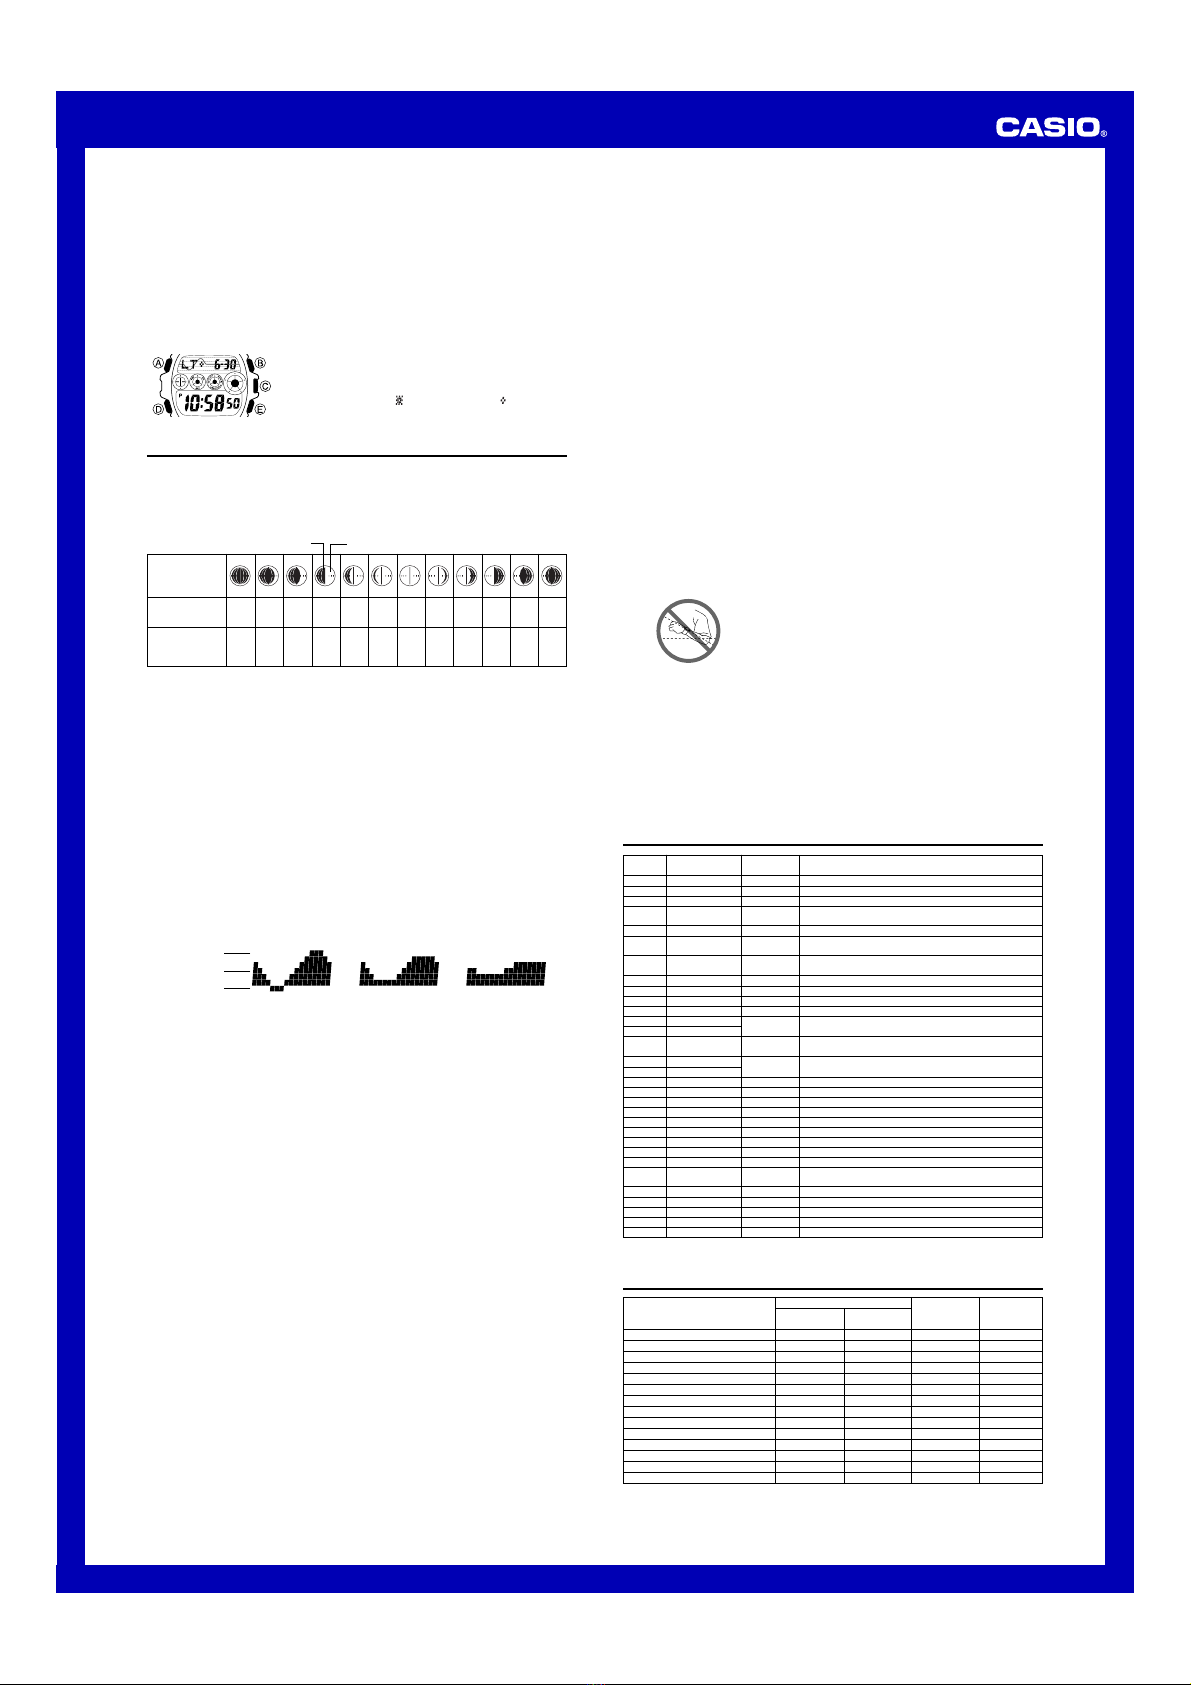
Moon Phase Indicator
The Moon phase indicator of this watch indicates the current phase of the Moon as
shown below.
Moon Phase
Indicator
Moon Age
Moon Phase
0, 1, 29
2 - 4 5, 6 7, 8 9, 10
11-13 14-16 17-19 20, 21 22, 23 24, 25 26-28
(part you cannot see) Moon phase (part you can see)
New
Moon
First
Quarter
(Waxing)
Full
Moon
Last
Quarter
(Waning)
•The Moon phase indicator shows the Moon as viewed at noon from a position in the
Northern Hemisphere looking south. Note that at times the image shown by the
Moon phase indicator may differ from that of the actual Moon in your area.
•The left-right orientation of the Moon phase is reversed when viewing from the
Southern Hemisphere or from a point near the equator.
Moon Phases and Moon Age
The Moon goes through a regular cycle that averages 29.53 days. During each cycle,
the Moon appears to wax and wane as the relative positioning of the Earth, Moon, and
Sun changes. The greater the angular distance between the Moon and the Sun,*the
more we see illuminated.
*The angle to the Moon in relation to the direction at which the Sun is visible from the
Earth.
This watch performs a rough calculation of the current Moon age starting from day 0
of the moon age cycle. Since this watch performs calculations using integer values
only (no fractions), the margin for error of the displayed Moon age is ±3 days.
Tide Graph
The Tide Graph screen shows one of three different waveforms to indicate spring tide,
intermediate tide, or neap tide as the current tide pattern. In addition, the current tide
level is indicated within the displayed tide pattern as a column of flashing dots.
•Spring Tide: Tides occurring at new and full Moons, when the range between high
and low tide is greatest.
•Neap Tide: Tides occurring at first and third Moon quarters, when the range between
high tide and low tide is smallest.
•Intermediate Tide: Indicates tide at the midpoint between spring tide and neap tide.
Low
Middle
High
Spring Tide Intermediate Tide Neap Tide
Tidal Movements
Tides are the periodic rise and fall of the water of oceans, seas, bays, and other
bodies of water caused mainly by the gravitational interactions between the Earth,
Moon and Sun. Tides rise and fall about every six hours. The tide graph of this watch
indicates tidal movement based on the Moon’s transit over a meridian and the lunitidal
interval. The lunitidal interval differs according to your current location, so you must
specify a lunitidal interval in order to obtain the correct tide graph readings.
•The tide graph displayed by this watch is based on the current Moon age.
Remember that the margin for error of the Moon age displayed by this watch is ±3
days. The greater the error in a particular Moon age, the greater the error in the
resulting tide graph.
Lunitidal Interval
Theoretically, high tide is at the Moon’s transit over the meridian and low tide is about
six hours later. Actual high tide occurs somewhat later, due to factors such as
viscosity, friction, and underwater topography. Both the time differential between the
Moon’s transit over the meridian until high tide and the time differential between the
Moon’s transit over the meridian until low tide are known as the “lunitidal interval.”
When setting the lunitidal interval for this watch, use the time differential between the
Moon’s transit over the meridian until high tide.
Auto Return Feature
If you leave a screen with flashing digits on the display for two or three minutes without
performing any operation, the watch automatically saves any settings you have made
up to that point and exits the setting screen.
Scrolling
The Band Ebuttons are used in various modes and setting screens to scroll
through data on the display. In most cases, holding down these buttons during a scroll
operation scrolls through the data at high speed.
•The year can be set in the range of 2000 to 2039.
•The watch’s built-in full automatic calendar makes allowances for different month
lengths and leap years. Once you set the date, there should be no reason to change
it except after you have the watch’s battery replaced.
Illumination Precautions
•The electro-luminescent panel that provides illumination loses power after very long
use.
•Illumination may be hard to see when viewed under direct sunlight.
•The watch may emit an audible sound whenever the display is illuminated. This is
due to vibration of the EL panel used for illumination, and does not indicate
malfunction.
•Illumination automatically turns off whenever an alarm operation (beep and
vibration) is performed.
•Frequent use of illumination runs down the battery.
More than 15 degrees
too high
Auto light switch precautions
•Wearing the watch on the inside of your wrist, movement of your arm, or vibration of
your arm can cause frequent activation of the auto light switch and illumination of the
display. To avoid running down the battery, turn off the auto light switch whenever
engaging in activities that might cause frequent illumination of the display.
•Illumination may not turn on if the face of the watch is
more than 15 degrees above or below parallel. Make
sure that the back of your hand is parallel to the ground.
•Illumination turns off after the preset illumination
duration (see “To specify the illumination duration”), even
if you keep the watch pointed towards your face.
•Static electricity or magnetic force can interfere with
proper operation of the auto light switch. If illumination
does not turn on, try moving the watch back to the
starting position (parallel with the ground) and then tilt it
back towards you again. If this does not work, drop your
arm all the way down so it hangs at your side, and then
bring it back up again.
•Under certain conditions, illumination may not turn on until about one second after
you turn the face of the watch towards you. This does not necessarily indicate
malfunction of the auto light switch.
•You may notice a very faint clicking sound coming from the watch when it is shaken
back and forth. This sound is caused by mechanical operation of the auto light
switch, and does not indicate a problem with the watch.
Pago Pago
Honolulu
Anchorage
Los Angeles
Denver
Chicago
New York
Caracas
Rio De Janeiro
London
Paris
City City GMT Other major cities in same time zone
Code
Differential
City Code Table
PPG
HNL
ANC
LAX
DEN
CHI
NYC
CCS
RIO
–––
–––
GMT
LON
PAR
–11.0
–10.0
–09.0
–08.0
–07.0
–06.0
–05.0
–04.0
–03.0
–02.0
–01.0
+00.0
+01.0
Papeete
Nome
San Francisco, Las Vegas, Vancouver,
Seattle/Tacoma, Dawson City
El Paso, Edmonton
Houston, Dallas/Fort Worth,
New Orleans, Mexico City, Winnipeg
Montreal, Detroit, Miami, Boston,
Panama City, Havana, Lima, Bogota
La Paz, Santiago, Port Of Spain
Sao Paulo, Buenos Aires, Brasilia, Montevideo
Praia
Dublin, Lisbon, Casablanca, Dakar, Abidjan
Milan, Rome, Madrid, Amsterdam, Algiers, Hamburg,
Berlin, Frankfurt, Vienna, Stockholm
Cairo
Jerusalem
Jeddah
Tehran
Dubai
Kabul
Karachi
Delhi
Dhaka
Yangon
Bangkok
Hong Kong
Tokyo
Adelaide
Sydney
Noumea
Wellington
+02.0
+03.0
+03.5
+04.0
+04.5
+05.0
+05.5
+06.0
+06.5
+07.0
+08.0
+09.0
+09.5
+10.0
+11.0
+12.0
Helsinki, Istanbul, Beirut, Damascus,
Cape Town, Athens
Kuwait, Riyadh, Aden, Addis Ababa, Nairobi, Moscow
Shiraz
Abu Dhabi, Muscat
Male
Mumbai, Kolkata
Colombo
Jakarta, Phnom Penh, Hanoi, Vientiane
Singapore, Kuala Lumpur, Beijing, Taipei, Manila, Perth,
Ulaanbaatar
Seoul, Pyongyang
Darwin
Melbourne, Guam, Rabaul
Port Vila
Christchurch, Nadi, Nauru Island
CAI
JRS
JED
THR
DXB
KBL
KHI
DEL
DAC
RGN
BKK
HKG
TYO
ADL
SYD
NOU
WLG
•Based on data as of June 2004.
To turn the auto light switch on and off
In any mode, hold down Lfor about two seconds to toggle the auto light switch on
(auto light switch on indicator displayed) and off (auto light switch on indicator not
displayed).
•In order to protect against runnning down the battery, the auto light switch will turn
off automatically approximately six hours after you turn it on. Repeat the above
procedure to turn the auto light switch back on if you want.
Timekeeping
•Resetting the seconds to 00 while the current count is in the range of 30 to 59
causes the minutes to be increased by 1. In the range of 00 to 29, the seconds are
reset to 00 without changing the minutes.
•With the 12-hour format, the P(PM) indicator appears on the display for times in the
range of noon to 11:59 p.m. and no indicator appears for times in the range of
midnight to 11:59 a.m.
•With the 24-hour format, times are displayed in the range of 0:00 to 23:59, without
any indicator.
Anchorage –9.0 –8.0 149°W 5:40
Bahamas –5.0 –4.0 77°W 7:30
Baja, California –7.0 –6.0 110°W 8:40
Bangkok +7.0 +8.0 101°E 4:40
Boston –5.0 –4.0 71°W 11:20
Buenos Aires –3.0 –2.0 58°W 6:00
Casablanca +0.0 +1.0 8°W 1:30
Christmas Island +14.0 +15.0 (*)158°W 4:00
Dakar +0.0 +1.0 17°W 7:40
Gold Coast +10.0 +11.0 154°E 8:30
Great Barrier Reef, Cairns +10.0 +11.0 146°E 9:40
Guam +10.0 +11.0 145°E 7:40
Hamburg +1.0 +2.0 10°E 4:50
Hong Kong +8.0 +9.0 114°E 9:10
Site/Lunitidal Interval Data List
GMT Differential Lunitidal
Site Standard DST/ Longitude Interval
Time Summer Time
*This watch does not support a GMT differential of +15.0.