Operation Guide 3429
E-40
To specify the illumination duration
1. In the Timekeeping Mode, hold down Auntil the
seconds start to flash, which indicates the setting
screen.
2. While the seconds are flashing, press Bto toggle the
setting between 1.5 seconds ( ) and 3 seconds ( ).
3. Press Atwice to exit the setting screen.
E-41
Reference
This section contains more detailed and technical information about watch operation.
It also contains important precautions and notes about the various features and
functions of this watch.
Moon Age
The Moon goes through a regular 29.53-day cycle. During each cycle, the Moon
appears to wax and wane as the relative positioning of the Earth, the Moon, and the
Sun changes. The greater the angular distance between the Moon and the Sun,* the
more we see illuminated.
* The angle to the Moon in relation to the direction at which the Sun is visible from
the Earth.
This watch performs a rough calculation of the current Moon age starting from day 0
of the moon age cycle. Since this watch performs calculations using integer values
only (no fractions), the margin for error of the displayed Moon age is ± 1 day.
E-42
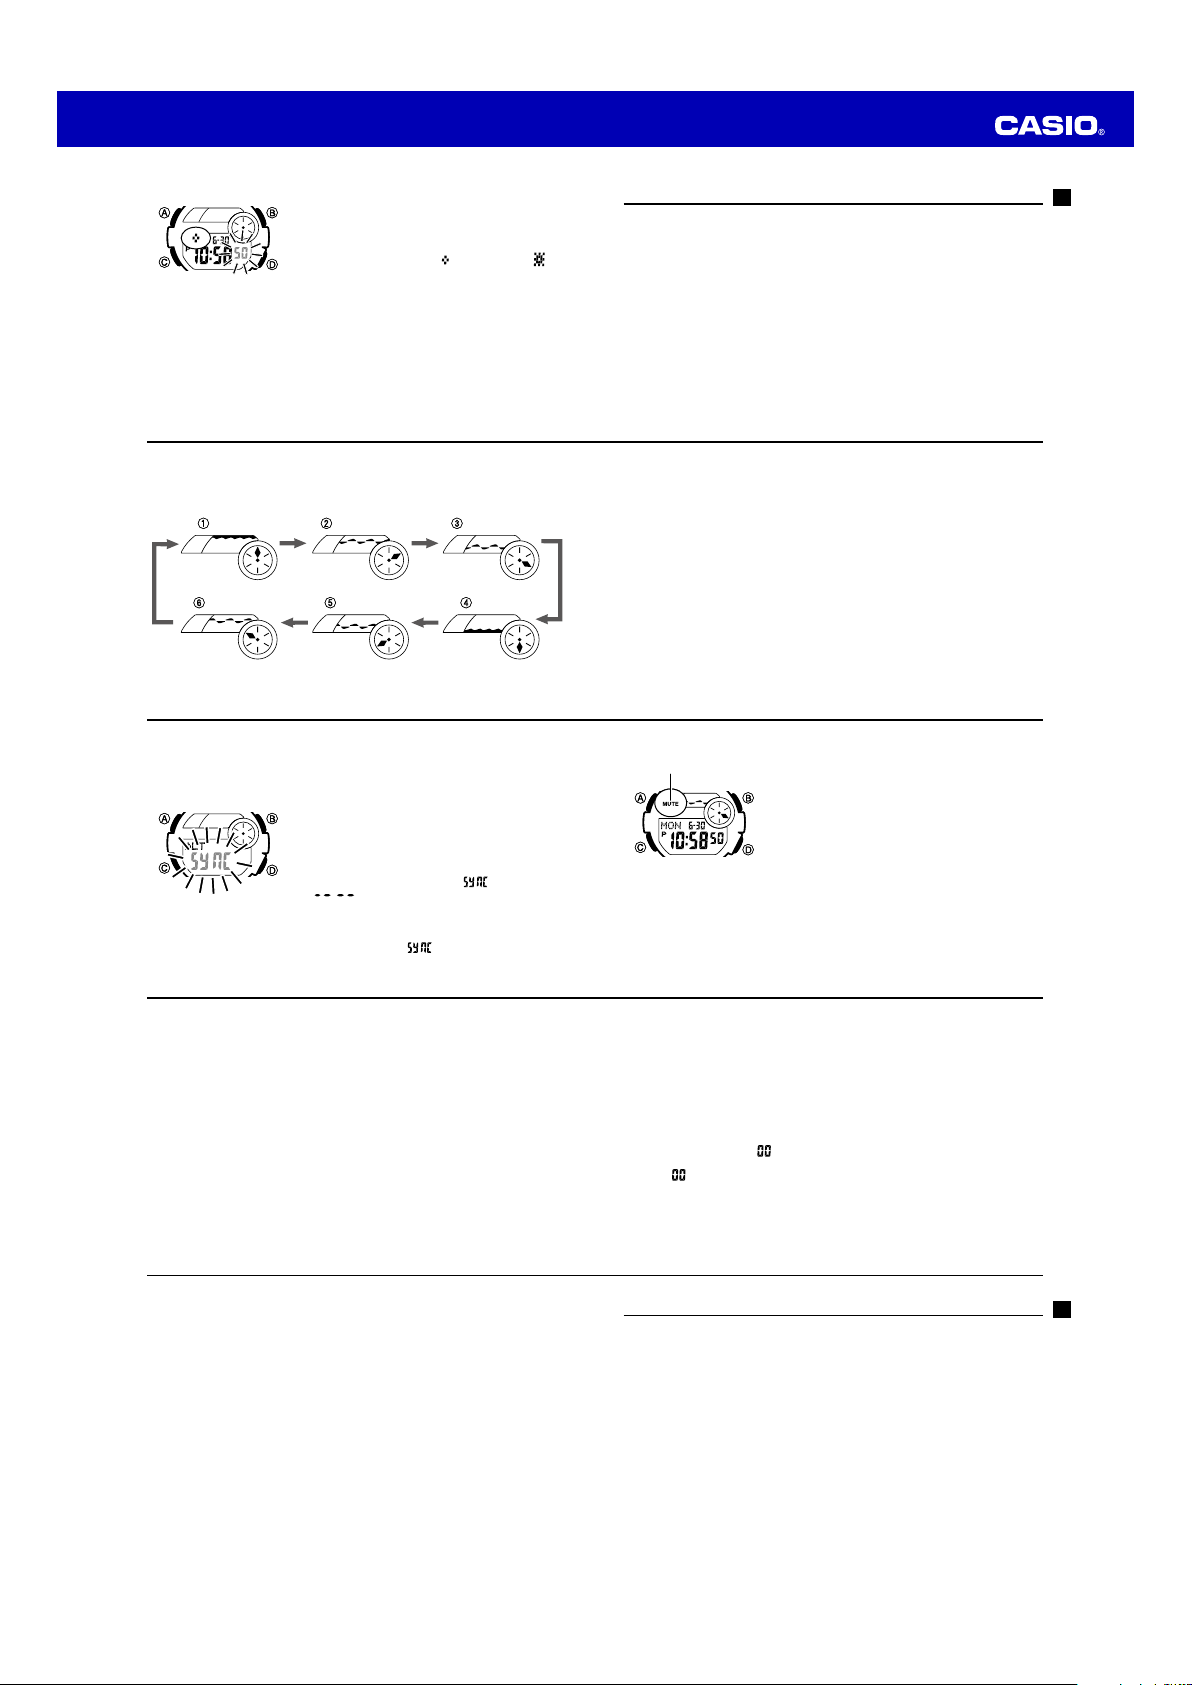
Tide Graph
The Tide Graph has six graphic patterns, each of which represents a different tide
condition. The current tide condition is indicated by the displayed graphic pattern.
High Tide Falling Tide Falling Tide
Low TideRising TideRising Tide
E-43
Tidal Movements
Tides are the periodic rise and fall of the water of oceans, seas, bays, and other
bodies of water caused mainly by the gravitational interactions between the Earth,
Moon and Sun. Tides rise and fall about every six hours. The tide graph of this watch
indicates tidal movement based on the Moon’s transit over a meridian and the lunitidal
interval. The lunitidal interval differs according to your current location, so you must
specify a lunitidal interval in order to obtain the correct tide graph readings.
The tide graph displayed by this watch is based on the current Moon age.
Remember that the margin for error of the Moon age displayed by this watch is ± 1
day. The greater the error in a particular Moon age, the greater the error in the
resulting tide graph.
Lunitidal Interval
Theoretically, high tide is at the Moon’s transit over the meridian and low tide is about
six hours later. Actual high tide occurs somewhat later, due to factors such as
viscosity, friction, and underwater topography. Both the time differential between the
Moon’s transit over the meridian until high tide and the time differential between the
Moon’s transit over the meridian until low tide are known as the “lunitidal interval”.
When setting the lunitidal interval for this watch, use the time differential between the
Moon’s transit over the meridian until high tide.
E-44
Flash Alert
When Flash Alert is turned on, the illumination flashes for the alarms, the Hourly Time
Signal, the countdown alarm, and stopwatch auto start.
To turn Flash Alert on and off
1. In the Timekeeping Mode, hold down Auntil the
seconds start to flash, which indicates the setting
screen.
2. Press Ceight times to display the Flash Alert setting
screen.
3. Press Dto toggle Flash Alert on ( displayed) and
off ( displayed).
4. Press Atwice to exit the setting screen.
•The Flash Alert setting you select with the above
procedure is applied in all modes.
•When Flash Alert is on, appears for about one
second whenever you enter the Stopwatch, Countdown
Timer, or Alarm Mode. E-45
Button Operation Tone
The button operation tone sounds any time you press one
of the watch’s buttons. You can turn the button operation
tone on or off as desired.
•Even if you turn off the button operation tone, the
alarms, the Hourly Time Signal, the countdown alarm,
and stopwatch auto start all operate normally.
To turn the button operation tone on and off
In any mode (except when a setting screen is on the
display), hold down Cto toggle the button operation tone
on (mute indicator not displayed) and off (mute indicator
displayed).
•Holding down Cto turn the button operation tone on or off also causes the watch’s
current mode to change.
•The mute indicator is displayed in all modes when the button operation tone is
turned off.
Mute indicatorMute indicator
E-46
Auto Return Features
•If you leave the watch in the Alarm Mode or Tide/Moon Data Mode for two or three
minutes without performing any operation, it changes to the Timekeeping Mode
automatically.
•If you leave a screen with flashing digits on the display for two or three minutes
without performing any operation, the watch exits the setting screen automatically.
Scrolling
The Band Dbuttons are used in various modes and setting screens to scroll
through data on the display. In most cases, holding down these buttons during a scroll
operation scrolls at high speed.
Initial Screens
When you enter the World Time or Alarm Mode, the data you were viewing when you
last exited the mode appears first.
E-47
UTC
•The UTC differential is a value that indicates the time difference between a
reference point in Greenwich, England and the time zone where a city is located.
•The letters UTC is the abbreviation for Coordinated Universal Time, which is the
world-wide scientific standard of timekeeping. It is based upon carefully maintained
atomic (cesium) clocks that keep time accurately to within microseconds. Leap
seconds are added or subtracted as necessary to keep UTC in sync with the
Earth’s rotation.
Timekeeping
•Resetting the seconds to while the current count is in the range of 30 to 59
causes the minutes to be increased by 1. In the range of 00 to 29, the seconds are
reset to without changing the minutes.
•The year can be set in the range of 2000 to 2099.
•The watch’s built-in full automatic calendar makes allowances for different month
lengths and leap years. Once you set the date, there should be no reason to
change it except after you have the watch’s battery replaced.
E-48
World Time
•The seconds count of the World Time is synchronized with the seconds count of the
Timekeeping Mode.
•All World Time Mode times are calculated from the current time in the Timekeeping
Mode using UTC time differential values.
Illumination Precautions
•The electro-luminescent panel that provides illumination loses power after very long
use.
•Illumination may be hard to see when viewed under direct sunlight.
•The watch may emit an audible sound whenever the display is illuminated. This is
due to vibration of the EL panel used for illumination, and does not indicate
malfunction.
•Illumination turns off automatically whenever an alarm sounds.
•Frequent use of illumination runs down the battery.
E-49
Specifications
Accuracy at normal temperature: ± 30 seconds a month
Timekeeping: Hour, minutes, seconds, p.m. (P), month, day, day of the week
Time format: 12-hour and 24-hour
Calendar system: Full Auto-calendar pre-programmed from the year 2000 to 2099
Other: Daylight Saving Time (summer time)/Standard Time; Home Site data
settings (UTC differential, longitude, lunitidal interval)
Tide/Moon Data: Moon age for specific date; Tide level for specific date and time
World Time: 48 cities (29 time zones)
Other: Daylight Saving Time/Standard Time
Stopwatch:
Measuring unit: 1/100 second
Measuring capacity: 23:59' 59.99''
Measuring modes: Elapsed time, split time, two finishes
Other: Auto-Start