
Operation Guide 5235/5414 (OC)
E-15
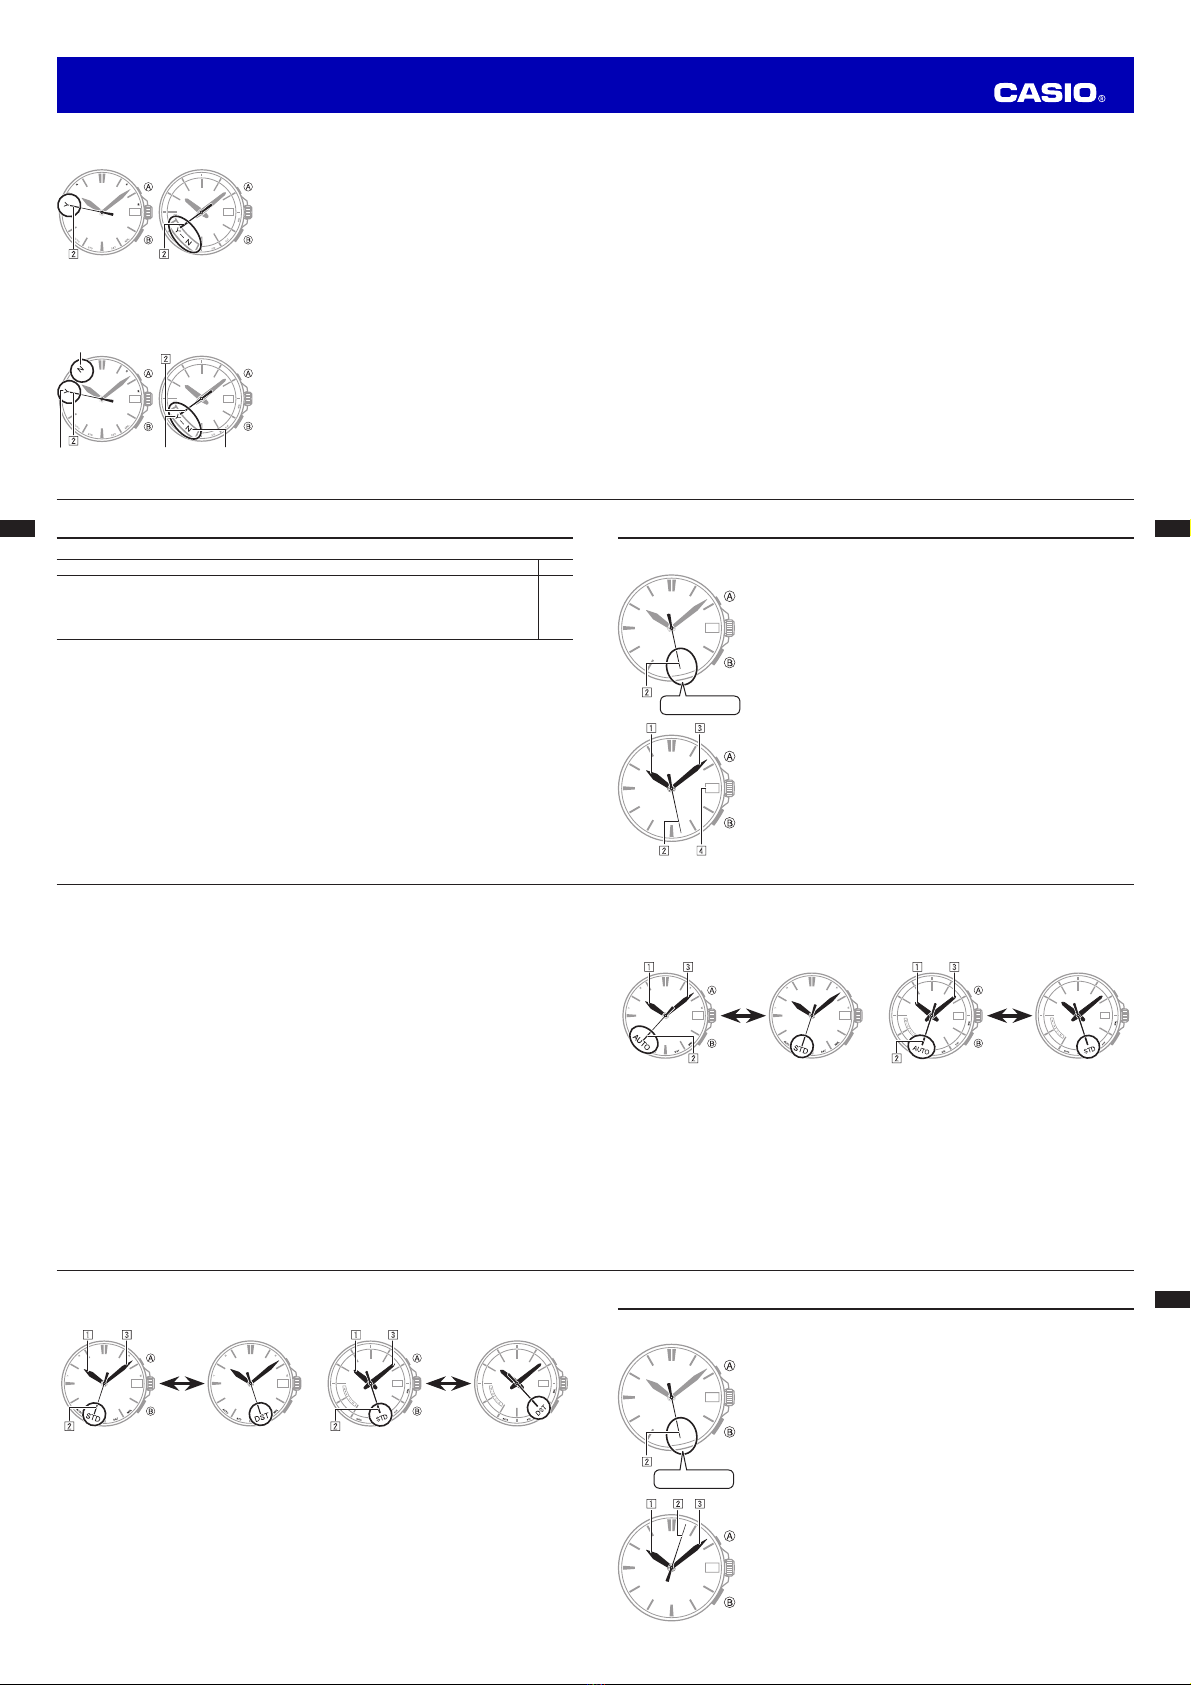
To perform manual receive
1. Keep Bdepressed for at least two seconds as the
Second Hand goes through the following
sequence.
xMoves to YES (or Yfor some models) or NO (N) to indicate the last signal reception result, then to
READY (R).
2. The
Second Hand indicates the operations the watch is currently performing.
When the 2
Second Hand is
pointed here: It means this:
READY (R) Watch is setting up for reception.
WORK (W) Reception is in progress.
YES (Y) Reception was completed successfully.
NO (N) Reception failed for some reason.
xIf signal reception is unstable, the 2
Second Hand may move between WORK
(W) and READY (R).
xWhen the receive operation is successful, the watch adjusts the time setting
accordingly, and then resumes regular timekeeping. It does not adjust the
setting if the operation failed.
Note
xTo interrupt a receive operation and return to regular timekeeping, press any
button.
Module 5235
Module 5414
30
2
30
2
E-14
xSignal reception may be difficult or even impossible under the conditions described below.
Inside or among
buildings
Inside a vehicle Near household
appliances,
office
equipment, or a
mobile phone
Near a
construction
site, airport, or
other sources of
electrical noise
Near high-
tension power
lines
Among
or behind
mountains
2. What you should do next depends on whether you are using Auto Receive or Manual Receive.
xAuto Receive: Leave the watch over night in the location you selected in step 2. See “Auto Receive”
for details.
xManual Receive: Perform the operation under “To perform manual receive”.
Auto Receive
xWith Auto Receive, the watch performs the receive operation each day automatically up to six times
(up to five times for the Chinese calibration signal) between the hours of midnight and 5 a.m. When any
receive operation is successful, none of the other receive operations for that day are performed.
xWhen a calibration time is reached, the watch will perform the receive operation. The receive operation
is not performed if a calibration time is reached while you are configuring settings.
E-13
B
Note
xEven if you are within the normal reception range of a time calibration signal, reception may be made
impossible by the following factors: geographic contours, weather, the season, the time of day, wireless
noise.
xAs of June 2013, China does not use Daylight Saving Time (DST). If China does go to the Daylight Saving
Time system in the future, some functions of this watch may no longer operate correctly.
To get ready for a receive operation
1. Place the watch in a location where signal reception is good.
12 o’clock
or
xPosition the watch as shown in the nearby illustration,
with 12 o’clock pointed towards a window. Make sure
there are no metal objects nearby.
xSignal reception normally is better at night.
xThe receive operation takes from two to seven minutes,
but in some cases it can take as long as 14minutes.
Take care that you do not perform any button operation
or move the watch during this time.
E-12 B
Approximate Reception Ranges
Japan (JJY)
The Japan time signal radio stations are located on Mt. Otakadoya in Fukushima and Mt. Hagane in
Fukuoka/Saga.
The reception range of the Japanese time signals is approximately 1,000 km from each transmission
station.
China (BPC)
The China time signal radio station is located in Shangqiu, Henan Province, China.
The reception range of the Chinese time signal is approximately 1,500 km from the transmission station.
United States (WWVB)
The United States time signal radio station is located in Fort Collins, Colorado.
The reception range of the U.S. time signal is approximately 3,000 km from the transmission station.
U.K. (MSF)/Germany (DCF77)
The U.K. time signal radio station is located in Anthorn, Cumbria.
The German time signal radio station is located in Mainflingen, southeast of Frankfurt.
The reception range of the U.K. and German time signals is approximately 1,500 km from each
transmission station.
E-11
B
Radio Controlled Atomic Timekeeping
This watch receives a time calibration signal and updates its time setting accordingly. However, when
using the watch outside of areas covered by time calibration signals, you will have to adjust the settings
manually as required. See “Configuring Current Time and Date Settings Manually” (page E-23) for more
information.
This section explains how the watch updates its time settings when the city code selected as the Home
City is in Japan, North America, Europe, or China, and is one that supports time calibration signal
reception.
If your Home City Code setting is this: The watch can receive the signal from the transmitter
located here:
LONDON (LON), PARIS (PAR), ATHENS (ATH) Anthorn (England), Mainflingen (Germany)
HONG KONG (HKG) Shangqiu City (China)
TOKYO (TYO) Fukushima (Japan), Fukuoka/Saga (Japan)
NEW YORK (NYC), CHICAGO (CHI),
DENVER (DEN), LOS ANGELES (LAX),
ANCHORAGE (ANC), HONOLULU (HNL)
Fort Collins, Colorado (United States)
E-10
Power Saving
Power Saving enters a sleep state automatically whenever the watch is left for a certain period in an area
where it is dark. The table below shows how watch functions are affected by Power Saving.
xThere actually are two sleep state levels: “second hand sleep” and “function sleep”.
Elapsed Time in Dark Operation
60 to 70 minutes (second hand sleep) 2
Second Hand only stopped at 12 o’clock, all other functions enabled
6 or 7 days (function sleep) xAll functions, including timekeeping, disabled
xInternal timekeeping maintained
xThe watch will not enter a sleep state between 6:00 AM and 9:59 PM. If the watch is already in a sleep
state when 6:00 AM arrives, however, it will remain in the sleep state.
To recover from the sleep state
Move the watch to a well-lit area or press any button.
E-9
Power Recovery Mode
The watch is designed to go into a power recovery mode that stops hand operation temporarily whenever
power suddenly drops below a certain level due to continuous signal reception or other operations over a
short period. Note that all operations are disabled while the watch is in the power recovery mode.
The hands will move to the correct positions and the watch will resume normal operation after power
recovers (in about 15 minutes). Putting the watch in a location where it is exposed to light will help power
to recover sooner.
Charging Times
Exposure Level (Brightness) Daily
Operation *1
Level Change *2
Level 3 Level 2 Level 1
Outdoor sunlight (50,000 lux) 8 minutes 3 hours 30 hours
Window sunlight (10,000 lux) 30 minutes 7 hours 111 hours
Window sunlight on cloudy day (5,000 lux) 48 minutes 11 hours 178 hours
Indoor fluorescent lighting (500 lux) 8 hours 120 hours – – –
*1 Approximate exposure each day to generate power for normal daily operation.
*2 Approximate exposure to take power up one level.
xThe above times are for reference only. Actual times depend on lighting conditions.
xFor details about the operating time and daily operating conditions, see the “Power Supply” section of
the Specifications (page E-34).
E-8
Important!
xKeep the watch in an area normally exposed to bright light when storing it for long periods. This helps
to ensure that power does not run down.
xStoring the watch for long periods in an area where there is no light or wearing it in such a way that it is
blocked from exposure to light can cause power to run down. Make sure that the watch is exposed to
bright light whenever possible.
Power Levels
You can get an idea of the watch’s power level by observing the movement of
the
Second Hand.
xIf the
Second Hand is moving normally at one-second intervals, power is
at Level 1.
xIf the
Second Hand is moving at two-second intervals, power is at Level 2,
which is quite low. Expose the watch to light as soon as possible so it can
charge (Low battery alert).
Level Hand Movement Function Status
1 Normal. All functions enabled
22
Second Hand moves at two-second intervals.
4
Day Indicator changes to 1(home position).
Time calibration signal
reception disabled
3
2
Second Hand stopped.
1
Hour Hand and 3
Minute Hand stopped at
12 o’clock.
All functions disabled
xWhen power drops to Level 3, all settings (including timekeeping) will be cleared. Recharging the
battery will reset all settings to their initial factory defaults.
Moves at two-second
intervals.
1
4
2
31


 User manual")


