Operation Guide 3511
EN-29
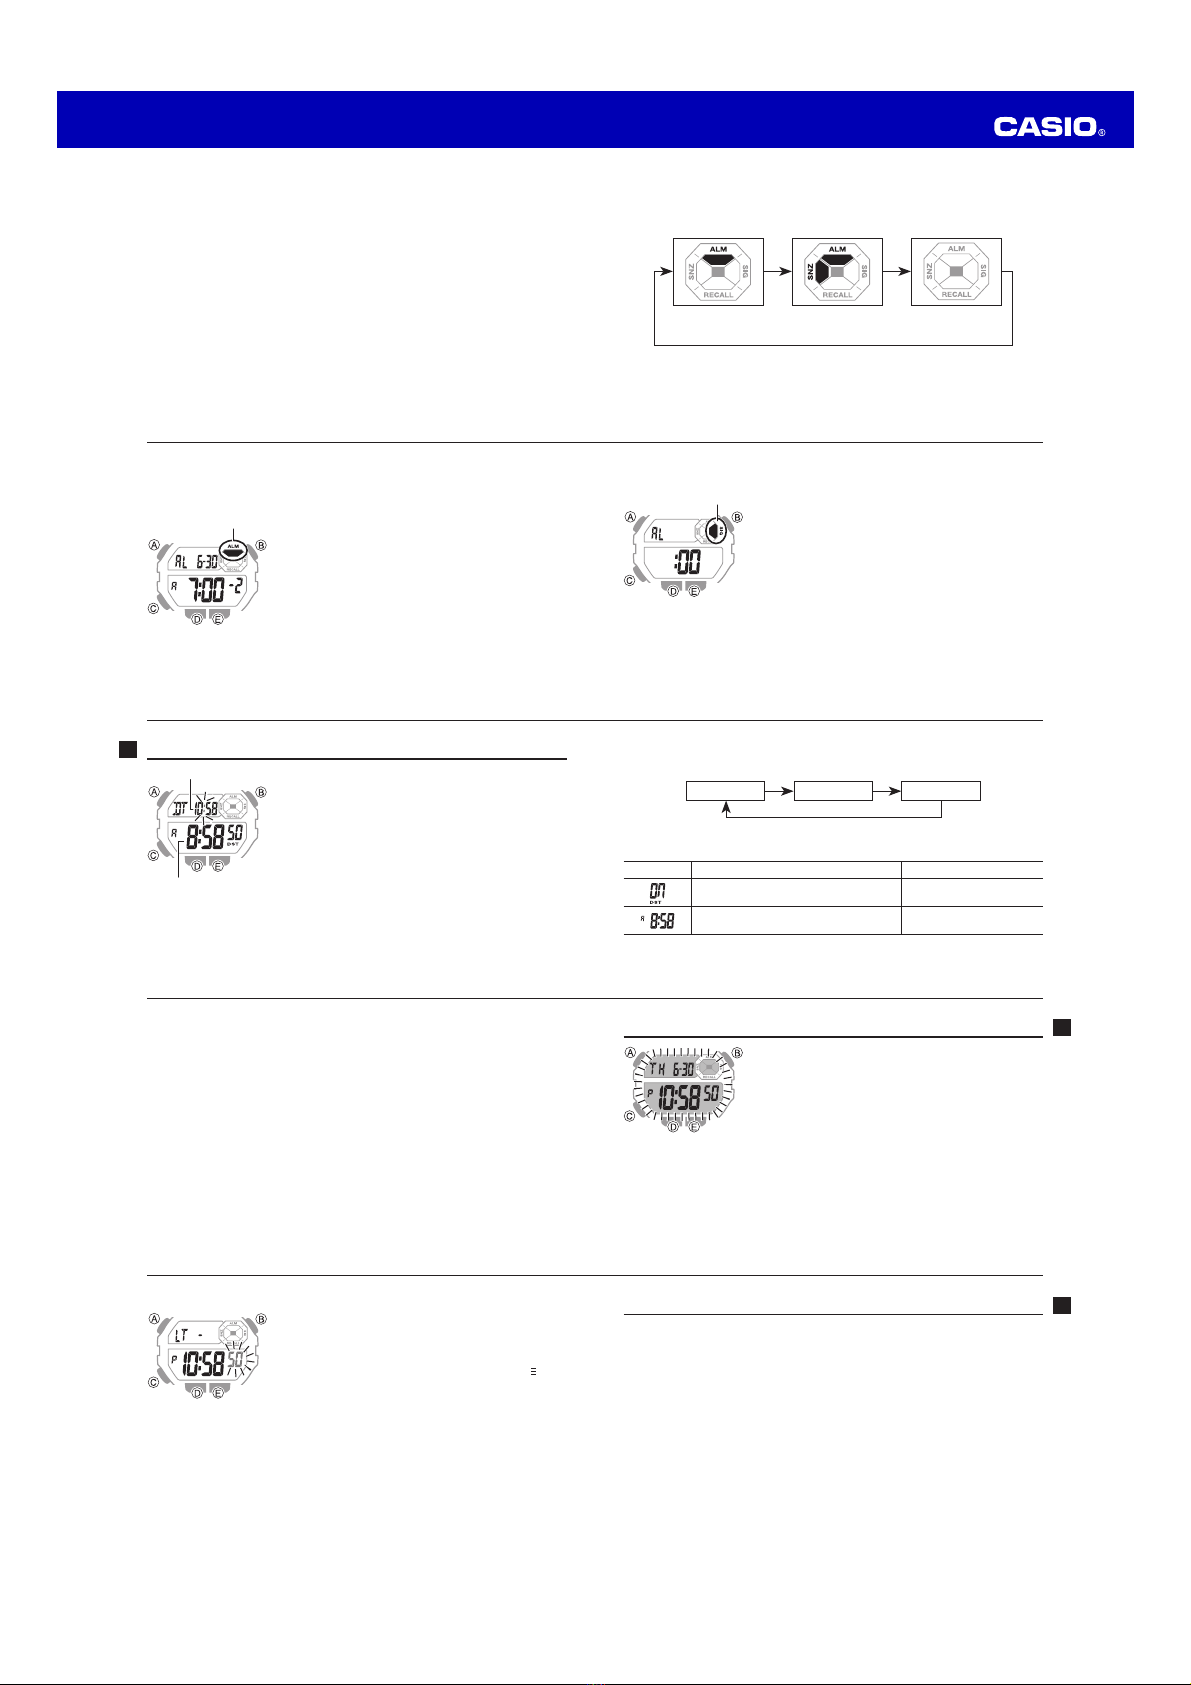
To recall stopwatch time records
1. In the Stopwatch Mode, check to make sure that the displays reset to all zeros
(page EN-19).
xIf all zeros are not displayed, reset the stopwatch.
2. Use the Ebutton to select either the lap time screen (to view lap time records) or
the split time screen (to view split time records) (pages EN-20 and EN-23).
xTo convert a lap time saved in the Stopwatch Mode to a split time, select the
split time screen.
3. Press the Cbutton to enter the Recall Mode.
4. Use the Abutton to scroll through the log title screens from the newest to the
oldest until the title screen of the log whose records you want to view is displayed.
5. Use D(forward) and E(back) to scroll through records in lap number sequence.
EN-28
Recall Mode
Use the Recall Mode to recall and delete logs and records
you stored in the Stopwatch Mode. You can use the
Recall Mode to view both lap and split time records.
xWhen you enter the Recall Mode, the newest log
recorded in the Stopwatch Mode will appear first. If
there are no logs in memory, –– – – appears on the
display.
xYou can use the Recall Mode to check memory data
even while a stopwatch elapsed time measurement
operation is in progress. However, the time data that is
currently being measured will not appear in the Recall
Mode.
xYou can convert a lap time saved in the Stopwatch
Mode to a split time (page EN-29).
Log Title Screen
Day of week
Log number
Month – Day
EN-27
How stopwatch data is stored
The following table shows how stopwatch data is stored when you perform
stopwatch button operations.
Stopwatch Button Operation Data Storage Description
From all-zeros, press Dto start. Creates a new log. Stores the date the button was
pressed, and the new log number.
Press Eto display lap/split time.
Creates a new record with each button operation.
Stores the lap and split times and total elapsed time
at each point the button is pressed.
Press Dto stop elapsed time
measurement and then press E
to reset.
Resets the elapsed time to all zeros without recording
data.
xSee “Recall Mode” (page EN-28) for details on how to recall time records from
memory.
EN-26
Memory Management
A new log is created each time you press Din the Stopwatch Mode to start a new
elapsed time measurement operation. A log contains a log title screen, and records
of all the lap or split times you record during the current elapsed time measurement
operation.
xThe capacity of the watch’s memory is 60 records.
xIf you are adding records to a log when there are multiple logs in memory and
watch memory becomes full, adding another record causes the oldest log in
memory and all of its records to be deleted automatically to make room for new
records.
EN-25
To time first and second place finishes
1. When the stopwatch display shows all zeros, press Eto display the split time
screen (indicated by SPL).
2. Press Dto start a time measurement.
3. Press Ewhen the first finisher crosses the finish line.
xThis freezes the time of the first finisher in the lower part of the display for about
eight seconds. After that, the display returns to elapsed time measurement.
4. Press Dwhen the second finisher crosses the finish line.
xThe second finisher’s time will appear in the lower display.
xThe difference between the first finisher’s and the second finisher’s time will
appear in the upper display.
5. Press Eto clear the stopwatch to all zeros.
EN-24
4. Repeat step 3 to record more split times.
5. Press Dto stop the stopwatch.
6. Press Eto clear the stopwatch to all zeros.
xSplit numbers are incremented automatically starting
from 1whenever you press Ein step 3 of the
above procedure. The maximum split number is
99. Recording a split time after that causes the split
number count to restart from 00.
Split Time Recording
(Displayed for eight seconds
after Eis pressed.)
Split number
Split time
EN-23
To measure elapsed time with split times
1. When the stopwatch display shows all zeros, press E
to display the split time screen (indicated by SPL).
2. Press Dto start an elapsed time measurement.
xAt the time, both the upper and lower displays will
show identical times.
3. Press Eto record the time of the first split.
xThe current split time appears in the lower display
for about eight seconds, as the total elapsed time,
next lap time, and next split time continue to be
timed internally by the watch. The split number of the
displayed time appears in the upper display.
xAfter eight seconds, the ongoing lap time
measurement appears in the upper display and the
ongoing elapsed time measurement appears in the
lower display.
Lap time
Elapsed time
EN-22
4. Repeat step 3 to record more lap times.
5. Press Dto stop the stopwatch.
6. Press Eto clear the stopwatch to all zeros.
xLap numbers are incremented automatically starting from 1whenever you press
Ein step 3 of the above procedure. The maximum lap number is 99. Recording
a lap after that causes the lap number count to restart from 00.
EN-21
Lap time
Elapsed time Lap number
Lap time
xThis freezes the current lap time in the upper part of the display for about
eight seconds, while measurement of total elapsed time and the next lap time
continue internally. The lap number of the displayed time appears in the lower
display.
xAfter eight seconds, the ongoing elapsed time measurement re-appears in the
lower display.
EN-20
To measure elapsed time with lap times
1. When the stopwatch display shows all zeros, press E
to display the lap time screen (indicated by LAP).
2. Press Dto start an elapsed time measurement.
xAt the time, both the upper and lower displays will
show identical times.
3. Press Eto record the time of the first lap.


 User manual")