Operation Guide 5035
4
To view the time in another city
In the World Time Mode, use Dto move the stopwatch second hand to the
city code of the city you want to select as the World Time city.
•The hour hand, minute hand, and date display will change automatically to
the applicable settings for the currently selected city code.
•The day of the week hand shows whether or not Daylight Saving Time
(summer time) is turned off for the currently selected city code.
•All buttons (except for Cfor changing modes) are disabled while the hands
and date display are changing.
•The watch will beep if the city code you select is your current Home City.
•For full information on city codes, see the “City Code Table”.
To toggle a city code time between Standard Time and Daylight
Saving Time
1. In the World Time Mode, use Dto select the
city code whose Standard Time/Daylight
Saving Time setting you want to change.
2. Hold down Afor about three seconds until
the watch beeps. This will cause the day of the
week hand to toggle between ON (Daylight
Saving Time) and OFF (Standard Time).
•Note that you cannot switch between Standard
Time and Daylight Saving Time while GMT is
selected as the city code.
•Note that the Standard Time/Daylight Saving
Time setting affects only the currently
displayed city code. Other city codes are not
affected.
•The Standard Time/Daylight Saving Time
setting of your Home City can be changed in
the Timekeeping Mode only. See “To set the
time and date manually”for more information.
Hold down
Afor three
seconds.
▲
▲
Swapping your Home City and World Time City
You can use the procedure below to swap your Home City and World Time
city. This changes your Home City to your World Time city, and your World
Time city to your Home City. This capability can come in handy when you
frequently travel between two cities in different time zones.
•If your current World Time city supports receipt of a time calibration signal,
making it your Home City enables calibration signal reception.
To swap your Home City and World Time city
1. In the World Time Mode, use Dto select the World Time city you want.
2. Hold down Bfor about three seconds until the watch beeps twice.
•This will make the World Time city (which you selected in step 1), your
Home City. At the same time, it changes the Home City you had selected
prior to step 2 your World Time city.
•After swapping the Home City and World Time city, the watch stays in the
World Time Mode with the city that was selected as the Home City prior to
step 2 now displayed as the World Time city.
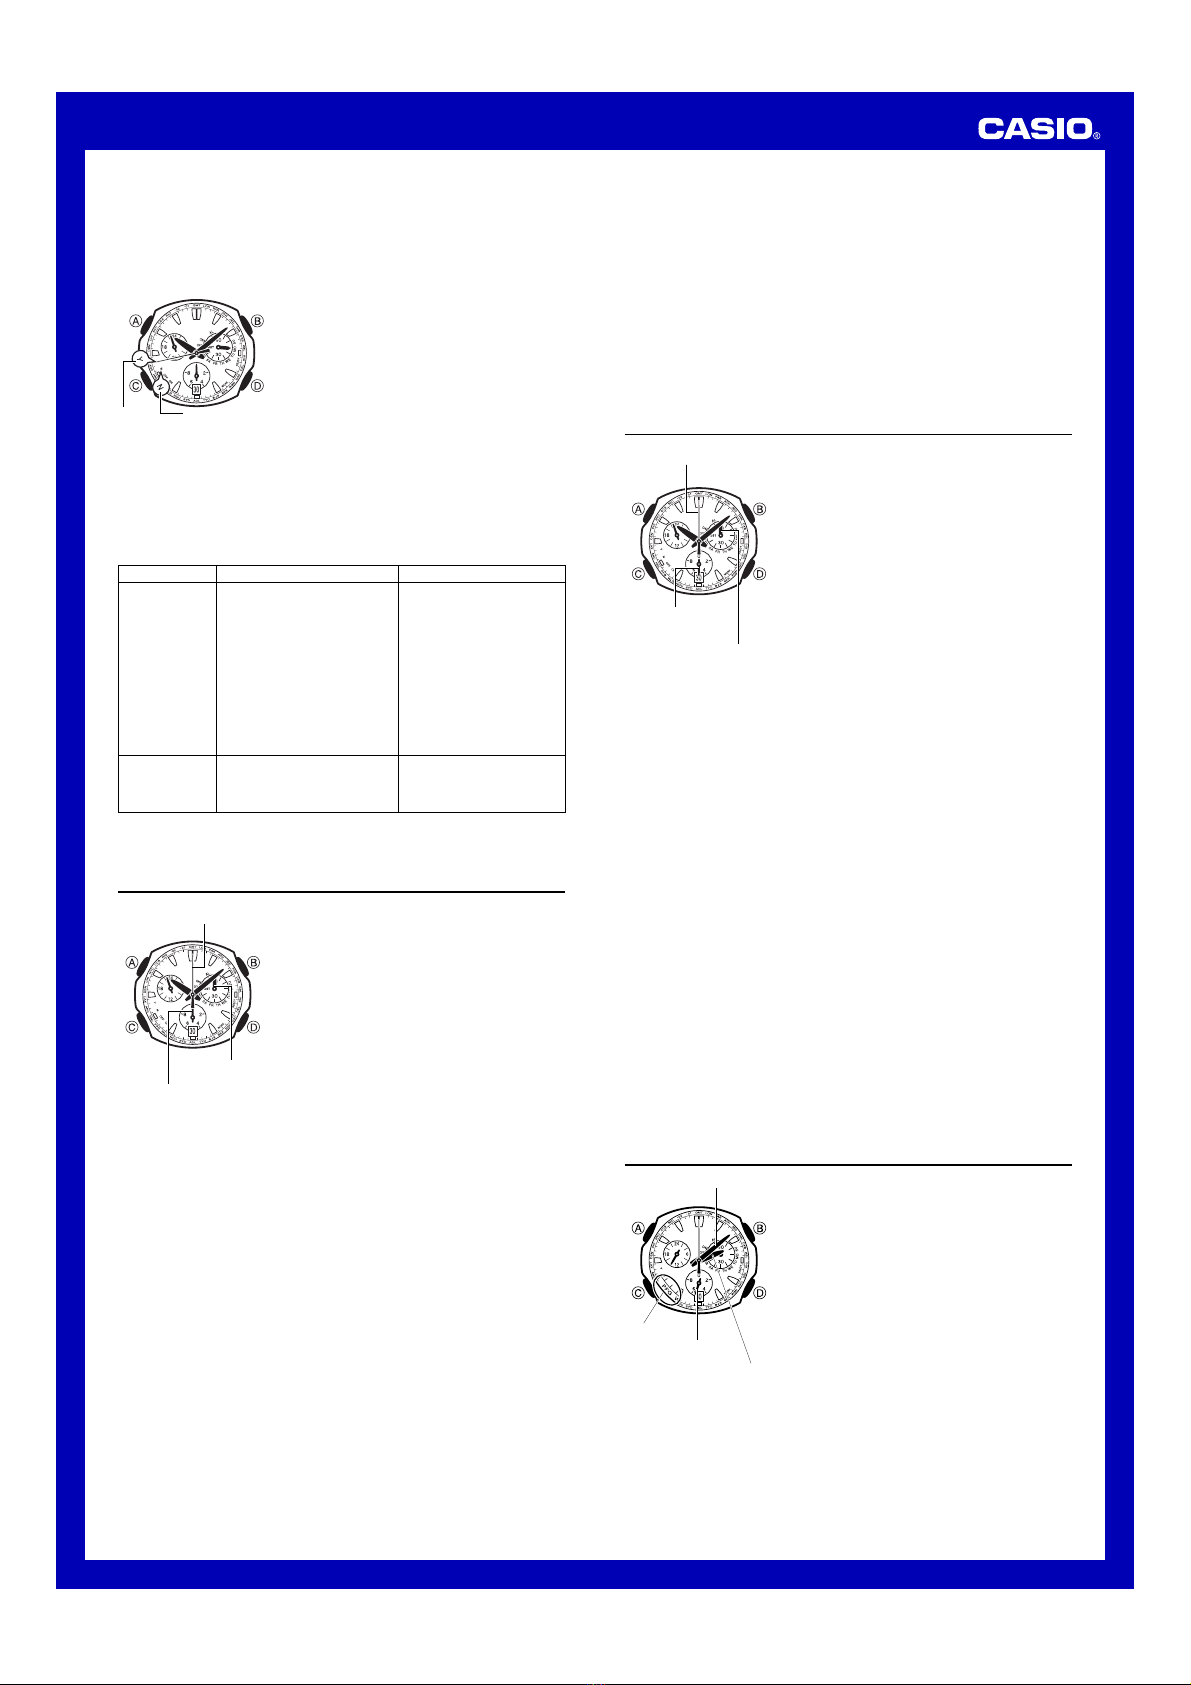
Alarm
When the alarm is turned on, the alarm sounds
when the alarm time is reached.
•The day of the week hand points to AL while
the watch is in the Alarm Mode. The stopwatch
second hand points to the current alarm on
(ON)/off (OFF) setting, while the hour, minute,
and 24-hour hands indicate the current alarm
time setting.
•All of the operations in this section are
performed in the Alarm Mode.
To set an alarm time
1. In the Alarm Mode, hold down Afor about
three seconds until the watch beeps. This
indicates it is in the setting mode.
•The stopwatch second hand will move to
ON (alarm on) at this time.
Mode
indicator
Alarm time
(minute)
Alarm time (hour)
2. Use D(+) and B(–) to change the alarm time setting.
•Each press of either button moves the hands one-minute.
3. After setting the alarm time, press Ato exit the setting mode.
•Setting the alarm time causes the alarm to turn on automatically.
•As you set the alarm time, take care to ensure that the 24-hour hand also is
at the correct position.
Alarm Operation
The alarm tone sounds at the preset time for 10 seconds, regardless of the
mode the watch is in.
•Alarm operations are performed in accordance with the Timekeeping Mode
time.
•Pressing any button stops the alarm tone operation.
To toggle an alarm on and off
In the Alarm Mode, press Ato toggle the alarm ON and OFF.
Adjusting the Home Positions
If the time and date settings are wrong even after the time calibration signal is
received normally, use the following procedure to adjust their home positions.
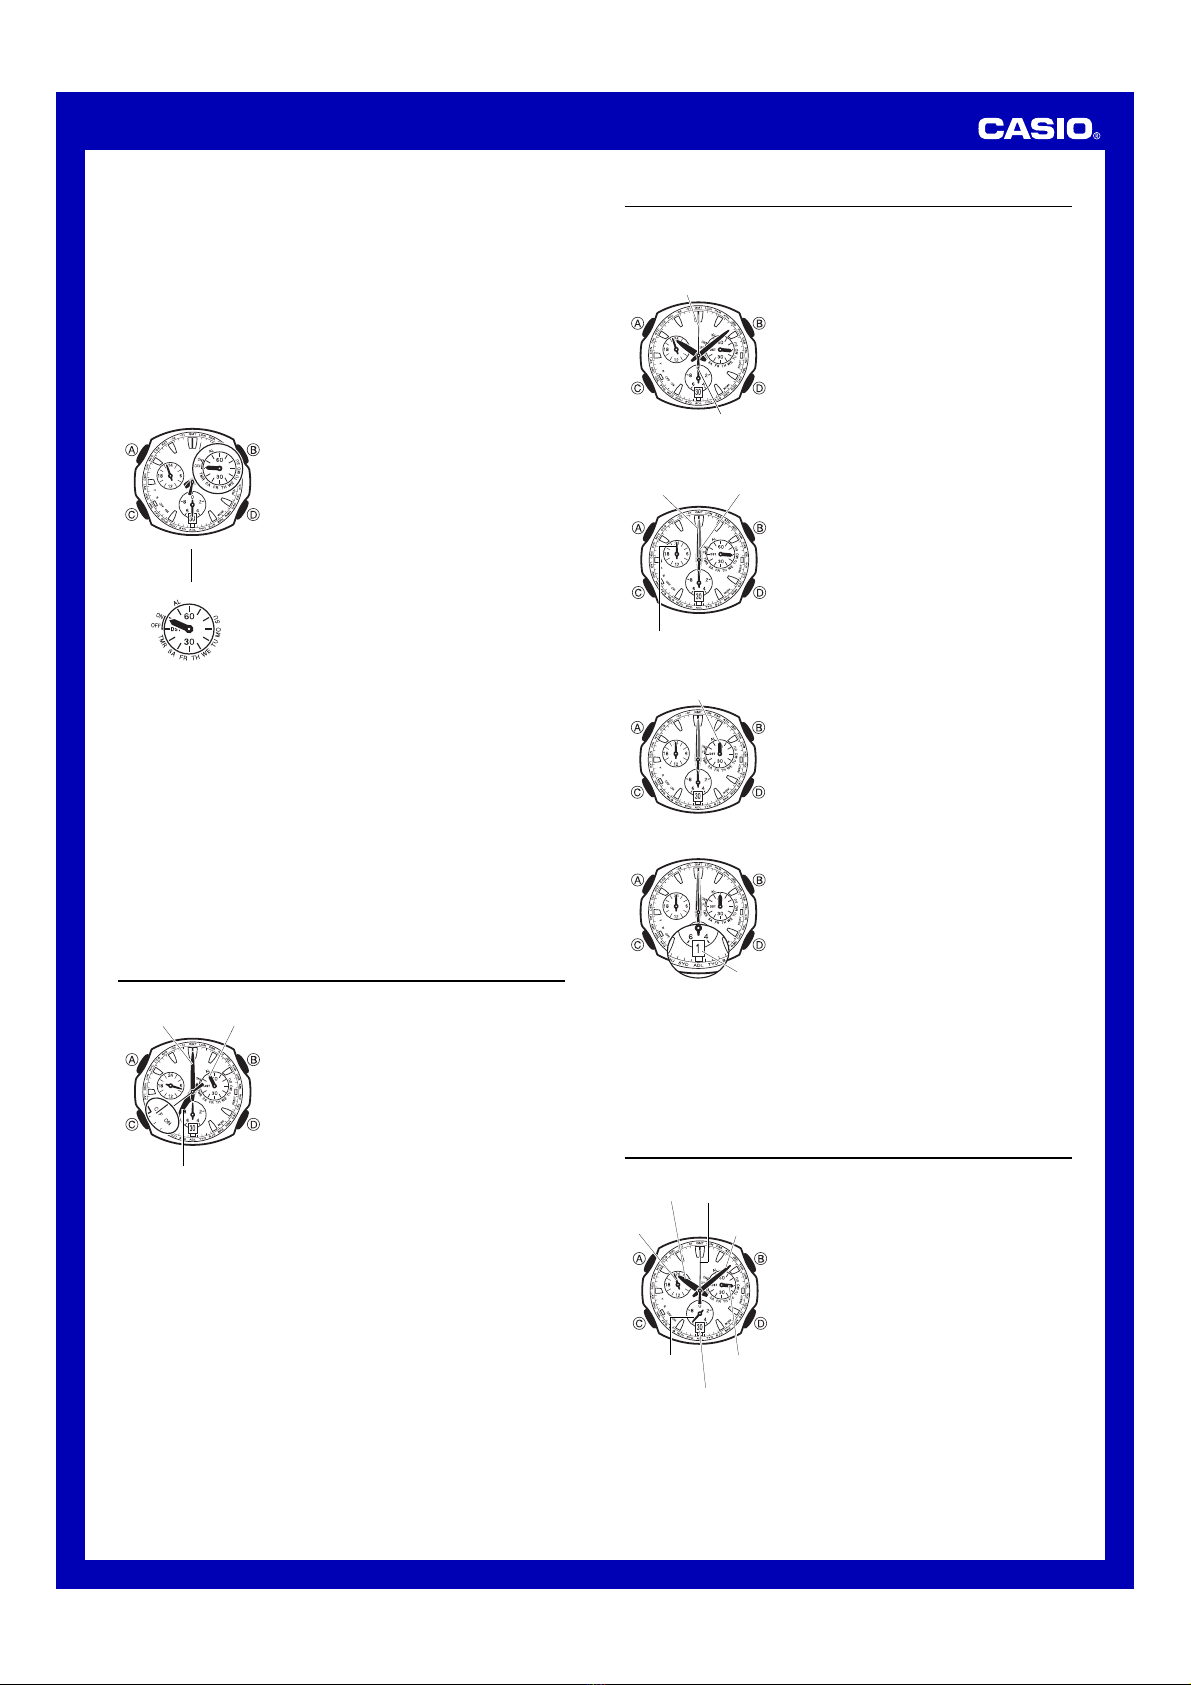
To adjust the home positions
1. In the Timekeeping Mode, as you hold down
A, hold down Cfor about three seconds
until the watch beeps.
•This indicates that the watch is in the time
and date home position adjustment mode.
•First is timekeeping second hand and
stopwatch second hand home position
adjustment.
•If the timekeeping second hand moves to
“0”, it is in the correct home position. If it
doesn’t, use Dto move the timekeeping
second hand to “0”.
Stopwatch second hand
Correct timekeeping second
hand and stopwatch second
hand home positions
Timekeeping
second hand
•The stopwatch second hand is also in the
proper home position if it moves to 12
o’clock. If it doesn’t, press Bto move it to
12 o’clock.
2. After confirming that the timekeeping second
hand and stopwatch second hand are both at
the proper home positions, press C.
This will switch to hour hand and minute hand
home position adjustment.
•The hour hand and minute hand are at their
proper home positions if they both move to
12 o’clock, and if the 24-hour hand is
pointing at hour 24. If the hands are not
positioned correctly, use D(+) and B(–)
to move all three hands to their proper home
positions.
•The 24-hour hand moves in accordance
with the hour, minute, and second settings.
As you set the time, take care to ensure that
the 24-hour hand also is at the correct
position.
Minute hand Hour hand
24-hour hand
Correct hour and minute
hand home position
3. After confirming that the hour and minute
hands are in the correct home position, press
C. This will advance to day of the week hand
home position adjustment.
•The day of the week hand is in the correct
home position if it is pointing at 0(or 60). If it
isn’t, use D(+) and B(–) to move the
hand to 0(or 60).
4. After confirming that the day of the week hand
is in the correct home position, press C. This
will advance to date home position
adjustment.
•The date is in the correct home position if it
shows “1”. If it doesn’t, use D(+) and B
(–) to change the date to “1”.
•Pressing Chere will return to the
timekeeping second hand and stopwatch
second hand home position adjustment in
step 1 of this procedure.
Date
Day of the week hand
Correct day of the week
hand home position
Correct date home position
5. Press Ato return to the Timekeeping Mode.
•After you complete the home position adjustment procedure, place the
watch in a location that allows good time calibration signal reception, and
then perform a manual receive operation. See “To perform manual receive”
for more information.
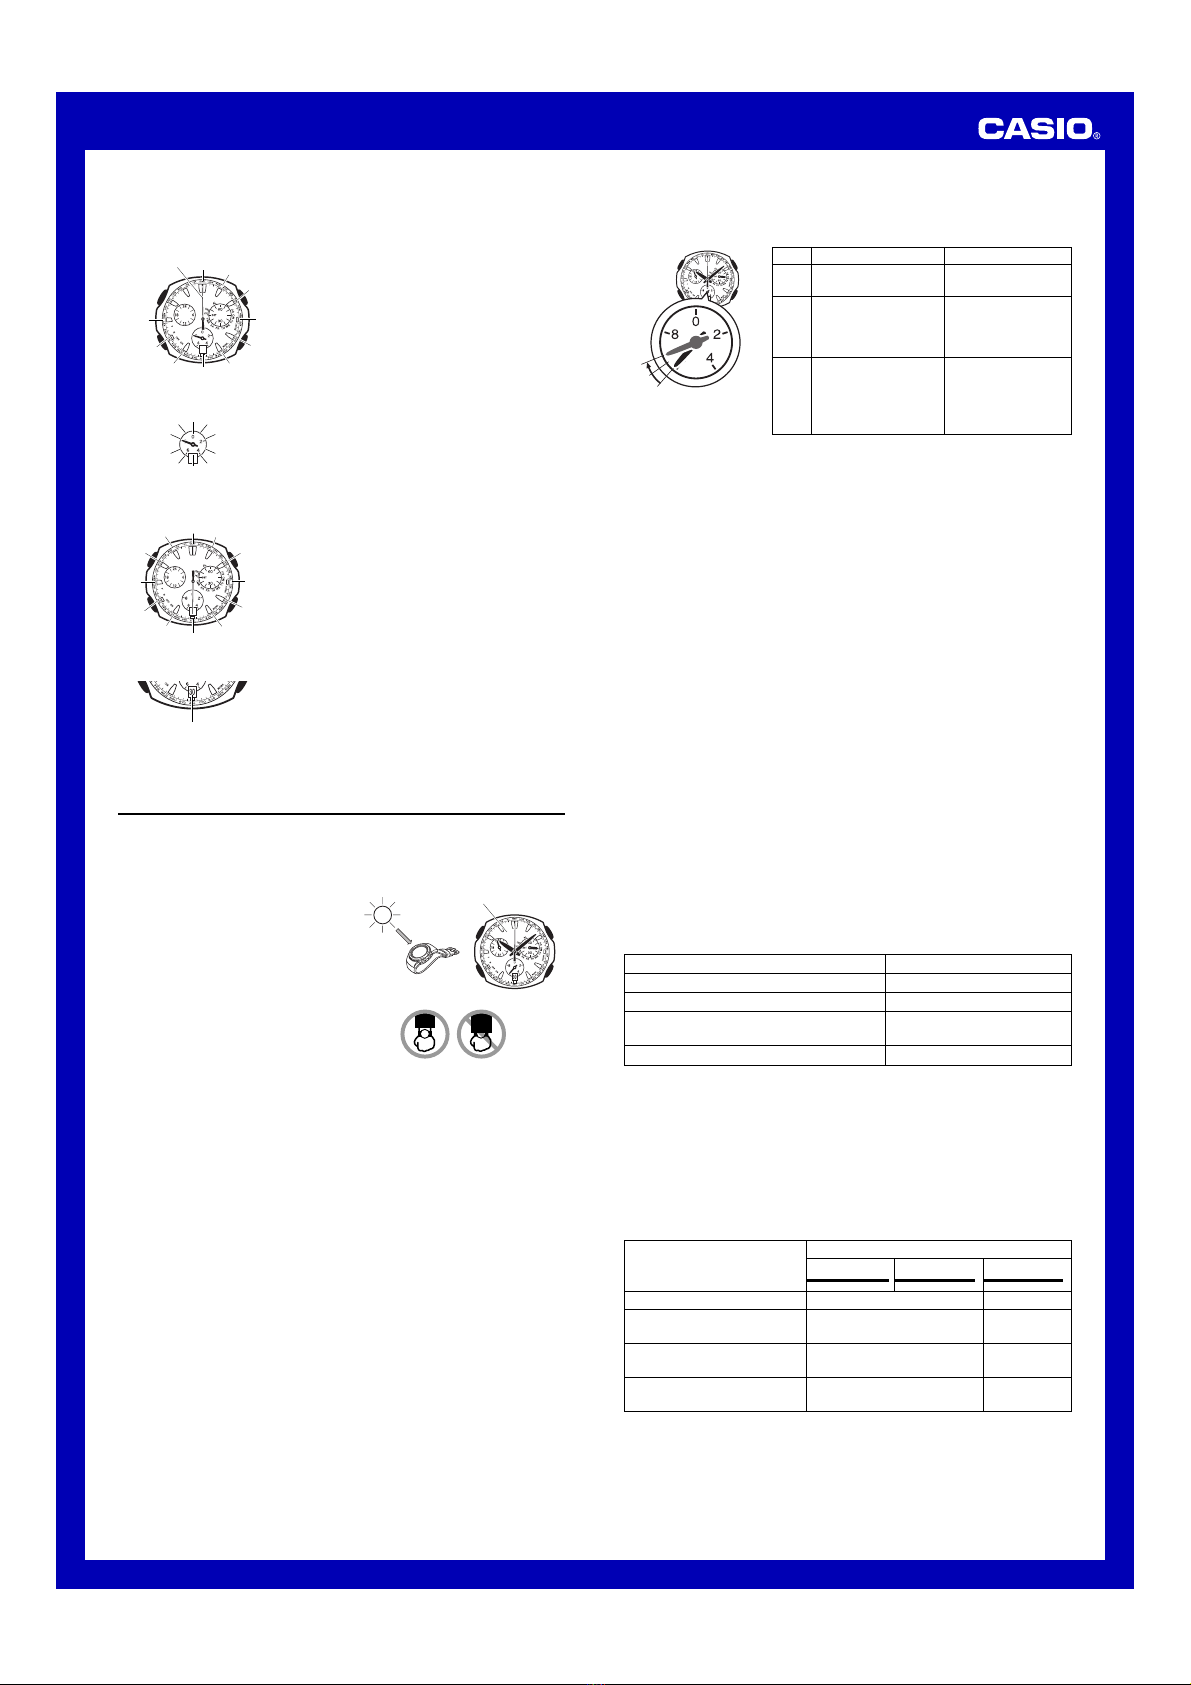
Timekeeping
Use the Timekeeping Mode to set and view the
current time and date. This section also explains
how to set the current date and time manually.
•All of the operations in this section are
performed in the Timekeeping Mode.
To set the time and date manually
1.
In the Timekeeping Mode, hold down Afor
about five seconds until the watch beeps twice.
•The stopwatch second hand will move to the
city code of the currently selected Home
City. This is the city code setting mode.
•The second hand will stop at “0”.*
* Some models show “60”instead of “0”.
2. Use Dto change the Home City setting.
•For full information on city codes, see the
“City Code Table”.
Hour hand
Timekeeping
second hand
Minute
hand
24-hour
hand
Day of the
week hand
Stopwatch
second hand
Date
3. Use Bto toggle the DST setting on (ON) and off (OFF).
•Even after you change the DST setting, you can still use Dto select a
different Home City code if you want.
4. After the Home City and DST settings are the way you want, press C.
•This will cause the watch to beep, and the stopwatch second hand and
day of the week hand to move to their 12 o’clock positions. This is the
time setting mode.