Operation Guide 3419
E-9
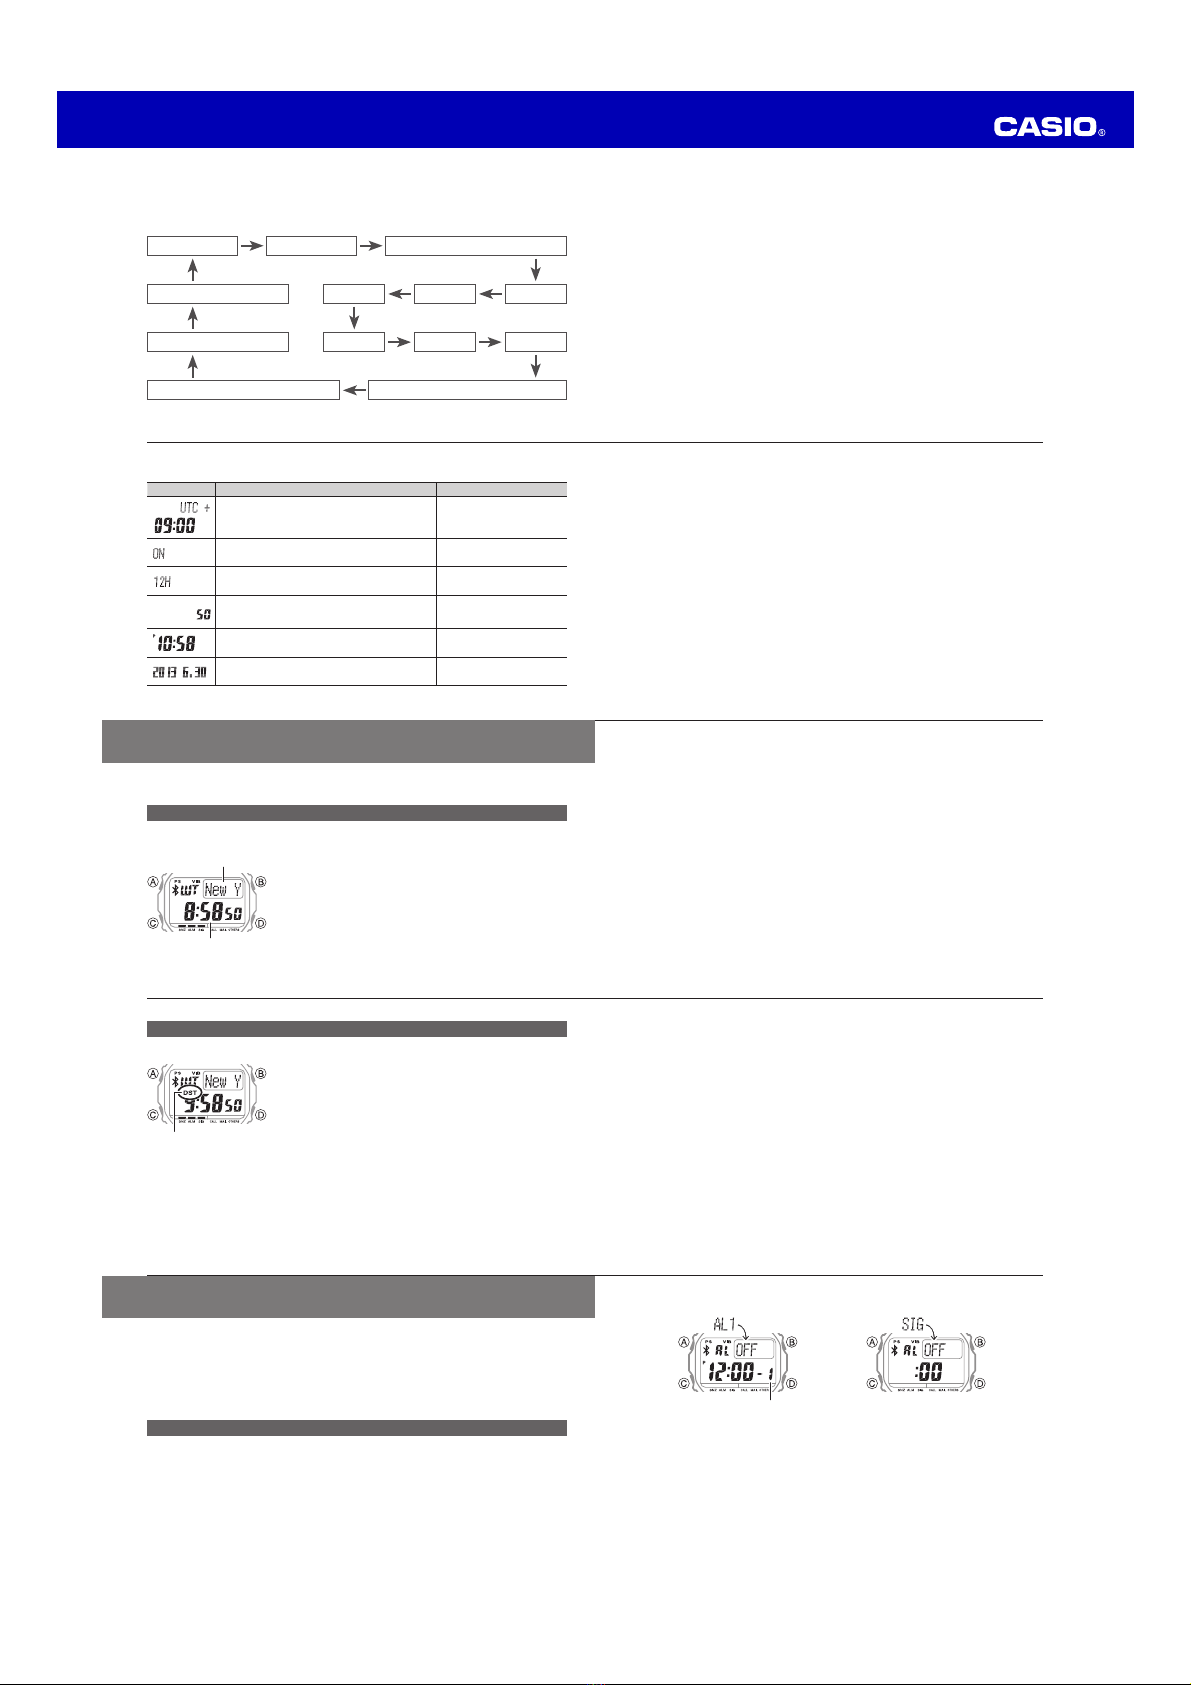
Tap Operations
Tap indicator
The word “tap” in this manual refers to striking the center of
watch display with your fingertip.
Example:
Tap twice to stop an ongoing tone or vibration alert for a
watch alarm.
How to tap:
Lightly strike the watch display twice with the tip of your
finger. (double-tap)
Important!
xThe tap function is enabled only while the Tap indicator is flashing on the watch
display.
xThe Tap indicator flashes automatically whenever the tap function is enabled
and can be used to stop a watch alarm or time up alert, etc.
E-8
About this User’s Guide
Display Types
Depending on the model of your watch, display text appears either as dark figures
on a light background or light figures on a dark background. All sample displays in
this manual are shown using dark figures on a light background.
xNote that the display style of a watch is fixed. You cannot switch between styles.
E-7
Illumination.......................................................................................................... E-44
To illuminate the display.................................................................................E-44
Using Auto Light ............................................................................................E-45
To specify the illumination duration.................................................................E-48
Other Settings..................................................................................................... E-50
To turn the button operation tone on or off .....................................................E-50
To change the alarm/timer alert method .........................................................E-52
Low Battery Indication........................................................................................ E-54
Specifications ..................................................................................................... E-56
Operating Precautions....................................................................................... E-m1
User Maintenance............................................................................................ E-m11
E-6
To configure the Summer Time (DST) setting ..................................................E-26
Alarms and Hourly Time Signal .......................................................................... E-28
To enter the Alarm Mode................................................................................E-28
To change an alarm setting ............................................................................E-30
To stop a tone/vibration alert operation ..........................................................E-35
To test the alarm............................................................................................E-36
Stopwatch........................................................................................................... E-37
To enter the Stopwatch Mode........................................................................E-37
To measure time with the stopwatch ..............................................................E-38
Timer ................................................................................................................... E-40
To enter the Timer Mode................................................................................E-40
To set the timer start time ..............................................................................E-41
To perform a countdown................................................................................E-42
To stop a tone/vibration alert operation ..........................................................E-43
E-5
Contents
Features ................................................................................................................ E-3
About this User’s Guide........................................................................................ E-8
Display Types ..................................................................................................E-8
Tap Operations................................................................................................E-9
Button Names and Display Indications............................................................E-10
Display Indicators ..........................................................................................E-12
Using Modes....................................................................................................... E-14
Mode Overview..............................................................................................E-16
Adjusting the Time Setting ................................................................................. E-18
Configuring Current Time and Date Settings Manually .....................................E-19
World Time.......................................................................................................... E-24
To view the times in other time zones .............................................................E-24
E-4
◆Stopwatch.................................................................................. Page E-37
The stopwatch measures elapsed time up to 1,000 hours in 1/100-second
increments.
◆Timer .......................................................................................... Page E-40
The timer counts down from a preset start time, and the watch sounds a tone or
vibrates when the countdown reaches zero.
E-3
Features
Your watch provides you with the features and functions described below.
◆Communication with your mobile phone ..........Visit the CASIO website
Connect with a Bluetooth enabled mobile phone and communicate with it.
For more information, visit the “User’s Guide for Mobile Link Functions” page at the
CASIO website.
◆World Time ................................................................................ Page E-24
Instantly view the current time in 100 cities around the globe.
◆Alarms........................................................................................ Page E-28
The watch can be configured to sound a tone or vibrate when a preset alarm time
is reached.
E-2
Mobile Link Function
This product includes functions that allow it to communicate with Bluetooth®4.0
(referred to as “Bluetooth” in this manual) capable mobile phones and other
devices, to sound an alert tone, perform vibration alert, and display alerts when a
phone call and/or mail is received on your phone, etc. (Mobile Link Function)
xThis product complies with or has received approval under radio laws in various
countries and geographic areas. Use of this product in an area where it does not
conform to or where it has not been approved under applicable radio laws may
be punishable under local laws. For details, see the separate “List of Countries
and Geographic Areas where Product Conforms to Radio Laws or Has Been
Approved”.
xUse of this product inside of an aircraft is restricted by the aviation laws of each
country. Be sure to obey instructions provided by flight personnel concerning
use of devices such as this product.
xFor Mobile Link operational procedures and a Q&A, go to the website below.
CASIO website: http://world.g-shock.com/ble/guide/
E-1
Congratulations upon your selection of this CASIO watch.
To ensure that this watch provides you with the years of service for which it is
designed, carefully read and follow the instructions in this manual, especially the
information under “Operating Precautions” and “User Maintenance”.
Be sure to keep all user documentation handy for future reference.
Bluetooth®is a registered trademark or trademark of Bluetooth SIG, Inc. of the
United States.
MA1405-EB
#!3)/#/-054%2#/,4$