Operation Guide 5410
E-31
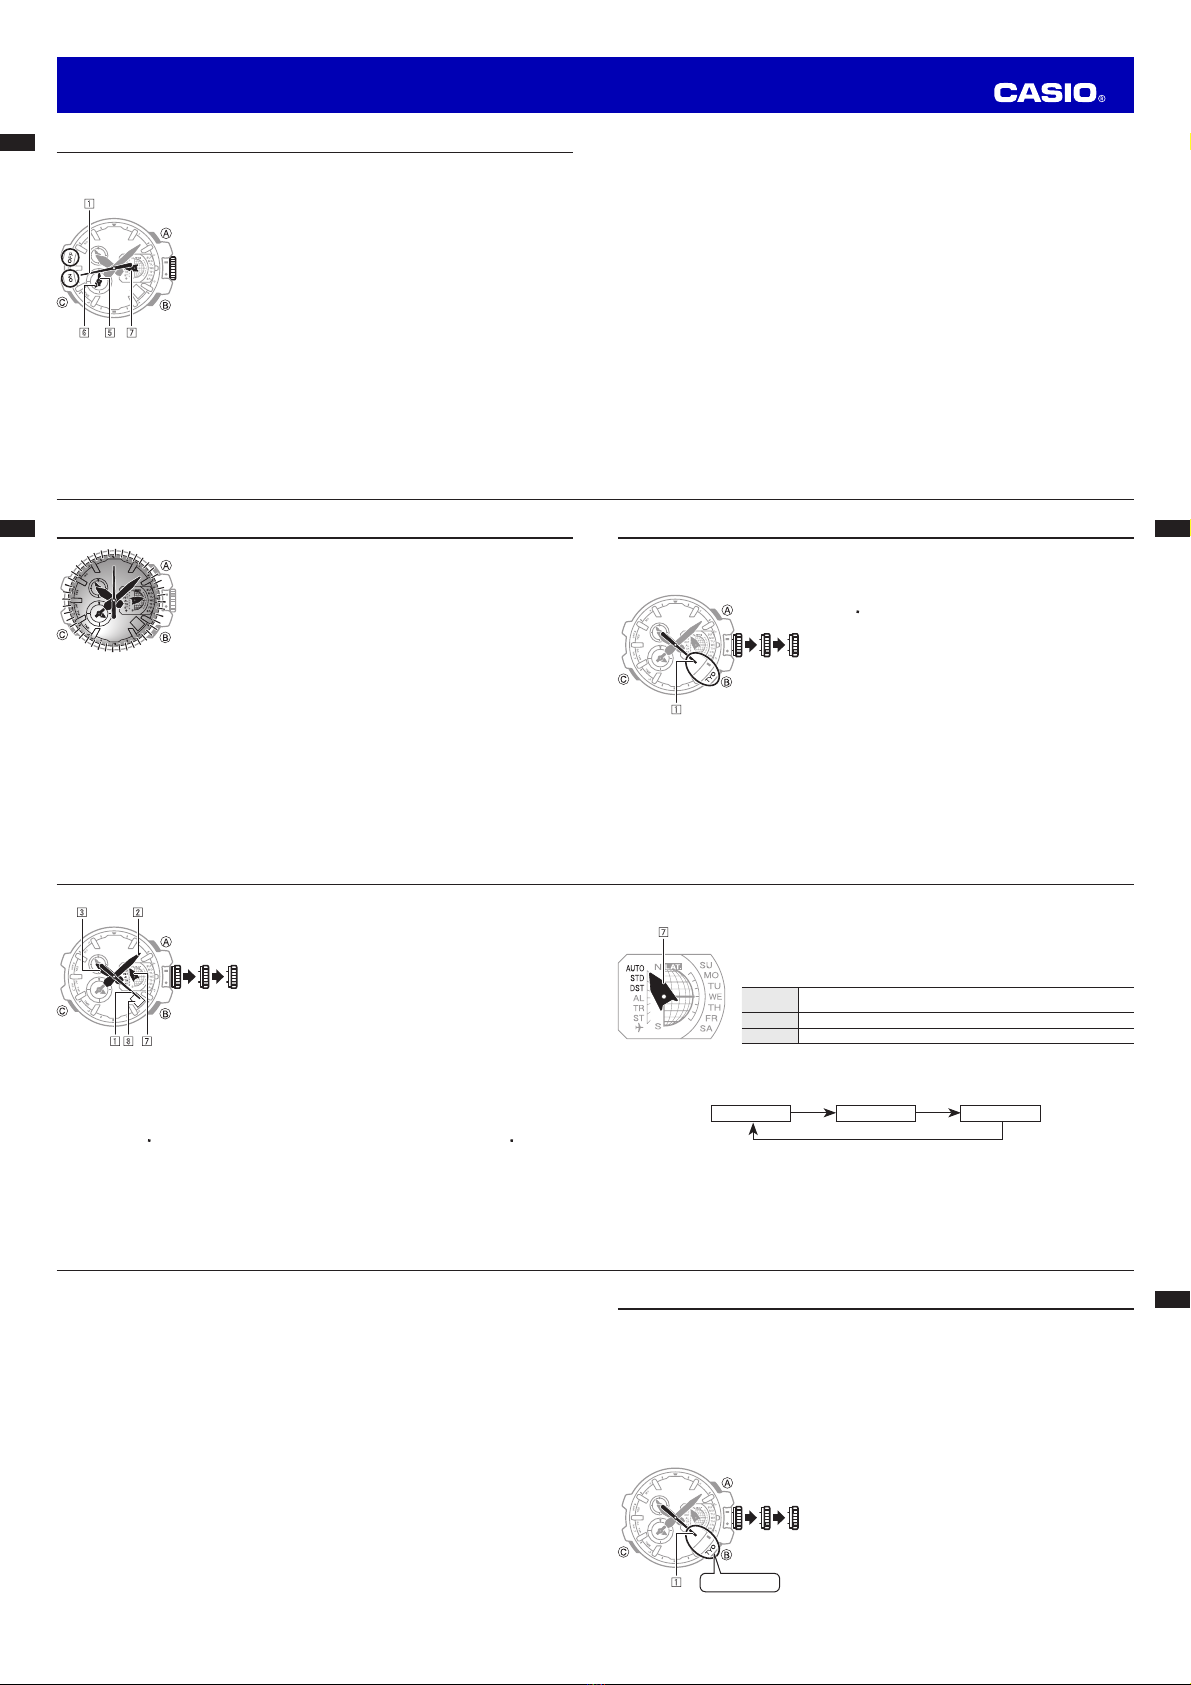
xWhen position information starts to be acquired from the GPS signal, the
Mode Hand will start
to move in a semi-circular pattern a number of times. If the acquisition operation is successful, the
Mode Hand will stop at 12 o’clock and then the approximate latitude will appear on the display.
30
30
1 7
xAcquisition normally takes anywhere from about 30 seconds to two minutes. It can take as long as
13 minutes when leap second information is included. See “Leap Seconds” (page E-35).
xIf the acquisition operation is successful, the
Second Hand will point to Y(YES) and then the time
and date settings will be adjusted automatically to local time.
xYou can perform an operation on the watch to check the currently set Home City (Time Zone) and
the approximate latitude of the location where signal receive was performed. See “To check receive
operation results (acquisition results)” (page E-40).
xIf the acquisition operation fails, the
Second Hand will move to N(NO) and then normal
timekeeping will resume with settings unchanged.
E-30
−Indoors (Reception may be possible near a window.)
−Near wireless communication equipment or other devices that generate magnetism
Adjusting Time Settings Immediately After Purchasing the Watch or While Traveling
Acquiring GPS Position Information
When position information is acquired, the watch automatically configures the Home City (Time Zone)
setting accordingly. The time and date settings are also changed to correspond with the Home City (Time
Zone).
xThis operation requires large amounts of power. Perform it only when necessary.
Perform this operation in the Timekeeping Mode (not in the Airplane Mode). See “Mode Reference Guide”
(page E-42).
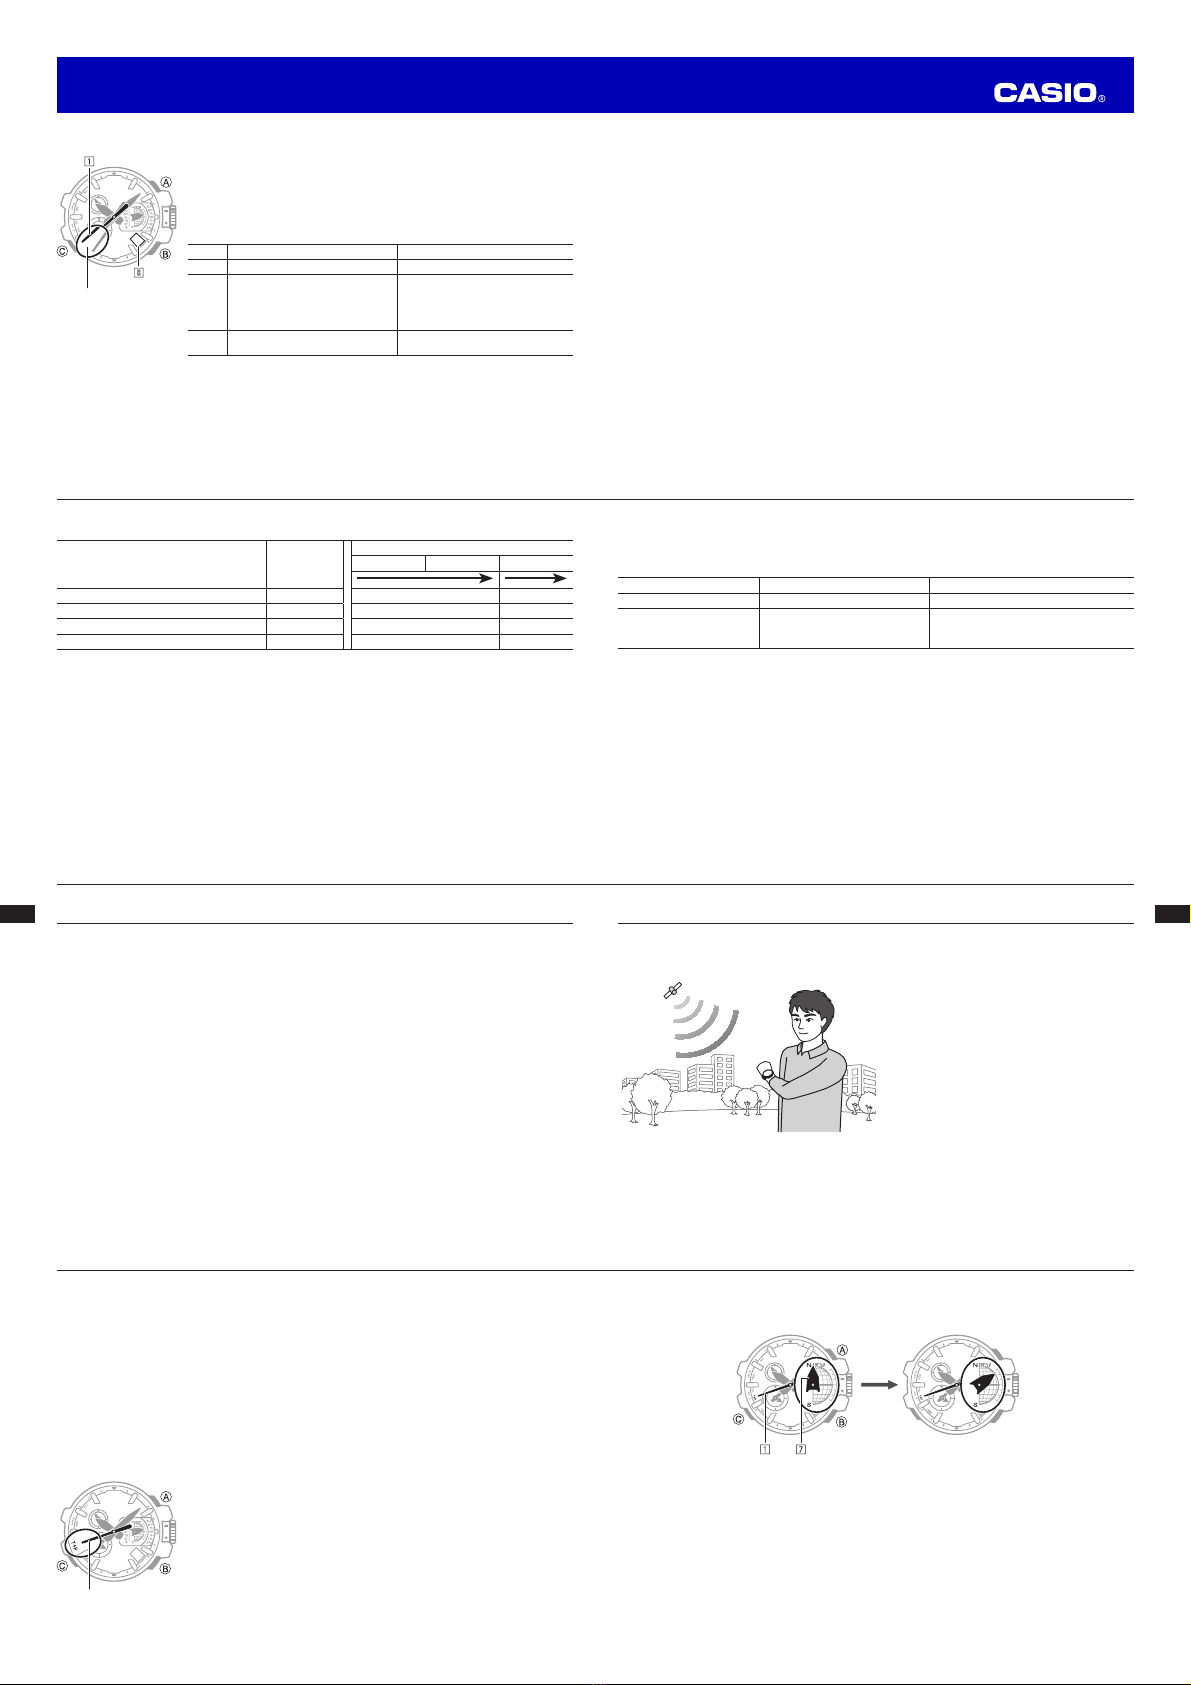
1. Move to a location appropriate for signal reception and orient the watch so its display is pointed straight
up at the sky. See “Appropriate Signal Reception Location (GPS Signal)” (page E-29).
2. Hold down Bfor at least three seconds until the
Second Hand moves
to T+P.
xThe position information acquisition operation starts when the
Second
Hand moves to T+P. Even if the
Second Hand is pointed at Y(YES), N
(NO), or T(TIME), keep Bdepressed until it moves to T+P.
E-29
Timekeeping (by GPS Signal)
Appropriate Signal Reception Location (GPS Signal)
Outdoors where the sky is visible and not blocked by buildings, trees, or other objects, orient the watch so
its face is pointed straight up at the sky.
Note
xIf you experience signal reception problems,
keep the watch still and point its display straight
up at the sky.
xWhile a receive operation is being performed,
take care to avoid covering the watch face with
your sleeve.
See “GPS Signal Auto Receive” (page E-32).
xYou may experience GPS signal reception problems in the areas described below.
−Where the view of the sky above is narrow
−Near trees or buildings
−Near a train station, airport, or other congested areas
xGPS signal reception is not possible in the areas described below.
−Where the sky is not visible
−Underground or in a tunnel
E-28
Automatic Timekeeping (by GPS Signal and Time Calibration Signal)
Time and date settings can be configured automatically by performing a GPS signal or time calibration
signal receive operation.
Important!
xBefore trying to receive GPS signal time information and/or a time calibration signal, first use GPS to
acquire GPS position information and configure Home Time (time zone) settings.
See “Acquiring GPS Position Information” (page E-30).
Daily watch operations depend on the geographical area where it is being used.
Areas that Support Time Calibration Signal Reception
A time calibration signal receive operation is performed between midnight and 5:00 a.m., and the time
and date settings are adjusted automatically. If a time calibration signal reception is not possible for some
reason, a GPS signal receive operation is performed between 6:00 a.m. and 10:00 p.m., and the time and
date settings are adjusted automatically.
Areas that Do Not Support Time Calibration Signal Reception
When a GPS signal receive operation is successful between 6:00 a.m. and 10:00 p.m., the time and date
settings are adjusted automatically.
You can also use a button operation to trigger a GPS signal auto receive operation any time during the
day, even if you are in an area where a time calibration signal is not receivable. See “Receiving GPS Time
Information” (page E-34).
E-27
Power Saving
Power Saving enters a sleep state automatically whenever the watch is left for a certain period in an area
where it is dark. The table below shows how watch functions are affected by Power Saving.
xThere actually are two sleep state levels: Level 1 and Level 2.
Elapsed Time in Dark Hands and Display Operation
60 to 70 minutes (Level 1) Second hand stopped. Other functions enabled.
6 or 7 days (Level 2)
All hands stopped at 12 o’clock.
xDate indicator moving.
xAlarm and timer beeper disabled.
Except for timekeeping, all functions
disabled.
xThe watch will not enter a sleep state between 6:00 AM and 9:59 PM. If the watch is already in a sleep
state when 6:00 AM arrives, however, it will remain in the sleep state.
xThe watch can enter a sleep state from the Timekeeping Mode only.
To recover from the sleep state
Move the watch to a well-lit area or press any button.
E-26
Charging Times
Exposure Level (Brightness) Daily
Operation *1
Level Change *2
Level 3 Level 2 Level 1
Outdoor sunlight (50,000 lux) 8 minutes 8 hours 27 hours
Window sunlight (10,000 lux) 30 minutes 26 hours 102 hours
Window sunlight on cloudy day (5,000 lux) 48 minutes 41 hours 165 hours
Indoor fluorescent lighting (500 lux) 8 hours 450 hours – – –
*1 Approximate exposure each day to generate power for normal daily operation.
*2 Approximate exposure to take power up one level.
xThe above times are for reference only. Actual times depend on lighting conditions.
xFor details about the operating time and daily operating conditions, see the “Power Supply” section of
the Specifications (page E-78).
E-25
You should charge the watch whenever the
Second Hand starts to jump at one-second intervals.
Important!
xIf the
Second Hand moves to 12 o’clock and stops there for some time after the watch is continuously
exposed to light, it could mean that charging is not possible due to over-discharge. Contact your
retailer and request replacement of the secondary battery.
Time Until Watch Operation Stops
Following a full charge, with no more charging: Approximately seven months
Starting from an insufficient charge: Approximately 20 days
Power Recovery Mode
The watch is designed to go into a power recovery mode that stops hand operation temporarily whenever
power suddenly drops below a certain level due to continuous signal reception, or overuse of the alarm
tone over a short period or other operations over a short period. Note that all operations are disabled
while the watch is in the power recovery mode.
The hands will move to the correct positions and the watch will resume normal operation after power
recovers (in about 15 minutes). Putting the watch in a location where it is exposed to light will help power
to recover sooner.
E-24
Power Levels
You can get an idea of the watch’s power level by observing the movement of
the
Second Hand.
xIf the
Second Hand is moving normally at one-second intervals, power is
at Level 1.
xLow power level is indicated when the
Second Hand is moving at two-
second intervals (Level 2) or five-second intervals (Level 3) (Low battery
alert). Expose the watch to light as soon as possible so it can charge.
Level Hand Movement Function Status
1 Normal. All functions enabled
2
1
Second Hand moves at
two-second intervals.
When power drops further, the
1
Second Hand moves at five-
second intervals.
Beeper, time calibration signal
reception, countdown timer
operation, and home position
adjustment disabled
3All hands stopped at 12 o’clock.
8
Day Indicator shows 1.All functions disabled
xWhen power drops to Level 3, all settings (including timekeeping) will be cleared. Recharging the
battery will reset all settings to their initial factory defaults, so you will need to configure settings again.
xWhen the watch is at Level 3, exposing it to light for a while will cause the 1
Second Hand to move to
the position of second 57. This indicates that charging has started.
30
1
8
Moves at two-second
intervals.