Casio 3770 User manual

Operation Guide 3770 3771 4308 4309
1
MO0505-EA
Getting Acquainted
Congratulations upon your selection of this CASIO watch. To get the most out of your
purchase, be sure to carefully read this manual and keep it on hand for later reference
when necessary.
About This Manual
•The operational procedures for Modules 3770, 3771,
4308, and 4309 are identical. All of the illustrations in
this manual show Modules 3770 and 4308.
•Button operations are indicated using the letters shown
in the illustration.
•Most of the display examples in this manual show only
the digital display, without the analog hands.
•Each section of this manual provides you with the
information you need to perform operations in each
mode. Further details and technical information can be
found in the “Reference” section.
Modules 3770 and 4308
Modules 3771 and 4309
▲
▲
▲
Stopwatch Mode Countdown Timer Mode
Alarm Mode
▲
Timekeeping Mode Press C.
▲
▲
World Time Mode
Hand Setting Mode
General Guide
•Press Cto change from mode to mode.
•In any mode, press Bto illuminate the face of the watch.
Radio-controlled Timekeeping
This watch receives a time calibration signal and updates its time setting accordingly.
The time calibration signal includes both Standard Time and Daylight Saving Time
(summer time) data.
•This watch is designed to pick up the time calibration signal transmitted from Rugby,
England and the signal from Mainflingen, Germany.
Minute hand
Hour hand
Day of week
Modules 3770 and 4308 Modules 3771 and 4309
Seconds
Month – Day
Hour hand Day of week
Current Time Setting
This watch automatically adjusts its time setting in accordance with a time calibration
signal.You can also perform a manual procedure to set the time and date, when
necessary.
•The first thing you should do after purchasing this watch is to set your Home City,
which is the city where you will normally use the watch. For more information, see
“To set your Home City” below.
•When using the watch outside the ranges of the time signal transmitters, you have to
adjust the current time setting manually as required. See “Timekeeping” for more
information about manual time setting.
•The analog time of this watch is synchronized with the digital time. Because of this,
the analog time setting is automatically adjusted whenever you change the digital
setting. See “Analog Timekeeping” for more information.
To set your Home City
1. In the Timekeeping Mode, hold down Auntil the city
code starts to flash, which indicates the setting screen.
2. Use D(east) and B(west) to scroll through the city
codes until the one you want to use as your Home City
is displayed.
•The following are the city codes for major cities in the
Western Europe time zones.
|
|
|
|
|
|
|
|
|
|
|
|
|
|
City code
Modules 3770 and 4308
|
|
|
|
|
|
|
|
|
|
|
|
|
|
Modules 3771 and 4309
City code
City City
Other major cities in same time zone
Code
Lisbon
London
Barcelona
Madrid
Paris
Milan
Rome
Berlin
Stockholm
Athens
Dublin, Casablanca, Dakar, Abidjan
Amsterdam, Algiers, Hamburg, Frankfurt,
Vienna
Cairo, Jerusalem, Helsinki, Istanbul,
Beirut, Damascus, Cape Town
LIS
LON
BCN
MAD
PAR
MIL
ROM
BER
STO
ATH
3. Press Ato exit the setting screen.
•Normally, your watch should show the correct time as soon as you select your Home
City Code. If it does not, it should adjust automatically after the next auto receive (in
the middle of the night).You can also perform manual receive or you can set the time
manually.
•If you are in an area that does not use Daylight Saving Time (summer time), turn off
the DST setting.
To display the digital time and last signal screen
•In the Timekeeping Mode, press Ato cycle through the digital time screens as
shown below.
•In the Timekeeping Mode, press Dto display the last signal screen. The last signal
screen shows the time and date of the last successful time calibration signal
reception.
▲
Press A.
Hour : Minutes
PM indicator
▲
Press D.
Last Signal
Screen
Reception date
A
Reception time
Time Calibration Signal Reception
There are two different methods you can use to receive the time calibration signal:
auto receive and manual receive.
•Auto Receive
With auto receive, the watch receives the time calibration signal automatically five or
six times a day. When any auto receive is successful, the remaining auto receive
operations are not performed. For more information, see “About Auto Receive”.
•Manual Receive
Manual receive lets you start a time calibration signal reception with the press of a
button. For more information, see “To perform manual receive”.
Important!
•When getting ready to receive the time calibration signal, position the watch as
shown in the nearby illustration, with its 12 o’clock side facing towards a window.
Make sure there are no metal objects nearby.
•The watch should not be on its side or facing the wrong way.
Resin Band Metal Band
•Proper signal reception can be difficult or even impossible under the conditions listed
below.
Inside or
among
buildings
Inside a
vehicle
Near
household
appliances,
office
equipment,
or a mobile
phone
Near a
construction
site, airport, or
other sources
of electrical
noise
Near high-
tension
power lines
Among or
behind
mountains

Operation Guide 3770 3771 4308 4309
2
•Signal reception is normally better at night than during the day.
•Time calibration signal reception takes from two to seven minutes, but in some
cases it can take as long as 14 minutes. Take care that you do not perform any
button operations or move the watch during this time.
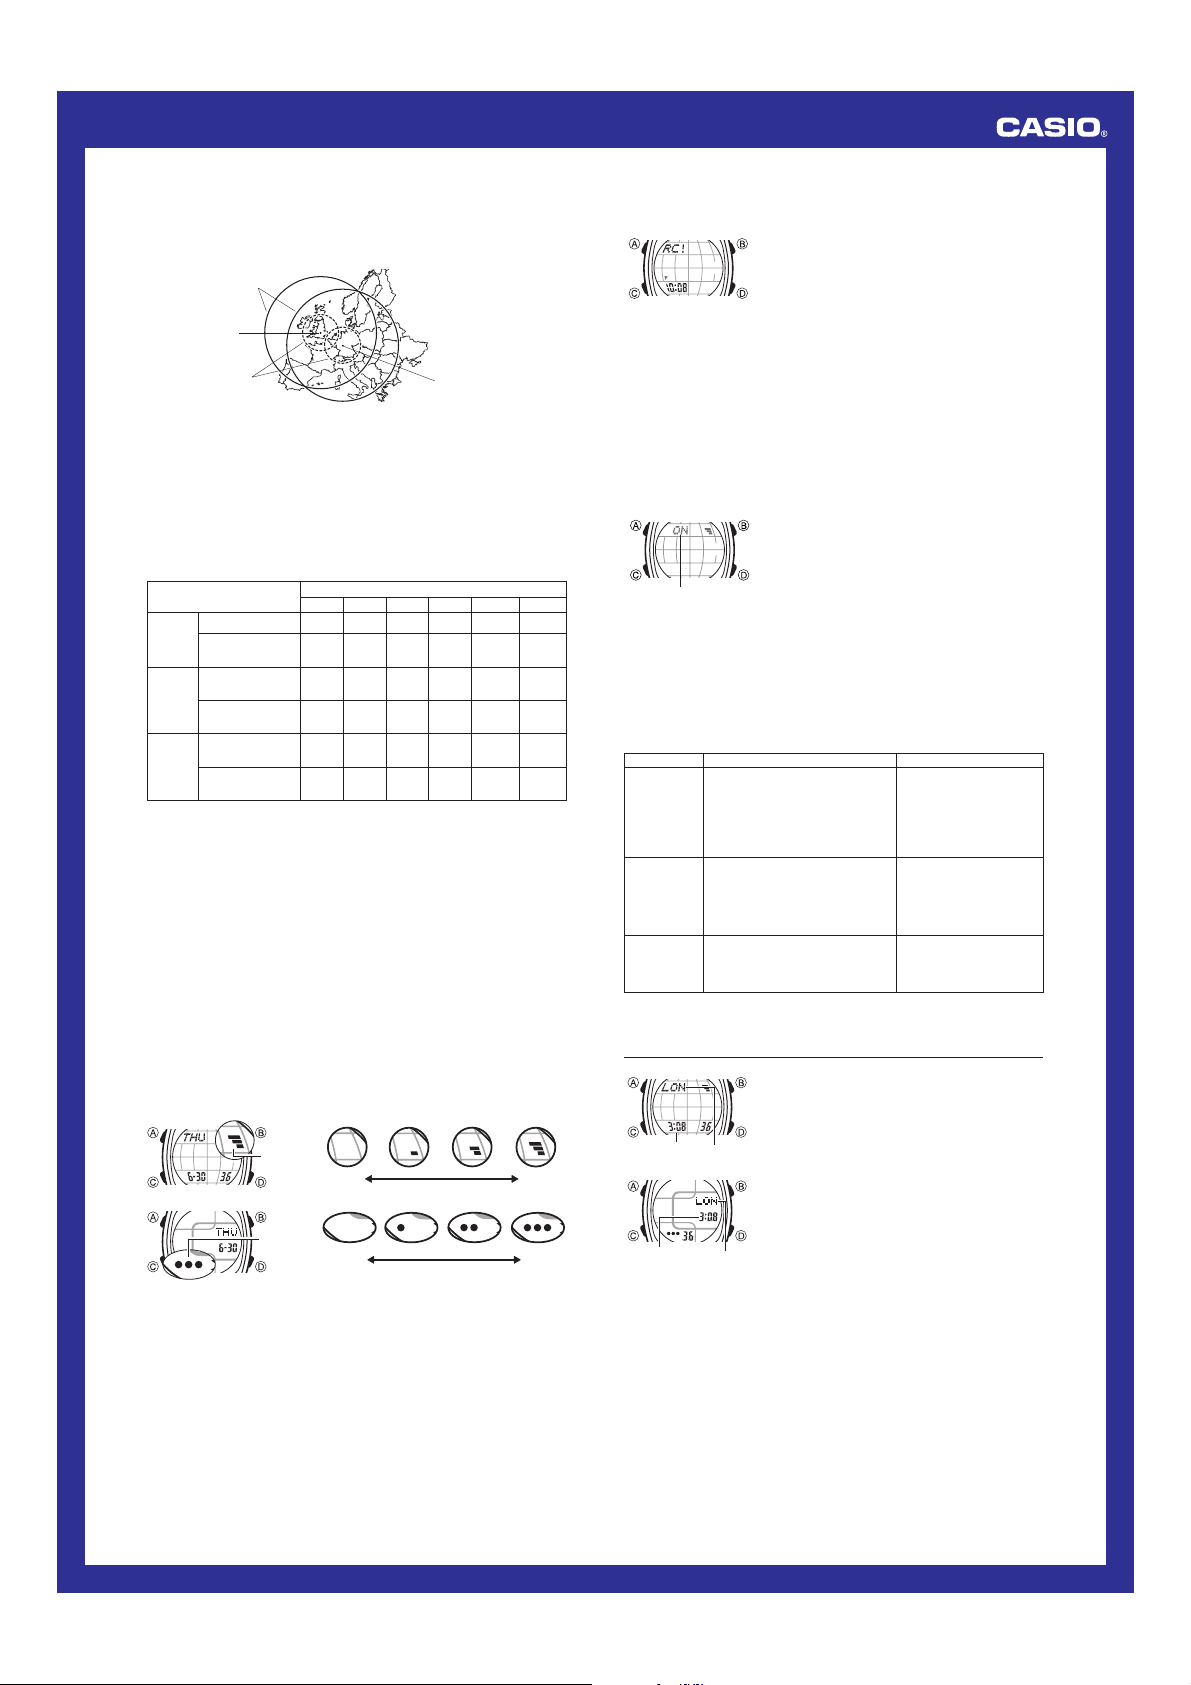
•This watch is designed to receive the time calibration signal transmitted from Rugby,
England and the signal from Mainflingen, Germany. Signal reception is possible
within the area represented by a circle with a radius of about 1,500 kilometers.
•At distances further than about 500 kilometers from a transmitter, signal reception
may not be possible during certain times of year or times of day. Radio interference
may also cause problems with reception.
•See the information under “Signal Reception Troubleshooting” if you experience
problems with time calibration signal reception.
Rugby
Mainflingen
1,500 kilometers
500 kilometers
About Auto Receive
With auto receive, the watch receives the time calibration signal automatically five or
six times a day. When any auto receive is successful, the remaining auto receive
operations are not performed. The reception schedule (calibration times) depends on
your currently selected Home City Code, and whether standard time or Daylight
Saving Time is selected for your Home City Code.
Your City Code Auto Receive Start Times
1234 5 6
LIS, LON Standard Time
1:00 am 2:00 am 3:00 am 4:00 am 5:00 am Midnight
(GMT +0) Daylight Saving
2:00 am 3:00 am 4:00 am 5:00 am Midnight 1:00 am
Time
next day
Standard Time
2:00 am 3:00 am 4:00 am 5:00 am Midnight 1:00 am
next day
Daylight Saving
3:00 am 4:00 am 5:00 am
Midnight
1:00 am 2:00 am
Time
next day next day
ATH St andard Time
3:00 am 4:00 am 5:00 am
Midnight
1:00 am 2:00 am
(GMT +2)
next day next day
Daylight Saving
4:00 am 5:00 am
Midnight
1:00 am 2:00 am 3:00 am
Time
next day next day next day
BCN, MAD,
PAR, MIL,
ROM, BER,
STO
(GMT +1)
Note
•Auto receive is performed only if the watch is in the Timekeeping Mode or World
Time Mode when one of the calibration times is reached. It is not performed if a
calibration time is reached while an alarm is sounding, or while you are configuring
settings (while settings are flashing on the display).
•Auto receipt of the calibration signal is designed to be performed early in the
morning, while you sleep (provided that the Timekeeping Mode time is set correctly).
Before going to bed for the night, remove the watch from your wrist, and put it in a
location where it can easily receive the signal.
•When auto receive is turned on, the watch receives the calibration signal for two to
seven minutes everyday when the time in the Timekeeping Mode reaches each of
the five calibration times. Do not perform any button operation within seven minutes
before or after any of the five calibration times. Doing so can interfere with correct
calibration.
•Remember that reception of the calibration signal depends on the time kept in the
digital display. Reception will be performed whenever the display shows one of the
five calibration times, regardless of whether or not the displayed time is actually the
correct time.
•Calibration signal reception is disabled while a countdown timer operation is in
progress.
About the Receiving Indicator
The receiving indicator shows the strength of the calibration signal being received. For
best reception, be sure to keep the watch in a location where signal strength is
strongest.
Receiving
indicator
Weak Strong
(Level 0) (Level 3)
Modules 3770 and 4308
Receiving
indicator
Weak Strong
(Level 0) (Level 3)
Modules 3771 and 4309
•Even in an area where signal strength is strong, it takes about 10 seconds for signal
reception to stabilize enough for the receiving indicator to indicate signal strength.
•Use the receiving indicator as a guide for checking signal strength and for finding the
best location for the watch during signal reception.
•The Level 3 receiving indicator remains on the display in all modes following
reception of the time calibration signal and calibration of the watch’s time setting.
The Level 3 receiving indicator is not displayed if signal reception was unsuccessful
or after manual adjustment of the current time setting.
•The Level 3 receiving indicator indicates that at least one of the six calibration signal
receive operations was successful. Note, however, that the indicator is cleared from
the display at the next successful reception each day.
To perform manual receive
1. Place the watch on a stable surface so its top (12
o’clock side) is facing towards a window.
2. In the Timekeeping Mode, hold down Dfor about two
seconds until the watch beeps.
3. After you release Dthe display will show the current
time and the letters RC!. This indicates that signal
reception is in progress.
•Time calibration signal reception normally takes from
two to seven minutes. Take care that you do not perform
any button operations or move the watch during this
time.
•After signal reception is complete, the display of the
watch changes to the last signal screen.
Note
•To interrupt a reception and return to the Timekeeping Mode, press D.
•If reception is unsuccessful, the message ERR appears on the display for one or
two minutes. After that, the watch returns to the Timekeeping Mode.
•Yo u can also change from the last signal or ERR screen to the normal timekeeping
screen by pressing D.
•Calibration signal reception is disabled while a countdown timer operation is in
progress.
To turn auto receive on and off
1. In the Timekeeping Mode, press Dto display the last
signal screen.
•
The watch will automatically return to the Timekeeping
Mode if you do not perform any button operation for one
or two minutes after displaying the last signal screen.
2. Hold down Auntil the current auto receive setting
flashes on the display. This is the setting screen.
•If the auto receive setting does not appear when you
hold down A, it means that the city code currently
selected for the Home City is for an area that does not
support calibration signal reception. You cannot turn
auto receive on or off in this case.
3.
Use
D
to turn auto receive on
(ON)
or off
(OFF).
4. Press Ato exit the setting screen.
•To return to the Timekeeping Mode from the last signal screen, press D.
•For information about city codes that support signal reception, see “To set your
Home City”.
|
|
|
|
|
|
|
|
|
|
|
|
|
|
|
|
|
|
|
|
|
|
|
On/Off status
Problem
Cannot perform
manual receive.
Auto receive is
turned on, but
the Level 3
receiving
indicator does
not appear on
the display.
Probable Cause
•The watch is not in the Timekeeping
Mode.
•Your current Home City is not one of the
following city codes: LIS, LON,
BCN, MAD, PAR, MIL, ROM,
BER, STO, or ATH.
•A countdown timer operation is in
progress.
•You changed the time setting manually.
•You were performing some button
operation during the auto receive.
•Even if reception is successful, the
Level 3 receiving indicator disappears at
the next successful reception each day.
What you should do
•Enter the Timekeeping Mode
and try again.
•Select LIS, LON, BCN,
MAD, PAR, MIL, ROM,
BER, STO, or ATH as your
Home City.
•Stop the countdown timer
operation.
•Perform manual receive or
wait until the next auto signal
receive is performed.
•Check to make sure the
watch is in a location where it
can receive the signal.
Signal Reception Troubleshooting
Check the following points whenever you experience problems with signal reception.
Time setting is
incorrect
following signal
reception.
•If the time is one hour off, the DST
setting may be incorrect.
•The Home City code setting is not
correct for the area where you are using
the watch.
•Change the DST setting to
Auto DST.
•Select the correct Home City
code.
•For further information, see “Important!” under “Time Calibration Signal Reception”
and “Radio-controlled Timekeeping Precautions”.
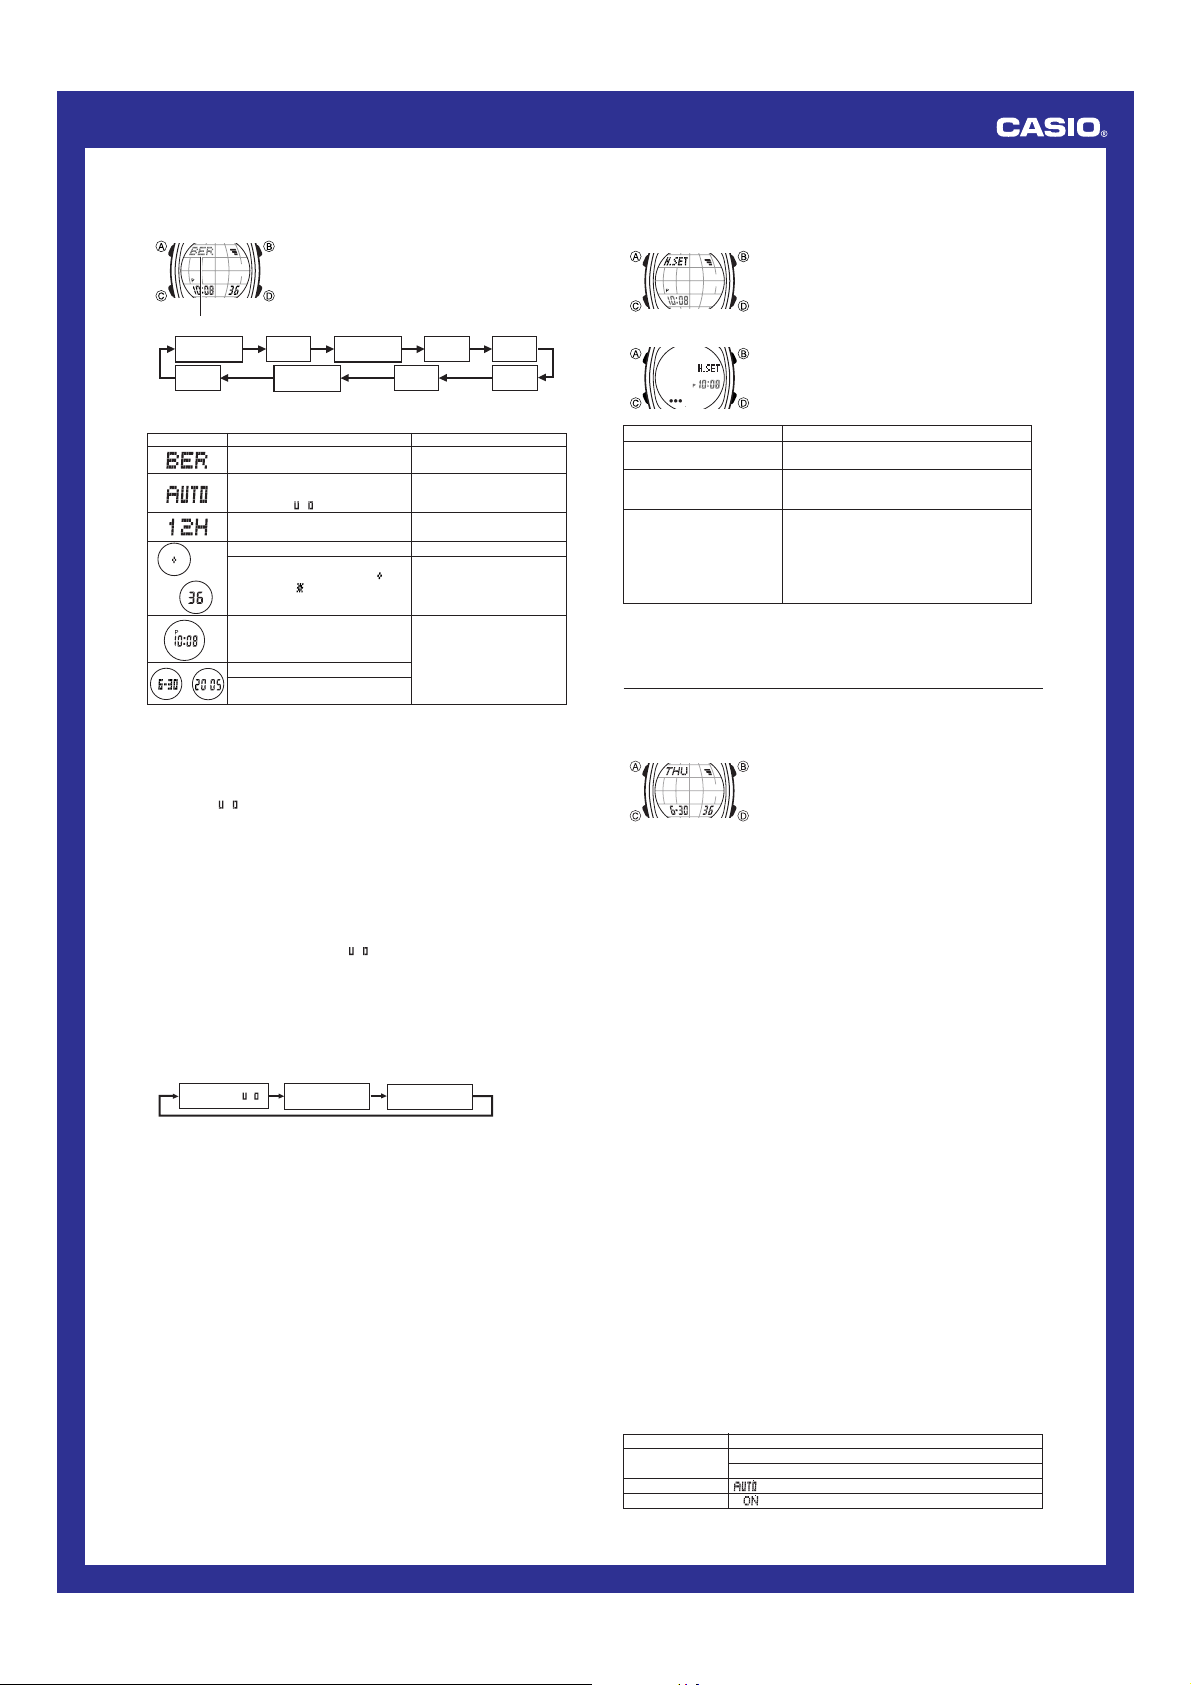
World Time
The World Time Mode digitally displays the current time in
48 cities (29 time zones) around the world.
•If the current time shown for a city is wrong, check your
Home City time settings and make the necessary
changes.
•The watch will perform a signal reception even if it is in
the World Time Mode when a calibration time is
reached. If this happens, the World Time Mode time
settings will be adjusted in accordance with the
Timekeeping Mode’s Home City time.
•All of the operations in this section are performed in the
World Time Mode, which you enter by pressing C.
Modules 3770 and 4308
Modules 3771 and 4309
City code
Current time in
selected city
Current time in
selected city City code
To view the time in another city
While in the World Time Mode, press Dto scroll through the city codes (time zones)
to the east.
•For full information on city codes, see the “City Code Table”.

Operation Guide 3770 3771 4308 4309
3
To toggle a city code time between Standard Time and Daylight Saving Time
1. In the World Time Mode, use Dto display the city code
(time zone) whose Standard Time/Daylight Saving Time
setting you want to change.
2. Hold down Ato toggle Daylight Saving Time (DST
indicator displayed) and Standard Time (DST indicator
not displayed).
•Note that you cannot use the World Time Mode to
change the DST setting of the Home City code you
currently have selected in the Timekeeping Mode. See
“To change the Daylight Saving Time (summer time)
setting” for information about turning the Home City
code DST setting on and off.
•The DST indicator will appear on the display whenever
you display a city code for which Daylight Saving Time is
turned on.
•Note that the DST/Standard Time setting affects only the
currently displayed city code. Other city codes are not
affected.
DST indicator
Modules 3770 and 4308
Modules 3771 and 4309
DST indicator
Stopwatch
The stopwatch lets you measure elapsed time, split times,
and two finishes.
•The display range of the stopwatch is 59 minutes, 59.99
seconds.
•The stopwatch continues to run, restarting from zero
after it reaches its limit, until you stop it.
•Exiting the Stopwatch Mode while a split time is frozen
on the display clears the split time and returns to
elapsed time measurement.
•The stopwatch measurement operation continues even
if you exit the Stopwatch Mode.
•All of the operations in this section are performed in the
Stopwatch Mode, which you enter by pressing C.
1/100 second
Minutes
Seconds
Modules 3770 and 4308
Modules 3771 and 4309
1/100 second
Minutes
Seconds
D
Start Stop
Elapsed Time
➤
Re-start Clear
D➤
Stop
D➤D➤A
Split Time
D
Start Split
➤
Split release Clear
A➤
Stop
A➤D➤A
Two Finishes
D
Start Split
➤
Stop Clear
A➤
Split release
D➤A➤A
First runner
finishes.
Display time of
first runner.
Second runner
finishes.
Display time of
second runner.
To measure times with the stopwatch
Countdown Timer
Yo u can set the countdown timer within a range of one to
60 minutes. An alarm sounds when the countdown
reaches zero.
•Calibration signal reception (both auto and manual) is
disabled while a countdown timer operation is in
progress.
•All of the operations in this section are performed in the
Countdown Timer Mode, which you enter by pressing
C.
Minutes Seconds
Modules 3770 and 4308
Modules 3771 and 4309
Minutes Seconds
To set the countdown start time
1. While the countdown start time is on the display in the Countdown Timer Mode,
hold down Auntil the current countdown start time starts to flash, which indicates
the setting screen.
•If the countdown start time is not displayed, use the procedure under “To use the
countdown timer” to display it.
2. While a setting is flashing, use D(+) and B(–) to change it.
3. Press Ato exit the setting screen.
To use the countdown timer
Press Dwhile in the Countdown Timer Mode to start the countdown timer.
•When the end of the countdown is reached, the alarm sounds for 10 seconds or until
you stop it by pressing any button. The countdown time is automatically reset to its
starting value after the alarm stops.
•Press Dwhile a countdown operation is in progress to pause it. Press Dagain to
resume the countdown.
•To completely stop a countdown operation, first pause it (by pressing D), and then
press A. This returns the countdown time to its starting value.
Alarm
When the alarm is turned on, the alarm sounds when the alarm time is reached. You
can also turn on an Hourly Time Signal, which will cause the watch to beep twice
every hour on the hour.
•All of the operations in this section are performed in the Alarm Mode, which you
enter by pressing C.
Hourly time signal
on indicator
Alarm on
indicator
Modules 3770 and 4308 Modules 3771 and 4309
Alarm time
(Hour : Minutes)
PM indicator
PM indicator
To set the alarm time
1. In the Alarm Mode, hold down Auntil the hour setting of the alarm time starts to
flash, which indicates the setting screen.
•This operation automatically turns on the alarm.
2. Press Cto move the flashing between the hour and minute settings.
3. While a setting is flashing, use D(+) and B(–) to change it.
•When setting the alarm time using the 12-hour format, take care to set the time
correctly as a.m. (no indicator) or p.m. (Pindicator).
4. Press Ato exit the setting screen.
Alarm Operation
The alarm sounds at the preset time for about 10 seconds, regardless of the mode the
watch is in.
•To stop the alarm tone after it starts to sound, press any button.
To test the alarm
In the Alarm Mode, hold down Dto sound the alarm.
Alarm On Indicator / Hourly Time Signal On Indicator
To turn the Daily alarm and the Hourly Time Signal on and off
In the Alarm Mode, press Dto cycle through the settings shown below.
•The alarm on indicator and the Hourly Time Signal on indicator are shown on the
display in all modes while these functions are turned on.
Signal Off
Alarm Off
Signal Off
Alarm On
Signal On
Alarm Off
Signal On
Alarm On
Illumination
An LED (light-emitting diode) and light guide panel
illuminate the digital display for easy reading in the dark.
•See “Illumination Precautions” for other important
information.
To turn on illumination
In any mode, press Bto illuminate the display.
•Yo u can specify 1.5 seconds or 2.5 seconds as the
illumination duration. See “To set the current digital time
and date manually” for more information.
Modules 3770 and 4308
Modules 3771 and 4309
Timekeeping
Use the Timekeeping Mode to set and view the current time and date. This section
also explains how to manually set the current date and time.
•When setting the time, you can also configure settings for the illumination duration
and the 12/24-hour format.
•All of the operations in this section are performed in the Timekeeping Mode, which
you can enter by pressing C.
▲
Press A.
PM indicator
▲
Reception date
A
Reception time
Hour : Minutes
Press D.
Last Signal
Screen
Setting the Digital Time and Date Manually
Make sure you select your Home City code before you change the current time and
date settings. World Time Mode times are all displayed in accordance with the
Timekeeping Mode settings. Because of this, World Time Mode times will not be
correct if you do not select the proper Home City code before setting the time and
date in the Timekeeping Mode.

Operation Guide 3770 3771 4308 4309
4
|
|
|
|
|
|
|
|
|
|
|
|
|
|
To set the current digital time and date manually
1. In the Timekeeping Mode, hold down Auntil the city
code starts to flash, which indicates the setting screen.
2. Press Cto move the flashing in the sequence shown
below to select other settings.
City code
3. When the setting you want to change is flashing, use Band/or Dto change it as
described below.
Seconds Hour
12/24-Hour
Format
Minutes
Year
DST
Day Month
City Code
Screen: To do this:
Change the city code
Cycle between Daylight Saving Time
(ON), Standard Time (OFF), and
Auto DST (At)
Toggle between 12-hour (12H) and
24-hour (24H) timekeeping
Do this:
Use D(east) and B(west).
Press D.
Press D.
Reset the seconds to 00
Toggle the illumination duration
setting between 1.5 seconds ( ) and
2.5 seconds ( )
Change the hour or minutes
Change the year
Change the month or day
Press D.
Press B.
Use D(+) and B(–).
•See “City Code Table” for a complete list of available city codes.
•For information about settings other than the time and date, see the following.
Illumination duration: Illumination
4. Press Ato exit the setting screen.
•When you exit the setting screen, the analog hands are adjusted automatically to
match the digital time. See “Analog Timekeeping” for more information.
Note
•Auto DST (At) can be selected only while LIS, LON, BCN, MAD, PAR,
MIL, ROM, BER, STO, or ATH is selected as the Home City code. For more
information, see “Daylight Saving Time (DST)” below.
Daylight Saving Time (DST)
Daylight Saving Time (summer time) advances the digital time setting by one hour
from Standard Time. Remember that not all countries or even local areas use Daylight
Saving Time.
The time calibration signals transmitted from Rugby and Mainflingen includes both
Standard Time and DST data. When the Auto DST setting is turned on, the watch
switches between Standard Time and DST (summer time) automatically in
accordance with the Rugby and Mainflingen signals.
•The default DST setting is Auto DST (At) whenever you select LIS, LON,
BCN, MAD, PAR, MIL, ROM, BER, STO, or ATH as your Home City code.
•If you experience problems receiving the time calibration signal in your area, it is
probably best to switch between Standard Time and Daylight Saving Time (summer
time) manually.
To change the Daylight Saving Time (summer time) setting
1. In the Timekeeping Mode, hold down Auntil the city code starts to flash, which
indicates the setting screen.
2. Press Conce and the DST setting screen appears.
3. Use Dto cycle through the DST settings in the sequence shown below.
4. When the setting you want is selected, press Ato exit the setting screen.
•The DST indicator appears on the display to indicate that Daylight Saving Time is
turned on.
Auto DST (At )DST off (OFF)DST on (ON)
Analog Timekeeping
The analog time of this watch is synchronized with the digital time. The analog time
setting is adjusted automatically whenever you change the digital time.
Note
•The hands for the analog timepiece move to adjust to a new setting whenever any of
the following occurs.
When you change the digital time setting manually
When the digital time setting is changed by time calibration signal reception
When you change the Home City code and/or DST setting
•If the analog time does not match the digital time for any reason, use the procedure
described under “To adjust the analog time” to match the analog setting to the digital
setting.
•Whenever you need to adjust both the digital and the analog time settings manually,
make sure you adjust the digital setting first.
•Depending on how much the hands have to move in order to adjust to the digital
time, it may take some time before they stop moving.
To adjust the analog time
1. In the Timekeeping Mode, press Cfive times to enter
the Hand Setting Mode.
2. Hold down Auntil the current digital time starts to
flash, which indicates the setting screen.
3. Use Dand Bto adjust the analog setting as
described below.
|
|
|
|
|
|
|
|
|
|
|
|
|
|
Modules 3770 and 4308
|
|
|
|
|
|
|
|
|
|
|
|
|
|
Modules 3771 and 4309
4. Press Ato exit the setting screen.
•The minute hand will be adjusted slightly to match the seconds when you exit the
setting screen.
•To return to the Timekeeping Mode, press C.
When you want to do this:
Move the hand setting
forward 20 seconds
Move the hand setting a short
way forward at high speed
Move the hand setting a long
way forward at high speed
Perform this button operation:
•Press D.
•Hold down D.
•Release Dwhen the hands reach the setting
you want.
•While holding down Dto move the hands at
high speed, press Bto lock the high-speed
hand movement.
•To stop the hand movement, press any
button.
•Hand movement stops automatically if the hour
hand makes one full (12-hour) revolution.
Reference
This section contains more detailed and technical information about watch operation.
It also contains important precautions and notes about the various features and
functions of this watch.
Auto Display
Auto Display continually changes the contents of the
digital display.
To turn off Auto Display
Press any button to turn off Auto Display. This returns to
the Timekeeping Mode.
To turn on Auto Display
In the Timekeeping Mode, hold down Cfor about three
seconds until the watch beeps.
Note
•Calibration signal reception is disabled while Auto
Display is being performed.
•Auto Display cannot be performed while a setting screen
is on the display.
Auto Return Features
•If you leave the watch in the Alarm or Hand Setting Mode for two or three minutes
without performing any operation, it automatically returns to the Timekeeping Mode.
•If you leave the watch with a flashing setting on the display for two or three minutes
without performing any operation, the watch automatically exits the setting screen.
Scrolling
The Band Dbuttons are used in various modes and setting screens to scroll
through data on the display. In most cases, holding down these buttons during a scroll
operation scrolls through the data at high speed.
Initial Screens
When you enter the World Time Mode, the data you were viewing when you last exited
the mode appears first.
Radio-controlled Timekeeping Precautions
•Strong electrostatic charge can result in the wrong time being set.
•Even when the watch is within the reception range of the transmitter, signal
reception will be impossible if the signal is blocked by mountains or other geological
formations between the watch and signal source.
•Signal reception is affected by weather, atmospheric conditions, and seasonal
changes.
•The time calibration signal bounces off the ionosphere. Because of this, such factors
as changes in the reflectivity of the ionosphere, as well as movement of the
ionosphere to higher altitudes due to seasonal atmospheric changes or the time of
day may change the reception range of the signal and make reception temporarily
impossible.
•Even if the time calibration signal is received properly, certain conditions can cause
the time setting to be off by up to one second.
•The current time setting in accordance with the time calibration signal takes priority
over any time settings you make manually.
Setting
City code
DST (summer time)
Auto receive
Initial Factory Default
LON (London) (Modules 4308 and 4309)
BER (Berlin) (Modules 3770 and 3771)
(Auto switching)
(Auto receive)
•The watch is designed to automatically update the date and day of the week for the
period January 1, 2000 to December 31, 2099. Setting of the date by the time
calibration signal cannot be performed starting from January 1, 2100.
•This watch can receive signals that differentiate between leap years and non-leap
years.
•If you are in an area where proper time calibration signal reception is impossible, the
watch keeps time within ±15 seconds a month at normal temperature.
•If you have problems with proper time calibration signal reception or if the time
setting is wrong after signal reception, check your current city code, DST (summer
time), and auto receive settings. The following are the initial factory defaults for these
settings.

Operation Guide 3770 3771 4308 4309
5
In this case:
The first signal auto search operation
after factory default settings are in effect,
or after the city code has been changed
Any case other than the above.
The watch does this:
1. Checks the Rugby signal first.
2. If the Rugby signal cannot be received,
checks the Mainflingen signal.
1. Checks the last successfully received
signal first.
2. If the last successfully received signal
cannot be received, checks the other
signal.
Modules 4308 and 4309
Transmitters
This watch is designed to receive the time calibration signal transmitted from Rugby,
England and the signal from Mainflingen, Germany. You can configure the watch to
automatically select the transmitter that has the strongest signal.
In this case:
The first signal auto search operation
after factory default settings are in effect,
or after the city code has been changed
Any case other than the above.
The watch does this:
1. Checks the Mainflingen signal first.
2. If the Mainflingen signal cannot be
received, checks the Rugby signal.
1. Checks the last successfully received
signal first.
2. If the last successfully received signal
cannot be received, checks the other
signal.
Modules 3770 and 3771
3770
4308
•To find out the module number of your watch, look at its
back cover. The Module number (3770, 3771, 4308, or
4309) will be engraved inside the box on the back cover.
Timekeeping
•Resetting the seconds to 00 while the current count is in the range of 30 to 59
causes the minutes to be increased by 1. In the range of 00 to 29, the seconds are
reset to 00 without changing the minutes.
•The day of the week is automatically displayed in accordance with the date (year,
month, and day) settings.
•The year can be set in the range of 2000 to 2099.
•The watch’s built-in full automatic calendar makes allowances for different month
lengths and leap years. Once you set the date, there should be no reason to change
it except after you have the watch’s battery replaced.
•The current time for all city codes in the Timekeeping Mode and World Time Mode is
calculated in accordance with the Greenwich Mean Time (GMT) differential for each
city, based on your Home City time setting.
•GMT differential is calculated by this watch based on Universal Time Coordinated
(UTC*) data.
*UTC is the world-wide scientific standard of timekeeping. It is based upon carefully
maintained atomic (cesium) clocks that keep time accurately to within microseconds. Leap
seconds are added or subtracted as necessary to keep UTC in sync with the Earth’s rotation.
The reference point for UTC is Greenwich, England.
12-hour/24-hour Timekeeping Formats
The 12-hour/24-hour timekeeping format you select in the Timekeeping Mode is also
applied in all other modes.
•With the 12-hour format, the PM indicator (P) appears on the display for times in the
range of noon to 11:59 p.m. and no indicator appears for times in the range of
midnight to 11:59 a.m.
•With the 24-hour format, times are displayed in the range of 0:00 to 23:59, without
any indicator.
Illumination Precautions
•Illumination may be hard to see when viewed under direct sunlight.
•Illumination automatically turns off whenever an alarm sounds.
•Frequent use of illumination runs down the battery.
Pago Pago
Honolulu
Anchorage
Vancouver
Los Angeles
Edmonton
Denver
Mexico City
Winnipeg
Chicago
Miami
Toronto
New York
Caracas
Halifax
St. Johns
Rio De Janeiro
Praia
City City GMT Other major cities in same time zone
Code
Differential
City Code Table
PPG
HNL
ANC
YVR
LAX
YEA
DEN
MEX
YWG
CHI
MIA
YTO
NYC
CCS
YHZ
YYT
RIO
RAI
–11.0
–10.0
–09.0
–08.0
–07.0
–06.0
–05.0
–04.0
–03.5
–03.0
–01.0
Papeete
Nome
San Francisco, Las Vegas,
Seattle/Tacoma, Dawson City
El Paso
Houston, Dallas/Fort Worth, New Orleans
Montreal, Detroit, Boston,
Panama City, Havana, Lima, Bogota
La Paz, Santiago, Port Of Spain
Sao Paulo, Buenos Aires, Brasilia, Montevideo
Lisbon
London
Barcelona
Madrid
Paris
Milan
Rome
Berlin
Stockholm
Athens
Cairo
Jerusalem
Moscow
Jeddah
Tehran
Dubai
Kabul
Karachi
Delhi
+00.0
+01.0
+02.0
+03.0
+03.5
+04.0
+04.5
+05.0
+05.5
Dublin, Casablanca, Dakar, Abidjan
Amsterdam, Algiers, Hamburg, Frankfurt, Vienna
Helsinki, Istanbul, Beirut, Damascus,
Cape Town
Kuwait, Riyadh, Aden, Addis Ababa, Nairobi
Shiraz
Abu Dhabi, Muscat
Male
Mumbai, Kolkata
LIS
LON
BCN
MAD
PAR
MIL
ROM
BER
STO
ATH
CAI
JRS
MOW
JED
THR
DXB
KBL
KHI
DEL
Dhaka
Yangon
Bangkok
Hong Kong
Seoul
Tokyo
Adelaide
Guam
Sydney
Noumea
Wellington
+06.0
+06.5
+07.0
+08.0
+09.0
+09.5
+10.0
+11.0
+12.0
Colombo
Jakarta, Phnom Penh, Hanoi, Vientiane
Singapore, Kuala Lumpur, Beijing, Taipei, Manila, Perth,
Ulaanbaatar
Pyongyang
Darwin
Melbourne, Rabaul
Port Vila
Christchurch, Nadi, Nauru Island
DAC
RGN
BKK
HKG
SEL
TYO
ADL
GUM
SYD
NOU
WLG
•Based on data as of December 2004.
This manual suits for next models
3
Table of contents
Other Casio Watch manuals

Casio
Casio MO0609-EA User manual

Casio
Casio 4390 User manual

Casio
Casio AMW-703D-1AV User manual

Casio
Casio 5417 User manual

Casio
Casio QW-728 Configuration guide

Casio
Casio 3452 Service manual

Casio
Casio G-Shock Frogman GW-8230B-9AER User manual

Casio
Casio 2707 User manual

Casio
Casio 5066 User manual

Casio
Casio 766 Configuration guide