Castex FS-2000 Product manual

ENGLISH - ESPAÑOL
FS-2000
Model No.:
609373
609374 - Pac
609452
Rev. 02 (06-04)
Electric Automatic Scrubber
Fregadora Automática Eléctrico
Operator and Parts Manual
Manual de Operación y de Piezas
CASTEX CUSTOMER SERVICE:
1--800--365--6625
FAX: 1--800--678--4240
TECHNICAL SUPPORT:
1--800--522--7839 EXT. 5356
TENNANT COMPANY
701 NORTH LILAC DRIVE
MINNEAPOLIS, MN 55422
MAILING ADDRESS:
TENNANT COMPANY
P.O. BOX 1452
MINNEAPOLIS, MN 55440--1452
Home
Find...
Go To..

OPERATION
2FS-2000 Electric Scrubber (06--04)
This manual is furnished with each new model.
It provides necessary operation and maintenance
instructions and an illustrated parts list.
Read this manual completely and understand the
machine before operating or servicing it.
Use the illustrated Parts Lists to order parts. Before
ordering parts or supplies, be sure to have your
machine model number and serial number handy.
Parts and supplies may be ordered by phone or mail
from any authorized parts and service center,
distributor or from any of the manufacturer’s
subsidiaries.
This machine will provide excellent service. However,
the best results will be obtained at minimum costs if:
SThe machine is operated with reasonable care.
SThe machine is maintained regularly - per the
maintenance instructions provided.
SThe machine is maintained with manufacturer
supplied or equivalent parts.
MACHINE DATA
Please fill out at time of installation for future reference.
Model No.-
Install. Date -
Serial No.-
E2000, 2001, 2004 Tennant Company Printed in U.S.A.
Castex is a registered United States trademark of Tennant Company.
Specifications and parts are subject to change without notice.
TABLE OF CONTENTS (ESPAÑOL ÍNDICE....15)
SAFETY PRECAUTIONS 3....................
GROUNDING INSTRUCTIONS 4...........
SAFETY LABEL 4............................
MACHINE COMPONENTS 5...................
MACHINE INSTALLATION 6...................
UNCRATING MACHINE 6..................
FILLING BALLAST TANK 6.................
MACHINE SETUP 6..........................
ATTACHING SQUEEGEE 6................
INSTALLING BRUSH OR PAD DRIVER 6....
FILLING SOLUTION TANK 7...............
CONNECTING POWER CORD 8...........
MACHINE OPERATION 8.....................
PRE--OPERATION CHECKS 8..............
WHILE OPERATING MACHINE 9...........
BRUSH MOTOR CIRCUIT BREAKER 9......
DRAINING TANKS 10..........................
DRAINING RECOVERY TANK 10............
DRAINING SOLUTION TANK 10.............
MACHINE MAINTENANCE 11..................
DAILY MAINTENANCE 11...................
MONTHLY MAINTENANCE 11...............
QUARTERLY MAINTENANCE 11............
TRANSPORTING MACHINE 11.................
STORING MACHINE 12........................
RECOMMENDED STOCK ITEMS 12.............
TROUBLE SHOOTING 13......................
SPECIFICATIONS 14..........................
ELECTRICAL DIAGRAMS 30...................
PARTS LIST 32...............................
REPLACEMENT BRUSHES AND
PAD DRIVER GROUP 32...................
SOLUTION TANK GROUP 34................
SOLUTION TANK REAR PANEL GROUP 36..
RECOVERY TANK GROUP 38...............
CONTROL CONSOLE GROUP 40...........
LEVER GROUP 42.........................
NON-DRIVE MODEL WHEEL GROUP 44.....
BRUSH DRIVE GROUP 46..................
SKIRT GROUP 48..........................
CURVED SQUEEGEE GROUP 50...........
OPTIONS 52...................................
SQUEEGEE WAND ASSEMBLY 52..........
BRUSH WEIGHT KIT 53....................
Home
Find...
Go To..

OPERATION
FS-2000 Electric Scrubber (06--04) 3
SAFETY PRECAUTIONS
This machine is intended for commercial use. It is
designed exclusively to scrub hard floors in an
indoor environment and is not constructed for any
other use. Use only recommended pads, brushes
and commercially available floor cleaners
intended for machine application.
All operators must read, understand and practice
the following safety precautions.
The following warning alert symbol and the “FOR
SAFETY” heading are used throughout this manual as
indicated in their description:
WARNING: To warn of hazards or unsafe
practices which could result in severe personal
injury or death.
FOR SAFETY: To identify actions which must be
followed for safe operation of equipment.
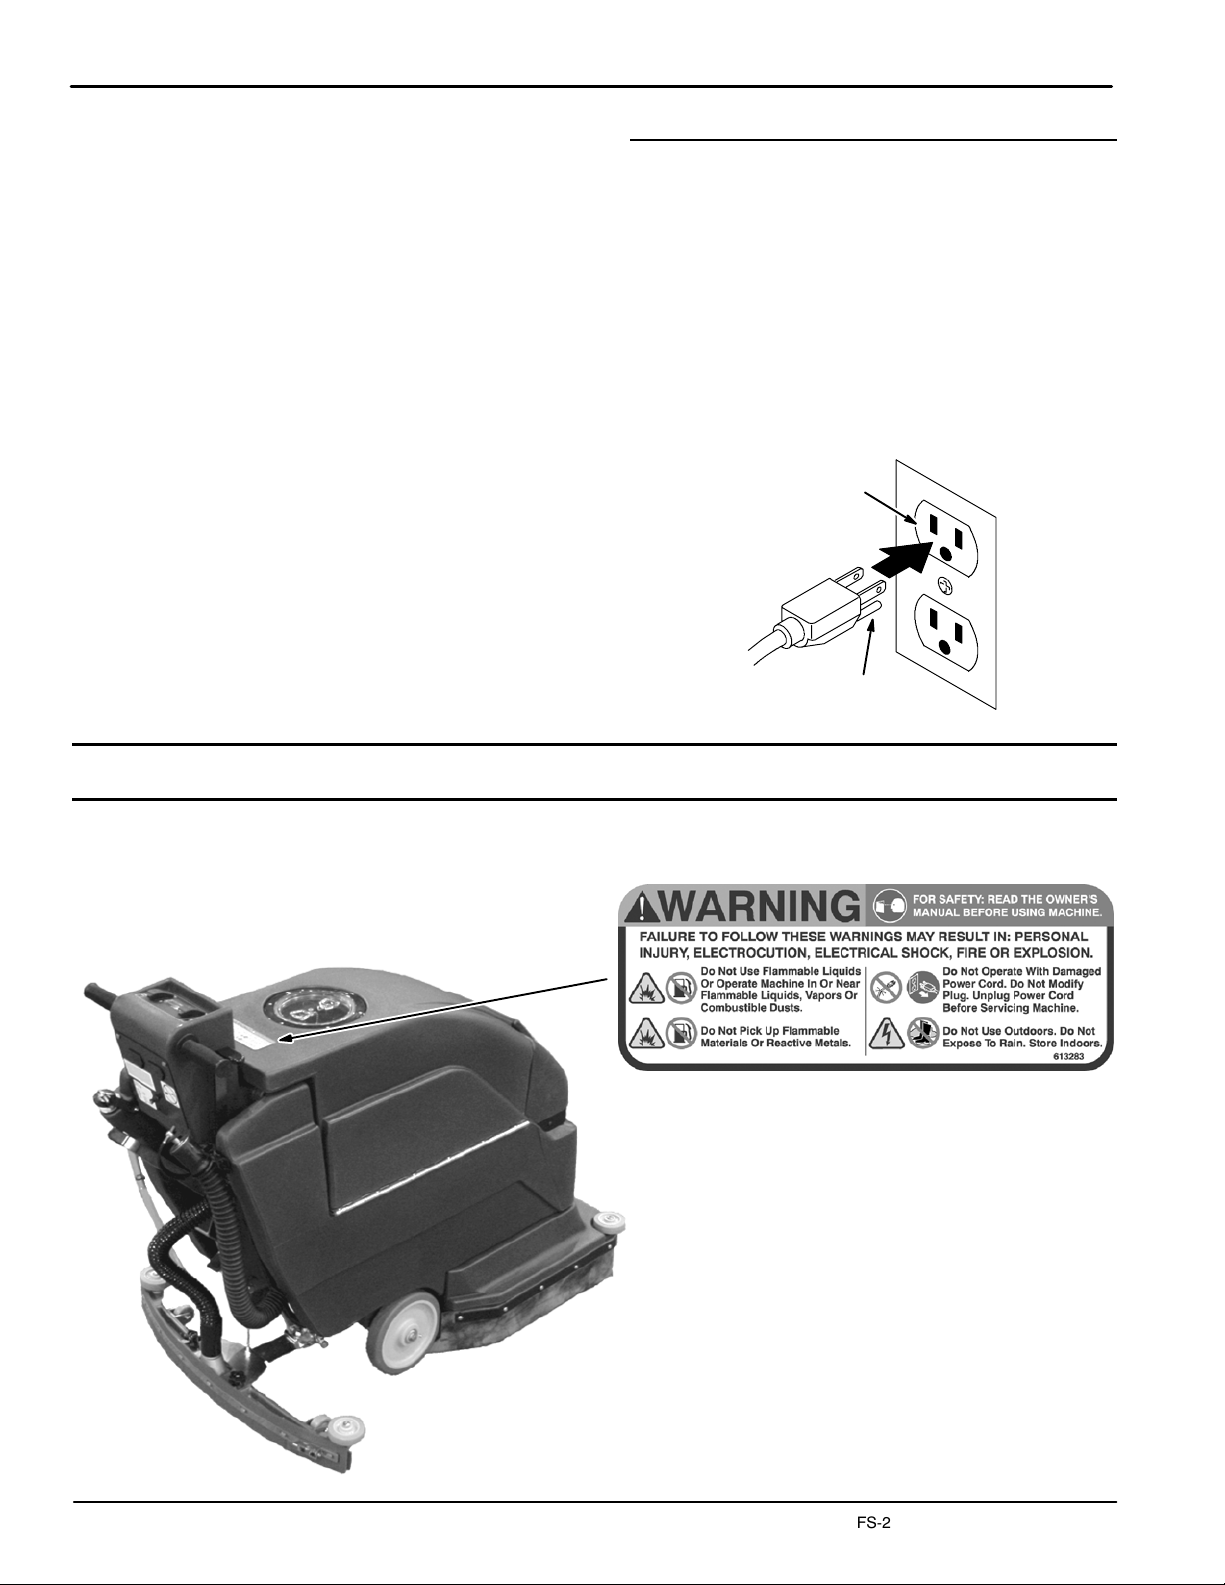
Failure to follow these warnings may result in:
personal injury, electrocution, electrical shock,
fire or explosion.
WARNING: Do Not Use Flammable Liquids Or
Operate Machine In Or Near Flammable Liquids,
Vapors Or Combustible Dusts.
This machine is not equipped with explosion
proof motors. The electric motors will spark upon
start up and during operation which could cause a
flash fire or explosion if machine is used in an
area where flammable vapors/liquids or
combustible dusts are present.
WARNING: Do Not Pick Up Flammable
Materials Or Reactive Metals.
WARNING: Do Not Operate With Damaged
Power Cord. Do Not Modify Plug. Unplug power
Cord Before Servicing Machine.
If the supply cord is damaged or broken, it must
be replaced by the manufacturer or it’s service
agent or a similarly qualified person in order to
avoid a hazard.
WARNING: Do Not Use Outdoors. Do Not
Expose To Rain. Store Indoors.
The following information signals potentially
dangerous conditions to the operator or
equipment:
FOR SAFETY:
1. Do not operate machine:
-- With flammable liquids or near flammable
vapors as an explosion or flash fire may
occur.
-- Unless trained and authorized.
-- Unless operator manual is read and
understood.
-- Unless cord is properly grounded.
-- With damaged cord or plug.
-- If not in proper operating condition.
-- In outdoor areas.
-- In standing water.
-- With the use of additional extension cords.
Only use manufacturer’s extension cord
equipped with machine which has proper
capacity and is grounded.
2. Before operating machine:
-- Make sure all safety devices are in place
and operate properly.
3. When using machine:
-- Do not run machine over cord.
-- Do not pull machine by plug or cord.
-- Do not pull cord around sharp edges or
corners.
-- Do not unplug by pulling on cord.
-- Do not stretch cord.
-- Do not handle plug with wet hands.
-- Keep cord away from heated surfaces.
-- Go slow on inclines and slippery surfaces.
-- Wear non--slip shoes.
-- Use care when reversing machine.
-- Report machine damage or faulty
operation immediately.
-- Never allow children to play on or around.
-- Follow mixing and handling instructions
on chemical containers.
4. Before leaving or servicing machine:
-- Stop on level surface.
-- Turn off machine.
-- Unplug cord from wall outlet.
Home
Find...
Go To..

OPERATION
4FS-2000 Electric Scrubber (06--04)
5. When servicing machine:
-- Unplug cord from wall outlet.
-- Avoid moving parts. Do not wear loose
jackets, shirts, or sleeves.
-- Block machine tires before jacking up.
-- Use hoist or jack that will support the
weight of the machine.
-- Use manufacturer supplied or approved
replacement parts.
-- All repairs must be performed by a
qualified service person.
-- Do not modify the machine from its
original design.
6. When transporting machine:
-- Turn machine off.
-- Get assistance when lifting machine.
-- Unplug cord from wall outlet.
-- Use a recommended ramp when
loading/unloading into/off truck or trailer.
-- Use tie--down straps to secure machine to
truck or trailer.
GROUNDING INSTRUCTIONS
Machine must be grounded. If it should
malfunction or breakdown, grounding provides a
path of least resistance for electrical current to
reduce the risk of electrical shock. This machine
is equipped with a cord having an
equipment--grounding conductor and grounding
plug. The plug must be plugged into an
appropriate outlet that is properly installed in
accordance with all local codes and ordinances.
Do not remove ground pin; if missing, replace
plug before use.
Grounded
3HoleOutlet
Ground Pin
SAFETY LABEL
W
A
RNING L
A
BEL --
L
OC
A
TEDONTOPOF
THE RECOVERY TANK.
The safety label appears on the machine in the
location indicated. Replace label if it becomes
damaged or illegible.
Home
Find...
Go To..

OPERATION
FS-2000 Electric Scrubber (02--00) 5
MACHINE COMPONENTS
2
3
5
8
14
1
6 7
12
10 9
13
11
15
20
16
14
7
19
22 21
17
6
18
4
1. Control Grips
2. Vacuum ON/OFF Switch
3. Brush ON/OFF Switch
4. Wall Rollers
5. Brush Circuit Breaker
6. Squeegee Lift Lever
7. Solution Flow Lever
8. Solution Flow Adjustment Knob
9. Adjustable Control Console Levers
10. Brush Lift Lever
11. Brush Lift Foot Lever
12. Recovery Tank Drain Hose
13. Solution Tank Drain Hose
14. Squeegee Assembly
15. Control Console
16. Recovery Tank
17. Recovery Tank Lid
18. Solution Fill Door
19. Safety Lights
20. Rear Drive Wheel
21. Scrub Head
22. Scrub Head Skirt
Home
Find...
Go To..

OPERATION
6FS-2000 Electric Scrubber (11--01)
MACHINE INSTALLATION
UNCRATING MACHINE
Carefully check carton for signs of damage. Report
damages at once to carrier. Check carton contents to
ensure all accessories are included.
To uncrate your machine, remove straps and raise
brush head. To raise scrub head, step down firmly on
the bottom brush lift foot pedal until pedal locks into
the raised position. Carefully lift or create a ramp using
crate boards to remove machine from pallet.
ATTENTION: Do not roll machine off pallet,
damage may occur.
FILLING BALLAST TANK
After removing machine from shipping pallet, hinge
over the recovery tank and fill ballast tank with clean
water. Replace plug securely after filling (Figure 1).
(Models sold in Canada require recovery tank lock
bracket removal to access ballast tank).
FIG. 1
MACHINE SETUP
ATTACHING SQUEEGEE
1. Pull back on squeegee lift lever to raise squeegee
mount bracket.
2. Loosen two thumb knobs on squeegee and slide
squeegee into slot at rear of squeegee mount
bracket. Make sure that squeegee roller wheels
are facing toward the rear (Figure 2).
FIG. 2
3. Tighten thumb knobs securely.
INSTALLING BRUSH OR PAD DRIVER
1. Turn machine off.
FOR SAFETY: Before leaving or servicing
machine, stop on level surface and turn off
machine.
2. Lower scrub head. Step down firmly on top pedal
and push pedal forward to lower (Figure 3).
FIG. 3
3. Position squeegee swivel mechanism so it’s
centered behind machine.
4. Tilt machine back to access motor hub.
5. Select a recommended pad or brush that best
meets your cleaning needs.
NOTE: Consult your authorized distributor for pad and
brush recommendations.
Home
Find...
Go To..

OPERATION
FS-2000 Electric Scrubber (06--04) 7
6. (For Pad Installation) Attach pad to pad driver
before installing driver to motor hub. To attach
pad, remove plastic centerlock from pad driver
and position pad centered on driver, replace
centerlock securely (Figure 4).
FIG. 4
7. Attach brush/pad driver to motor hub. Align 3
mounting studs with slots in motor hub and give
the driver a quick turn toward the spring clip on the
motor hub to attach brush/pad driver. Be certain
that spring clip locks into one of the studs on the
driver before operating machine (Figure 5).
FIG. 5
8. Raise scrub head. To raise brush head, step down
firmly on the bottom brush lift foot pedal until brush
locks into the raised position (Figure 6).
FIG. 6
FILLING SOLUTION TANK
1. Push machine to fill station. Raise squeegee and
scrub head when transporting.
2. Pull solution flow lever completely back to shut off
solution flow (Figure 7).
FIG. 7
3. Open solution fill door at front of machine and fill
solution tank with 38L (10 gal) of clean water,
60°C (140°F) maximum temperature. Or use the
rear fill port to fill solution tank. The clear tube
below the fill port has 19L (5 gal) increment
markers to indicate amount of water in tank
(Figure 8).
NOTE: The water must not be hotter than 60_C
(140_F) or tank damage may occur.
FIG. 8
NOTE: If filling with a bucket be certain that bucket is
clean. This will prevent possible solution line clogs.
4. Add cleaning chemical. See proper dilution ratio
instructions on bottle.
FOR SAFETY: When using machine, follow mixing
and handling instructions on chemical containers.
ATTENTION: Use only recommended detergents.
Machine damage due to improper detergent usage
will void the manufacturer’s warranty. Contact
your Tennant Sales Representative for detergent
recommendations.
Home
Find...
Go To..

OPERATION
8FS-2000 Electric Scrubber (06--04)
WARNING: Do Not Use Flammable Liquids Or
Operate Machine In Or Near Flammable Liquids,
Vapors Or Combustible Dusts.
CONNECTING POWER CORD
Connect the supplied extension cord to machine. Plug
cord into a grounded wall outlet (Figure 9).
Grounded
3HoleOutlet
Ground Pin
FIG. 9
FOR SAFETY: Do not operate machine with the
use of additional extension cords. Only use
manufacturer’s extension cord equipped with
machine which has proper capacity and is
grounded.
MACHINE OPERATION
FOR SAFETY: Do not operate machine unless
operator manual is read and understood.
WARNING: Do Not Operate With Damaged
Power Cord. Do Not Modify Plug. Unplug power
Cord Before Servicing Machine.
If the supply cord is damaged or broken, it must
be replaced by the manufacturer or it’s service
agent or a similarly qualified person in order to
avoid a hazard.
PRE--OPERATION CHECKS
1. Sweep and dust mop floor.
2. Inspect power cord for damage, replace
immediately if damaged.
3. Check that a pad/brush is installed.
4. Check that squeegee is installed.
1. Adjust control grips to a comfortable operating
height (three settings). Squeeze together two
levers under console to raise or lower control grips
(Figure 10).
FIG. 10
2. Lower squeegee by releasing squeegee lift lever
from the lock position (Figure 11).
FIG. 11
3. Lower brush head, step down firmly on top brush
lift pedal and push pedal forward to lower
(Figure 12).
FIG. 12
4. Turn vacuum switch to the on position.
Home
Find...
Go To..

OPERATION
FS-2000 Electric Scrubber (06--04) 9
5. Push solution flow lever forward to desired flow
rate. Solution will immediately begin to flow once
lever is activated (Figure 13).
FIG. 13
To adjust the maximum solution flow rate, turn
solution flow adjustment knob down to increase or
up to decrease (Figure 14).
FIG. 14
6. Turn brush switch to the on position.
ATTENTION: To prevent floor finish damage, DO
NOT leave machine at stand still once brush
begins to spin.
7. Begin scrubbing by pushing machine forward.
WHILE OPERATING MACHINE
WARNING: Do Not Pick Up Flammable
Materials Or Reactive Metals.
FOR SAFETY: When using machine, go slow on
inclines and slippery surfaces.
1. Periodically check for excessive foam in recovery
tank (look through clear lid). If excessive foam
appears, pour a foam control solution into the
recovery tank.
ATTENTION: Do not allow foam or water to enter
float shut-off screen, vacuum motor damage will
result; not covered by warranty. Foam will not
activate float shut-off screen.
2. If more scrubbing pressure is needed for small
heavily soiled areas, simply pull brush lift lever
upward while operating (Figure 15).
FIG. 15
3. If squeegee leaves streaks, raise squeegee and
wipe both blades with a cloth.
4. Before stopping or turning machine around, pull
back on solution control lever to shut off solution
flow.
5. View clear tube at rear of machine for remaining
cleaning solution.
6. When the solution tank runs dry, turn off brush
switch, shut off solution control lever and continue
to vacuum until all dirty water is consumed into the
recovery tank. Raise the squeegee and scrub
head and drain recovery tank (See DRAINING
TANKS).
BRUSH MOTOR CIRCUIT BREAKER
Machine is equipped with a circuit breaker to protect
brush motor from damage. If the brush motor circuit
breaker trips, it can not be reset immediately.
Determine reason why breaker tripped, allow motor to
cool and then reset. Circuit breaker will trip due to
brush motor overload. Clean or change pad if breaker
should trip. Brush motor circuit breaker button is
located at rear of control console.
Home
Find...
Go To..

OPERATION
10 FS-2000 Electric Scrubber (06--04)
DRAINING TANKS
1. Turn machine off and unplug cord from wall outlet.
FOR SAFETY: Before leaving or servicing
machine, stop on level surface, turn off machine
and unplug cord from wall outlet.
2. Raise squeegee and scrub head and transport
machine to floor drain.
NOTE: If using bucket to drain machine, do not use
same bucket for filling solution tank.
DRAINING RECOVERY TANK
When finished scrubbing or when refilling solution
tank, recovery tank should be drained and cleaned.
ATTENTION: If recovery tank is not drained before
refilling, foam or water may enter the float shut-off
screen and damage vacuum motor. Foam will not
activate float shut--off screen.
1. Remove drain hose from holder, position hose
over floor drain and twist off drain hose plug. To
completely drain recovery tank, hinge open tank
and flip up tank support stand to rest tank on
(Figure 16).
FIG. 16
2. Clean recovery tank after each use. Use a hose to
rinse out recovery tank. Be careful not to spray
water into float shut-off screen.
3. Replace drain hose plug tightly after draining.
DRAINING SOLUTION TANK
To drain leftover cleaning solution from solution tank
perform the following steps:
1. Pull clear tube off hose barb at rear of machine
and drain solution into floor drain or bucket
(Figure 17).
FIG. 17
2. Rinse solution tank with clean water after each
use. This will prevent clogging due to chemical
buildup.
3. Push solution flow lever forward to rinse out
solution flow system.
4. Reconnect clear tube. Be certain tube is
completely pushed on hose barb.
Home
Find...
Go To..

OPERATION
FS-2000 Electric Scrubber (06--04) 11
MACHINE MAINTENANCE
To keep machine in good working condition, simply
follow machines daily and monthly maintenance
procedures.
WARNING: Hazardous Voltage. Shock or
electrocution can result. Unplug machine before
servicing.
ATTENTION: Contact an Authorized Service
Center for machine repairs. Machine repairs
performed by other than an authorized person will
void your warranty.
DAILY MAINTENANCE
(Every 4 Hours of Use)
1. Inspect power cord and cord grip for damage.
Replace immediately if damaged. Always coil
extension cord neatly after each use.
2. Remove and clean pad/brush.
3. Remove and clean float shut-off screen located in
recovery tank (Figure 18).
FIG. 18
4. Drain and rinse tanks thoroughly. After draining
tanks, hinge recovery tank until you can see
vacuum intake hole at rear of tank. Remove any
debris in hole if necessary.
5. Raise squeegee and wipe it down with a dry cloth.
Store squeegee in the up position to prevent
squeegee damage.
6. Clean machine with an all purpose cleaner and
damp cloth.
ATTENTION: Do not power spray or hose off
machine. Electrical component damage may
result.
MONTHLY MAINTENANCE
(Every80HoursofUse)
1. Lubricate all linkage pivot points with silicon spray
then coat with a water resistant grease to maintain
a smooth operation.
2. Check machine for water leaks and loose nuts and
bolts.
QUARTERLY MAINTENANCE
(Every 250 Hours of Use)
Inspect motors for carbon brush wear. Replace
brushes when worn to a length of 10mm (0.38 in.) or
less. Contact an Authorized Service Center for carbon
brush inspection.
ATTENTION: Contact an Authorized Service
Center for machine repairs. Machine repairs
performed by other than an authorized person will
void the warranty.
TRANSPORTING MACHINE
When transporting machine by use of trailer or truck,
be certain to follow tie--down procedures below:
FOR SAFETY: When using machine, go slow on
inclines and slippery surfaces.
1. Raise squeegee and scrub head.
2. Load machine using a recommended loading
ramp.
3. Position front of machine up against front of trailer
of truck. Once machine is positioned, lower scrub
head and squeegee.
4. Place a block behind the main wheel and the rear
casters.
5. Place tie--down straps over top of machine and
secure straps to floor. It may be necessary to
install tie--down brackets to the floor of your trailer
or truck.
NOTE: Do not use control grips to secure machine for
transporting.
FOR SAFETY: When transporting machine, use a
recommended ramp when loading/unloading
into/off truck or trailer, use tie--down straps to
secure machine to truck or trailer.
Home
Find...
Go To..

OPERATION
12 FS-2000 Electric Scrubber (06--04)
STORING MACHINE
Store machine in a dry area in the upright position.
Before storing machine be certain to flush tanks and
drain machine of all water. Remove recovery tank lid
to promote air circulation. Raise pad driver and
squeegee off floor to prevent damage.
ATTENTION If storing machine in freezing
temperatures, be certain to drain machine of all
water. Damage due to freezing temperatures is not
covered by warranty.
WARNING: Do Not Use Outdoors. Do Not
Expose To Rain. Store Indoors.
RECOMMENDED STOCK ITEMS
Refer to Parts List section for recommended stock
items. Stock Items are clearly identified with a bullet
preceding the parts description. See example below:
Home
Find...
Go To..

OPERATION
FS-2000 Electric Scrubber (11--01) 13
TROUBLE SHOOTING
PROBLEM CAUSE SOLUTION
No power. Tripped building circuit breaker. Reset breaker.
p
Faulty extension cord. Replace extension cord.
Faulty pigtail cord. Contact Service Center.
Brush motor does not operate. Faulty brush switch. Contact Service Center.
p
Machine circuit breaker has tripped. Clean or replace pad or brush and
reset breaker button.
Rectifier has burned out. Contact Service Center.
Faulty wiring. Contact Service Center.
Faulty brush motor. Contact Service Center.
Carbon brushes worn. Contact Service Center.
Vacuum motor does not operate. Faulty vacuum switch or wiring. Contact Service Center.
p
Faulty vacuum motor. Contact Service Center.
Carbon brushes worn. Contact Service Center.
Little or no solution flow. Solution flow lever is not activated. Push solution flow lever forward.
Solution line is clogged. Remove hose and blow
compressed air through it.
Solution valve is clogged. Remove valve and clean. Do not
scratch or damage inside of valve.
Solution flow adjustment knob
needs adjusting. Adjust solution flow knob to
increase solution flow. Turn knob
down to increase flow.
Poor water pick up. Recovery tank is full. Empty recovery tank.
p
p
Ball float shutoff screen inside
recovery tank is clogged. Remove screen and clean.
Squeegee is clogged with debris. Clean squeegee.
Squeegee blades are worn. Replace squeegee blades.
Squeegee thumbscrews are loose. Tighten thumbscrews.
Vacuum hose connections are
loose or hose has a hole. Push vacuum hose cuffs firmly on
connections. Replace hose if
damaged.
Vacuum hose is clogged with
debris. Remove clogged debris.
Tank gasket is defective. Replace tank gasket.
Recovery tank water inlet is
plugged. Inlet is located at bottom
of recovery tank.
Empty recovery tank and tilt it
sideways to locate inlet hole,
remove clogged debris.
Drain hose plug is loose. Tighten drain plug.
Clear recovery tank lid is loose. Tighten lid.
Vacuum motor is loose. Tighten down vacuum motor. Do
not over tighten and damage motor.
Safety lights do not work. Flasher is burned out. Contact Service Center.
Home
Find...
Go To..

OPERATION
14 FS-2000 Electric Scrubber (11--01)
SPECIFICATIONS
Model FS-2000
LENGTH 1194 mm (47 in.)
WIDTH 559 mm (22 in.)
HEIGHT 965 mm (38 in.)
WEIGHT 108 Kg (238 lb)
SOLUTION TANK CAPACITY 38 L (10 gal)
RECOVERY TANK CAPACITY 45 L (12 gal)
CLEANING PATH WIDTH 508 mm (20 in.)
TOTAL POWER CONSUMPTION 120V, 14.0A, 1416w
BRUSH MOTOR .75hp, 250 rpm, 120v, 6.5A, 550w
VACUUM MOTOR 1.15hp, 2 stage, 120v, 866w, 7.5A
WATER LIFT 2083 mm (82 in.)
POWERCORDLENGTH 14/3, 23m (75 ft.)
DECIBEL RATING AT OPERATOR’S EAR, INDOORS ON TILE 70dB(A)
Home
Find...
Go To..

OPERACIÓN
15
FS-2000 Eléctrico (06--04)
Este manual se proporciona con cada nuevo modelo.
Proporciona instrucciones necesarias de
mantenimiento y lista ilustrada de piezas.
Antes de operar o prestar servicio a la máquina,
lea completamente este manual y entienda la
máquina.
Para ordenar piezas use las Listas Ilustradas de las
Piezas. Asegúrese de tener listo el número de modelo
y de serie de la máquina, antes de ordenar piezas o
suministros. Las piezas y suministros pueden
ordenarse por teléfono o por correo de cualquier
centro autorizado de piezas y servicio, distribuidor o
de cualquiera de las subsidiarias del fabricante.
Esta máquina proporcionará un servicio excelente. Sin
embargo, los mejores resultados se obtienen a un
costo mínimo si:
SLa máquina se opera con un cuidado razonable.
SLa máquina se mantiene con regularidad, según las
instrucciones de mantenimiento provistas.
SLa máquina se mantiene con las piezas provistas
por el fabricante o equivalentes.
DATOS DE LA MÁQUINA
Por favor complete en el momento de la instalación,
para referencia futura.
No. de modelo --
Fechadeinstalación--
Nº de Serie--
E2000, 2001, 2004 Tennant Company Printed in U.S.A.
ÍNDICE
MEDIDAS DE SEGURIDAD 16.......................
INSTRUCCIONES DE CONEXION A TIERRA 17....
ETIQUETA DE SEGURIDAD 18.......................
COMPONENTES DE LA MÁQUINA 19................
INSTALACIÓN DE LA MÁQUINA 20..................
DESEMBALADO DE LA MÁQUINA 20.............
LLENAR EL TANQUE DE DESECHO 20...........
PREPARACIÓN DE LA MÁQUINA 20.................
FIJACIÓN DE LA ESCOBILLA DE GOMA 20........
INSTALACIÓN DEL IMPULSOR DEL CEPILLO
O DE LA ALMOHADILLA 20......................
LLENADO DEL DEPÓSITO DE LA DISOLUCIÓN 21.
ENCHUFE EL CABLE EN LA TOMA DE LA PARED 22
FUNCIONAMIENTO DE LA MÁQUINA 22..............
COMPROBACIONES PREVIAS A LA PUESTA EN
FUNCIONAMIENTO 22..........................
DURANTE LA UTILIZACIÓN DE LA MÁQUINA 23...
CORTACIRCUITOS DEL MOTOR DE LA
ALMOHADILLA 24..............................
VACIADO DE LOS DEPÓSITOS 24...................
VACIADO DEL DEPÓSITO DE RECUPERACIÓN 24.
VACIADO DEL DEPÓSITO DE LA DISOLUCIÓN 25.
MANTENIMIENTO DE LA MÁQUINA 25...............
MANTENIMIENTO DIARIO 25....................
MANTENIMIENTO MENSUAL 25..................
MANTENIMIENTO TRIMESTRAL 26...............
TRANSPORTE DE LA MÁQUINA 26..................
ALMACENAMIENTO DE LA MÁQUINA 26.............
RECOMENDACIONES PARA EL ALMACENAMIENTO 26
LOCALIZACIÓN DE AVERÍAS 27.....................
ESPECIFICACIONES 29.............................
DIAGRAMAS ELECTRICAS 30.......................
LISTA DE PIEZAS 32................................
CEPILLO DEL REEMPLAZO Y GRUPO DEL
MANDO DE LA ALMOHADILLA 32................
GRUPE DEL DEPÓSITO DE DISOLUCIÓN 34......
CONJUNTO PANEL TRASERA 36.................
CONJUNTO DESPÓSITO RECUPERAR 38........
CONJUNTO CONSOLA DE CONTROLES 40.......
CONJUNTO DE PALANCAS 42...................
CONJUNTO PARA LEVANTAR CEPILLO 44........
CONJUNTO IMPULSO DE CEPILLO 46............
CONJUNTO JUEGO 48..........................
CONJUNTO PALETA ENCORUADO 50............
OPCIONES 52......................................
GROUPE D’ASPIRATION ET RACLETTE À MAIN 52
KIT DEL PESO DEL CEPILLO 53.................
Home
Find...
Go To..

OPERACIÓN
16 FS-2000 Eléctrico (06--04)
MEDIDAS DE SEGURIDAD
Esta máquina está diseñada para el uso
comercial. Se ha diseñado exclusivamente para
limpiar pisos duros en un ambiente interior y no
se fabrica para ningún otro uso. Use sólo
limpiadores recomendados de pisos
comercialmente disponibles para la aplicación de
la máquina.
Todos los operadores deben leer, entender y
practicar las precauciones siguientes de
seguridad.
El siguiente símbolo de alerta de advertencia y el
encabezamiento de ”PARA SEGURIDAD” se usan en
este manual como se indica en su descripción:
ADVERTENCIA: Para advertir de riesgos o
prácticas inseguras que podrían resultar en
lesiones personales graves o la muerte.
PARA SEGURIDAD: Para identificar acciones que
deben seguirse para el funcionamiento seguro del
equipo.
El no seguir estas advertencias puede resultar en:
lesiones personales, electrocución, choque
eléctrico, fuego o explosión.
ADVERTENCIA: No use líquidos inflamables
ni opere la máquina en o cerca de líquidos y
vapores inflamables o polvos combustibles.
Esta máquina no está equipada con motores a
prueba de explosión. Los motores eléctricos
emiten chispas al arrancar y durante el
funcionamiento lo que podría causar un fuego
explosivo o explosión si la máquina se usa en una
área donde están presentes vapores/líquidos
inflamables o polvos combustibles.
ADVERTENCIA: No aspire materiales
inflamables o metales reactivos.
ADVERTENCIA: No opere con un cordón
eléctrico dañado. No modifique el enchufe.
Desenchufe el cordón eléctrico antes de reparar la
máquina.
Si el cordón del suministro se daña o se rompe,
debe ser reemplazado por el fabricante o su
agente de servicio o una persona similarmente
calificada para evitar un riesgo.
ADVERTENCIA: No use al aire libre o en
superficies húmedas. No exponga a la lluvia.
Almacén bajo techo.
La información siguiente señala condiciones
potencialmente peligrosas para el operador o el
equipo:
PARA SEGURIDAD:
1. No opere la máquina:
-- Con líquidos inflamables o cerca de los
vapores inflamables ya que puede ocurrir
una explosión o fuego explosivo.
-- A menos que está capacitado y autorizado.
-- A menos que se haya leído y entendido el
manual del funcionamiento.
-- A menos que el cordón se conecte
apropiadamente a tierra.
-- Con un cordón o enchufe dañados.
-- Si no está en condición de ejecutar una
operación apropiada.
-- En áreas al aire libre.
-- En agua estancada.
-- Con cables alargadores adicionales.
Utilice únicamente los alargadores
proporcionados por el fabricante junto a la
máquina para asegurarse de que
presentan la capacidad y toma de tierra
adecuadas.
2. Antes de arrancar la máquina:
-- Asegúrese que todos los dispositivos de
seguridad están en su lugar y operando
apropiadamente.
3. Al usar máquina:
-- No pase la máquina encima del cordón.
-- No tire de la máquina por el enchufe o el
cordón.
-- Evite pasar el cable por bordes agudos o
esquinas.
-- No desenchufe tirando del cordón.
-- No estire el cordón.
-- No maneje el enchufe con las manos
húmedas.
-- Mantenga el cordón lejos de las
superficies calientes.
-- Avance lentamente en las cuestas y
superficies resbaladizas.
-- Use zapatos antiresbalosos.
-- Sea precavido al retroceder la máquina.
-- Informe inmediatamente acerca de daños
o un funcionamiento defectuoso.
-- Nunca permita que los niños jueguen en o
alrededor de la máquina.
-- Siga las instrucciones de mezcla y manejo
indicados en los recipientes químicos.
Home
Find...
Go To..

OPERACIÓN
17
FS-2000 Eléctrico (06--04)
4. Antes de salir de o reparar la máquina:
-- Deténgala en una superficie nivelada.
-- Apague la máquina.
-- Desenchufe cordón del tomacorriente de
la pared.
5. Al prestar servicio a la máquina:
-- Desenchufe cordón del tomacorriente de
la pared.
-- Evite las piezas móviles. No use
chaquetas, camisas, o mangas, holgadas.
-- Calce las ruedas de la máquina antes de
levantarla con un gato.
-- Use güinches o gatos para soportar el
peso de la máquina.
-- Use piezas de repuesto provistas o
aprobadas por el fabricante.
-- Todas las reparaciones deben ser
realizadas por una persona de servicio
calificada.
-- No modifique la máquina de su diseño
original.
6. Al transportar máquina:
-- Apague la máquina.
-- Obtenga ayuda al alzar la máquina.
-- Desenchufe cordón del tomacorriente de
la pared.
-- Use una rampa recomendada al
cargar/descargar al/fuera del camión o
remolque .
-- Use correas de amarre para asegurar la
máquina al camión o remolque.
INSTRUCCIONES DE CONEXION A TIERRA
La máquina debe conectarse a tierra. En caso de
mal funcionamiento o desarreglo, la conexión a
tierra provee un recorrido de menor resistencia
para la corriente eléctrica para reducir el riesgo de
choque eléctrico. Esta máquina está equipada con
un cordón con un conductor de conexión a tierra
del equipo y enchufe de conexión a tierra. El
enchufe debe enchufarse en un tomacorrientes
apropiado correctamente instalado de acuerdo
con todos los códigos y ordenanzas locales. No
extraer la clavija de conexión a tierra; si falta,
reemplazar el enchufe antes de usar.
Conexión a tierra
Tomacorrientes de
3orificios
Clavija de conexión
a tierra
Home
Find...
Go To..

OPERACIÓN
18 FS-2000 Eléctrico (06--04)
ETIQUETA DE SEGURIDAD
La etiqueta de seguridad aparece en la máquina en la
localización indicada. Substituya la etiqueta si llega a
ser dañada o ilegible.
ETIQUETA DE SEGURIDAD -- LOCALIZADA EN EL
TANQUE DE RECUPERACION.
Home
Find...
Go To..

OPERACIÓN
19
FS-2000 Eléctrico (06--04)
COMPONENTES DE LA MÁQUINA
2
3
5
8
14
1
6 7
12
10 9
13
11
15
20
16
14
7
19
22 21
17
6
18
4
1. Mandos de control
2. Interruptor de Encendido/Apagado (ON/OFF) de
la aspiración
3. Interruptor de Encendido/Apagado (ON/OFF) del
cepillo
4. Rodillos de pared
5. Cortacircuitos del cepillo.
6. Palanca de elevación de la escobilla de goma
7. Palanca del flujo de la disolución
8. Botóndeajustedelflujodeladisolución
9. Palancas de ajuste de la consola de control
10. Palanca de elevación del cepillo
11. Pedal de elevación del cepillo
12. Manguera de vaciado del depósito de
recuperación
13. Manguera de vaciado del depósito de
recuperación con indicación en galones.
14. Conjunto de la escobilla de goma
15. Consola de control
16. Depósito de recuperación
17. Tapa del depósito de recuperación
18. Puerta de relleno de la disolución
19. Luces de seguridad
20. Rueda de tracción trasera
21. Cabezal de fregado
22. Aleta del cabezal de fregado
Home
Find...
Go To..

OPERACIÓN
20 FS-2000 Eléctrico (06--04)
INSTALACIÓN DE LA MÁQUINA
DESEMBALADO DE LA MÁQUINA
Compruebe cuidadosamente si la caja de cartón
muestra daños. En caso de que así sea informe
inmediatamente de los daños al transportista. Controle
el contenido de la caja para asegurarse que incluye
todos los accesorios. La escobilla de goma está
embalada con la máquina. Los impulsores de las
almohadillas están embalados aparte.
Para desembalar la máquina retire las cintas y eleve el
cabezal de barrido. Para elevar este cabezal pise
firmemente sobre la parte inferior del pedal de elevación
del cepillo hasta que dicho pedal quede bloqueado en la
posición elevada. Levante la máquina con cuidado o
utilice una rampa formada con las planchas de embalaje
para retirar la máquina del pallet.
ATENCIÓN: No ruede equipo de pallet. Pude
danarse.
LLENAR EL TANQUE DE DESECHO
Después de retirar la máquina del pallet. Abra el
depósito de recuperación y llene el tanque de desecho
con agua limpia. Cierre de nuevo el tapón después de
llenar (Figura 1). (Las máquina vendidas en Canadá
requieren herramienta para remover tanque de
desecho).
FIG. 1
PREPARACIÓN DE LA MÁQUINA
FIJACIÓN DE LA ESCOBILLA DE GOMA
1. Empuje hacia atrás la palanca de elevación de la
escobilla de goma para elevar el soporte de la
escobilla de goma.
2. Afloje los dos tornillos de orejas de la escobilla de
goma e introduzca dicha escobilla deslizándola en
las ranuras de la parte posterior del soporte de la
escobilla de goma. Asegúrese de que las ruedas
del rodillo de la escobilla de goma se encuentran
hacia atrás (Figura 2).
FIG. 2
3. Fije los tornillos de orejas.
INSTALACIÓN DEL IMPULSOR DEL CEPILLO O
DE LA ALMOHADILLA
1. Apague todos los interruptores y desenchufe el
cable eléctrico.
PARA SEGURIDAD: Al abandonar o revisar la
máquina, deténgase en una superficie plana,
apague la máquina.
2. Baje el cabezal del cepillo, pise con fuerza la parte
superior del pedal y empuje dicho pedal hacia
delante (Figura 3).
FIG. 3
Home
Find...
Go To..
This manual suits for next models
2
Table of contents
Languages:
Other Castex Scrubber manuals
Popular Scrubber manuals by other brands

RoboVent
RoboVent ProCube HVP-120-575 Owner's manual & operating instructions

Clemas & Co
Clemas & Co TENNANT T291 Operator's manual

Nilfisk-ALTO
Nilfisk-ALTO Scrubtec 770 L Operator's manual

American-Lincoln
American-Lincoln Alto SR7770HC Operator's manual, instruction book and parts list

Metcal
Metcal bvx-201 Operation manual

ALBERTI
ALBERTI TURBODRILL Instruction book