manuals.online logo
Brands
  1. Home
  2. •
  3. Brands
  4. •
  5. Cateye
  6. •
  7. Bicycle Accessories
  8. •
  9. Cateye GE100 User manual

Cateye GE100 User manual

ENG
*1
2
4
3
1
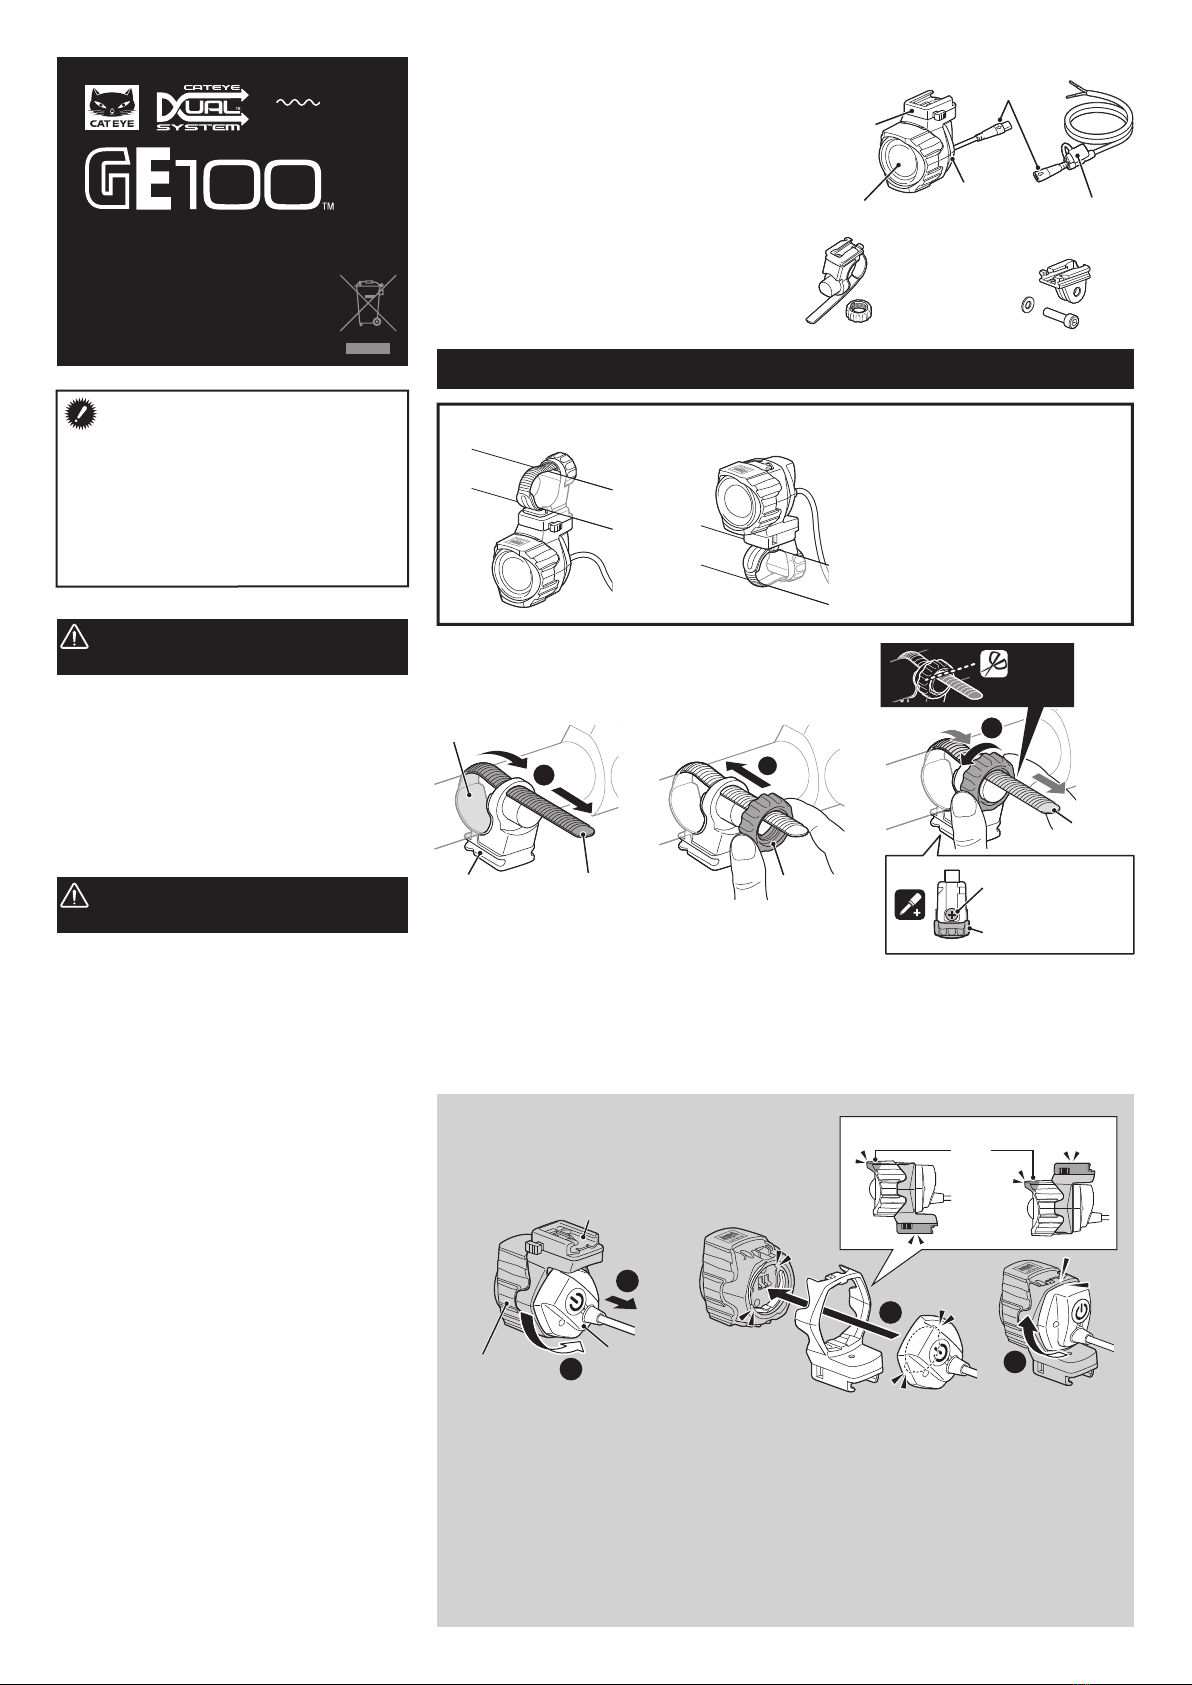
Turn the E-Bike adapter counterclock-
wise to separate the adapter from the
headlight and the bracket holder.
Turn the bracket holder and align the grooves on the E-Bike
adapter to the grooves on the headlight, and turn clockwise
until the adapter stops.
Design Pat. Pending
Copyright© 2021 CATEYE Co., Ltd.
HLEB570G-210521 11HOW TO MOUNT TO A BICYCLE
• This instruction manual is intended for use
by E-Bike specialists.
Do not attempt to install this headlight if
you are not experienced with E-Bikes.
Consult your dealer for more information.
• After mounting the headlight, dealers are
expected to explain how to use the light and
to provide this instruction manual to the
customer.
K 1808
HL-EB570G
GE100 FEATURES
The GE100 headlight connects directly to the E-Bike
drive unit for use. The headlight includes a visor to
direct the light distribution, allowing the unit to be
mounted on the top or bottom of the handlebar.
See “2. Mounting the headlight” for how to change
the mounting position of the E-Bike adapter. The
e-bike light GE100 can also be used as a battery
light via the optionally available battery. See
“Removing & optional use as battery light” for more
information.
Mounted below Mounted above
1. Mounting the bracket
2. Mounting the headlight
Wrap the strap around the
handlebar.
Attach the dial.
Securely tighten the dial.
Cut
2
3
1
Headlight
Handlebar diameter: Φ22 – 35 mm
Mounting height : 400 – 1200 mm
Rubber pad
Bracket Strap
Strap
Dial
CAUTION!:
• Be sure to tighten the dial by hand. When you tighten it too hard with a tool, the screw thread may be
stripped.
• Check the dial and screw (*1) on the bracket periodically, and use them without any loosening.
• Round off the cut edge of the bracket strap to prevent injury.
Always mount the light with the visor facing upwards so
that the low beam is correctly aligned.
E-BIKE HEADLIGHT
Instruction Manual for E-Bike Dealers
Connector specifications
Bracket holder
E-Bike adapter
Click
Removing
Mounted above Mounted below
Visor
Mounting
CAUTION!:
• When attaching or removing the E-Bike adapter, be sure to hold the headlight to prevent it from
dropping and becoming damaged.
• Do not attach the cartridge battery if water droplets, dust, or other foreign matter is attached to the
unit, and do not touch the terminals.
• Never position the visor to the bottom of the headlight.
Doing so will dazzle oncoming traffic.
WARNING!!!
(Risk of death; Prevention of accidents)
• Do not look directly at the light source. In addition,
when mounting the light unit, ensure that the light
will not dazzle other road users. Position the visor
of the head unit to the top of the headlight.
• Before your trip, please make sure the light is
firmly mounted to the bracket and it lights up. The
light must not be obscured.
• Do not disassemble or modify the light or any of the
included items.
CAUTION!
(Prevention of injury, damage, or property damage)
• Operating the light while riding is dangerous.
Always ride safely.
• Note that the light becomes hot while illuminated.
Do not block the lens or cover the light.
• Due to the variability of LEDs, the color and
brightness may differ even between devices with
the same model number.
• Do not place it within children’s reach.
•
Do not remove the E-Bike adapter when the light is on.
• Do not attach the E-Bike adapter if water droplets,
dust, or other foreign matter is attached to the unit.
Also, do not touch the terminals.
• Never use a high-pressure hose to clean the light.
• This device is rated IPX4 based on JIS C0920. Do
not immerse the device in water. Doing so may
cause a malfunction. Wipe off any moisture after
using the device in rainy weather.
• Do not subject the light to strong vibrations,
impacts, or excessive force. Discontinue use if any
abnormality occurs.
• Do not charge or use the battery at any voltage or
polarity other than that specified. Do not short-cir-
cuit the battery.
• Do not drop the light into a fire or heat the light.
• If the light unit or parts become dirty with mud,
etc., clean with a soft cloth which is moistened with
mild soap. Never apply paint thinner, benzine or
alcohol; damage will result.
Screw
(Horizontal adjustment)
Dial (Vertical adjustment)
FlexTight™ bracket
(H-34N)
Relay cable
GP bracket
Headlight
Bracket holder
E-Bike adapter
Connector
Protective cap
Included Items
Light unit
* This section explains how to mount the light unit below the
handlebar.
Black Red
To light unit
NO!
OK
USB
6
1
USB
52
3
4
Light connection
terminals
1
1HOW TO MOUNT TO A BICYCLE (Continue)
2SWITCH OPERATION
Removing & optional use as battery light
3. Attaching/removing the light
4. Connecting to the drive unit
Connect the relay cable to the E-Bike drive unit, and
then connect the E-Bike adapter on the light unit to the
relay cable connector.
CAUTION!:
Be sure to check “E-Bike output compatibility” before
connecting to the drive unit, and be sure to connect to
the drive unit correctly.
Release button
When the light unit is turned on, press the switch to
change the lighting mode.
*2 If the bicycle is stationary for a certain period of time
(about 50 seconds), brightness is reduced to
conserve the battery.
High*2 Low (Eco)
Click
Slide
Press and hold
Removing
Mounting
When mounting the light unit, ensure that the light will not dazzle other road
users. To adjust the angle, loosen the dial or the screw (*1) to the point that the
bracket moves slightly, make the adjustment, and then tighten the screw to fix
the light unit in place.
The diagram on the left
shows only one example
of connecting method.
The shape, connection
(position of and ),
and wiring of the light
connection terminals may
differ depending on the
E-Bike model.
Refer to the instruction
manual for the E-Bike for
more information.
DC 5.5−14.5 V
6.8 W Nominal power(s)
E-Bike output compatibility
Input voltage
Power consumption
Cable length
Approx. 160 cm
• Light unit : Approx. 15 cm
• Relay cable : Approx. 145 cm
(Red: Positive / Black: Negative)
Click
Switch
The light unit can be turned on/off using the E-Bike controller.
The operation of the controller may differ depending on the E-Bike
model. Refer to the instruction manual for the E-Bike for more
information.
ONOFF
Controller operation
Switching the lighting mode
Adjusting the lighting angle
Horizontal
Relay cable
E-Bike adapter
Light unit
Example connection
Drive unit
Connector
Cartridge battery (Optional)
E-Bike adapter
Bracket holder
Click
Connector
Protective cap
Store
Protective cap
CAUTION!:
• After disconnecting the relay cable connector, cover the tip on the drive unit side with the
protective cap to prevent water from entering the connector.
• Perform the procedure in reverse to reconnect the E-Bike adapter, making sure the arrows on the
cable align when connecting the connector.
• Always store the protective cap carefully for use.
Headlight
Relay cable (drive unit side)
Disconnected Connected
E-Bike adapter side
LIMITED WARRANTY
2-year warranty: Light unit only (excludes accessories/attachments)
CatEye products are warranted to be free of defects from materials and workman-
ship for a period of 2 years from original purchase. If the product fails to work
during normal use, CatEye will repair or replace the defect at no charge. Service
must be performed by CatEye or an authorized retailer. To return the product, pack
it carefully and enclose the warranty certificate (proof of purchase) with instruction
for repair. Please write or type your name and address clearly on the warranty
certificate. Insurance, handling and transportation charges to CatEye shall be borne
by person desiring service.
2-8-25, KUWAZU, HIGASHI SUMIYOSHI-KU, OSAKA, JAPAN 546-0041
For inquiries, please visit https://cateye.com/intl/contact/
CO., LTD.
LEGAL INFORMATION
SPECIFICATIONS
STANDARD ACCESSORIES
OPTIONAL ACCESSORIES
Only road legal in Germany if installed on bicycles with pedal assist function up to
25 km/h that are also equipped with a battery charge indicator and function to
switch off the motor to prevent a deep discharge of the battery to ensure that the
lighting function is available when needed.
Light source High-brightness multi-white LED
Temperature range 14˚F – 104˚F (-10˚C – 40˚C)
Waterproof IPX4
E-Bike output compatibility
• Input voltage DC5.5 − 14.5 V
• Power consumption 6.8 W Nominal power(s)
• Cable length Approx. 160 cm
Light unit : Approx. 15 cm
Relay cable : Approx. 145 cm
(Red: Positive / Black: Negative)
Dimensions/weight 2-9/16” x 2-31/64” x 51/64” (65.0 x 63.0 x 45.5 mm)
/ 3.5 oz (94.5 g) (Light unit only)
* The specifications and design are subject to change without notice.
5336922
E-Bike adapter
(Min 5.5V-Max 14.5V)
5336840
Cartridge battery
(BA-3.4DS)
5338827N
FlexTight™ bracket
(H-34N)
1604110
Out-front bracket 2
(OF-200)
5445340
GP bracket
5342440
Center fork bracket
(CFB-100)
5336860
Protective cover
USB

This manual suits for next models

1

Other Cateye Bicycle Accessories manuals

Cateye RAPIDmicro G User manual

Cateye

Cateye RAPIDmicro G User manual

Cateye Tomo CC ST-200 User manual

Cateye

Cateye Tomo CC ST-200 User manual

Cateye Reflex Auto TL-LD570-F Assembly instructions

Cateye

Cateye Reflex Auto TL-LD570-F Assembly instructions

Cateye STRADA CC-RD100N User manual

Cateye

Cateye STRADA CC-RD100N User manual

Cateye TWIN HL-NC250 User manual

Cateye

Cateye TWIN HL-NC250 User manual

Cateye Avventura User manual

Cateye

Cateye Avventura User manual

Cateye TR200DW280P User manual

Cateye

Cateye TR200DW280P User manual

Cateye CC-FR7CL User manual

Cateye

Cateye CC-FR7CL User manual

Cateye CC-AT200W User manual

Cateye

Cateye CC-AT200W User manual

Cateye ENDURO 2 User manual

Cateye

Cateye ENDURO 2 User manual

Cateye Velo Wireless + User manual

Cateye

Cateye Velo Wireless + User manual

Cateye Velo 9 User manual

Cateye

Cateye Velo 9 User manual

Cateye OS 1.0 User manual

Cateye

Cateye OS 1.0 User manual

Cateye STEALTH EVO User manual

Cateye

Cateye STEALTH EVO User manual

Cateye Stealth EVO+ CC-GL51 Instruction manual

Cateye

Cateye Stealth EVO+ CC-GL51 Instruction manual

Cateye TL-LD1100 User manual

Cateye

Cateye TL-LD1100 User manual

Cateye CC-VL500 User manual

Cateye

Cateye CC-VL500 User manual

Cateye PADRONE DIGITAL CC-PA400B User manual

Cateye

Cateye PADRONE DIGITAL CC-PA400B User manual

Cateye MITY 3 User manual

Cateye

Cateye MITY 3 User manual

Cateye Padrone+ User manual

Cateye

Cateye Padrone+ User manual

Cateye CC-MT400 User manual

Cateye

Cateye CC-MT400 User manual

Cateye Enduro8 CC-ED300 Setup guide

Cateye

Cateye Enduro8 CC-ED300 Setup guide

Cateye PADRONE SMART User manual

Cateye

Cateye PADRONE SMART User manual

Cateye Bicycle Accessories User manual

Cateye

Cateye Bicycle Accessories User manual

Popular Bicycle Accessories manuals by other brands

BIGSTONE C800-TFT instructions

BIGSTONE

BIGSTONE C800-TFT instructions

SRAM RockShox Vivid Air Series Technical manual

SRAM

SRAM RockShox Vivid Air Series Technical manual

Wald D584,675 Assembly instructions

Wald

Wald D584,675 Assembly instructions

Babboe MINI instruction manual

Babboe

Babboe MINI instruction manual

FUXON RL-MINI EB manual

FUXON

FUXON RL-MINI EB manual

Crivit FT-2882 Instructions for use

Crivit

Crivit FT-2882 Instructions for use

Dynastream Innovations BKM3 manual

Dynastream Innovations

Dynastream Innovations BKM3 manual

Overade Oxi Lum owner's manual

Overade

Overade Oxi Lum owner's manual

Schwinn Paramount Series 8 owner's manual

Schwinn

Schwinn Paramount Series 8 owner's manual

Klarfit Corgi manual

Klarfit

Klarfit Corgi manual

Xtracycle PorterPack manual

Xtracycle

Xtracycle PorterPack manual

CAMPAGNOLO BR-PE05001 user manual

CAMPAGNOLO

CAMPAGNOLO BR-PE05001 user manual

Topeak WHITELITE 800BT quick start guide

Topeak

Topeak WHITELITE 800BT quick start guide

Continental Refrigerator Ergon Series Original instructions

Continental Refrigerator

Continental Refrigerator Ergon Series Original instructions

Flexcom FB222 Installation and operating instructions

Flexcom

Flexcom FB222 Installation and operating instructions

Manitou R7 EXPERT Service guide

Manitou

Manitou R7 EXPERT Service guide

Flyer AC801 instruction sheet

Flyer

Flyer AC801 instruction sheet

DAXYS Head Light user manual

DAXYS

DAXYS Head Light user manual

manuals.online logo
manuals.online logoBrands
  • About & Mission
  • Contact us
  • Privacy Policy
  • Terms and Conditions

Copyright 2025 Manuals.Online. All Rights Reserved.