BATTERY HEADLIGHT
Manual
Design Pat. Pending
Copyright© 2022 CATEYE Co., Ltd.
HLEL160-220608 1.1
+
-
-
+
3
OFF ON *1
OK
NO!
Warning (Risk of serious injury or accident)
• Be sure to direct the light beam downward so
approaching car or pedestrian are not dazzled.
• Before your trip, please make sure the light is firmly
mounted to the bracket and it lights up.
•
Always pay attention to the remaining battery power by
checking the indicator periodically while using the light.
• Do not disassemble or modify the light or any of the
included items.
Caution (Risk of injury, malfunction, or damage)
• Due to the variability of LEDs, the color and
brightness may differ even between devices with the
same model number.
• Do not place it within children’s reach.
•
Do not stare directly at the light when it is on or flashing.
• When used with a cyclocomputer, attach the
headlight as far away from the cyclocomputer as
possible, as it may affect measurement.
• This device is rated IPX7 based on JIS C0920.
However, do not operate the headlight underwater.
Doing so may cause a malfunction.
• If the light unit or parts become dirty with mud, etc.,
clean with a soft cloth which is moistened with mild
soap. Never apply paint thinner, benzine or alcohol;
damage will result.
•
Dispose of the batteries according to local regulations.
SPECIFICATIONS
Light source LED x 1
Battery 2 x AA Alkaline batteries
Operating time Constant : Approx. 30 hours
(Alkaline batteries) Flashing : Approx. 250 hours
Waterproof IPX7
Temperature range 14˚F – 104˚F (-10˚C – 40˚C)
Dimensions/weight 3-1/2” x 1-1/2” x 1-17/64” (89 x
38 x 32 mm) / 2.93 oz (83 g)
(Incl. batteries)
* The specifications and design are subject to change
without notice.
LIMITED WARRANTY
2-year Warranty: Light unit only
CatEye products are warranted to be free of defects
from materials and workmanship for a period of 2 years
from original purchase. If the product fails to work
during normal use, CatEye will repair or replace the
defect at no charge. Service must be performed by
CatEye or an authorized retailer. To return the product,
pack it carefully and enclose the warranty certificate
(proof of purchase) with instruction for repair. Please
write or type your name and address clearly on the
warranty certificate. Insurance, handling and
transportation charges to CatEye shall be borne by
person desiring service.
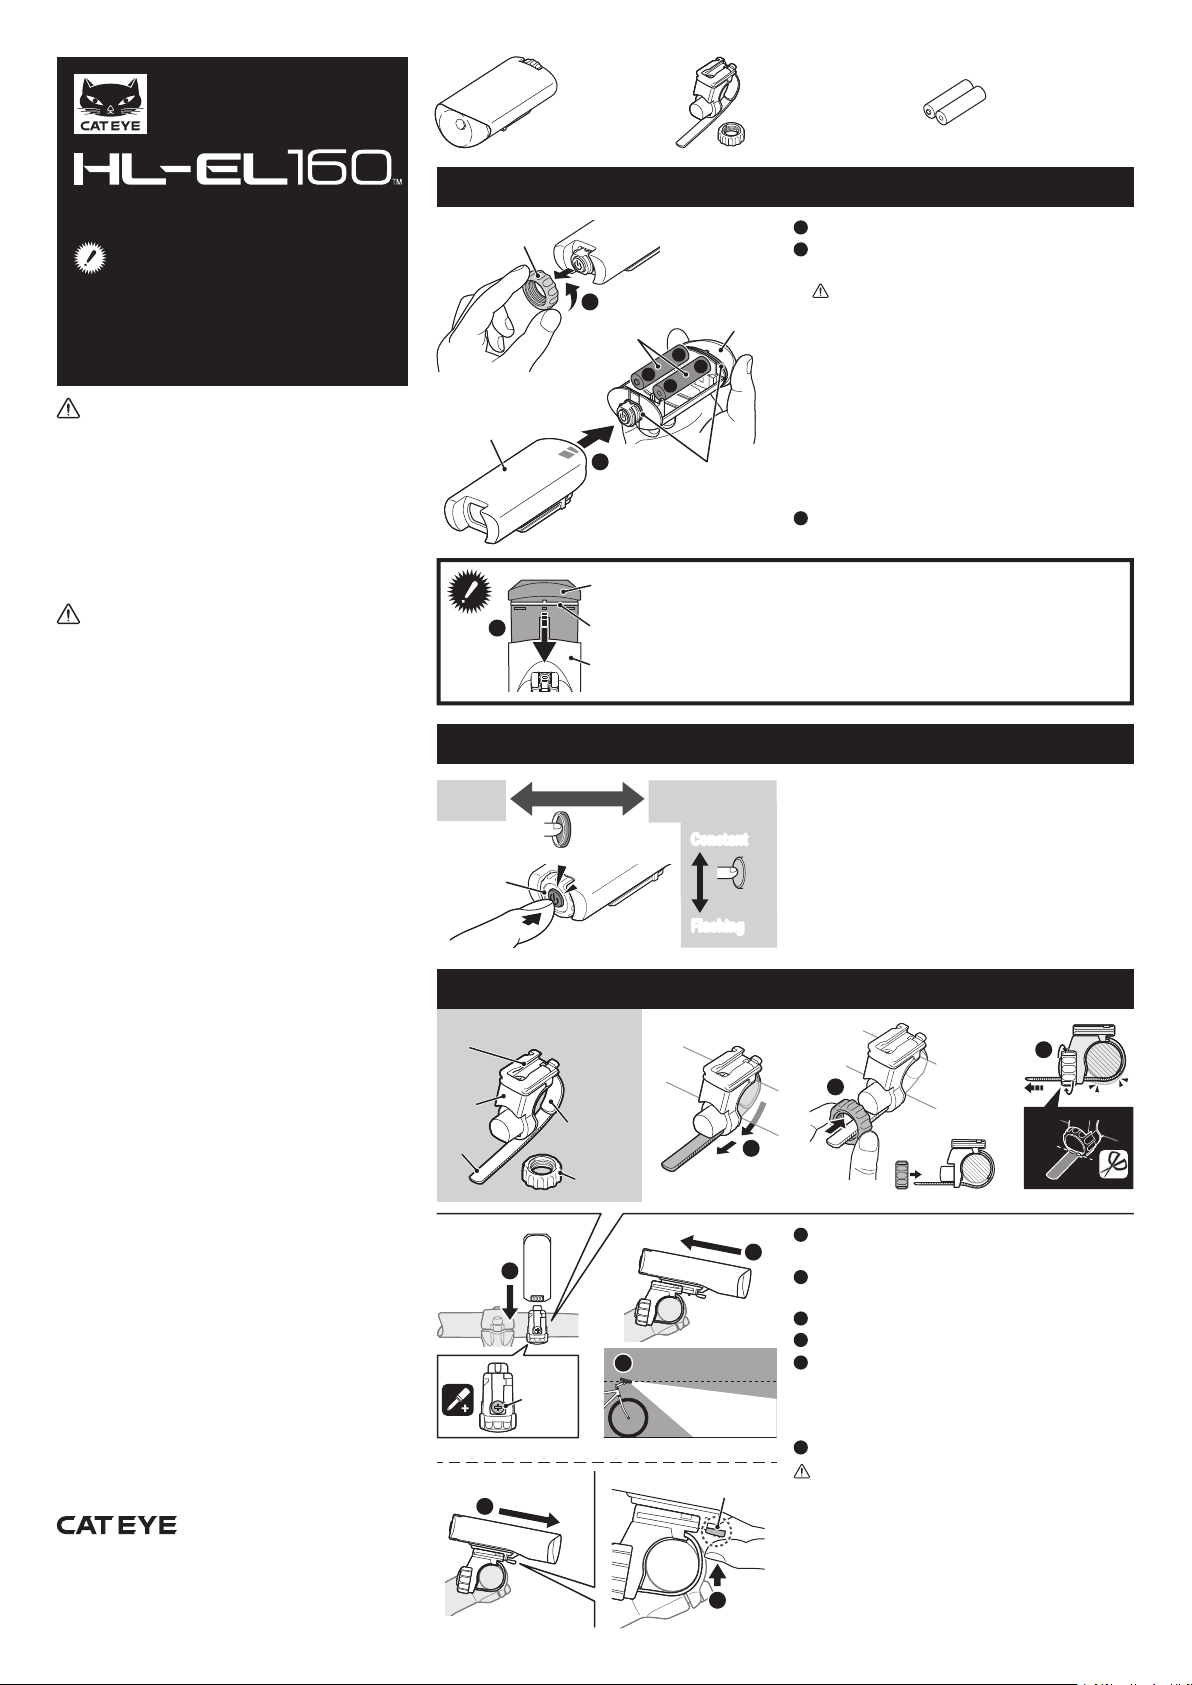
2SWITCH OPERATION
ENG
1HOW TO REPLACE BATTERY
3HOW TO MOUNT TO A BICYCLE
Before using the light, read this manual
thoroughly and keep it for future reference.
Do not use the light in any way other than as
described in this manual.
Light unit
Alkaline AA batteries
(x2)
MountingMounting
Removing
2-8-25, KUWAZU, HIGASHI SUMIYOSHI-KU, OSAKA, JAPAN 546-0041
For inquiries, please visit https://cateye.com/intl/contact/
[For US Customers]
CATEYE AMERICA, INC.
Please visit https://www.cateyeamerica.com/contact-us/
Toll Free : 800.5.CATEYE
CO., LTD.
FlexTight™ bracket
(H-34N)
Rotate the dial to remove.
Pull the lens body out of the cover, and insert the
batteries in the indicated orientation.
CAUTION!
• Hold near the lens when removing the lens body
from the cover.
•
Do not change the batteries when the headlight is wet.
• To prevent injury or malfunction due to battery
leakage or other problems, do not mix old and
new batteries or different types of batteries, and
be sure to insert the batteries in the indicated
orientation. Also, be sure to remove the
batteries if they are dead or if the headlight will
not be used for a long time.
Put the lens body back into the cover.
Precautions when replacing the battery
To maintain the high level of waterproofing, note the following points.
1.Ensure the rubber gasket is not misaligned or sticking out when
inserting the lens body into the cover.
2.Firmly push the lens body into the cover, and then tighten the dial
until it stops.
Wrap the strap around the handlebar and thread it
through the hole on the base.
Pass the strap through the dial and attach the dial
to the protrusion on the base.
Rotate the dial to tighten.
Slide the light unit into the rail until it clicks.
Adjust the angle of the light.
* To readjust the angle of the light, loosen the dial
and/or the screw enough to move the bracket, and
firmly tighten them after adjustment. (*3)
Pull the light unit forward while pressing the release tab.
CAUTION!:
• Be sure to tighten the dial by hand. If tightened
too hard with a tool, the screw thread may be
stripped.
• If cutting the strap, be careful of injury from
where the strap is cut. (*2)
• Check the dial and screw (*3) on the bracket
periodically, to monitor for any loosening.
Lens body
Cover
Rubber gasket
Rail
Base
Rubber pad
Strap
Dial
Bracket
Switch
Press and hold Constant
Flashing
Click
1
1
2
3
2
4
4
6
6
5
*2
Dial
AA batteries Lens body
Rubber gasket
Cover
1
2
3
1
2
3
4
5
6
Release tab
Screw
*3
*1 When turning the light on, it lights up in the mode
that was used last time. (Mode memory function)
Remaining battery power:
The brightness of the headlight will decrease below
the normal level about 30 minutes after the switch
(indicator) turns red. Replace the battery as soon as
possible.


