manuals.online logo
Brands
  1. Home
  2. •
  3. Brands
  4. •
  5. CatGenie
  6. •
  7. Pet Care Product
  8. •
  9. CatGenie Tabby Package User manual

CatGenie Tabby Package User manual

Your
SIMPLE SETUP
for
SUCCESS
World’s Only Self-Flushing, Self-Washing Cat Box™
© 2009 CatGenie (UK) Ltd
TABLE of CONTENTS:
Cover. Cat Preparation. Guarantee, Warranty, CatGenie Terms
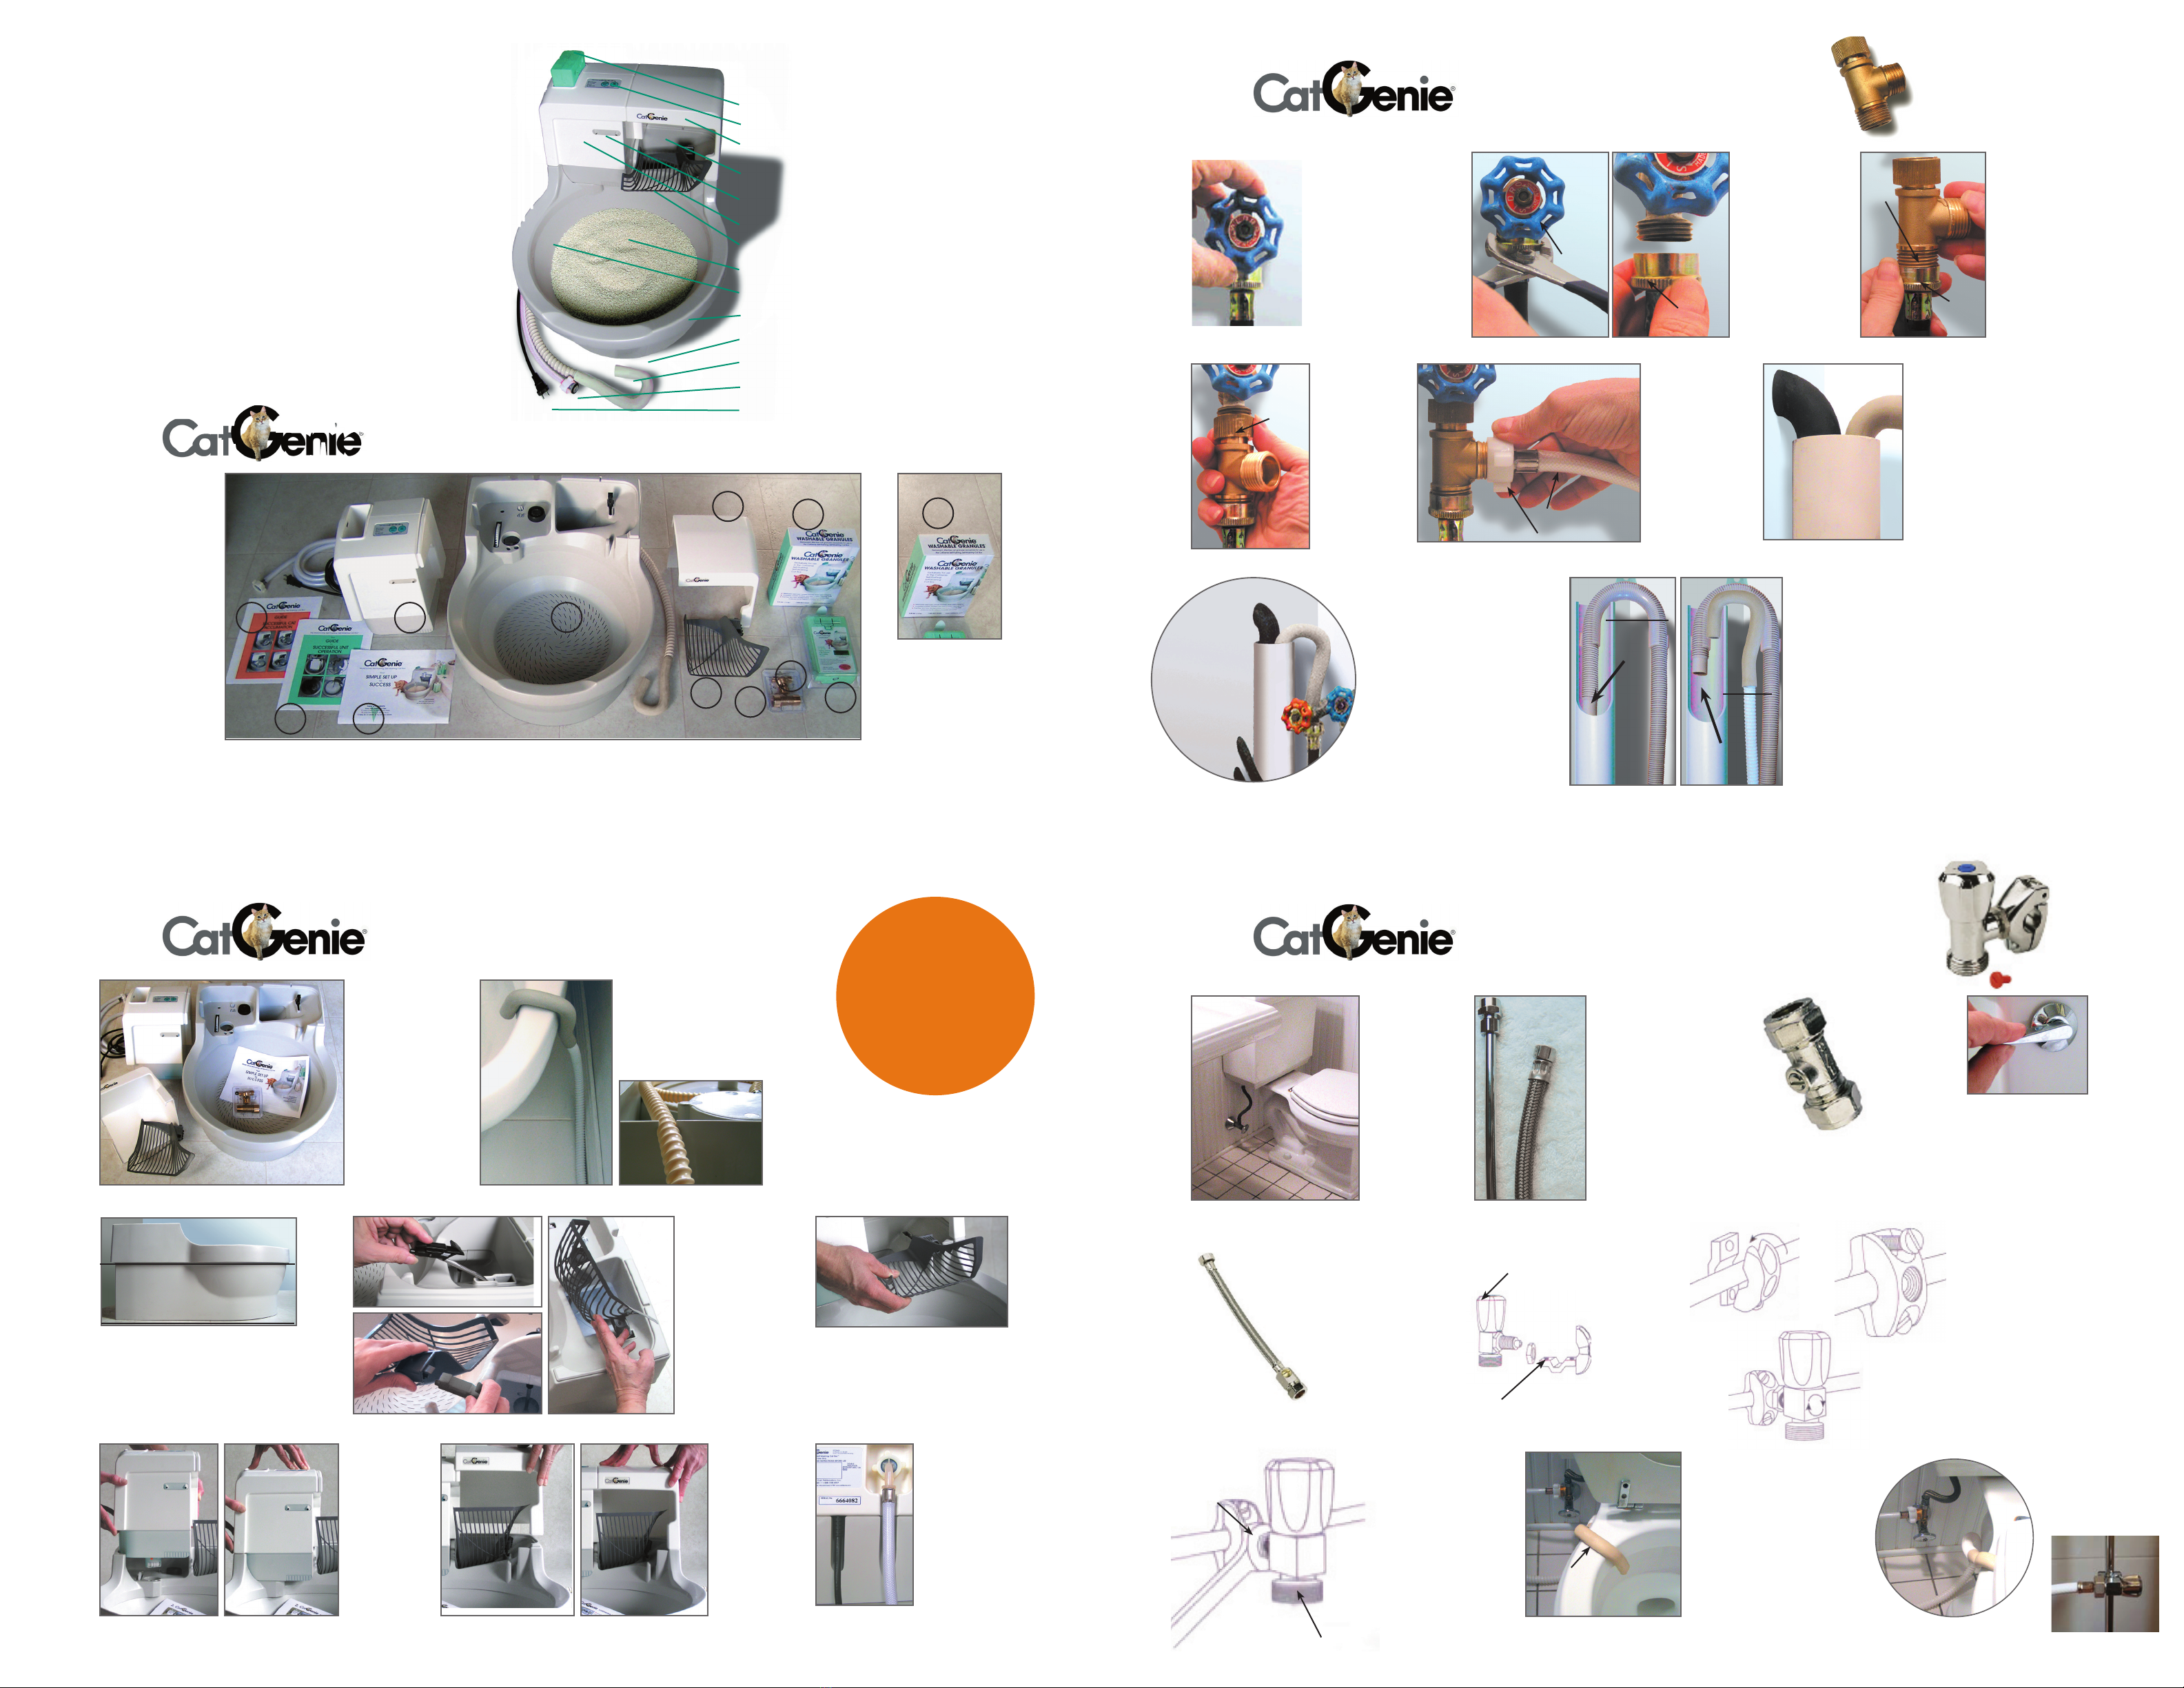
1. Unpack & Check 2. Assemble 4 Easy Pieces 3. Laundry Room Setup
4. Bathroom / Toilet Setup 5. Ready, Set, Go CatGenie
6. Your Cat & Your CatGenie
IMPORTANT: READ
NEXT PAGE
3
BATHROOM / TOILET
1
12
2
If the CatGenie goes in a location different than
the old litter box, DO NOT set up CatGenie yet.
First move the old litter box to the new area.
CAUTION: If the litter box or boxes need to
be moved a great distance, our cat behaviorists
recommend moving the old box or boxes little by
little, slowly over time to the new location so that
your cats can adjust to the change. When cats
are comfortable, proceed with CatGenie set up.
TIP: Keep track of when your cats use the litter box. This will be helpful
when you set up the auto start function.
BEST LOCATION FOR CATGENIE
a Utility Room / Kitchen OR a Bathroom or Toilet
BECAUSE YOUR CATGENIE NEEDS
1) fresh water from a cold water supply line that connects
to a sink, toilet or washing machine 2) a toilet or laundry
drain pipe for cat waste removal 3) an electrical outlet.
The CatGenie Water Hose is 8 feet (2.45m) long; the
CatGenie Drainhose is 10 feet (3.05m) long; the electrical
cable is 11.5 feet (3.5m) long.
WILL IT FIT?
MEASURE THE AREA to make
sure that your CatGenie will fit. 53cm
high, 61cm deep, 48cm wide in front,
43cm wide at the base bottom, and 41cm
wide at top.
NOW YOU ARE READY TO UNPACK YOUR CATGENIE
OR
OR
LAUNDRY ROOM / UTILITY ROOM
48cm
WIDE
front at widest
43cm
WIDE
at base
bottom
ALL YOU NEED
is a spanner or pliers to
attach supplied Adapters.
For Laundry Room, use
pliers; For Bathroom, use
pliers, an Adjustable spanner
& screwdriver
19”
(48cm)
21"
(53cm)
24"
(61cm)
16” (41cm)
17” (43cm)
Fills to this level
READY, SET, GO CATGENIE
Whether Laundry Room or Bathroom/Toilet Set Up, do the following
5.
2) Empty one entire box
of Washable Granules
into the Bowl. Box will fill
to the level indented inside
Bowl. Spread Granules evenly.
WARNING:
Only use CatGenie Washable Granules.
DO NOT use or mix cat litter in the CatGenie.
Any other litter causes severe damage to the
CatGenie and voids your Warranty.
3) a Slip a Smart Cartridge
into slot on top of the CatGenie.
Notch and arrow points to back.
b Push down firmly to activate
Cartridge. Good for 120 washes.
CAUTION:
CatGenie can not function
when the Smart Cartridge is
empty. ALWAYS HAVE AN
EXTRA Cartridge on hand.
The Smart Cartridge releases
the exact amount of cat-safe,
vet-approved SaniSolution.
The Cartridge protects the
CatGenie operation and the
health of your cats.
4) Plug in
the CatGenie
electric cord.
Best to plug
into a 13 amp
wall socket.
or fused spur
if fitted in a
bathroom.
1) Have a towel handy.
Turn water on. Check all con-
nections for leaks. Use a tool
to tighten fittings that drip.
CAUTION:
DO NOT use a tool to
tighten the CatGenie white
plastic Lock Nut. It has a
pressure seal that only
needs hand tightening.
6) To run a
Cleaning Cycle,
Press & Release
START / PAUSE
Button.
TIP: Make sure
that your cats
are not nearby.
MAKE SURE YOUR CATS ARE NOT NEARBY WHEN YOU FIRST RUN YOUR CATGENIE
If you have
any problems or
questions please call
0844 736 2790
Don’t attempt to fix
or tamper with the
CatGenie
5) When plugged in, a series
of Beeps sound and all LEDs
light up in sequence. Means
CatGenie is operating correctly.
NOTE: If Beeps do not sound
check that the Processing Unit
is properly in place by lifting it
up and replacing it into its slot.
NOTE: Ridges
on the GenieHand
purposely rub against
a post on the Brim so
that excess Granules
get shaken back into
the Bowl. The sound
it makes is normal.
ab
HOW OFTEN SHOULD I RUN
MY CATGENIE?
One Cat..........Clean 1-2 times per day
Two Cats.........Clean 2-3 times per day
Three Cats......Clean 3-4 times per day
Every cat is different. From our experience with over 15,000 cats, most, once
shown the Bowl and Granules, know it’s where to go and use it immediately.
If CatGenie is in the same place as the litter box, adjustment is usually easier.
A percentage of cats need time to adjust to something new. During this time,
1) If your cats do
NOT use CatGenie
immediately, put their
old litter box nearby.
DO NOT clean out
old box. The dirtier it
gets, the more cats
prefer CatGenie.
Once your cats use
CatGenie, remove
the old box and litter.
TIP: If having a problem getting
cat use to Granules, try mixing
them with litter BUT ONLY in the
litter box. Toss all the contents
once the litter box is used.
2) When running CatGenie
in the first week, shut the door
or make sure your cats are not
nearby. The new sound of the
cleaning process might startle
them. Over time your cats will
associate the sound with their
new, always clean cat box.
3) Until your cats are
comfortable with CatGenie,
only press START / PAUSE
to initiate cleaning. In time,
you can program the Auto
Setup to start the CatGenie
automatically. See page 5
in Green Owner’s Guide.
NOTE: Unless you know
that your cats are NOT using the
CatGenie, it is important to run at
least one cleaning cycle per cat
every day. Clean even if you do
not see any waste in the box as
urine does NOT show on the
Washable Granules.
4) Check the CatGenie
Cat Acclimation Guide for
details. Guides are also
on line: CatGenie.co.uk
at Customer Service
To consult, call us:
0844 736 2790
YOUR CAT AND YOUR CATGENIE
6.
it is safe and normal for cats to refrain from “going” in the first 24 to 48 hours. Do not
make a fuss over the CatGenie. Act normal, natural. Let your cats be curious. Do not
hover about. Do not follow your cats into their bathroom. Praise and treat them when
they use CatGenie. Orange Cat Acclimation Guide has full details and techniques.
WHAT SHOULD I EXPECT DURING THE CLEANING?
Bowl rotates and turns to the left and to the right
•Scoop Cycle: GenieHand comes down 3 times to remove solids. 5 min
•Wash Cycle: After scooping, water flows in to cover Washable Granules.
During three wash cycles, SaniSolution with GenieHand scrubs Granules
and Bowl. Hand moves to agitate Granules. Solids are liquefied inside the
Hopper. Water and waste drains out. Interior is rinsed clean. 11 min
•Dry Cycle: GenieHand sifts through Granules for thorough drying. 16 min
•Cats Sleep: 15 to 20 hours per day. Run CatGenie while they sleep.
WARNING:
Do NOT mix cat
litter or add used
litter with Washable
Granules in the
CatGenie Bowl.
Cat litter causes
severe damage to
the CatGenie and
its use voids your
Warranty.
X
BEFORE SETTING UP YOUR CATGENIE, TAKE CARE OF YOUR CATS!
WHERE SHOULD CATGENIE GO?
TIPS:
Watch
Video of
What to Expect
During Cleaning at
CatGenie.co.uk /
Customer Service
Check
CatGenie.co.uk / Customer
Service for Manual Updates
TIP: Watch video of What to Expect During Cleaning at CatGenie.co.uk / Customer Service
START
TWO-YEAR WARRANTY
Before assembling, write down your serial number located on the
back of the Processing Unit. Go on line to: www.catGenie.co.uk
then at Customer Service to WARRANTY. Fill out and you will
automatically be registered for Warranty, traceable for service, and
eligible for exclusive money saving offers. Serial #______________
UNPACK & CHECK
90-DAY, MONEY-BACK GUARANTEE
With our 90-Day, Unconditional, Money Back Guarantee you and
your cats have a total of 90 days from your purchase date to fall in
love with CatGenie. TIP: Save the original carton and receipt for
your CatGenie for at least 90 days in case you need to return the
CatGenie. See the back cover of the Green Owner’s Guide for
complete details.
UNPACK
cautiously.
Do not drop.
If you suspect that
your CatGenie is
defective, do not use.
Contact CatGenie
Support. Call us at:
0844 736 2790
E mail: support@
catGenie.co.uk
TIP: Save original
carton and receipt
for at least 90 days
in case you need to
return CatGenie.
1.
1) Cat Acclimation Guide. 2) Owners Guide. 3) Simple Setup Sheet. 4) Processing Unit, attached Water Supply Hose and Power
Cord. 5) CatGenie Base, includes Brim, Bowl, Hopper, and attached DrainHose and Hook. 6) Hopper Cover. 7) GenieHand.
8) Laundry Room T-Adapter. 9) Self-cutting tap. 10) One Box Washable Granules. 11) One SaniSolution 120 Smart Cartridge.
12) Bonus Pack:
only included by par-
ticipating retailers.
CHECK that you received all
of the following
12 items:
1
2 3
4 5
6
7
10
11
9
8
12
CATGENIE TERMS
SaniSolution Smart Cartridge
™
:Dispenses sanitizer
Control Panel: Buttons, LEDs, and Error Indicators
Hopper Cover: Stores GenieHand, hides Hopper
Hopper: Chamber where Impeller macerates waste
GenieEyes
™
:Sensors delay auto wash if cat enters
Processing Unit: Holds motors and electronics
GenieHand
™
:Scoops, Scrubs, Sifts. Attaches to Arm
Washable Granules
™
:Satisfy cat’s need to dig & cover
Bowl: Where cats and Washable Granules go
Brim: Encircles the Bowl; attaches to Base
Base: Very bottom of CatGenie
Genie DrainHose
™
: Drains into toilet or waste pipe
Genie Water Supply Line
™
: Connects to cold water
Genie Electric Cord
™
: Plugs into 13 amp AC power
3) Place the CatGenie Base in position.
Make sure it is level. If you need more
space, assemble the CatGenie nearby
then carefully slide it into its final position.
4) a Pull the Black
Clip and steel Arm
forward.
bAttach the Genie-
Hand to the BlackClip.
A click tells you it is
securely on the Hand.
cPush the Arm and
GenieHand into the
upright position.
5) a Insert
Processing Unit
by lining it up
with the Base
opening
bthen
carefully slip
it into its slot.
6) a Fit the
Hopper Cover
into grooves in
the Base and
right side of the
Processing Unit.
bCatGenie
name indicates
the front.
ASSEMBLING 4 EASY PIECES
GO TO 3for LAUNDRY ROOM Set Up; GO TO 4for BATHROOM / TOILET Set Up
1) Bring Base,
Processing Unit,
Hopper Cover,
GenieHand, plus
the T-Adapters and
this Set Up Sheet
to the site.
Site must have
a water source,
a drain and an
electrical outlet. ab
a
b
c
ab a b
Base
Processing
Unit
Hopper
Cover
GenieHand
2) Turn over the Base to access
the 10’ DrainHose. Remove packing.
a Uncoil the Hose so that the Hook
reaches the waste drain or toilet. Make
sure there are no crimps or sharp turns
If you have
any problems or
questions please call
0844 736 2790
Don’t attempt to fix
or tamper with the
CatGenie
2.
bThread the
DrainHose through groove
cut into the back of the Base. Do not
tightly coil any extra hose as that could
cause clogs or poor draining of waste.
The GenieHand can NOT be moved
when Processing Unit is in place. Do
NOT force GenieHand into position.
Remove the Unit to move it.
X
7) Fit Water
Hose and Electric
Cord from
Processing Unit
into groves behind
the base. Write
down your serial #
for Warranty sign-
up on line.
Turn-
Off
Valve Water
Line
Hose
Lock
Nut
Threaded
Opening
T’s
Lock
Nut
CatGenie
Water Hose
& Lock Nut
CatGenie Waste
Pipe should be
added
WITHOUT the
Drain Hook so
that the Genie
Waste Pipe can-
not be pinched.
Use the hook
ONLY with toilet
setup.
3.LAUNDRY/UTILITY ROOM SET UP
You’ll only need a pliers and the large T-Adapter
(Your taps may look slightly different to those illustrated)
3) Screw the lock
nut on the washing
machine hose to the
threaded opening of
large T-Adapter.
TIP: If you need to
use a tool to tighten
the connection don’t
over tighten.
4) Now attach
the hose and
T-Adapter to the
water line.
Make sure that
the T’s lock nut
is movable.
Tighten the lock
nut around the
pipe threads.
5) Screw the
CatGenie hose on
to the T-Adapter.
CAUTION:
Do NOT use pliers
to tighten the
CatGenie
Lock Nut. Hand
tighten only.
ab
Flexible
Pipe
YOU’RE
READY TO
GO
Rigid
Pipe
Clamp
CatGenie
DrainHook
© 2009 CatGenie (UK) Ltd
6) Connect the
CatGenie water
supply hose to the
Self Cutting Tap &
HAND TIGHTEN.
Do not use a tool
on the CatGenie
plastic Lock Nut.
7) Place CatGenie DrainHook
over the toilet bowl then lower
the toilet seat.
Check that toilet seat has “feet”
so Hook is not squeezed
when the toilet seat is down.
NOTE: If your water pres-
sure is low, best not to flush the
toilet while the CatGenie runs.
BATHROOM / TOILET SET UP
You’ll only need a spanner, screwdriver and the small self-cutting tap
4.
GO TO 5FOR NEXT STEPS
1) Have a towel handy.
Shut off COLD water supply
line on wall by Washer.
TIP: Cold water line
may have a blue valve,
be labeled, or feels cold.
WARNING: ONLY
use COLD water line.
Hot water damages
CatGenie mechanism.
2) a Unscrew
COLD waterline hose
under the turn-off
valve. Loosen con-
nection with pliers.
b Finish discon-
necting the hose by
hand. Hold the hose
upright so water
won’t drip.
6) Insert
CatGenie
pipe without
DrainHook,
securely
into the
Washing
Machine
waste
pipe.
YOU’RE
READY
TO GO
GO TO 5FOR NEXT STEPS
NOTE: If the CatGenie
DrainPipe goes into a floor
drain, you must run a
portion of the CatGenie
DrainHose at least 2 feet
above the CatGenie Bowl.
Just a short run is needed.
NOTE: If you have low
water pressure, best NOT
to run the Washer and
CatGenie at the same time.
CAUTION: Do NOT
force GeniePipe into
waste pipe. If it can’t
fit easily together with
Washer’s drainhose
call 0844 736 2790
NOTE: A waste pipe
opening higher than 4’
from the floor, may slow
down draining. Only a
tiny % have this problem.
NOTE: Following your
Washer’s Manual directions also
keeps CatGenie wastewater flowing
and helps avoids clogs. First check
Washer’s drainhose for correct length.
WRONG
Washer
hose in
too far RIGHT
less
Washer
hose is
safer
X
1) Access the
cold water pipe to
a toilet or sink.
WARNING:
Use ONLY the
COLD water line
to the sink. HOT
water DAMAGES
the CatGenie.
Fresh water to
a toilet is cold.
NOTE: If either sink or
toilet water line is a rigid
pipe, you will need the
self-cutting tap. If a
flexible water pipe is fit-
ted an alternative screw
T fitting (not supplied)
should be used. Turn off
water, attach a suitable
fitting and screw ON
GenieHose. Proceed
with CatGenie setup.
2) Shut off
COLD water
by turning
the valve (if
applicable)
on toilet or
sink water
line. Keep a
towel handy
to any catch
drips.
3) For toilet, with
flexible pipe check
that water is off by
flushing the toilet to
empty the tank.
4)
Remove the
clamp from
the valve. Fix
the clamp on
to the copper
pipe making
sure that the
washer is cor-
rectly posi-
tioned
5) aFasten the
clamp over the copper
pipe by tightening the
screws securely.
bBore the hole in the
copper pipe by screw-
ing the self cutting
valve into the clamp &
then tightening. You
will feel resistance as
the copper pipe is
pierced.
FYI: Washing Machine Manufacturer
Manuals warn to put NO more than
5 inches of Washer drainhose
into the waste pipe. A hose
that’s in too far can cause back
flow, which results in flooding.
FYI: Plumbers warn
that a cystern that refills
after turning the shut off
valve, indicates an
unsafe situation. The
valve needs fixing.
NOTE: Fix valve, or move
CatGenie to another loca-
tion, or return CatGenie.
Call us to discuss at
0844 736 2790
a
Self Cutting
Tap with Valve
CatGenie Water Hose & Lock Nut
to be Hand Tightened
b
Use spanner
to adjust
position of
valve as
required
If you in any doubt
about installation please
consult a qualified
plumber or Call us for
advice on 0844 736 2790
IMPORTANT: If your
bathroom has a rigid
copper pipe follow steps
4), 5), 6), & 7). If there is
a flexible pipe follow
steps 1), 2), 3), & 7).
Water Shut
Off Valve &
Screw Fitting
(if applicable)

Popular Pet Care Product manuals by other brands

B. Braun AESCULAP Econom II Instructions for use

B. Braun

B. Braun AESCULAP Econom II Instructions for use

Pet Gear The ON-THE-GO Pet I-GO2 PLUS TRAVELER instruction manual

Pet Gear

Pet Gear The ON-THE-GO Pet I-GO2 PLUS TRAVELER instruction manual

PULSE+ Pulse EQ-XX user guide

PULSE+

PULSE+ Pulse EQ-XX user guide

Petmate CAT MATE C300 user manual

Petmate

Petmate CAT MATE C300 user manual

Pet Gear AT3 GENERATION 2 instruction manual

Pet Gear

Pet Gear AT3 GENERATION 2 instruction manual

Dogtrace X25 Series manual

Dogtrace

Dogtrace X25 Series manual

Pet Gear I-GO2 SPORT instruction manual

Pet Gear

Pet Gear I-GO2 SPORT instruction manual

I-care Tonovet TV01 User and maintenance manual

I-care

I-care Tonovet TV01 User and maintenance manual

Catit 43742 user manual

Catit

Catit 43742 user manual

Num'axes Canicom Spray user guide

Num'axes

Num'axes Canicom Spray user guide

Arf Pets CAT LITTER BOX CABINET user guide

Arf Pets

Arf Pets CAT LITTER BOX CABINET user guide

Goodlife Bark Control Pro instruction manual

Goodlife

Goodlife Bark Control Pro instruction manual

XPower B-24 owner's manual

XPower

XPower B-24 owner's manual

Num'axes CANIBEEP RADIO PRO user guide

Num'axes

Num'axes CANIBEEP RADIO PRO user guide

AllPetSolutions 6 Meal Automatic Pet Feeder user guide

AllPetSolutions

AllPetSolutions 6 Meal Automatic Pet Feeder user guide

Easypix EasyPet instruction manual

Easypix

Easypix EasyPet instruction manual

Arf Pets APCLBS user guide

Arf Pets

Arf Pets APCLBS user guide

I-care TONOVET PLUS quick guide

I-care

I-care TONOVET PLUS quick guide

manuals.online logo
manuals.online logoBrands
  • About & Mission
  • Contact us
  • Privacy Policy
  • Terms and Conditions

Copyright 2025 Manuals.Online. All Rights Reserved.