manuals.online logo
Brands
  1. Home
  2. •
  3. Brands
  4. •
  5. Cavity Sliders
  6. •
  7. Lock
  8. •
  9. Cavity Sliders CL100 Mortice Lock User manual

Cavity Sliders CL100 Mortice Lock User manual

NOTE: Please read instructions before drilling any
holes or marking out hole centres.
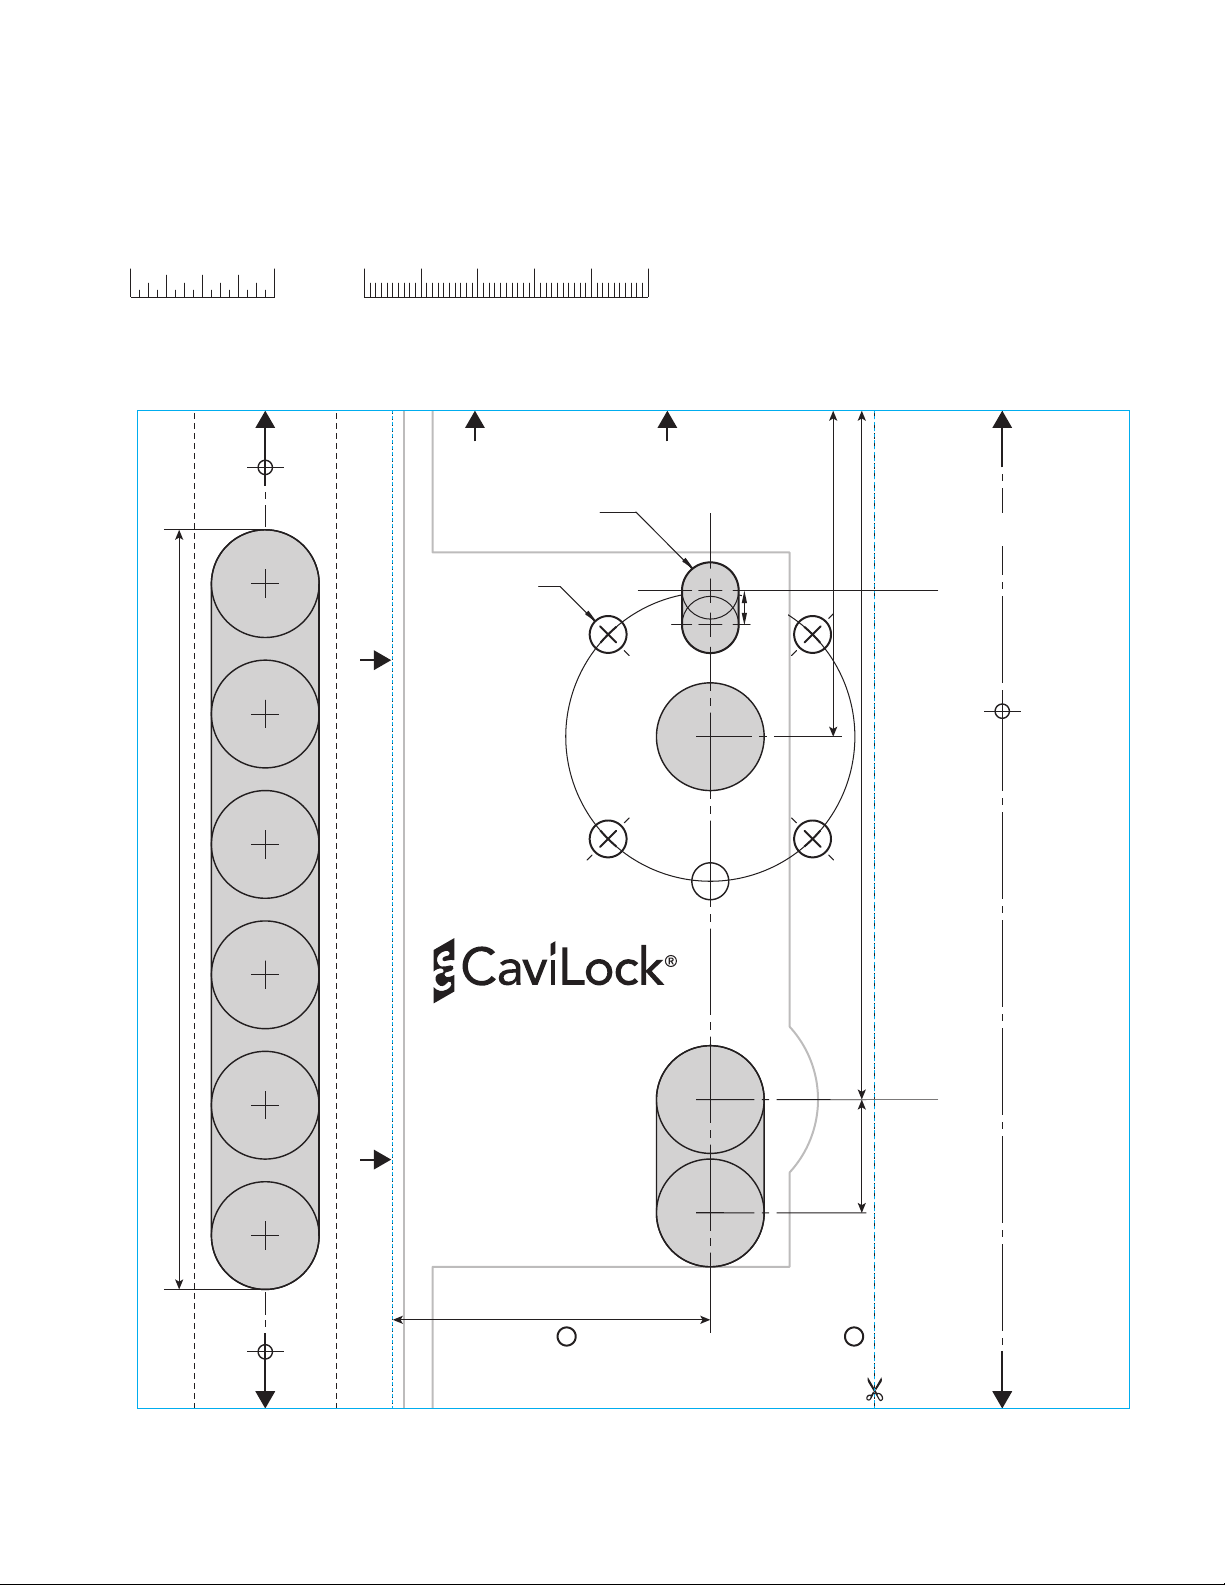
Mark both sides of the door using the template (flip
template over to mark other side).
DO NOT drill right through the door as alignment
issues will occur. Only drill to centre.
There are five stages to fitting the Mortice Case:
Stage 1: Mark drilling positions for lock case.
Stage 2: Mark drilling positions for door furniture to
be installed
Stage 3: Prepare door by mortising and drilling holes.
Stage 4: Fit lock & door furniture.
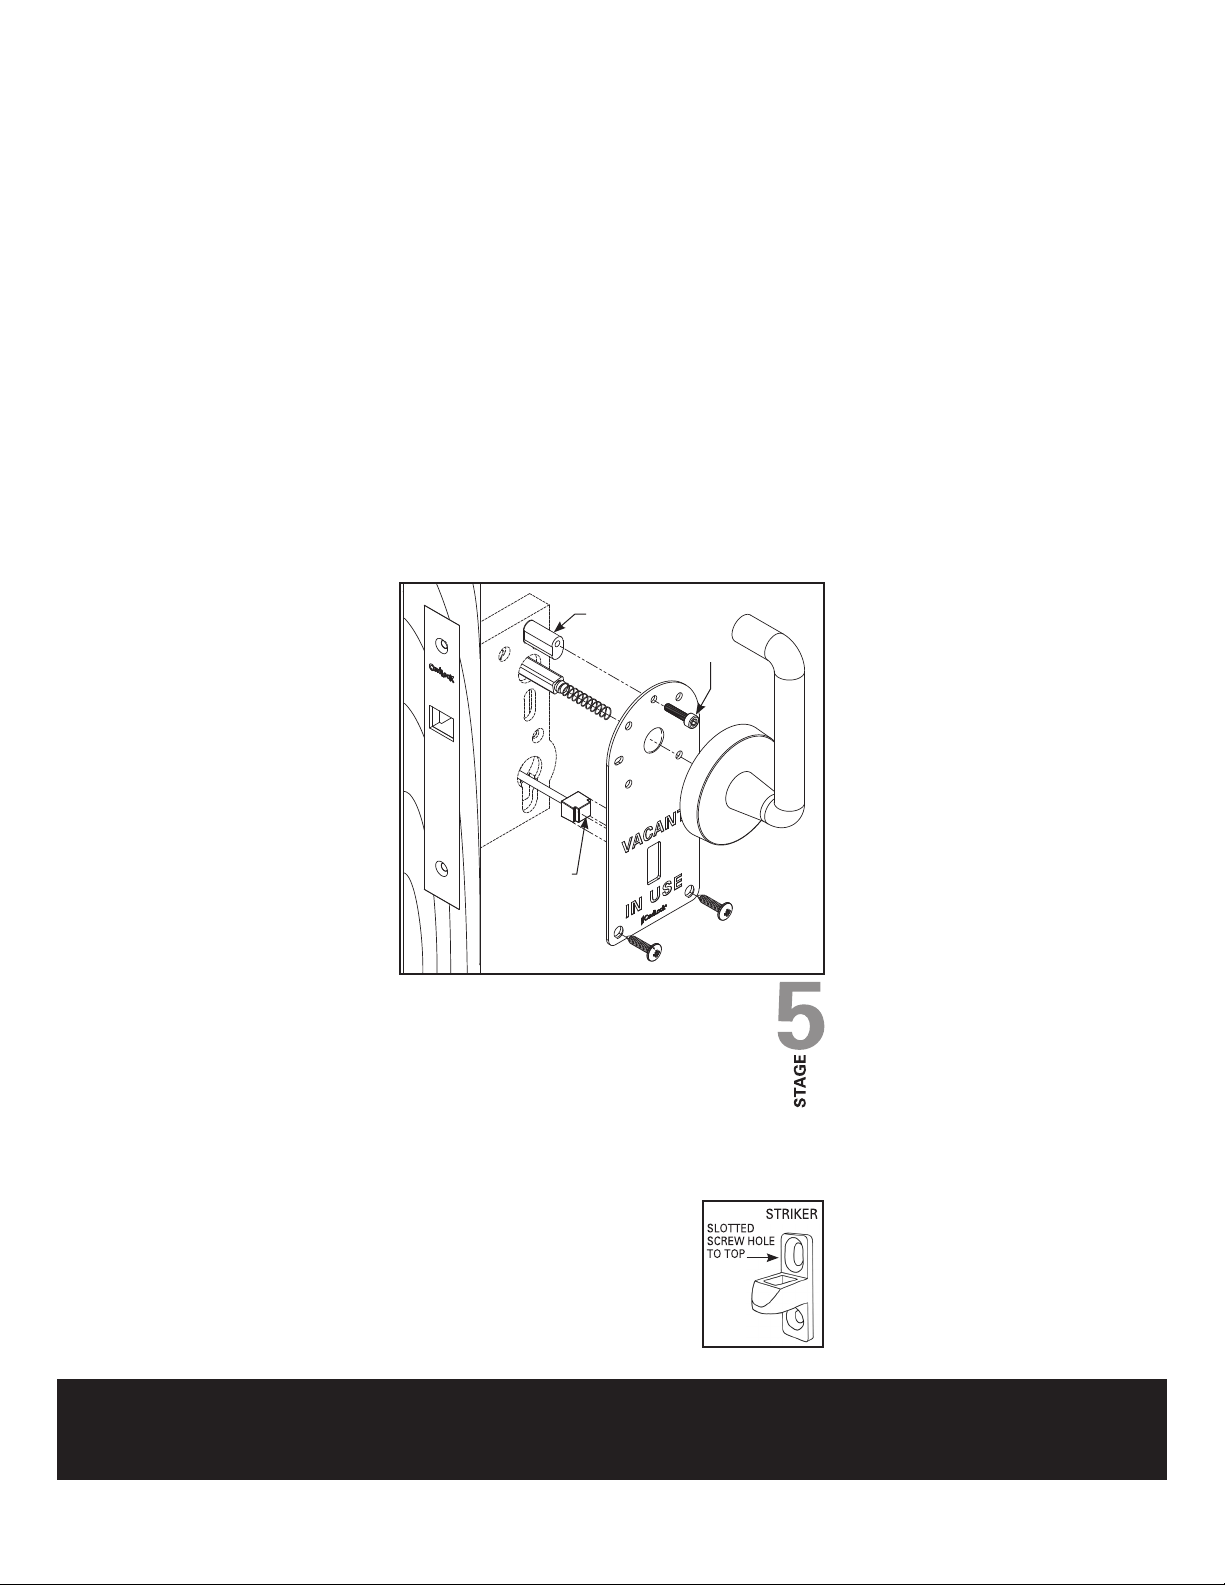
Stage 5: Fit striker.
Stage 1 - Mark Drilling Positions
for Lock Case
1. Mark chosen height of lock on face of door.
Height is normally measured to centre of square
spindle (Hole 9).
2. Mark ‘Height Line’ at top of template 57.5mm
(2-9/32”) above Hole 9 or 121.5mm (4-25/32”) above
Hole 10 on front edge and both faces of door.
3. Make a vertical centre line on front edge of door.
Universal Hole Positions
Hole # Hole Diameter Depth
1 - 6 19mm 3/4” 77mm 3”
7 & 8 2.5mm 3/32” 25mm 1”
Indicator Lock Hole Positions
Hole # Hole Diameter Depth Door Side
9 - 11 19mm 3/4” To Centre of Door Both
12 or 13 6.5mm 1/4” To Centre of Door Both
14 &15 10mm 25/64” To Centre of Door Both
4. Align top edge of template with height line and
arrows to vertical centre line.
5. Mark universal hole positions (Holes 1-8) for lock
case using a sharp nail or pencil.
1
2
3
4
5
6
8
7
FOLD HERE AND PLACE ON CORNER OF DOOR
134
mm
(5-9/32”)
9
12 12
1212
16
13
14
15
10
11
Backset 56
mm
(2-13/64”)
CL100ZA525
02.2018
HEIGHT LINE
DRILLING TEMPLATE FOR CL100 MORTICE
READ FITTING INSTRUCTIONS
121.5
mm
(4-25/32”)
20
mm
(25/32”)
57.5
mm
(2-1/4”)
STRIKER TEMPLATE
Ø
10
mm
(25/64”)
4x Ø
6.5
mm
(1/4”)
6
mm
(15/64”)
Stage 2 - Mark Drilling Positions
for Door Furniture
1. Highlight correct drilling options required
for handle and use a sharp nail or pencil to
mark required hole centres. Holes 12-13 to be
vertical or diagonal fixing holes at the correct
hole centres to suit the lever handles being
used.
Stage 3 - Mortice & Drill Holes
DO NOT drill right through the door.
Alignment issues will occur. Drill to centre on
both sides for through holes. Check Stage 2
chart for hole depth.
1. Drill Holes 1-6. Make sure drilled holes are
straight and level.
2. Chisel out remaining wood between holes indicated
in shaded area on template to create a slot.
Note: Maximum slot length not to exceed 134mm
(5-9/32”).
3. Drill Holes 7 and 8.
4. Remove face plate from lock case and temporarily
screw lock case in place. Mark around outside edge
of inner forend then remove lock.
5. Router out marked area to a depth of 7mm (9/32”).
Important: Recess of front section must be routered
flat and even. Long term damage will occur if not
done correctly.
6. Drill Holes 9 to 11.
7. Remove remaining wood from oval shaped slot
between Holes 10 and 11.
8. Drill holes for fixing handles using marks from
Stage 2.
Height
line
Centre
line
Front
edge
of
door
Face
plate
Inner
forend Drilled
holes
7 & 8
Router
out 7mm
(9/32”)
INDICATOR LOCK Fitting Instructions
1
STAGE
STAGE
2
STAGE
3
Stage 4 - Fit Lock and Furniture
Fit lock into mortice and screw in place using
#10 countersunk screws supplied.
1. Locking pin should be 0.5mm (1/64”) shorter
than door thickness. Cut to suit if required
and de-burr the end.
Emergency
release
button
2. Cut Lever & Rose handle screws to 19mm (3/4”)
larger than door thickness.
3. Refit faceplate.
4. Fit locking buttons with springs.
5. Check handing and hold indicator plates in place
while fitting spindle and handles. Tighten screws
enough to hold handles in place.
6. Test lock for the following:
A - Handles move freely.
B - Latch returns to the latched position when
handle is let go.
C - Locking buttons move freely without jamming.
7. Line the face plates up to be parallel to the door
edge.
8. Fully tighten handles to door.
9. Drill holes for indicator plates and screw to door.
Stage 5 - Fit Striker
1. Slide door closed and transfer height line
from door onto closing jamb.
2. Cut out template where marked and align top
of template with height line.
3. Ensure striker is facing right way up with
slotted screw hole to top.
4. Mark top screw hole, ensuring it is in centre of
closing jamb (use centre line marked on template).
5. Fit striker using top screw only.
Close door slowly to check that
striker lines up with lock.
Adjust if necessary then fit bottom
screw.
On timber jambs you may mortice
the back of the striker into the closing
jamb to a depth of 3mm (1/8”).
IMPORTANT: THE CL100 IS NOT A DOOR STOP.
The door should be stopped in the correct closed position by the door stop, NOT the lock.
If the door’s momentum is not stopped by a closing jamb or an independent stop, long term damage may be done to the lock. To avoid this,
ensure the door hits the jamb or stop at the same time that the striker bottoms out on the faceplate of the lock.
STAGE
4
© All copyright and other property in this document is reserved by Cavity Sliders Ltd. Details and specifications are subject to change without notice. Whilst all care is taken to ensure the accuracy of all information, no
responsibility will be accepted for any errors or omissions. ® CAVILOCK is a Registered Trademark.
CAVILOCK® CL100 (O.D. 1994). 02.2018 csfordoors.co.nz • cavitysliders.com.au • cavitysliders.com
M4 x20mm
cap screw
M4 threaded plug
1
9
12 12
1212
16
13
14
15
10
11
2
3
4
5
6
8
7
Backset 56mm (2-13/64”)
CL100ZA525
02.2018
HEIGHT LINE
DRILLING TEMPLATE FOR CL100 MORTICE
READ FITTING INSTRUCTIONS
FOLD HERE AND PLACE ON CORNER OF DOOR
134mm (5-9/32”)
121.5mm (4-25/32”)
20mm
(25/32”)
57.5mm (2-1/4”)
STRIKER TEMPLATE
1” 50mm
CL100 DRILLING TEMPLATE. Print at 100% Size
Ø10
mm
(25/64”)
4x Ø6.5
mm
(1/4”)
6
mm
(15/64”)

Popular Lock manuals by other brands

XD Design P705.771 instructions

XD Design

XD Design P705.771 instructions

CENTURION SYSTEMS D5-EVO installation manual

CENTURION SYSTEMS

CENTURION SYSTEMS D5-EVO installation manual

Schlage B260 Series installation instructions

Schlage

Schlage B260 Series installation instructions

Baldwin Evolved Pairing Instructions

Baldwin

Baldwin Evolved Pairing Instructions

Häfele Keya-Tronic 231.49.031 How to use

Häfele

Häfele Keya-Tronic 231.49.031 How to use

Emtek Classic Installation & programming guide

Emtek

Emtek Classic Installation & programming guide

Yale MC182010B quick start guide

Yale

Yale MC182010B quick start guide

Digilock NEXT Sola3 Touch RFID Product guide

Digilock

Digilock NEXT Sola3 Touch RFID Product guide

Detex 03W ADVANTEX installation instructions

Detex

Detex 03W ADVANTEX installation instructions

Robimatic YARDLOCK installation guide

Robimatic

Robimatic YARDLOCK installation guide

Gantner GAT NET.Lock 7020 System Installation, configuration & operation

Gantner

Gantner GAT NET.Lock 7020 System Installation, configuration & operation

Assa Abloy ASSA Coded 1.2 Programming instructions

Assa Abloy

Assa Abloy ASSA Coded 1.2 Programming instructions

Schlage WA5200 installation instructions

Schlage

Schlage WA5200 installation instructions

Assa Abloy EL595 quick start guide

Assa Abloy

Assa Abloy EL595 quick start guide

Iseo Zero1 installation guide

Iseo

Iseo Zero1 installation guide

TriTeq MicroIQ installation instructions

TriTeq

TriTeq MicroIQ installation instructions

U-tec Ultraloq UL300 user guide

U-tec

U-tec Ultraloq UL300 user guide

CAME A4366 manual

CAME

CAME A4366 manual

manuals.online logo
manuals.online logoBrands
  • About & Mission
  • Contact us
  • Privacy Policy
  • Terms and Conditions

Copyright 2025 Manuals.Online. All Rights Reserved.