CAVS 205G USB User manual

1
Multi-Format Karaoke Player
CAVS
205G USB
USER MANUAL

2
Table of Contents
Safety Warnings--------------------------------------------------------------------------------------------2
Precautions--------------------------------------------------------------------------------------------------3
Description
Front panel and Rear Panel-------------------------------------------------------------------------------4
Remote Controller-----------------------------------------------------------------------------------------5
Remote Control Operating Range------------------------------------------------------------------------6
Battery of Remote Controller-----------------------------------------------------------------------------6
Extension of IR Input--------------------------------------------------------------------------------------6
Connections
Connecting to the Power Supply-------------------------------------------------------------------------7
Connecting the Audio Out to Amplifier ----------------------------------------------------------------7
Connecting the Video Out to TV/ Monitor -------------------------------------------------------------7
Connecting with a Coin Machine------------------------------------------------------------------------8
Connecting with a Flash Drive or Card-----------------------------------------------------------------8
Basic Operation---------------------------------------------------------------------------------------------9
Karaoke Operation---------------------------------------------------------------------------------------11
Setup
System Setup---------------------------------------------------------------------------------------------14
Language Setup------------------------------------------------------------------------------------14
Audio Setup-----------------------------------------------------------------------------------------------15
Video Setup-----------------------------------------------------------------------------------------------15
Speaker Setup---------------------------------------------------------------------------------------------15
Digital Setup----------------------------------------------------------------------------------------------16
Trouble Shooting-----------------------------------------------------------------------------------------17
Specification------------------------------------------------------------------------------------------18

3
Safety Warnings
CLASS 1 LASER PRODUCT
This player is classified as a CLASS 1 LASER product.
Use of controls, adjustments or performance of procedures
other than those specified herein may result in hazardous
radiation exposure.
CAUTION:
TO REDUCE THE RISK OF ELECTRIC
SHOCK, DO NOT REMOVE REAR COVER.
NO USER SERVICEABLE PARTS INSIDE.
REFER SERVICING TO QUALIFIED
SERVICE PERSONNEL
Thi symbol indicates that dangerous voltage which can cause electric shock is present inside this unit.
This symbol alerts you to important operating and maintenance instructions accompanying the unit.
WARNING: To reduce the risk of fire or electric shock, do not expose this appliance to rain or moisture.
CLASS 1 LASER PRODUCT
KLASSE 1 LASER PRODUKT
LUOKAN 1 LASER LAITE
KLASS 1 LASER APRARAT
PRODUCTO LASER CLASE1
CAUTION
RISK OF ELECTRIC SHOCK.
DO NOT OPEN

4
Precautions
Ensure that the POWER supply in your house complies with the identification sticker located on the back of your
player. Install your player horizontally, on a suitable base (furniture), with enough space around it for ventilation
(7.5~10cm). Make sure the ventilation slots are not covered. Do not stack anything on top of the player. Do not place
the player on amplifiers or other equipment which may become hot. Before moving the player, ensure the disc tray is
empty. This player is designed for continuous use. Switching off the Player to the stand-by mode does not disconnect
the electrical supply. In order to disconnect the player completely from the power supply, remove the main plug from
the wall outlet, especially when left unused for a long period of time.
During thunderstorms, disconnect POWER main plug from the wall outlet.
Voltage peaks due to lighting could damage the unit.
Do not expose the unit to direct sunlight or other heat sources.
This could lead to overheating and malfunction of the unit.
Protect the player from moisture (e.g. vases), and excess heat (e.g. fire place) or equipment creating strong magnetic
or electric fields (e.g. speakers…). Disconnect the power cable from the AC supply if the player malfunctions. Your
player is not intended for industrial use.
Use of this product is for personal use only.
Condensation may occur if your player or disc have been stored in cold temperatures.
If transporting the player during the winter, wait approximately 2 hours until the unit has reached room temperature
before using.
The batteries used with this product contain chemicals that are harmful to the environment.
Do not dispose of batteries in the general household trash.
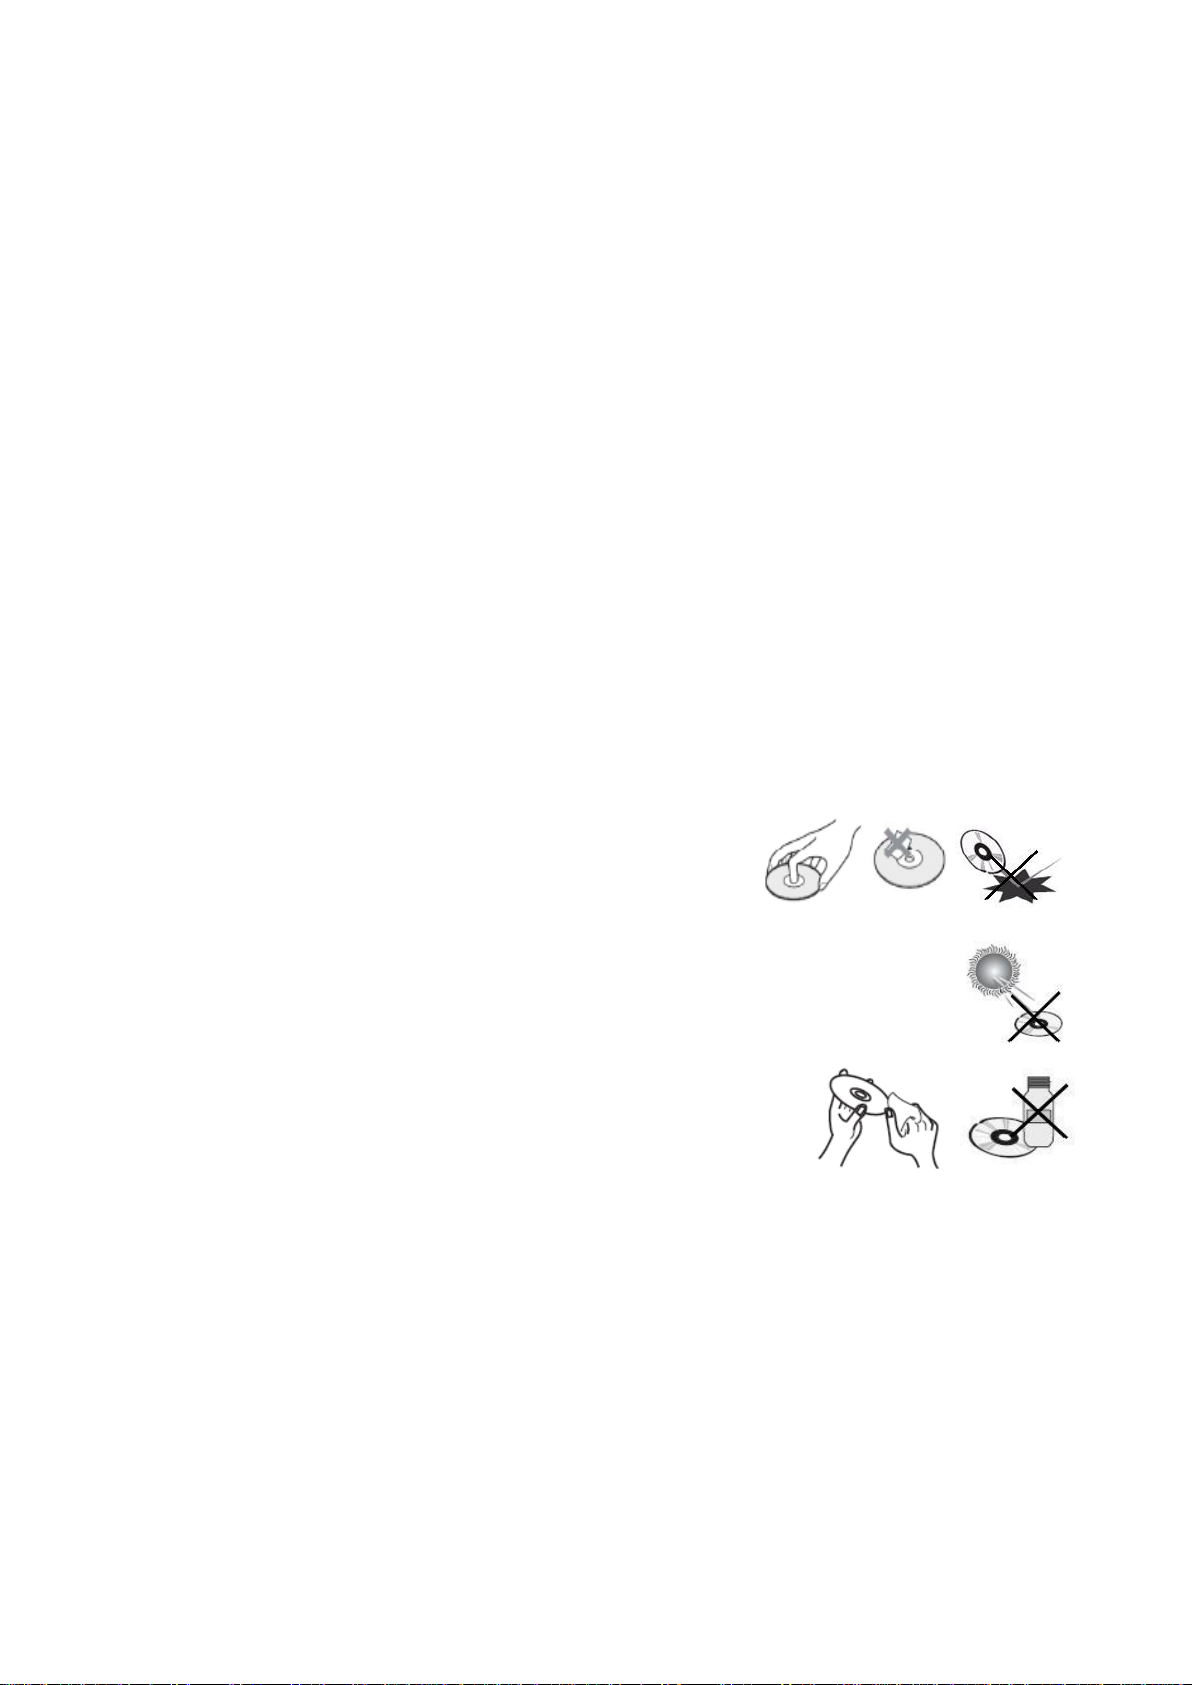
Handling discs
Do not touch the playback (bottom) side of the disc.
Hold the disc by the edges so that fingerprints will not get on the surface.
Do not stick paper or tape on the disc.
Do not drop or scratch the disc
Storing discs
After playing, store the disc in its case.
Do not expose the disc to direct sunlight or sources of heat, or leave it in a parked car exposed
to direct sunlight, as there may be a considerable temperature increase inside the car.
Cleaning discs
Fingerprints and dust on the disc can cause poor picture quality and sound
distortion. Before playing, clean the disc with a clean cloth. Wipe the disc
from the center out.
Do not use strong solvents such as alcohol, benzene, thinner, commercially
available cleaners, or anti-static spray intended for older vinyl records.
Handling the Unit
When setting up the unit, the picture and sound of a nearby TV, or radio may be distorted during playback. In this
case, position the unit away from the TV or radio.
Cleaning the unit
To clean the unit, use a soft, dry cloth. If the surfaces are extremely dirty, use a soft cloth lightly moistened with a
mild detergent solution. Do not use strong solvents such as alcohol, benzene, or thinner, as these might damage the
surface of the unit.

5
Description
Front Panel
1. POWER SWITCH: Turn On/Off the Power
2. VOLUME -/+: Adjust the Audio Volume
3. ECHO -/+: Adjust Echo Level
4. KEY b/#: Adjust Key Level
5. MPX (MULTIPLEX): Vocal On/Off for multiplex
track.
6. RECORD: Record singing
7. LED DISPLAY
8. IR SENSOR
9. PLAY/PAUSE: Play or Pause a track
10. STOP: Stop playback
11. NUMBER (0-9): Input song or track number
12. RESERVE: Program song or track number
13. CANCEL: Delete wrong letter or number input
14. OPEN/ CLOSE: Open/Close the Disc Tray
15. DISC TRAY
16. CARD INPUT
17. MICROPHONE 1 & 2 VOLUME: Adjust the
volume of Microphone 1 & 2
18. USB INPUT
19. MICROPHONE 1 & 2 INPUT
Rear Panel
1. COMPOSITE (CVBS) VIDEO OUT
2. AUDIO LEFT OUT
3. AUDIO RIGHT OUT
4. COAXIAL OUT
5. COIN: For use with a Coin machine, connect a cable from Coin machine to this port.
6. SCORE: When microphones are connected to an external amplifier, connect a cable between MIC OUTPUT port on
the amplifier and SCORE port of the player to generate Score after singing.
7. HDMI VIDEO AUDIO OUT
8. IR EXTENTION: To extend the IR reception performance, connect an extra IR Sensor to this port.
9. DC 5VADAPTER INPUT

6
Description
Remote Controller
BUTTONS
FUNCTION
POWER
Turn On/Off the Power
EJECT
Open/Close the Disc Tray
MODE
Switch between DISC, USB or CARD mode
AUDIO
Select different audio layer of Disc or AVI files
EQ
Change EQ settings for Audio
SETUP
Enter/Exit Setup Mode
NUMBER(0-9)
-Input Song or Track Numbers at Number Input mode
-Input Letter of Title or Singer Name on the SONG LIST
CANCEL
Cancel the wrong number or letter input
RESERVE
Reserve Song or Track in the Program List
MPX
Vocal On/Off for multiplex files
▶∥
Play a file or track, Pause the playback
■
Stop playback
Fast reverse at 2X, 4X, 8X, 20X, Normal Speed.
Fast forward at 2X, 4X, 8X, 20X, Normal Speed.
Skip to the Previous Song or Track
Skip to the Next Song or Track
MENU
-Create the song list of SCDG or MP3G files to USB or CARD
as SONGLIST.TXT file
-Move to the disc menu mode
TITLE
Enter the TITLE mode of Disc
PBC
CUE/PASS
-Playback Control for Video CD
-Jump to the beginning of the Video
RETURN
Return to the previous step on the file list
◀▶▲▼
Navigate between files or folders
Play a file or track
VOL -/+
Music Volume -/+ Control
KEY b/#
Key b/ # Control
SONG LIST
Open/Close the Song Search Menu
NUMBER
INPUT
Song Number Input mode to input number.
RECORD
Record your singing with SCD+G, MP3+G or CD+G into USB
or CARD. The recorded file is saved in MP3+G format.
ECHO -/+
Echo -/+ Control
RIPPING
Rip any CD+G or MP3+G Disc to USB or CARD. The ripped
file is stored at MP3+G format

7
Description
Remote Controller
Remote Control Operation Range
Point the remote controller at the remote sensor and press the buttons.
The remote control can be used up to approximately 23feet/7meters in a straight line.
It can also be operated at a horizontal angle of up to 25° from the remote control sensor.
Battery of Remote Controller
Insert Two AAA size batteries with + and –aligned correctly.
Extension of IR Input
To extend the Remote Signal Reception Performance, connect an External IR Sensor to the IR INPUT Jack of the Player.
<※CAUTION>
Do not mix old and new batteries. Never mix different types of batteries (standard, alkaline, etc.).
Do not expose batteries to heat or flame.
BUTTONS
FUNCTION
SLOW
Play in slow forward/ reverse motion
ZOOM
Enlarge a particular area of the displayed image at 2X, 3X, 4X, 1/2, 1/3, 1/4, OFF
INFO
Display the playback time and disc information
SUBTITLE
Select different subtitle language
GOTO
Jump to a chosen time position of Disc or file.
A-B
Repeat from A position to B position
REPEAT
Repeat a chapter, track, title or entire Disc
MUTE
Disable and Enable the sound output

8
Connections
Connecting your System to the Power Supply
1. Plug the AC lead of the Power Adapter to a wall outlet and the DC lead to the player
2. Press the POWER button on the front of the player to turn it on.
3. The present product can be used under the AC 100~240V~. 50/60Hz
<NOTE>
Check the voltage of the wall outlet before plugging in.
Connecting theAudio Out to Amplifier
1. Connect Audio L/R to the amplifier. When the player is connected with microphone, the audio output contains
both the music and singing for Karaoke.
2. Connect Coaxial (Digital) to the amplifier. The audio output does not contain the microphone singing.
3. SCORE INPUT: When microphone is connected to the amplifier, connect a cable between MIC OUTPUT of the
amplifier and SCORE of the Player to generate the Score after singing.
4. For digital amplifier, connect HDMI to the amplifier. When the player is connected with microphone, the audio
output contains both the music and singing for Karaoke.
Connecting the Video Out to TV/Monitor
1. Connect Composite to the TV/Monitor.
2. Connect HDMI to the TV/Monitor. The output contains both video and audio from the Player. When the Player is
connected to microphone, the audio output contains both the music and singing for Karaoke.

9
Connections
Connecting with a COIN MACHINE
If you want to use a Coin Machine with this Player, connect a cable between the Coin Machine and COIN port of this
player.
Connecting with a Flash Drive or Card
Connect a Flash Drive or Card to its slot on the player.
Do not connect both Flash Drive and Card at any time.
If there are no Disc in the Disc tray, the player will read the Flash Drive or Card automatically.
If there is a Disc is in the Disc tray, press “MODE”button to select the Flash Drive or Card.
Use the ◀▶▲▼ buttons to select the file and press “ENTER or PLAY”button to start playback.
< NOTE >
Supported file: Super CD+G (SCDG), MP3+G, AVI, MPG and JPG
Supported System: FAT32 only. ※NTFS is not supported.
Supported Capacity: External HDD up to 2TB, CARD up to 256GB.
Each folder in the HDD, Flash Drive, or Card can hold up to 32767 song files. Use multiple folders when storing more
than 32767 song files.
Be sure the External HDD has its own power cord and is turned on for proper operation.
External HDD must be turned on before connecting to the player, and must be disconnected from the player before
turning off the player.
Some High Resolution Video files may not play properly.
Some External HDDs or Cards may not play properly.
Do not take out the Flash Drive or Card during playback.

10
Basic Operation
Basic Operation
POWER
Press POWER to turn On or Off the Power.
EJECT
Press EJECT to open and close the disc tray.
NUMERIC(0~9)
Press NUMERIC (0-9) buttons to select a file/track number to play.
NOTE: When playing CD or CD+G disc, press 05 to select the track 5, or press 5and wait for the
-5 OSD (On Screen Display) to change to 05. Pressing the Play button before the change will
result in playing the disc from the track 1.
NOTE: When playing a Video CD (VCD), press the Play button for Menu before selecting a song
or track. For track 5, press 05 or 5and wait for the -5 OSD to change to 05. Pressing the Play
button before the change will result in playing the disc from the track 1.
NOTE: When playing a DVD, press the MENU button for Menu before selecting a song or track.
For track 5, press 05 or 5and wait for the -5 OSD to change to 05. Pressing the Play button before
the change will result in playing the disc from the track 1.
RESERVE
Press RESERVE to enter the PROGRAM LIST and input the desired chapter/track/file number
and press PLAY button to start playback in programmed order.
In case of VCD, it works at PBC off mode. In case of MP3, it works in a single folder only.
NOTE: To program Track 3, 5, 7 in order, press RESERVE, 3, ▼, 5, ▼, 7, ▼, and PLAY.
To clear the PROGRAM LIST, click CLEAR button, or OPEN and CLOSE the disc tray.
CANCEL
Press CANCEL to clear the wrong number input.
NOTE: For CD or CD+G disc playing, press STOP to clear the wrong number input. The
CANCEL button clears the number input when in Reserve or playing SCDG or MP3+G disc.
▶∥
(PLAY/PAUSE)
Press ▶∥once to play the file/track desired and press ▶∥again to pause the playback. To
return to playback, press ▶∥again.
■(STOP)
Press STOP to end the playback.
On DISC, you can resume the playback by pressing the PLAY.
Press the STOP twice to stop the playback completely.
/
Press (PREVIOUS) or (NEXT) to skip to the previous or next track or file.
/
Press / to change the playback speed;
(Fast Reverse): 2X, 4X, 8X, 20X, Normal Play.
(Fast Forward): 2X, 4X, 8X, 20X, Normal Play.
Note: / buttons works only when playing video files or discs.
▲▼◀▶
Press ▲▼◀▶ buttons to navigate the files/folders
ENTER
Press to play or confirm the desired selection.
VOLUME -/+
Press ‘VOL +’to raise the sound volume. Press ‘VOL–‘to lower the sound volume.
MODE
Press MODE to select between DISC, FLASH DRIVE and CARD.
Connect the CARD or FLASH DRIVE to the Player.
Press MODE to switch from DISC to FLASH DRIVE or CARD.
Use ◄►▼▲ buttons to select a file and press to play.
Press MODE to switch back to DISC mode.
NOTE: The unit will not work if 2 devices (FLASH DIRVE and CARD) are inserted into the
player at the same time.
If there is no disc in the player, the device mode will automatically switch to FLASH DRIVE or
CARD that is inserted.
AUDIO
Press AUDIO to select a different audio channel or language of video files or discs.
EQ
(EQUALIZER)
Press EQ button and select between SRND/EQ/BAND/KEY options. For EQ, select between
STANDARD/CLASSIC/ROCK/JAZZ/POP or adjust manually by selecting USER.
MPX
(MULTIPLEX)
Press MPX to select between the Left, Right and Stereo channel of a multiplex vocal track.
MONO L: Playing Left channel sound only
MONO R: Playing Right channel sound only
STEREO: Playing Left and Right channel sound
PBC
CUE/PASS
Press PBC to turn off/on the Playback Control mode in VCD discs.
Press CUE/PASS to jump to the beginning of the Movie discs

11
Basic Operation
Basic Operation
RETURN
Press RETURN to return to the Menu or previous step.
MENU
Press MENU button to go to the DISC MENU in video discs. Press ▲▼◀▶ buttons or
NUMBER (0~9) buttons to select an option and press to confirm.
NOTE: The DISC MENU will be different for each disc.
TITLE
Press TITLE to view the title of the currently playing section in a disc containing multiple titles.
NOTE: Depending on discs, this feature may not be available.
SLOW
Press SLOW to lower the playback speed (1/21/41/8PLAY) in video discs or files
NOTE: There is no audio during the slow playback.
ZOOM
Press ZOOM button to enlarge the displayed image during the playback or pause mode (2X
3X 4X 1/21/31/4OFF). Use ▲▼◀▶ buttons to move in the enlarged area.
NOTE: Depending on discs, this feature may not be available.
INFO
Press INFO for the display of the playback time and the Disc information on the TV screen.
SUBTITLE
Press SUBTITLE to select a different subtitle language.
Depending on the disc, different language options for subtitle will be available.
GOTO
(TIME SEARCH)
Press GOTO button and select a chapter or input a time with NUMBER (0~9) buttons. Press
ENTER to begin play from the chapter or time.
A-B
Press A-B once at point (A) where you wish to begin the repeat.
Press A-B again at point (B) where you wish to end the repeat. Then the player will repeat
playback between A and B.
Press A-B the third time to turn off A-B repeat mode. You can also press STOP to cancel the A-B
repeat mode.
REPEAT
Press REPEAT during playback to change the Repeat Mode between OFF/REP 1/REP ALL (or
OFF/CHAPTER/TITLE/REP ALL).
MUTE
Press MUTE to disable/enable the audio output.
SETUP
Press SETUP to enter/exit the setup mode.

12
Karaoke Operation
Karaoke Operation
MICROPHONE
SETTING
Connect Microphones to MIC 1 and MIC 2 Input jacks on the Front Panel.
Adjust Microphone Volume with MIC 1 and MIC 2 VOLUME Knobs on the Front Panel.
Adjust ECHO Level of Microphones with ECHO -/+ buttons on the Remote Controller.
VOLUME -/+
Adjust AUDIO VOLUME with VOL -/+ buttons on the remote control.
KEY +/- Control
Press KEY -/+ buttons on the Remote Control to raise or lower the KEY Level of the music.
NUMBER (0~9)
Use NUMBERIC (0~9) buttons to enter a Song Number.
SONG SEARCH
(SCDG, MP3+G)
SEARCH SONGS WITH SONG LIST BY TITLE or ARTIST
①Press SONG LIST button to display the song list of the SCDG or MP3+G files.
②Press TITLE button to switch the Song List by TITLE or by ARTIST
③Input LETTER of the TITLE or ARTIST with NUMBER (2~9) buttons. The matching
result will appear on the TV screen. Press CANCEL to delete the Wrong Letter input.
④Press PLAY or ENTER to start playback of selected song. Press STOP to stop playback.
INPUT SONG NUMBER
①Press NUMBER INPUT button to enter the Song Number Input Mode
②Input desired song number with NUMBER (0-9) buttons. The matching result will be
displayed on the TV Screen. Press CANCEL to delete the Wrong Number Input.
③Press ENTER or PLAY to start playback of selected song. Press STOP to stop playback.
PROGRAM
PLAYBACK
(SCDG, MP3+G)
You can reserve up to 16 songs on the PROGRAM LIST
①Select a song using the SONG LIST or NUMBER INPUT mode.
②Press RESERVE button to program the song in the PROGRAM LIST.
③Repeat the steps above to program more songs. That is, go to SONG LIST or NUMBER
INPUT, select a song, and press RESERVE button to program the song.
④When done programming songs, press the PLAY button in the PROGRAM LIST to start
playback in programed order.
⑤To move a programed song to the top of the queue, select the song in the PROGRAM LIST
and press button.
⑥To cancel a programmed song, select the song in the PROGRAM LIST and press
CANCEL button.
⑦To terminate the program playback, press RESERVE and press CLEAR, or open and close
the Disc tray.
MPX
(MULTIPLEX)
Press MPX button to cancel the Lead Vocal sound in Multiplex tracks or files.
MONO L: Play Left channel sound only
MONO R: Play Right channel sound only
STEREO: Play Left and Right channel sound
RECORDING
OF SINGING
(SCDG, MP3+G)
You can record your singing, music & lyrics into Flash Drive/CARD in MP3+G format when
playing SCDG and MP3+G discs.
①Insert a Flash Drive/CARD and microphone to the Player.
②After selecting a song, press RECORD button to start recording into Flash Drove/Card.
③Your singing, music, and the lyrics display of SCDG/MP3+G file or disc will be recorded
in RECORD folder in the Flash Drive/Card at MP3+G format.
④To stop recording, press STOP.
⑤After the recording, press MODE button to find the RECORD folder in the Flash
Drive/Card and re-play the recorded files.

13
Karaoke Operation
Karaoke Operation
SCDG
Disc Copying
SCDG Discs can be copied onto a Flash Drive/CARD using a PC/ Laptop.
①Insert a Flash Drive/CARD into the PC/laptop.
②Insert a SCDG Disc into the DVD Disc drive of the PC/laptop. Be sure the Flash
Drive/CARD has sufficient memory space to copy the SCDG disc which can be
approximately 5GB when single sided and 8GB when double sided.
①Copy the folder CAVS_MCG located inside the SCDG disc onto the Flash Drive/CARD.
Be sure to copy the entire folder CAVS_MCG.
②When done, rename the copied CAVS_MCG folder so that it can be identified with the
original SCDG disc, such as using a name “CB516V5”.
③You can continue to copy other SCDG discs onto the Flash Drive/CARD if the space
allows. Be sure to rename the CAVS_MCG folder differently to prevent overwriting.
④Take out the Flash Drive/CARD and insert it into the Player.
⑤Press MODE to select the Flash Drive/CARD.
⑥Enter the folders to play the matching SCDG.
MP3+G Disc
Copying
MP3+G Discs can be copied with high speed (8X) into FLASH DRIVE/CARD directly without
PC/Laptop.
①Connect a Flash Drive/CARD to the Player and Insert a MP3+G Disc to the player.
②Highlight a MP3+G file in the SONG LIST and press RIPPING button.
③When “Do you want to copy it to USB/CARD?”appears, select ONE or ENTIRE to start
copying the Disc, or select Cancel to cancel the copying.
ONE: Copy the selected song only
ENTIRE: Copy from the selected file to the last file in the folder
④Copied files are saved at DISC TO MP3G folder in FLASH DRIVE/CARD.
⑤Repeat the above steps to continue copying more MP3+G songs.
⑥When done, press MODE button to enter the DISC TO MP3G folder in FLASH
DRIVE/CARD and re-play the copied files.
CD+G Disc
Ripping
CD+G Discs can be ripped with High Speed (4X) into FLASH DRIVE/CARD directly without
PC/Laptop.
①Connect a Flash Drive/CARD to the Player and Insert a CD+G Disc into the player.
②Press RIPPRING button and follow the screen menu to set the OPTIONS and TRACKS.
③Select START and press to begin Ripping.
④During the Ripping, you can change the Ripping speed between 1X and 4X.
⑤When done, select QUIT and press to exit the Ripping mode.
⑥The Ripped songs will be saved in CDG TO MP3G folder in the Flash Drive/CARD at
MP3+G format with following file names.
TRKAAA01
TRKAAA02
…..
TRKAAA10
etc.
⑦To continue with more CD+G Discs, repeat the step ①to ⑦.
⑧When done, press MODE button to enter CDG TO MP3G folder in the Flash Drive/CARD
and play the ripped files.
AAA indicates the Disc ID.
01, 02...etc indicate the Track numbers.

14
Karaoke Operation
Karaoke Operation
SONG LIST
CREATING
(SCDG/MP3+G)
You can create the song list of SCDG/MP3+G discs or SCDG/MP3+G Flash Drive/CARD. The
resulting SONG LIST.TXT file will be saved in a Flash Drive/CARD.
①Insert the SCDG/MP3+G Disc or the SCDG/MP3+G Flash Drive/CARD to the player. If it
is a disc, connect a Flash Drive/Card to the player.
②Press SONG LIST button to display all SCDG/MP3+G Songs on the Screen.
③Press MENU button to create the list of all SCDG/MP3+G files
④The resulting SONG LIST.TXT file will be saved at the ROOT of the Flash Drive/CARD.
⑤Print the SONG LIST.TXT file for paper songbooks.
REPEAT
Press REPEAT to change the repeat mode of programmed song by ONE, ALL and OFF.
ONE: Repeat the currently playing song.
ALL: Repeat all songs continuously.
OFF: Repeat Off
EQ (Equalizer)
Press EQ button and select an option (SRND, EQ, BAND, and KEY) using ◀▶ buttons. For
each category, use ▲▼ buttons to select a setting. For EQ, select the USER setting to adjust
manually.

15
Setup
System Setup
Press SETUP to enter SYSTEM SETUP. Press SETUP again to exit.
TV System
Switch between different TV systems (NTSC, PAL60, PAL and AUTO).
*If not known, select AUTO.
SCREEN SAVER
Turn the screen saver ON or OFF.
HD OUTPUT
If the TV is HD, select the corresponding HD resolution (HD OFF / 720P / 1080i / 1080P).
If the TV is not a HDTV but the output is set at 720P or 1080P, the image will not be of good
quality. In this case, reset the output to the regular TV image (HD OFF).
VIDEO
Select a Video Output according to your connection setup. Both Composite (CVBS) and HDMI
outputs are enabled by default.
TV TYPE
For a normal TV, select 4:3PS (Pan and Scan) or 4:3(Letter Box).
For a wide-screen TV, select 16:9.
PASSWORD
Input 4 numbers and press to setup your own password. When you set up a password, the
player will ask you to enter the password to change the some system settings such as RATING.
Please store your password safely as we are not able to retrieve it.
The default password is 0000.
RATING
When changing the Rating, you need to enter your password to unlock the SYSTEM SETUP.
Rating level is base on the information of the discs. All discs with Rating levels below the
selected Rating will play.
1 KID SAFE: It will play all discs.
2 G: General Audience; recommended as acceptable for viewers of all ages.
3 PG: Parental Guidance suggested.
4 PG13: Material is unsuitable for children under age 13.
5-6 PG-R: Parental Guidance - Restricted; recommended that parents restrict children
under 17 from viewing or allow to view only when supervised by a parent or adult
guardian.
7 NC-17: No children under age 17; not recommended viewing for children under age 17.
8 ADULT: Mature material; should be viewed only by adults due to graphic sexual
material, violence or language.
DEFAULT
Change back to factory setting.
Language Setup
Press SETUP to enter SYSTEM SETUP. Use ◀▶ buttons to select LANGUAGE SETUP. Factory default for all settings is
English.
OSD LANGUAGE
Select a language of the Screen.
AUDIO LANG
Select a language of the Audio.
SUBTITLE LANG
Select a language of the Subtitle.
MENU LANG
Select a language of the Menu.

16
Setup
Audio Setup
Press SETUP to enter SYSTEM SETUP. Use ◀▶ buttons to select AUDIO SETUP.
AUDIO OUT
Select an Audio Output according to the audio connection. To cancel COAXIAL connection, use
SPDIF/OFF.
SPDIF/OFF: Analog audio output through the jacks on back panel (Audio L, Audio R).
SPDIF/RAW: Digital audio output through the Coaxial/HD Audio Output.
SPDIF/PCM: PCM Digital audio output through the Coaxial/HD Audio Output.
HD AUDIO
AUTO: Digital audio output through the HD Audio output.
PCM: PCM Digital audio output through the HD Audio output.
SCORE
AUTO: Display score after singing with microphone (s).
OFF: Turn off the display of score.
COIN
OFF: Turn Off the Coin mode
ON: Turn On the Coin mode.
KEY
Change the Key of music (-6, -4, -2, 0, 2, 4, 6)
ECHO
Change the Echo Level of microphone sound output (OFF/2/4/6/8).
MIC VOL
Change the Volume of microphone sound output (OFF/2/4/6/8).
Video Setup
Press SETUP to enter SYSTEM SETUP. Use ◀▶ buttons to select VIDEO SETUP.
BRIGHTNESS
Set the brightness of the video from range 0-12.
CONTRAST
Set the contrast of the video from range 0-12
HUE
Set the hue of the video. +color to increase red color, -color to increase green color.
SATURATION
Set the degree of the saturation of the video.
SHARPNESS
Set the degree of the sharpness of the video.
Speaker Setup
Press SETUP to enter SYSTEM SETUP. Use ◀▶ buttons to select SPEAKER SETUP.
DOWNMIX
Switch the audio output between LT/RT Mono, STEREO, VSS and OFF mode. In LT/RT Mono
Mode, two sound tracks will be mixed and the difference between these two tracks will be enhanced.
In VSS mode, two sound tracks will be mixed and the difference between these two tracks will be
decreased.
FRONT
Change the font between LARGE and SMALL.

17
Setup
Digital Setup
Press SETUP to enter SYSTEM SETUP. Use ◀▶ buttons to select DIGITAL SETUP.
OP MODE
Switch between Line Out (encode signal) and RF REMOD (raw signal)
DYNAMIC
RANGE
Set the scale of dynamic range between OFF, 1/8, 2/8. …7/8, 1.
DUAL
MONO
Set the Dual Mono modes from STEREO, MONO L, MONO R and MIX MONO.
STEREO: The proper channel output through both right and left speakers.
MONO L: the left side channel output through both right and left speakers
MONO R: the right side channel output through both right and left speakers.
MIX-MONO: the mixed two channel output through both right and left speakers.

18
Trouble Shooting
Symptom
Remedy
C
O
M
M
O
N
No power
Insert the Power plug securely into the power outlet and press “Power” button
on the front panel.
Play fails to start even when PLAY button is
pressed.
Play starts but then stops immediately
Condensation has formed: wait about 1 to 2 hours to allow the player to dry
out.
The disc may be dirty and may require cleaning.
Ensure that the disc is inserted with the label side up.
No Picture
Ensure that the video equipment is connected properly.
Ensure that the input setting for the video equipment is set properly.
No sound
Distorted sound
Ensure that the audio equipment is connected properly.
Ensure that the input setting for the audio equipment is set properly.
Picture is distorted during fast forward or fast
reverse.
The picture will be somewhat distorted at times: this is normal.
Picture freezes momentarily during playback
Check the disc for fingerprints/scratches and clean with a soft cloth wiping
from centre to edge.
No fast forward or fast reverse play.
Some discs may have section which prohibit fast forward or fast reverse.
No 4:3 (16:9) picture
Choose a correct setup for the connected video equipment.
No operations can be performed with the
remote control.
Check that the batteries are inserted with correct polarities (+/-).
The batteries are depleted: replace them with new ones.
Point the remote control unit at the remote control sensor and operate.
Operate the remote control unit at a distance of not more than 23 feet/7
meters from the remote control sensor.
Remove the obstacles between the remote control unit and remote control
sensor.
No key operation (by the unit and/or the
remote control) is effective.
Set the POWER button to OFF and then back to ON. Alternatively, turn off
the power, disconnect the power plug and then re-connect it.
On-Screen Menu icons not displayed or only
partially displayed on the TV Screen.
Select the appropriate TV Screen type by consulting the operating manual for
the TV.
The player is not working normally.
When “NO DISC”message appears on the display of the main unit, enter the
SETUP mode, select DEFAULT, and all settings will return to the default
values.
Press the POWER button to reboot the player
O
T
H
E
R
S
Play does not start even when title is selected.
Confirm the ‘RATING”setting.
Audio soundtrack and/or subtitle language is
not the one selected at the initial settings.
If the audio soundtrack and/or subtitle language does not exist on the disc, the
language selected at the initial settings will not be in effect.
No subtitles
Subtitles appear only with discs which contain them.
Subtitles are removed from the TV monitor. Perform the steps to display the
subtitles.
Alternative audio soundtrack (or subtitle)
languages fail to be selected.
An alternative language is not selected with discs which do not contain more
than one language.
In the case of some discs, the alternative language cannot be selected by
operating the AUDIO or SUBTITLE button. Try selecting it from the menu if
available.
Unable to play AVI movies
Check that the AVI file is encoded correctly.
Microphone does not work.
Check if the microphone is switched ON.
Check the microphone volume of the Player and the Amplifier.
Check if the microphone is defective. If so, replace it.
When using the microphone, the speaker
makes a noise.
Keep the microphone away from the speaker. Do not place it toward the
speaker.
Scoring has no function
Connect the microphone to the player correctly.
Sing each song with enough voice output level for over 1 minute.
Unable to recognize the Flash Drive/CARD
Take out the Flash Drive/CARD and re-connect to the player.
Check if the cable is plugged in correctly.
Check that the External HDD has its own power input. The external HDD
must be connected to its own power supply for proper operation.

19
Specification
Supported Format
Super CD+G, MP3+G, CD+G, AVI, MPG and JPG
Supported Video Resolution: 720 * 480p
TV System
PAL/NTSC/Multi System
Video Output
Composite, HDMI VIDEO AUDIO Output
Progressive Scan up to 720P, 1080i, 1080P
Audio Output
AUDIO L/R Out (For Karaoke)
HDMI VIDEO AUDIO Out (For Karaoke)
COAXIAL Out
Input
Microphone Input: 2EA
Flash Drive: 1EA, Ver2.0
Card Input: 1EA
Others
Power source: DC 5V Adapter (AC 100-240V~ 50/60Hz)
Power consumption: <15W
Table of contents
Other CAVS Karaoke System manuals

CAVS
CAVS DVD-105G USB User manual

CAVS
CAVS Karaoke Station IPS-11G User manual

CAVS
CAVS DVD-105G USB Quick start guide

CAVS
CAVS DVD-105G USB Manual

CAVS
CAVS JB-199 Premier User manual

CAVS
CAVS JB-99 RS User manual

CAVS
CAVS JB-199 IV Online User manual

CAVS
CAVS JB-99RT Instruction manual

CAVS
CAVS JB-99RG I Instruction manual

CAVS
CAVS DVD-305G USB User manual