CBM PANACEA ELETTRONICA 2429/V User manual

C.B.M. S.r.l. Medical Equipment - Via Castello 10, 26038 Torre d Picenardi (CR) –Italy
Rev.3 28/07/2010 2429-2430-2431-V COMP- r3x4.DOC pag. 1 di 17
PANACEA ELETTRONICA
Art. 2429/V - 2430/V - 2431/V
Produced by C.B.M. S.r.l.
(CEE 93/42)
- MANUALE D'USO ...........................................pag.2
- USER MANUAL................................................page.6
- MANUEL D'EMPLOI.........................................pag.9
- BETRIEBSANLEITUNG ....................................S.12
Dichiarazione di conformit –Declaration of conformity
Déclaration de conformité– Konformitätserklärung

C.B.M. S.r.l. Medical Equipment - Via Castello 10, 26038 Torre d Picenardi (CR) –Italy
Rev.3 28/07/2010 2429-2430-2431-V COMP- r3x4.DOC pag. 2 di 17
Avvertenze:
♦Le presenti istruzioni d'uso vanno conservate con cura nei pressi dell'apparecchiatura in modo che tutti
gli utilizzatori le possano consultare
♦In caso di mancata tensione o accensione della spia di allarme l'apparecchiatura blocca il ciclo di
incubazione.
♦Si consiglia di non appoggiare nessun oggetto sullapparecchiatura.
♦Oscillazioni della temperatura, durante il ciclo, dellordine di qualche grado sono da considerarsi normali.
♦Una delle griglie perforate va sempre posizionata sul piano inferiore (1)
Descrizione dell’apparecchiatura:
•(A) Interruttore generale
•(B) spia gialla di macchina pronta
Questa spia èaccesa quando l'incubatrice èpronta ed èin attesa dellavvio di un ciclo
•(C) spia rossa di allarme
Questa spia si accende per segnalare eventuali anomalie accompagnata da alcuni BIP, ), per
annullare lallarme premere il pulsante START(vedi Tabella Allarmi)
•(D) pulsante START
Questo pulsante ha la funzione di avvio di un ciclo, se la spia (B)èaccesa.
Il pulsante STARTfunziona anche cometasto RESET,se premuto durante il ciclo questo viene
interrotto, inoltre se èintervenuto un allarme, premendo il pulsante STARTlallarme viene annullato.
•(E) pulsante commutatore ó
Questo pulsante ha la funzione di alternare, sul display(H), la visualizzazione della temperatura e del
tempo di incubazione.

C.B.M. S.r.l. Medical Equipment - Via Castello 10, 26038 Torre d Picenardi (CR) –Italy
Rev.3 28/07/2010 2429-2430-2431-V COMP- r3x4.DOC pag. 3 di 17
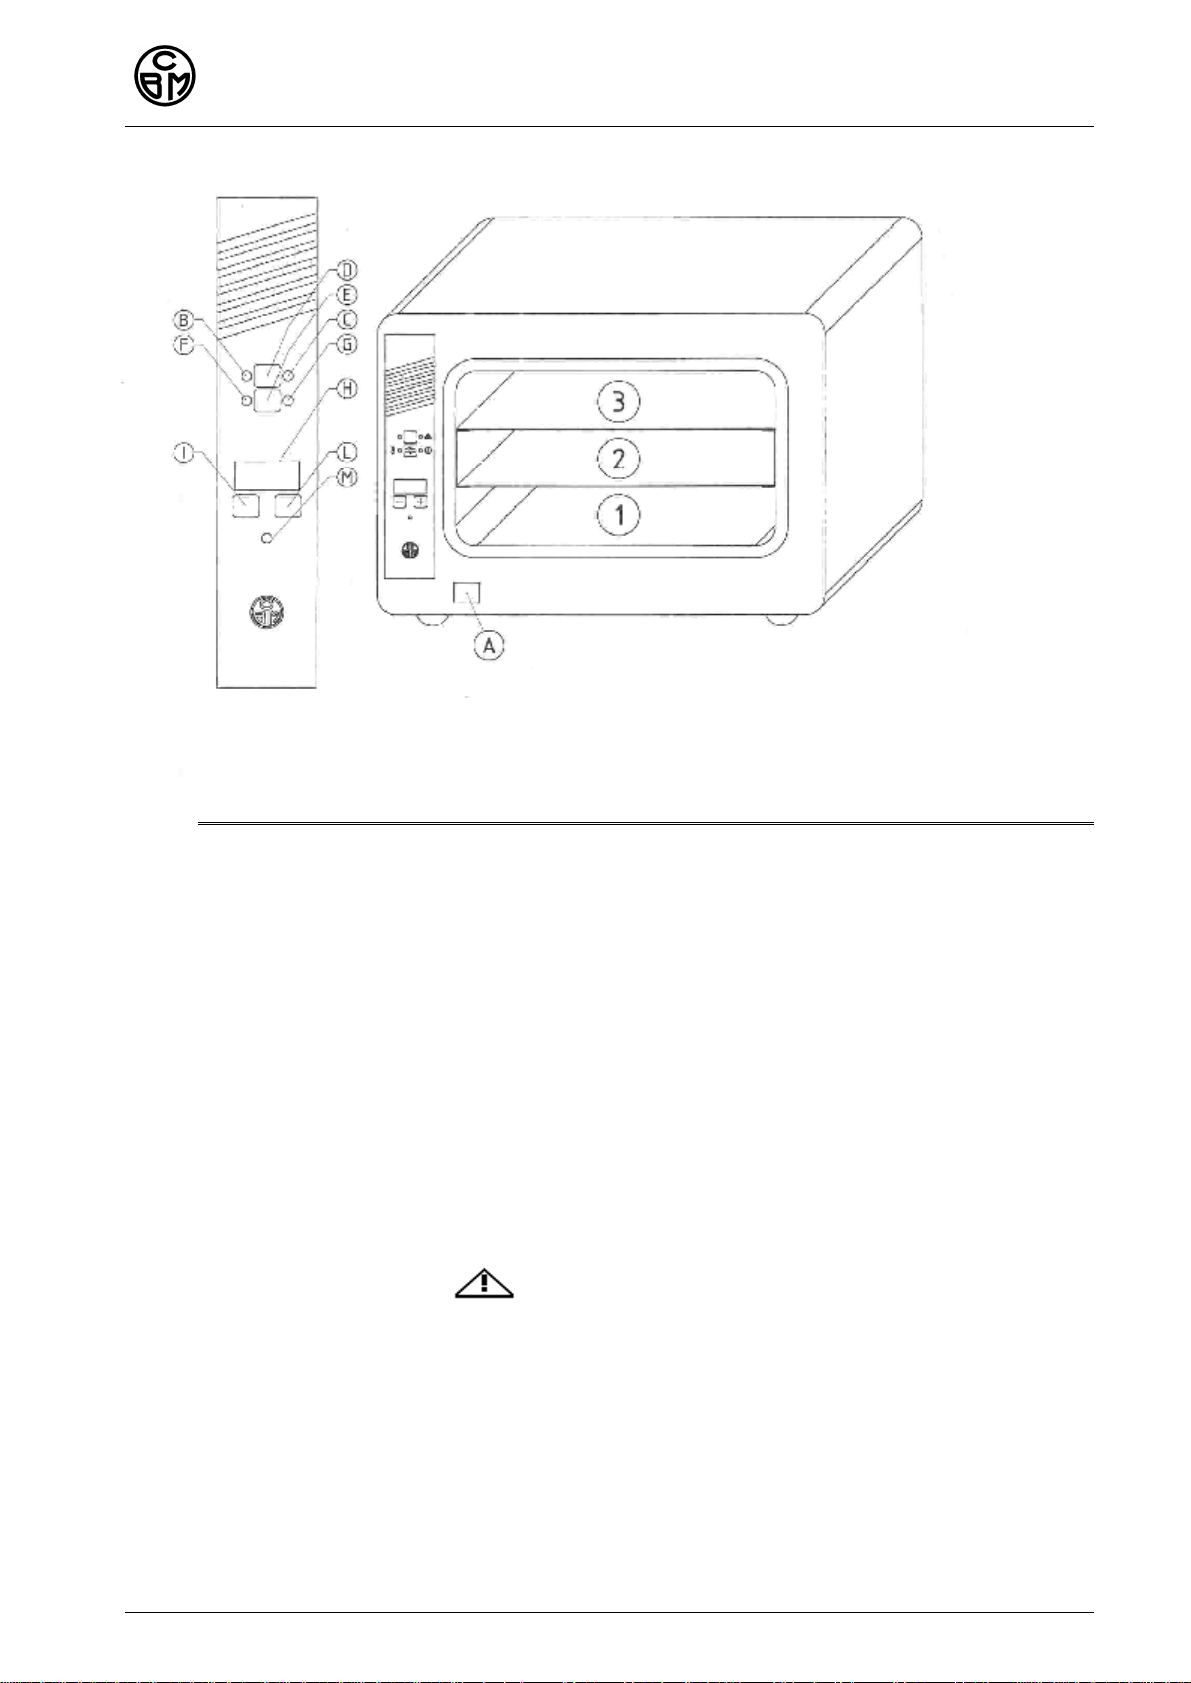
•(F) spia temperatura
Questa spia accesa indica che il valore letto e/o impostato sul display(H) si riferisce alla
temperatura.
•(G) spia tempo ½
Questa spia accesa indica che il valore letto e/o impostato sul display(H) si riferisce al tempo di
durata della incubazione, escluso il riscaldamento.
Se lampeggia significa che èstato impostato il tempo INFINITO
•(H) display
Sul displaysono visualizzati iparametri del ciclo: temperatura interna alla camera, tempo di
incubazione, temperatura impostata.
Per reimpostare i dati del ciclo questo deve essere interrotto.
•La temperatura puòessere impostata da 30°C a 70°C,
•Il tempo puòessere impostato da 1 minuto a 600 minuti, oppure a tempo infinito.
Per impostare il tempo INFINITObisogna tenere premuto il tasto +sino a600 poi attendere ancora
qualche secondo, quando sul displayappariràla scritta “INF”attendere 3secondi per la
memorizzazione automatica.
Quando èselezionata la modalitàINFINITO “INF”la spia tempo continua lampeggiare
Per togliere tempo INFINITO tenere premuto il tasto .
ATTENZIONE, CON TEMPO INFINITO L'APPARECCHIATURASI SPEGNE SOLO MANUALMENTE.
•(I) (L) tasti
Questi tasti hanno la funzione di modificare limpostazione della temperatura edel tempo di
incubazione, diminuendone o aumentandone il valore.
Premendo il tasto +una volta, con l'incubatore in attesa (spia Baccesa) viene visualizzato sul
displayil valore di temperatura o del tempo di incubazione impostati.
Da questo momento, premendo tasti o+èpossibile modificare il valore.
Dopo avere raggiunto il valore desiderato, attendere 3 secondi per lacquisizione automatica.
Se uno di questi tasti viene premuto durante il ciclo, sul displaysi leggono ivalori impostati di tempo
o temperatura ma non èpossibile modificarli.
•(M) spia heating
Questa spia indica laccensione delle resistenze di riscaldamento dellapparecchiatura
Istruzioni d’uso
1. Inserire la spina nella presa di linea 230V. Accendere linterruttore generale (A).
La scheda elettronica esegue un breve self-test segnalando sul displayla versione di Firmware poi, si
accende la spia gialla (B), con lo scopo di segnalare che la macchina èpronta per il ciclo.
2. Aprire i due caminetti scorrevoli sui lati al fine di facilitare la circolazione dellaria allinterno dell'incubatore
3. Collocare il materiale da trattare all'interno dell'incubatore e chiudere lo sportello (non aprire lo sportello
durante il ciclo).
4. Impostare la temperatura ed il tempo di incubazione desiderati,
•Impostare la temperatura: con la spia di temperatura accesa, premere i tasti oppure +.
Tenendo premuto il pulsante, laumento o la diminuzione del valore impostato diviene rapido. Dopo
avere raggiunto il valore desiderato, attendere per 3 secondi per la memorizzazione del valore
impostato.
•Impostare il tempo di incubazione: premere il pulsante commutatore ó si accende la spia
timer ½. Ripetere le operazioni precedenti per visualizzare e modificare il tempo. Attendere 3
secondi per la memorizzazione del valore impostato.
5. Dopo avere impostato i parametri, dare inizio al ciclo di incubazione premendo il pulsante“START”

C.B.M. S.r.l. Medical Equipment - Via Castello 10, 26038 Torre d Picenardi (CR) –Italy
Rev.3 28/07/2010 2429-2430-2431-V COMP- r3x4.DOC pag. 4 di 17
6. La spia gialla (B) si spegne e dopo qualche minuto l'incubatore si porta alla temperatura scelta e vi rimane
per il tempo impostato. Sul displayviene visualizzata la temperatura misurata allinterno della camera di
incubazione (con tolleranza ±2°C) oppure, commutando con il pulsante óil tempo rimanente alla fine del
ciclo.
7. Al termine del tempo impostato il ciclo di fermaautomaticamente eil displayindica la scritta END
accompagnata da alcuni BIP avvisando che l'incubatore ha completato il ciclo.
ATTENZIONE, CON TEMPO INFINITO L'APPARECCHIATURASI SPEGNE SOLO MANUALMENTE.
8. Afine ciclo chiudere icaminetti scorrevoli qualora il materiale venga lasciato allinterno
dell'apparecchiatura.
9. Se l'apparecchiatura non viene utilizzata, spegnere linterruttore generale (A) oppure il pulsante START.
Importante il ciclo deveessere considerato valido solo se al termine del ciclo appare la
scritta END “End”
TABELLAALLARMI
Display / Difetto Causa Rimedio
AL 1 Allarme resistenze rotte 1) Carico eccessivo
2) Rottura delle resistenze 1) Diminuire il carico e ripetere il ciclo
2) Sostituire la resistenza difettosa
AL 2 Allarme calo temperatura Rottura delle resistenze Sostituire la resistenza difettosa
AL 3 Allarme sovratemperatura
Errore di lettura Aprire immediatamente la porta
Sostituire scheda difettosa
AL 4 Sonda Guasta Errore di lettura Sostituire scheda difettosa
AL 5 Mancata Tensione Èmancata tensione Ripetere il ciclo
Manutenzione
Attenzione: Prima di iniziare la pulizia o di svitare qualsiasi parte dell'apparecchiatura, assicuratevi
che questa sia sconnessa dalla rete di alimentazione.
Pulire la camera di incubazione e le griglie, almeno una volta la settimana.
Per una buona pulizia utilizzare esclusivamente detergenti neutri.
Non utilizzare spugne o materiali abrasivi che possano danneggiare le superfici.
Evitare lutilizzo di detergenti, disinfettanti o altri liquidi contenenti cloruri o tricloroetilene (trielina)
poichélacciaio Inox èintaccato da essi, in caso di contatto si consiglia la pulizia immediata.

C.B.M. S.r.l. Medical Equipment - Via Castello 10, 26038 Torre d Picenardi (CR) –Italy
Rev.3 28/07/2010 2429-2430-2431-V COMP- r3x4.DOC pag. 5 di 17
Garanzia
Il presente apparecchio èprogettato ecostruito in conformitàalla direttiva comunitaria 93/42/CEE "Dispositivi
medici”ela C.B.M. S.r.l. si considera responsabile agli effetti della sicurezza, affidabilitàeprestazioni purché
eventuali modifiche oriparazioni siano effettuate da persone da essa autorizzate, purchél'impianto elettrico
dell'ambiente sia conformealle prescrizioni IEC epurchél'apparecchio sia impiegato in conformitàalle
presenti istruzioni d'uso.
La C.B.M. garantisce ipropri incubatori asecco per un (1) anno contro eventuali difetti di costruzione o guasti
ai componenti, purchénon dovuti, agiudizio della C.B.M., al cattivo uso dell'apparecchiatura da parte degli
operatori.
La garanzia non copre le parti soggette ad usura, le riparazioni ole sostituzioni eseguite da personale non
autorizzato dalla C.B.M.
La C.B.M. S.r.l. si riserva il diritto di apportare modifiche migliorative ai propri prodotti senza nessun
preavviso.
Istruzioni per RAEE
Rifiuti di Apparecchiature Elettriche ed Elettroniche - Direttiva 2002/96/CE
Il simbolo (soprariportato) che appare su questo prodotto indica che il prodotto non devessere smaltito
assieme ai normali rifiuti urbani ma mediante raccolta separata.
Le attrezzature elettriche ed elettroniche possono contenere materiali nocivi per lambiente e la salute umana
e, pertanto, devono essere smaltite presso apposite discariche.
La legge sanziona severamente coloro che smaltiscono questi rifiuti abusivamente.
La raccolta differenziata della presente apparecchiatura giunta a fine vitaèorganizzata e gestita dal
produttore.
Lutente che vorràdisfarsi della presente apparecchiatura dovràquindi contattare il produttore e seguire il
sistema che questo ha adottato per consentire la raccolta separata dellapparecchiatura giunta a fine vita.

C.B.M. S.r.l. Medical Equipment - Via Castello 10, 26038 Torre d Picenardi (CR) –Italy
Rev.3 28/07/2010 2429-2430-2431-V COMP- r3x4.DOC pag. 6 di 17
DRY INCUBATOR- USER MANUAL
Remarks:
♦These instructions have to be carefullykept near the equipment, in order to be consulted byall users.
♦In case oflackofvoltage or lighting ofthe alarmpilot lamp the equipment stops the incubation cycle.
♦We recommend not to lean anyobject on the equipment.
♦Temperature oscillations offew °C, during the cycle, have to be considered normal.
♦Always place one ofthe perforated grids on the lower plane (1).
Description of the equipment :
Referring to the figure ofpage 2 the incubator components are described here below:
•(A)Master switch
•(B) "Readymachine" yellowpilot lamp
This lamp is on when the incubator is readyand it is waiting the start ofa cycle
•(C) Alarm red lamp
This pilot lamp turns on in order to signal some possible anomalies and it is matched to a BIP sound.
To set aside the alarmpush the STARTbutton (see Alarms Table).
•(D) STARTpush button
The function ofthis push button is to start a cycle, ifthe pilot lamp (B) is turned on.
The START push button works also as RESETkey, ifit is pressed during an incubation cycle the cycle is
cancelled. Moreover, ifan alarmhas intervened, bypressing the START push button, the alarmis
cancelled.
•(E) Switch push button ó
The function ofthis push button is to alternate, on the display(H), the visualization oftemperature and
incubation time.
•(F) Temperature pilot lamp
When this pilot lamp is turned on it shows that the value read and/or set on the display(H) is referred to
the temperature.
•(G) time pilot lamp ½
When this pilot lamp is turned on it shows that the value read and/or set on the display(H) is referred to
the incubation duration, heating excluded.
Ifit flashes it means that INFINITE time has been set.
•(H) display
Cycle parameters are visualized on the display: temperature inside the chamber, incubation time, set
temperature.
In order to reset the cycle data, this must be stopped.
•The temperature can be set between 30°C and 70°C,
•Time can be set between 1 minute and 600 minutes or infinite time.
To set the INFINITE time the push button + must be kept pressed up to 600 and then it is necessaryto
wait fewseconds.
When the writing “INF“appear on the displaywait 3 seconds for automatic storage.
When INFINITE time is selected the Lamp Time (G) flashes.
To remove INFINITE time press the button .
ATTENTION: ATINFINITE TIME THE EQUIPMENTCAN BE SWITCHED OFF ONLY MANUALLY.

C.B.M. S.r.l. Medical Equipment - Via Castello 10, 26038 Torre d Picenardi (CR) –Italy
Rev.3 28/07/2010 2429-2430-2431-V COMP- r3x4.DOC pag. 7 di 17
•(I) (L) keys
The function ofthese keys is to modifythe temperature setting and the incubation time, increasing or
decreasing the value. Bypressing the +keyonce, with the incubator waiting (B pilot lamp turned on), the
set temperature value or the set incubation time is visualized on the display.
Fromthis moment, bypressing the +or keys it is possible to modifythe value.
After reaching the desired value, wait 3 seconds for automatic acquisition.
Ifone ofthese keys is pressed during the cycle, the set values oftime or temperature can be read on the
displaybut it is not possible to modifythem.
•(M) Heating pilot lamp
This lamp indicates the switching on ofthe heating elements ofthe equipment.
User's instructions
1. Connect the plug into the 230V outlet. Switch on the master (A).
The displayshows a short selftest, including the Firmware Version.
The yellowpilot lamp (B) is turned on in order to showthat the machine is readyfor the cycle.
2. Open the two sliding chimneys on both sides in order to make an easier air circulation inside the
incubator.
3. Place the material to be treated inside the incubator and close the door (do not open the door during the
cycle).
4. Set the desired temperature and time ofincubation,
- Set the temperature :
with the temperature pilot lamp on, press the +or keys, or keeping the push button pressed, the
increase or the decrease ofthe value becomes quick. After reaching the desired value, wait 3 seconds
for the storing ofthe set value.
- Set the incubation time:
press the switch push button óthe timer pilot lamp turns on ½. Repeat the previous operations, in
order to visualize and modifythe time. Wait 3 seconds for the storing ofthe set value.
5. After the parameters setting, start the incubation cycle bypressing the "START" push button. The yellow
pilot lamp (B) turns off.
6. After some minute the incubator arrives at the set temperature and keeps it for the set time. The
temperature measured inside the incubation chamber is visualized on the display(with a±2°C tolerance)
or, byswitching the ópush button, the remaining time to the end ofthe cycle.
7. At the end ofthe set time, the cycle automaticallystops and the displayshows the writing END matched
to fewBIP sounds, informing that the incubator has finished the cycle.
IMPORTANT: The cycle is considered valid onlyif, at the end, the writing “End“
appears.
8. At the end ofthe cycle close the sliding chimneyin case some material is left inside.
9. Ifthe equipment is not used, switch off the master (A) or the push button START.
ATTENTION: AT INFINITE TIME THE EQUIPMENT CAN BE SWITCHED OFF ONLY
MANUALLY.

C.B.M. S.r.l. Medical Equipment - Via Castello 10, 26038 Torre d Picenardi (CR) –Italy
Rev.3 28/07/2010 2429-2430-2431-V COMP- r3x4.DOC pag. 8 di 17
ALARM TABLE
Display/Defect Cause Remedy
AL 1 Alarmheating element
broken 1) Excessive load
2) Heating element broken 1) Reduce the load and repeat the cycle
2) Replace the faultyheating element
AL 2 AlarmLowTemperature Heating element broken Replace the faultyheating element
AL 3 AlarmOverheating CPU card in Error 1) Open immediatelythe door
2) Replace the faultyCPU card
AL 4 - Probe broken CPU card in Error Replace the faultyCPU card
AL 5 Black Out The Black Out Repeat the cycle
Cleaning
ATTENTION: Before cleaning or screwing out anypart of the machine make sure that this one is
disconnected from the feeding network
To make a good cleaning use onlyneutral detergents and rinse
The gaskets and all plastic parts can be cleaned with a cotton flocksoaked in alcohol.
Do not use sponges or abrasive materials which can damage the surface.
Toclean do not use detergents, disinfectants or other liquids containing chlorides as theyare corrosive for
stainless steel; in case ofcontact please rinse immediately.
Warranty
This instrument is designed and built according to the CommunityDirective CEE 93/42 “Medical equipments
and C.B.M. is responsible for safety,reliabilityand performances provided that possible modifications or
repairs are carried out byauthorized people, the corresponding electric plant complies with IEC regulations
and the equipment is used in compliance with these instruction for use.
C.B.M. guarantees its incubator for one (1) year, in case ofmanufacturing defects or failures ofcomponents,
though not due, according to C.B.M. evaluation, to the operators wrongful use ofthe apparatus.
The manufacturing companyis released byanyresponsibilities for damages to people or things due to failure
to earth the plant.
The warrantydoes not cover parts subject to wear and repairs or replacements carried out bypersonnel not
authorised byC.B.M.
Details, descriptions and pictures are merelyindicative.
C.B.M. S.r.l. reserves the right to carryout ameliorative modifications to its own products without any
previous notice.
Disposal Of Electric And Electronic Refuse
Waste fromElectrical and Electronic Equipment - Directive 2002/96/EC (WEEE)
The symbol (shown above) that appears on this product means that it should not be disposed oftogether with
normal household refuse but should be treated separately.
Electric and electronic equipment maycontain substances that are harmful to the environment and to the
health ofhumans and should therefore be disposed ofat special waste disposal sites.
There are harsh legal penalties in force against persons found disposing ofsuch equipment in an
irresponsible manner.
When the equipment is no longer ofanyuse, it maytaken backto the outlet fromwhich you intend to
purchase a replacement.

C.B.M. S.r.l. Medical Equipment - Via Castello 10, 26038 Torre d Picenardi (CR) –Italy
Rev.3 28/07/2010 2429-2430-2431-V COMP- r3x4.DOC pag. 9 di 17
INCUBATEUR A SEC - MANUEL D'EMPLOI
Avertissements :
♦Il faut conserver ces instructions pour l'emploi avec le plus grand soin près de l'installation, de façon que
tous les opérateurs peuvent les consulter.
♦En cas de manque de tension ou d'allumage du voyant d'alarme, l'installation bloque le cycle
d'incubation.
♦On recommande de ne pas appuyer aucun objet sur l'installation.
♦Des oscillations de la température, pendant le cycle, en raison de quelques degré, peuvent être
considérées normales.
♦Il faut toujours positionner une des grilles perforées sur le plan inférieur (1).
Description de l'installation:
En se référant àla figure de la page 2 on décrit ci-dessous les différentes parties de lincubateur:
♦(A)Interrupteur général
♦(B) Voyant jaune de "machine prête"
Ce voyant s'allume quand lincubateur est prêt et attend le démarrage d'un cycle.
♦(C) Voyant rouge d'alarme
Ce voyant s'allume pour signaler des anomalies éventuelles et il est accompagnépar des BIP.
Pour annuler lalarme il faut presser le bouton-poussoir START(voir Tableau des Alarmes).
♦(D) Bouton-poussoir START
Ce bouton-poussoir a la fonction de faire démarrer un cycle, si le voyant (B) est allumé.
Le bouton-poussoir STARTmarche aussi comme bouton RESET, s'il est pressépendant un cycle de
incubation le cycle est annulé. En plus, si un alarme intervient, en appuyant sur le bouton-poussoir
STARTl'alarme est annulé.
♦(E) Bouton commutateur ó
Ce bouton a la fonction d'alterner sur l'afficheur (H), la visualisation de la température et du temps
d'incubation.
♦(F) Voyant température.
Ce voyant alluméindique que la valeur lue et/ou sélectionnée sur l'afficheur (H) se réfère àla
température.
♦(G) Voyant temps ½
Ce voyant alluméindique que la valeur lue et/ou sélectionnée sur l'afficheur (H) se réfère au temps de
durée de l'incubation, chauffage exclu.
Sil clignote signifie que le temps INFINI a étéarrangé.
♦(H) Afficheur
Sur l'afficheur les paramètres du cycle sont affichés : température àl'intérieur de la chambre, temps d
incubation, température sélectionnée
Afin de sélectionnée les données du cycle il faut l'arrêter.
•La température peut être réglée entre 30°C et 70°C,
•On peut régler le temps entre 1 minute et 600 minutes, ou régler sur temps infini.
Pour régler sur temps infini il faut appuyer sur le touche +jusqu à 600 et puis il faut attendre encore
quelques secondes ; lorsque sur l afficheur apparaîtra l inscription "INF" il faut attendre 3 secondes pour
la mise en mémoire automatique.
Lorsque la modalité"INF" est sélectionnée le voyant temps continue àclignoter.
Pour enlever temps INFINI il faut presser le touche .
ATTENTION: Sur temps infini l'installation ne s'éteint que Manuellement

C.B.M. S.r.l. Medical Equipment - Via Castello 10, 26038 Torre d Picenardi (CR) –Italy
Rev.3 28/07/2010 2429-2430-2431-V COMP- r3x4.DOC pag. 10 di 17
•(I) (L) touches
Ces touches ont la fonction de modifier le réglage de la température et du temps d'incubation, en
réduisant ou augmentant ces valeurs.
En pressant sur la touche +une fois, avec l'incubateur en attente, (voyant B allumé) l'afficheur visualise
la valeur de la température ou du temps d'incubation sélectionnés.
A partir de ce moment là, en pressant sur les touches +or il est possible de modifier la valeur.
Dès que l'on a atteint la valeur souhaité, il faut attendre 3 secondes pour la saisie automatique des
données.
Si une des ces touches est pressée pendant le cycle, sur l'afficheur on peut lire les valeurs sélectionnés
de temps ou de température mais il n'est pas possible de les modifier.
•(M) Voyant chauffage (heating)
Ce voyant indique lallumage des résistances de chauffage de l incubateur.
Instructions pour l'emploi
1. Introduire la fiche dans la prise de courant 230V. Brancher le commutateur général (A).
Lafficheur effectue un brefself-test en signalant la version de Firmware ; après le voyant jaune (B)
sallume afin de nous indiquer que la machine est prête pour le cycle.
2. Ouvrir les deux petites cheminées glissants sur les côtés, afin de faciliter la circulation de l'air àl'intérieur
de l'incubateur.
3. Placer le matériel àtraiter àlintérieur de lincubateur et fermer la porte (il ne faut pas ouvrir la porte
pendant le cycle).
4. Sélectionner la température et le temps d'incubation souhaités.
•Changer la température: avec le voyant de température allumé, appuyer sur les touches +or ,
en tenant le bouton poussoir appuyé, l'augmentation ou la diminution de la valeur devient rapide.
Après être arrivéàla valeur souhaitée, il faut attendre 3 secondes pour la saisie de la valeur.
•Changer le temps de incubation: appuyer sur le bouton commutateur óqui allume le voyant
timer ½. Répéter les opérations précédentes pour visualiser et modifier le temps. Attendre 3
secondes pour la saisie de la valeur sélectionnée.
5. Après avoir sélectionnéles paramètres, faire démarrer le cycle d'incubation en appuyant sur le bouton
poussoir "START". Le voyant jaune (B) s'éteint.
6. L'incubateur arrive àla température choisie et yreste pendant le temps sélectionnée. La température
mesurée àl'intérieur de la chambre de incubation est visualisée sur l'afficheur (avec une tolérance de
±2°C) ou, en commutant avec le bouton pousseur ó, le temps qui reste àla fin du cycle.
7. A la fin du temps sélectionnée le cycle s'arrête automatiquement et l'afficheur indique l'inscription END
accompagnée par quelques BIP en signalant que l'incubateur a achevéle cycle.
Important : le cycle peut être considérévalable seulement si l'inscription «END »est affichée àla fin
du cycle.
8. A la fin du cycle fermer les cheminées si le matériel est laisséàl'intérieur de lincubateur.
9. Si l'installation n'est pas utilisée, éteindre l'interrupteur général (A) ou le bouton-poussoir START.
ATTENTION: Sur temps INFINI l'installation ne s'éteint que Manuellement

C.B.M. S.r.l. Medical Equipment - Via Castello 10, 26038 Torre d Picenardi (CR) –Italy
Rev.3 28/07/2010 2429-2430-2431-V COMP- r3x4.DOC pag. 11 di 17
Tableau Des Alarmes
Afficheur / Défaut Cause Remède
1) Charge excessive 1) Réduire le charge et répéter le cycle
AL 1 Alarme résistances en panne 2) Rupture de la résistance 2) Remplacer la résistance défectueuse
AL 2 Alarme chute de température Rupture de la résistance Remplacer la résistance défectueuse
AL 3 Alarme surchauffage Erreur de lecture 1) Ouvrir immédiatement la porte
2) Remplacer la carte électronique
défectueuse
AL 4 Sonde en panne Erreur de lecture Remplacer la carte électronique
AL 5 Chute de tension La tension est manquéeRépéter le cycle
Nettoyage
ATTENTION: Avant de nettoyer ou de dévisser quelconque partie de l’appareil assurez-vous qu’elle
soit disjointe du réseau d’alimentation
Pour un bon nettoyage, utilisezexclusivement des produits détergents neutres.
Les joints et toutes les parties en plastique peuvent être nettoyées avec du coton imbibéd alcool.
Nutilisezpas dé ponges ou de matériaux abrasifs qui pourraient abîmer la surface.
Pour le nettoyage, évitezdutiliser des détergents, des désinfectants ou tout autre liquide contenant des
chlorures car ils sont corrosifspour lacier Inox. Si cela se produit, nous vous conseillons de rincer
immédiatement.
Garantie :
Cet appareil a étéconçuet construit en conformitéavec les directives communautaires 93/42/CEE
“Dispositifsmédicaux”et C.B.M. S.r.l. considère qu elle est responsable de la sécurité,de la fiabilitéet des
prestations dudit appareil, àcondition que linstallation électrique soit conformeaux prescriptions IEC et à
condition que lappareil soit utiliséen suivant le mode demploi.
C.B.M. garantit ses incubateurs pour un (1) annéeen cas de défauts de fabrication ou de pannes aux
composants, non dus, selon lé valuation de C.B.M., au mauvais emploi de lappareil par les opérateurs.
La garantie ne couvre pas les parties sujettes àlusure et les réparations ou substitutions effectuées par un
personnel non autorisépar la sociétéC.B.M.
Les données, descriptions et illustrations sont purement indicatives.
C.B.M. S.r.l. se réserve le droit daméliorer ses produits sans aucun préavis.
INSTRUCTIONS pour DEEE
Déchets d é quipements électriques et électroniques - Directive 2002/96/CE
Le symbole (représentéci-dessus) qui apparaîtsur ce produit, indique que celui-ci ne doit pas être mélanger
aux déchets communs mais doit faire lobjet d une collecte séparée.
Les équipements électriques et électroniques peuvent contenir des matériaux dangereux pour
lenvironnement et la santépublique et, par conséquent, doivent être déposés dans des containers adéquats.
La loi sanctionne sévèrement ceux qui rejettent ces déchets de façon abusive.
A la fin de sa durée de vie lappareil pourra être retournéàson distributeur si le propriétaire a besoin den
acquérir un nouveau ou un similaire.

C.B.M. S.r.l. Medical Equipment - Via Castello 10, 26038 Torre d Picenardi (CR) –Italy
Rev.3 28/07/2010 2429-2430-2431-V COMP- r3x4.DOC pag. 12 di 17
BETRIEBSANLEITUNG
Hinweise:
♦Dieses Handbuch der Gebrauchsanleitungen in der Nähe des Apparats sorgfältig aufbewahren, damit
das Bedienungspersonal darin Einsicht nehmen kann.
♦Bei Spannungsausfall oder Aufleuchten der Warnlampe unterbricht der Apparat den Inkubationszyklus.
♦Keine Gegenstände aufden Apparat stellen.
♦Temperaturschwankungen umeinige °C während der Zyklusdurchführung sind absolut normal.
♦Einer der Lochroste wird immer aufdie tiefste Ebene positioniert (1)
Beschreibung des Apparats:
Mit Bezug aufdie Abb. von Seite 2werden in der Folge die Komponenten des Inkubatorsapparats
beschrieben:
•(A) Hauptschalter
•(B) Gelbe Warnlampe für betriebsbereiten Inkubatorsapparat
Diese Warnlampe leuchtet auf, sobald der Inkubator betriebsbereit ist und aufZyklusstart wartet
•(C) Rote Warnlampe
Diese Warnlampe leuchtet auf,umevtl. (von Hörsignalen begleitete) Störungen zu melden. Über den
DruckknopfSTARTden Alarmrückstellen. (siehe auch Tabelle der Alarme).
•(D) START Druckknopf
Über diesen Druckknopferfolgt der Zyklusstart, wenn die Warnlampe (B) eingeschaltet ist.
Der STARTDruckknopfdient auch als RESETDruckknopf:Während eines Zyklus niedergedrückt,
bewirkter die Rückstellung des Zyklus. Bei Alarmmeldung wird über den STARTDruckknopfder
Alarmrückgestellt.
•(E) Umschaltdruckknopf ó
Über diesen Druckknopfwerden amDisplay(H) Temperatur und Inkubationsdauer angezeigt.
•(F) Kontrolllampe der Temperatur
Diese Kontrolllampe meldet, dass der amDisplay(H) abgelesene u/o eingestellte Wert sich aufdie
Innentemperatur bezieht.
•(G) Kontrolllampe der Zyklusdauer ½
BeimAufleuchten gibt diese Kontrolllampe an, dass der amDisplay(H) angezeigte bzw.eingestellte
Wert sich aufdie Inkubationszeit bezieht. Heizungszeit ausgeschlossen.
Die blinkende Kontrolllampe meldet, dass die Zeit aufENDLOS eingestellt worden ist.
•(H) Display
AmDisplaywerden alle Zyklusparameter angezeigt: Temperatur imInneren der Kammer,
Inkubationszeit, eingestellte Temperatur.
Den Zyklus unterbrechen, umdie Zyklusdaten neu einzustellen.
•Die Temperatur kann zwischen 30 °C und 70°C eingestellt werden,
•Die Zeit kann zwischen 1 Minute und 600 Minuten bzw. aufENDLOS eingestellt werden.
Umdie Zeit aufENDLOS einzustellen, den Druckknopf+bis auf600 niedergedrückthalten, noch
einige Sekunden warten. Sobald amDisplaydie Schrift „INF“angezeigt wird, 3Sekunden zwecks
automatischer Speicherung warten.
Wird der Modus ENDLOS “INF”gewählt, dann blinkt die Kontrolllampe der Zeit ununterbrochen.
Umdie Zeit ENDLOS rückzustellen, die Taste niedergedrückt halten.
ACHTUNG, ISTDIE ZYKLUSDAUER AUF ENDLOS EINGESTELLT, SO WIRD DER APPARATE VON
HAND AUSGESCHALTET.
•(I) (L)Tasten
(I) (L) Funktion dieser Tasten ist die Änderung von Temperatur- und Inkubationseinstellung durch
Verringerung bzw. Steigerung des Wertes.
Wird die Taste +einmal niedergedrückt, wenn der Inkubator sich in Bereitschaftbefindet
(Kontrolllampe Bleuchtet auf),so wird amDisplayder eingestellte Wert fürTemperatur bzw.für
Inkubationszeit angezeigt.
Nun kann man diesen Wert ändern, wenn man aufdie Tasten o+drückt.

C.B.M. S.r.l. Medical Equipment - Via Castello 10, 26038 Torre d Picenardi (CR) –Italy
Rev.3 28/07/2010 2429-2430-2431-V COMP- r3x4.DOC pag. 13 di 17
Sobald der eingestellte Wert erreicht wird, 3 Sekunden zwecks automatischer Erfassung abwarten.
Wird eine dieser Tasten während der Zyklusdurchführung niedergedrückt, werden am Displaydie für
Zeit bzw. Temperatur eingestellten Werte angezeigt, die jedoch nicht geändert werden können
•(M) heating Kontrolllampe
Diese Kontrolllampe meldet das Einschalten der Heizwiderstände des Apparats.
Gebrauchsanweisungen
1. Den Stecker in die Steckdose zu 230V einstecken und den Hauptschalter (A) betätigen.
Die elektronische Karte führt einen raschen self-test durch und zeigt amDisplaydie Firmware Version,
danach schaltet sich die gelbe Kontrolllampe (B) ein und meldet, dass der Apparat betriebsbereit ist..
2. Zwecks optimaler Luftzirkulation imInneren des Inkubators die beiden Seitenabzüge öffnen.
3. Die gewünschte Temperatur und Inkubationszeit einstellen,
-Einstellen der Temperatur: Bei eingeschalteter Kontrolllampe der Temperatur die Tasten
od. +.niederdrücken. Wird die Taste niedergedrücktgehalten, so wird der eingestellte Wert am
schnellsten verringert od. gesteigert..
Sobald der eingestellte Wert erreicht wird, 3 Sekunden warten, damit der Wert gespeichert wird.
-Einstellen der Inkubationszeit: Aufden Umschaltdruckknopfódrücken.
Die timer Kontrolllampe ½ schaltet sich ein. Den Vorgang wiederholen, umdie Zeit anzuzeigen
und zu ändern , 3 Sekunden warten, damit der Wert gespeichert wird.
4. Nach der Einstellung der Parameter über “START”den Inkubatorzyklus starten.
5. Die gelbe Kontrolllampe (B) schaltet sich aus und nach einigen Minuten erreicht der Inkubatorapparat
den eingestellten Temperaturwert, der für die gewünschte Zeit unverändert bleibt..
6. AmDisplaywird die Innentemperatur der Inkubationskammer (mit einer Toleranzvon ±2°C)
angezeigt bzw. über den Druckschalter ódie bis zumZyklus ende nötige Zeit.
7. AmEnde des Zyklus stoppt der Apparat automatisch, amDisplaywird END angezeigt, was die
erfolgte Durchführung des kompletten Zyklus meldet.
WICHTIG: Der Zyklus gilt als vollkommen durchgeführt, ausschließlich wenn die Schrift END am
Displayerscheint.
8. AmZyklus ende die Seitenluftabzüge schließen, wenn das Material imApparat gelassen wird.
9. Den Hauptschalter (A) abschalten, wenn der Apparat nicht benutzt wird.
ACHTUNG: ISTDIE ZYKLUSDAUER AUF ENDLOS EINGESTELLT, SO KANN DER APPARATNUR VON
HAND ABGESCHALTETWERDEN.
Tabelle der Alarme
Display / Störung Ursache Eingriff
AL 1 Alarmbei Bruch der
Widerstände 1) Übertriebene Ladung
2) Bruch der Widerstände 1) Ladung verringern und Zyklus wiederholen
2) Den defekten Widerstand austauschen
AL 2 Alarm
Temperaturrückgang Bruch der Widerstände Den defekten Widerstand austauschen
AL 3 Alarm Übererwärmung Ablesefehler Defekte Karte austauschen
AL 4 Defekte Sonde Ablesefehler Defekte Karte austauschen
AL 5 Spannungslosigkeit Spannung fehlt Zyklus wiederholen

C.B.M. S.r.l. Medical Equipment - Via Castello 10, 26038 Torre d Picenardi (CR) –Italy
Rev.3 28/07/2010 2429-2430-2431-V COMP- r3x4.DOC pag. 14 di 17
Wartung
Achtung: Bevor die Reinigung vorgenommen oder ein beliebiges Teil des Geräts ausgeschraubt wird
muss sichergestellt werden, dass das Gerät nicht am Stromnetz angeschlossen ist.
Inkubationskammer und Roste mindestens einmal die Woche reinigen.
Dazu sind ausschließlich neutrale Reinigungsmittel zu verwenden.
Keine scheuernden Schwämme oder Materialien benutzen, da diese die Oberflächen schädigen
könnten.
Die Verwendung von Reinigungs- und Desinfektionsmitteln bzw. sonstigen Flüssigkeiten, die Chloride oder
Trichloräthylen („Tri“) enthalten, muss vermieden werden, da sie den Inoxstahl angreifen. Bei versehentlichem
Kontakt empfiehlt sich eine sofortige Reinigung.
Garantie
Das vorliegende Gerät wurde in Konformität mit der EG- Richtlinie 93/42/EG „Medizinische Vorrichtungen“
entwickelt und gebaut und die Fa. C.B.M. S.r.l. betrachtet sich als verantwortlich für Sicherheit, Zuverlässigkeit
und Leistungen, vorausgesetzt, dass eventuelle Abänderungen oder Reparaturen durch von ihr zugelassenes
Personal ausgeführt werden, dass die Elektroanlage des Raums den IEC- Vorschriften entspricht und das Gerät
gemäßden vorliegenden Betriebsanweisungen eingesetzt wird.
C.B.M. leistet ein (1) Jahr Garantie aufdie eigenen Inkubationsapparate imFalle von evtl.
Fabrikationsfehlern bzw.von Komponentenfehlern, die nach unanfechtbarer Ansicht des Herstellers nicht auf
den unsachgemäßen Gebrauch des Apparats zurüchzuführen sind.
Die Garantie gilt nicht fürVerschleißteile, sowie fürReparaturen oder Ersatz von Teilen, die von nicht durch
C.B.M. zugelassenes Personal ausgeführt wurden.
Anweisungen Zur Entsorgung Von Elektro
–Und Elektronik-Altgerate
Elektro –und Elektronik-Altgerate –Richtlinie 2002/96/EG
Das (oben dargestellte) Symbol an diesemProdukt weist daraufhin, dass dieses Produkt nicht als normaler
Haushaltsmüll sondern als Sonderabfall entsorgt werden soll.
Elektrische und elektronische Apparate können für Umwelt und Menschen schädliche Stoffe enthalten, die
bei Sonderabfalldeponien entsorgt werden sollen.
Das Gesetzbestraft strengstens diejenigen, die solche Abfälle rechtswidrig entsorgen.
Nach abgelaufener Lebensdauer kann der Apparat demVerkäufer zurückgegeben werden, wenn man einen
neuen bzw. ähnlichen kaufen will.

C.B.M. S.r.l. Medical Equipment - Via Castello 10, 26038 Torre d Picenardi (CR) –Italy
Rev.3 28/07/2010 2429-2430-2431-V COMP- r3x4.DOC pag. 15 di 17
Dati elettrici Electrical data
Information electrique Elektrische Angaben
2429/V 2430/V (*) 2431/V
potenza assorbita
power absorbed
Leistungsaufnahme 400 W200 W100W
corrente assorbita
current absorbed
Stromaufnahme 1,8 A 0,9 A 0,5 A
voltaggio
voltage
Spannung ~ 220 V
frequenza
frequency
Frequenz 50 / 60 Hz.
fusibili –fuses-
type F 5x20 250V
Schmelzsicherungen Typ F5x20
250V 2 A 1 A 1 A
Art. 2431/V - n°1 Resistenza - n°1 Heating element - n°1 Resistance- n°1 Widerstand
A= Fusibili - Fuses –Fusibles- Schmelzsicherungen
B= Interruttore generale - Main switc - Interrupteur général - Hauptschalter
C= Scheda CPU - Board CPU - Fiches CPU –CPU Karte
D = Resistenza 2 - Heating element 2 - Resistance 2 –Widerstand 2
E= Resistenza 1 - Heating element 1 - Resistance 1- Widerstand 1
F= Termoresistenza NTC - Thermoresistance NTC –Thermowiderstand NTC

C.B.M. S.r.l. Medical Equipment - Via Castello 10, 26038 Torre d Picenardi (CR) –Italy
Rev.3 28/07/2010 2429-2430-2431-V COMP- r3x4.DOC pag. 16 di 17
Tabella di sicurezza –Safetytable
Apparecchio - Apparatus Incubator a secco
Dryincubator
Costruttore - Manufacturer
C.B.M. S.r.l.
via Castello n°10
26038 Torre de Picenardi
Cremona -Italy
Modello - Model
2429/V, 2430/V,
2431/V
Norma di riferimento - Reference norm CEIEN 61010-1
Dati di targa - Data ofplate:
Documentazione annessa -Attached documentation si -yes
Morsetti - Terminals
Terra di protezione -Protection ground wire si -yes
Equipotenzialità-equipotential no
Terra funzionale -Functional ground wire no
Spina d'alimentazione - Feeding plug
Corrente nominale -Nominal current 10A
Tipo smontabile -Disassembled type no
Marchio di sicurezza -Securitymarksi -yes
Cavo di alimentazione -Feedingcable Separabile -separable
Fusibili - Fuses
Accessibili all'esterno -Open to outside si -yes
Tipo -Type F
Caratteristiche - Characteristics
Classe Apparecchio -Class equipment I
Categoria di installazione -Installation categoryII
Grado d'inquinamento -Pollution degree 1
Marchio di sicurezza -Securitymarkno
Autocertificazione . Self-certification si -yes
Altitudine max di funzionamento Max. operatingaltitude 2000 m.
Temperature ambiente di funzionamento
Operative environment temperature Da 5°C a 40°C
5°C up to 40°C
Umiditàrelativa Max. ambiente di funzionamento
Max relative humidityin the operative environment Max 93 %
Condizioni di immagazzinamento Storage conditions 0°C ~ + 50°C

C.B.M. S.r.l. Medical Equipment - Via Castello 10, 26038 Torre d Picenardi (CR) –Italy
Rev.3 28/07/2010 2429-2430-2431-V COMP- r3x4.DOC pag. 17 di 17
DICHIARAZIONE DI
CONFORMITÀDECLARATION OF
CONFORMITY
LaC.B.M. S.r.l., Via Castello 10, 26038
Torre de Picenardi (CR) Italy,nella persona
del suo Legale Rappresentante ed
Amministratore Unico Sig.ra Innocenta Trusi
sotto la propria responsabilitàdichiara che la
seguente apparecchiatura:
We: C.B.M. S.r.l., Via Castello 10, 26038
Torre de Picenardi (CR) Italy,in the person of
its Sole Administrator and
Legal Representative Mrs. Trusi Innocenta
declare on our own responsibility,that the
followingelectrical equipment:
Incubatore a secco Dry Incubator
REF Articolo
Article
SN Numero di serie
Serial Number
Costruito in data:
Manufactured on
date:
soddisfano le disposizioni applicabili delle
seguenti direttive e loro successive modifiche:
meet the provisions of followingDirectives which
applyto them and its modifications:
-Norma EN 61010-1 ““Sicurezza elettrica”-Standard EN 61010-1 “Electrical safety”
-Direttiva 93/42/CE “Dispositivi medici”-Directive CE 93/42 “Medical Devices”
-Direttiva 2006/95/CE “Bassa Tensione”-Directive CE 2006/95 “Low Tension”
-Direttiva 2004/108/CE “Compatibilità
elettromagnetica”-Directive CE 2004/108 “Electro-Magnetic
Compatibility”
Luogo e Data / Date and Place
Torre déPicenardi (CR)
C.B.M. S.r.l.
L'Amministratore Unico Sole Administrator
Sig.ra Mrs. Innocenta Trusi
This manual suits for next models
2
Table of contents
Languages:
Other CBM Laboratory Equipment manuals