CBN CH6643E User manual

.
Compal Broadband Networks
Wireless Gateway Series
Compal Broadband Networks
CH6643E
Wireless Gateway Series
User Guide
1

2
Table o Contents
1.Overview 4
Contact Information...........................................................................................................4
Standard Features ..............................................................................................................4
CH6643E LAN Choices........................................................................................................5
Wireless LAN ........................................................................................................................5
Wired Ethernet LAN.............................................................................................................6
Front Panel ..........................................................................................................................7
Rear Panel...........................................................................................................................9
AC Label ........................................................................................................................10
2. Getting Started 11
Inside the Box ....................................................................................................................11
Before You Begin ..............................................................................................................11
System Requirements .......................................................................................................12
Connecting the CH6643E.................................................................................................12
Wall ounting the CH6643E.............................................................................................14
Setting Up Internet Access ...............................................................................................15
Configuring TCP/IP in Windows XP...................................................................................16
Verifying the IP Address for Windows XP .........................................................................16
Configuring TCP/IP in Windows 7 .....................................................................................16
Verifying the IP Address for Windows 7............................................................................17
Configuring TCP/IP in windows 8 .....................................................................................17
Verifying the IP Address in Windows 8 .............................................................................18
Renewing the IP Address for Windows XP, Windows 7& Windows 8..............................18
Setting Up a Wi-Fi Network ...............................................................................................18
3.Basic Con iguration 19
Starting the CH6643E Configuration anager (C GR).................................................19
CH6643E enu Options Bar .............................................................................................20
4.CABLE MODEM 21
CABLE ODE Status Section .........................................................................................21
CABLE ODE Signals Section........................................................................................21
CABLE ODE Logs Section ...........................................................................................23
CABLE ODE Addresses Section ..................................................................................24
5.Gateway 25
Basic Setup........................................................................................................................25
Basic DHCP Section ..........................................................................................................28
Basic DNS Proxy Section ...................................................................................................30
Basic LAN Users .................................................................................................................31

3
6.Gateway Wireless 31
Wireless Band ode Section............................................................................................31
Wireless Basic Section .......................................................................................................32
Wireless Security Section...................................................................................................34
Wireless WPS Section.........................................................................................................38
Wireless Access Control Section ......................................................................................40
Wireless Status Section......................................................................................................41
Setting Up Your Wireless LAN............................................................................................41
Encrypting Wireless LAN Transmissions .............................................................................42
7.Gateway Advanced 43
Advanced Options Section .............................................................................................43
Advanced IP Filtering Section..........................................................................................44
Advanced AC Filtering Section ....................................................................................45
Setting a AC Address Filter............................................................................................46
Advanced Port Filtering Section ......................................................................................46
Advanced Port Forwarding Section ................................................................................47
Advanced Port Triggers Section ......................................................................................48
Advanced D Z Host Section...........................................................................................49
Advanced Dynamic DNS .................................................................................................50
Advanced Intrusion Detection Section ...........................................................................51
Advanced HomePlug AV Section ...................................................................................52
8.Gateway USB 53
Print Server.........................................................................................................................53
FTP Server...........................................................................................................................54
File Server ..........................................................................................................................55
9.Gateway Management 56
Change Password ............................................................................................................56
Remote anagement Control ........................................................................................57
10.Help 58
HELP Cable odem Section............................................................................................58
11.Trouble Shooting 58
Solutions.............................................................................................................................59
Front-Panel LEDs and Error Conditions.............................................................................60
12. FCC Statement

4
The CBN CH6643E Wireless Gateway is designed for your home, home office, or
small business/enterprise. It can be used in households with one or more
computers capable of wireless connectivity for remote access to the wireless
gateway.
This user guide provides product overview and setup information for the CH6643E.
It also provides instructions for installing the wireless gateway and configuring the
wireless LAN, Ethernet, router, DHCP, and security settings.
Contact In ormation
•
For any questions or assistance with the CH6643E Wireless Gateway, contact
your Internet Service provider.
•
For information on customer service, technical support, or warranty claims;
see the CBN CH6643E Software License, Warranty, Safety, and Regulatory
Information card provided with the CH6643E Wireless Gateway.
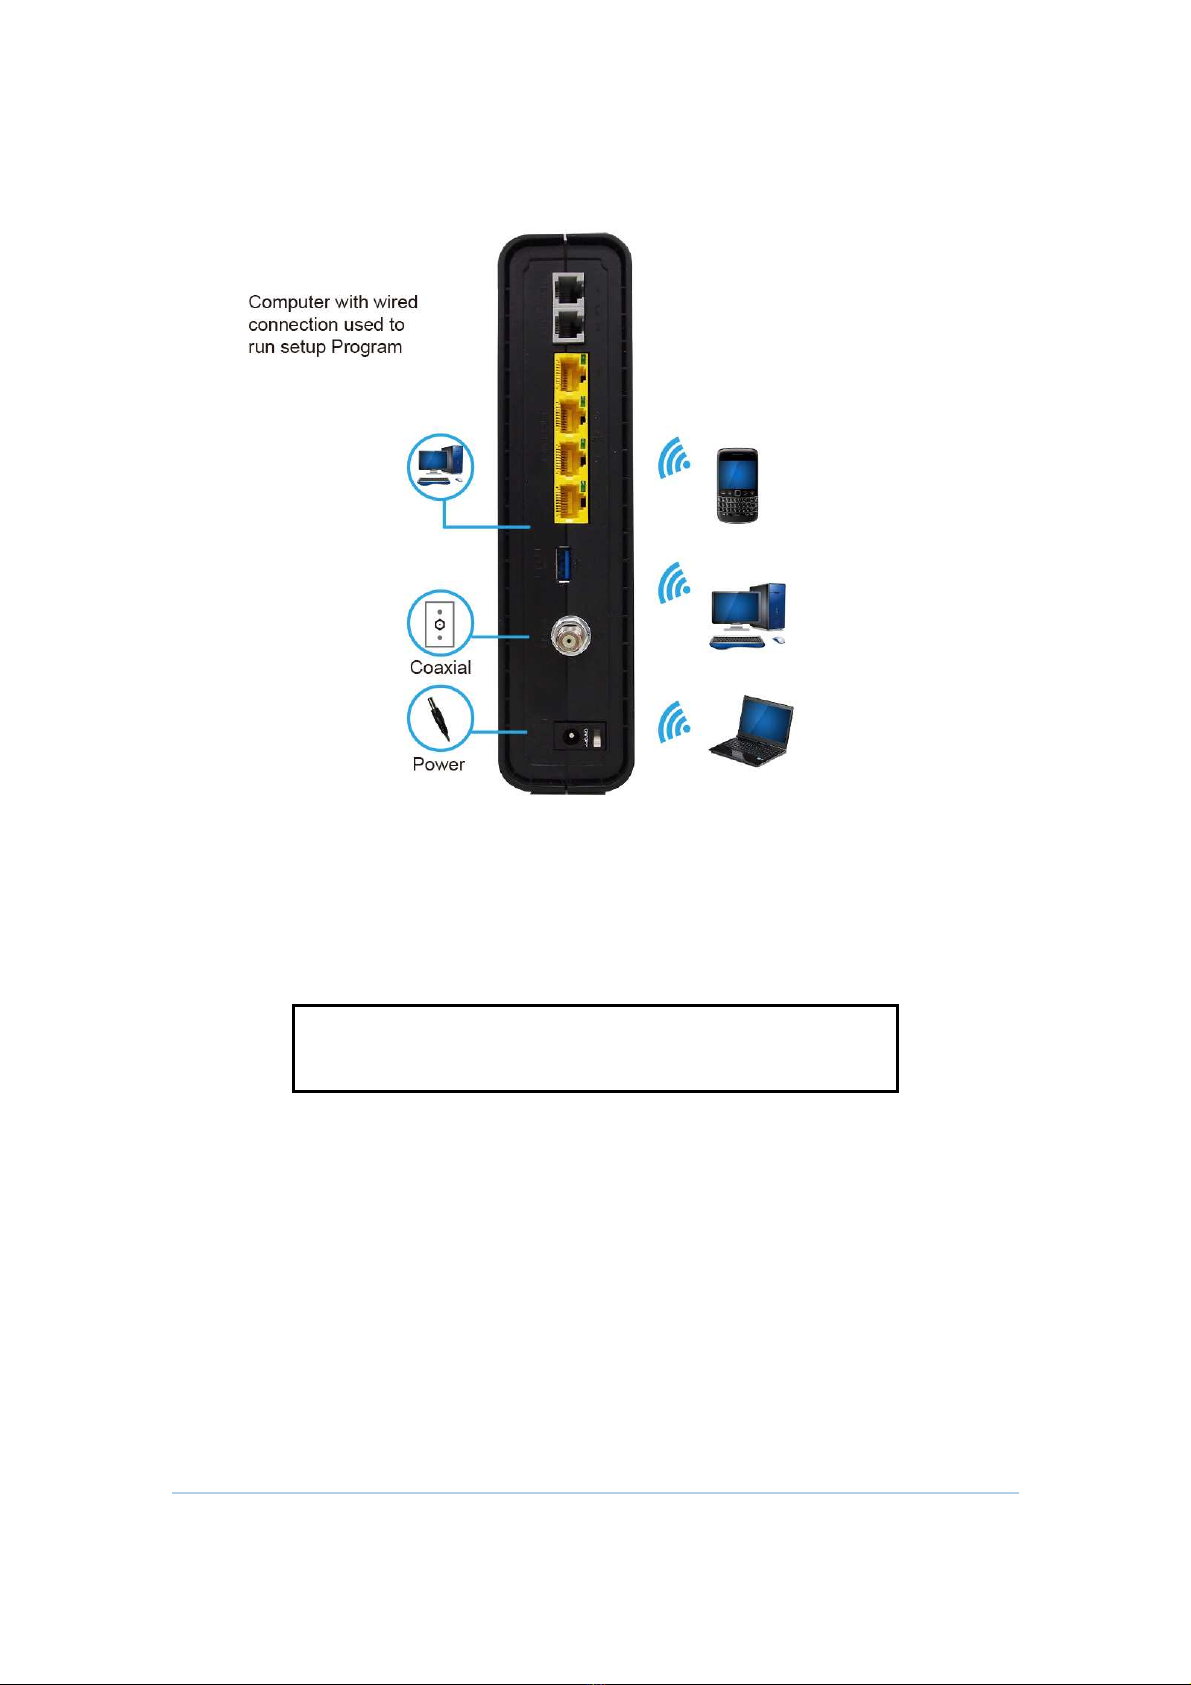
Standard Features
The CH6643E Wireless Gateway combines high-speed Internet access, networking,
and computer security for a home or small-office LAN. It offers the following
features:
•
Combination of five separate products in one compact unit — an EURO/
DOCSIS® 3.0 cable modem, IEEE 802.11b/g/n/a wireless access point,
Ethernet 10/100/1000 Base-T connections, two VoIP Internet telephone
connections, and firewall.
•
An integrated high-speed cable modem for continuous broadband access
to the Internet and other online services with much faster data transfer than
traditional dial-up or ISDN modems.
•
Advanced firewall for enhanced network security from undesired attacks
over the Internet. It supports stateful-inspection, intrusion detection, D Z,
denial-of-service attack prevention, and Network Address Translation (NAT).
•
One broadband connection for up to 253 computers to surf the web; all
computers on the LAN communicate as if they were connected to the same
physical network.
•
Four 10/100/1000Base-T Ethernet uplink ports supporting half- or full-duplex
connections with auto- DIX capability.
•
An IEEE 802.11n wireless access point to enable laptop users to remain
connected while moving around the home or small office or to connect
desktop computers without installing network wiring. Depending on distance,
wireless connection speeds can vary.
•
CH6643E wireless function supports Wi-Fi 2.4G and 5G dual-band mode. You
can either select 2.4G or 5G single mode or select dual-band concurrent
mode to adapt to a wide variety of environment.
1.Overview

5
•
A secure Wireless Fidelity (Wi-Fi) broadband connection for Wi-Fi enabled
devices on your network, such as your cellular telephone, laptops, printers,
PDAs, and desktops.
•
Routing for a wireless LAN (WLAN) or a wired Ethernet LAN; you can connect
more than four computers using hubs and/or switches
•
A built-in DHCP server to easily configure a combined wired and/or wireless
Class C private LAN.
•
Virtual private network (VPN) pass-through operation supporting IPSec, PPTP,
or L2TP to securely connect remote computers over the Internet.
•
CH6643E Configuration anager (C GR) which provides a graphical user
interface (GUI) for easy configuration of necessary wireless, Ethernet, router,
DHCP, and security settings.
•
USB 2.0 host port is provided to support print server and network storage
function with FTP server and Samba server which file system supported are
FAT16, FAT32, and NTFS. You can plug in an USB memory stick then access it
via FTP client or Windows Explorer.
CH6643E LAN Choices
You can connect up to 253 client computers to the CH6643E using one or any
combination of the following network connections:
•
Wi-Fi wireless LAN (WLAN)
•
Ethernet local area network (LAN)
Wireless LAN
Wireless communication occurs over radio waves rather than a wire. Like a
cordless telephone, a WLAN uses radio signals instead of wires to exchange data.
A wireless network eliminates the need for expensive and intrusive wiring to
connect computers throughout the home or office. obile users can remain
connected to the network even when carrying their laptop to different locations
in the home or office.
Each computer or other device on a WLAN must be Wi-Fi enabled with either a
built-in or external wireless adapter.
Laptops — Use a built-in wireless notebook adapter, a wireless PC CIA slot
adapter, or a wireless USB adapter.
Desktops — Use a wireless PCI adapter, wireless USB adapter, or compatible
product in the PCI slot or USB port, respectively.

6
Sample Wireless Network Connections (CH6643E model shown)
Your maximum wireless operation distance depends on the type of materials
through which the signal must pass and the location of your CH6643E and clients
(stations). CBN cannot guarantee wireless operation for all supported distances in
all environments.
Note: To get better wireless coverage, please put your
CH6643E wireless gateway vertically.
Wired Ethernet LAN
You can easily connect any PC with an Ethernet cable to the CH6643E Ethernet
port. Because the CH6643E Ethernet port supports auto- DIX, you can use a
straight-through or cross-over cable to connect a hub, switch, or computer. Use
category 5, or better, cabling for all Ethernet connections.

7
Sample Ethernet to Computer Connection (CH6643E model shown)
A wired Ethernet LAN with more than four computers requires one or more hubs,
switches, or routers. You can:
•
Connect a hub or switch to any Ethernet port on the CH6643E.
•
Use Ethernet hubs, switches, or routers to connect up to any combination of
253 computers and wireless clients to the CH6643E.
ore detailed information on Ethernet cabling is beyond the scope of this
document.
Front Panel
The CH6643E front panel contains indicator lights and the WPS button which is
used to configure Wi-Fi Protected Security (WPS) on compatible clients
connected to the CH6643E network.

8
The CH6643E front panel LED indicators provide the following status information
for power, communications, and errors:
LED Flashing On
1
POWER Not applicable — LED does
not flash
Green: Power is properly
connected
2
RECEIVE Scanning for a downstream
channel connection
Green: Downstream channel is
connected
Blue: Downstream channel is
connected with bonded
channels
3
SEND Scanning for an upstream
channel connection
Green: Upstream channel is
connected
Blue: Upstream channel is
connected with bonded
channels
4
ONLINE Scanning for Internet
connection: Transmitting or
receiving data over the
Internet
Green: Connected to Internet
5
TEL1
TEL 2
Telephone is off-hook: Dialing
or call in progress
Green: Telephone is
connected and activated: on-
hook

9
LED Flashing On
6
WIRELESS Amber: WPS function is
enabled.
Green: Wi-Fi wireless interface
is active now.
Rear Panel
The CH6643E (shown above) rear panel contains the following cabling port and
connectors:
Item Description
1
TEL 1
TEL 2
VoIP connection for a single telephone. Two sets of
telephone can be supported.
2
ETHERNET
1 2 3 4
Use any Ethernet port to connect an Ethernet-equipped
computer, hub, bridge, or switch using an RJ-45 cable.
Activity LED - Green LED defines the activity of the Ethernet
connector.
When LED is ON, this indicates that there is no data traffic
and a connection is stabilized.
When LED is FLASHING, this indicates that there is data being
transmitted upstream or downstream.
When LED is OFF, this indicates that the unit is not powered or

10
Item Description
there is no Ethernet connection.
3
USB USB host port for print server or network storage function
4
RESET Press and hold the RESET button for five seconds or longer to
restore CH6643E to factory default settings. After factory
default settings are restored, the gateway will restart and
may take 5 to 30 minutes to find and lock on the appropriate
communication channels.
5
CABLE Connect the CH6643E to a cable wall outlet.
6
POWER
SWITCH
Switch gear for power on/off the CH6643E.
7
POWER Provide power to the CH6643E.
MAC Label
The CH6643E edia Access Control ( AC) label is located on the bottom of the
CH6643E. The label contains the AC address which is a unique, 48-bit value that
identifies each Ethernet network device. To receive data service, you will need to
provide the AC address marked HFC MAC ID to your Internet Service provider.”

Inside the Box
Before you install the
are included in the box with the
Item
Power cord
So tware License &
Regulatory Card
CH6643
E Install
Sheet
You must have the latest service packs and patches installed on your computer for
your operating system.
You will
need a 75
CH6643
E to the nearest cable outlet. If a TV is connected to the cable outl
may need a 5 to 900 Hz RF splitter and two additional coaxial cables to use the
TV and the
CH6643
Be ore You Begin
Take the following precautions before installing the
•
Postpone installation until there is no risk of thunderstorm or ligh
the area.
•
To avoid potential shock, always unplug the power cord from the wall outlet
or other power source before disconnecting it from the
•
To prevent overheating the
the
sides of the unit. Do not open the unit. Refer all service to your Internet
Service provider.
Check that you have the required cables, adapters, and adapter software.
that the proper drivers are installed for the Ethernet adapter on each networked
computer.
For information on WLAN setup, see
2. Getting Started
Before you install the
CH6643
E Wireless Gateway, verify that the following items
are included in the box with the
CH6643E:
Item
Description
Connects the
CH6643
electrical outlet
So tware License &
Contains software license, warranty, and
safety information for the
E Install
Provides basic information for setting up
the CH6643E
You must have the latest service packs and patches installed on your computer for
your operating system.
need a 75
-ohm coaxial cable with F-
type connectors to connect the
E to the nearest cable outlet. If a TV is connected to the cable outl
may need a 5 to 900 Hz RF splitter and two additional coaxial cables to use the
CH6643
E.
Take the following precautions before installing the
CH6643E:
Postpone installation until there is no risk of thunderstorm or ligh
To avoid potential shock, always unplug the power cord from the wall outlet
or other power source before disconnecting it from the
CH6643
To prevent overheating the
CH6643
E, do not block the ventilation holes on
sides of the unit. Do not open the unit. Refer all service to your Internet
Service provider.
Check that you have the required cables, adapters, and adapter software.
that the proper drivers are installed for the Ethernet adapter on each networked
For information on WLAN setup, see
Setting Up Your Wireless LAN
11
E Wireless Gateway, verify that the following items
Description
CH6643
E to an AC
Contains software license, warranty, and
safety information for the
CH6643E.
Provides basic information for setting up
You must have the latest service packs and patches installed on your computer for
type connectors to connect the
E to the nearest cable outlet. If a TV is connected to the cable outl
et, you
may need a 5 to 900 Hz RF splitter and two additional coaxial cables to use the
Postpone installation until there is no risk of thunderstorm or ligh
tning activity in
To avoid potential shock, always unplug the power cord from the wall outlet
CH6643
E rear panel.
E, do not block the ventilation holes on
sides of the unit. Do not open the unit. Refer all service to your Internet
Check that you have the required cables, adapters, and adapter software.
Verify
that the proper drivers are installed for the Ethernet adapter on each networked
Setting Up Your Wireless LAN
.

12
System Requirements
Your computer must meet the following minimum requirements:
•
Computer with Pentium
©
class or better processor
•
Windows XP, Windows 7, Windows 8, acintosh, or UNIX operating system with
available operating system CD-RO
•
Any web browser, such as icrosoft Internet Explorer, Netscape Navigator
®
, or
ozilla
®
Firefox
®
Connecting the CH6643E
Before starting, be sure the computer is turned on and the CH6643E power cord is
unplugged.
1. Connect one end of the coaxial cable to the cable outlet or splitter.
2. Connect the other end of the coaxial cable to the Cable connector on the
CH6643E. Hand-tighten the connectors to avoid damaging them.
3. Plug the power cord into the Power port on the CH6643E.
4. Plug the other end of the power cord into an electrical wall outlet.
This automatically powers on the gateway. You do not need to unplug the
gateway when it is not in use. The first time you plug in the CH6643E, allow it 5
to 30 minutes to find and lock on the appropriate communications channels.
5. Plug the other end of the telephone cord of a single or two-line telephone
into the TEL 1/2 port on the rear of the CH6643E.
6. Plug the telephone cord of a single or two-line telephone into the telephone.
7. (optional step) Plug USB memory stick or hard-disk drive into USB port on
CH6643E.
8. Connect the Ethernet cable to the Ethernet port on the computer, and
connect the other end of the Ethernet cable to the Ethernet port on the
gateway.
9. For a second telephone, plug the telephone wire of a single-line telephone
into the TEL 2 port on the rear of the CH6643E.

13
10. Check that the LEDs on the front panel cycle through the following sequence:
CH6643E LED Activity During Startup
LED Description
POWER
Turns on when AC power is connected to the CH6643E.
Indicates that the power is connected properly.
RECEIVE
Flashes while scanning for the downstream receive channel.
Changes to solid green when single downstream channel is
locked.
Changes to solid blue when multiple downstream channels
are locked.
SEND
Flashes while scanning for the upstream send channel.
Changes to solid green when single upstream channel is
locked.
Changes to solid blue when multiple upstream channels are
locked.
ONLINE
Flashes during CH6643E registration and configuration.
Changes to solid green when the CH6643E is registered
successfully and ready for Internet access

14
Wall Mounting the CH6643E
You have the option to wall mount the CH6643E. Do the following before
mounting the CH6643E on the wall:
•
Locate the unit as specified by the local or national codes governing
residential or business cable TV and communications services.
•
Follow all local standards for installing a network interface unit/network
interface device (NIU/NID).
•
ake sure the AC power plug is disconnected from the wall outlet and all
cables are removed from the back of the CH6643E before starting the
installation.
•
Decide if you want to mount the CH6643E horizontally or vertically.
If possible, mount the unit to concrete, masonry, a wooden stud, or some other
very solid wall material. Use anchors if necessary (for example, if you must mount
the unit on drywall).
CAUTION Before drilling holes, chec the structure for
potential damage to water, gas, or electrical lines.
Do the following to mount your CH6643E on the wall:
1. Print a copy of the Wall ounting Template.
2. easure the printed template with a ruler to ensure that it is the correct size.
3. Use a center punch to mark the center of the holes.
4. On the wall, locate the marks for the mounting holes.
5. Drill the holes to a depth of at least 1 1/2 inches (3.8 cm). Use 3.5 x 38 mm
(#6 x 11/2 inch) screws with a flat underside and maximum screw head
diameter of 9.0 mm to mount the CH6643E.
6. Using a screwdriver, turn each screw until part of it protrudes from the wall, as
shown in the following wall mounting screw dimensions illustration.
There must be .10 inches (2.5 mm) between the wall and the underside of the
screw head.
7. Place the CH6643E so the keyholes on the back of the unit are aligned above
the mounting screws.
6.0 mm (.24 inches) maximum
9.0 mm (.35 inches) maximum
2.5 mm (.10 inches).

8.
Slide the
CH6643
9.
After mounting, reconnect the coaxial cable input and Ethernet connection.
10.
Plug the power cord into the +12VDC connector on the gateway and the
electrical outlet.
11.
Route the cables to avoid any safety h
Wall Mounting Template
Setting Up Internet Access
After installing the
retrieve an IP address for your computer’s network interf
following options:
•
Retrieve the statically defined IP address and DNS address
•
Automatically retrieve the IP address using the Network DHCP server
CH6643
E down
until it stops against the top of the keyhole opening.
After mounting, reconnect the coaxial cable input and Ethernet connection.
Plug the power cord into the +12VDC connector on the gateway and the
electrical outlet.
Route the cables to avoid any safety h
azards.
Figure 1 Wall Mounting Template
Setting Up Internet Access
After installing the
CH6643
E, check that you can connect to the Internet. You can
retrieve an IP address for your computer’s network interf
ace using one of the
Retrieve the statically defined IP address and DNS address
Automatically retrieve the IP address using the Network DHCP server
15
until it stops against the top of the keyhole opening.
After mounting, reconnect the coaxial cable input and Ethernet connection.
Plug the power cord into the +12VDC connector on the gateway and the
E, check that you can connect to the Internet. You can
ace using one of the
Automatically retrieve the IP address using the Network DHCP server

16
The CBN CH6643E Wireless Gateway provides a DHCP server on its LAN. It is
recommended that you configure your LAN to obtain the IPs for the LAN and DNS
server automatically.
ake sure all computers on your LAN are configured for TCP/IP. After configuring
TCP/IP on your computer, you should verify the IP address.
Note: For UNIX or Linux systems, follow the instructions in the
applicable user documentation.
Con iguring TCP/IP in Windows XP
1.
Open the Control Panel.
2.
Double-click Network Connections to list the Dial-up and LAN or High-Speed
Internet connections.
3.
Right-click the network connection for your network interface.
4.
Select Properties from the drop-down menu to display the Local Area
Connection Properties window. Be sure Internet Protocol (TCP/IP) is checked.
5.
Select Internet Protocol (TCP/IP) and click Properties to display the Internet
Protocol (TCP/IP) Properties window.
6.
Select Obtain an IP address automatically and Obtain DNS server address
automatically.
7.
Click OK to save the TCP/IP settings and exit the TCP/IP Properties window.
8.
Close the Local Area Connection Properties window and then exit the Control
Panel.
9.
When you complete the TCP/IP configuration, continue with Verifying the IP
Address in Windows XP
Veri ying the IP Address or Windows XP
1. On the Windows taskbar, click Start.
2. Select Run to open the Run window.
3. Type cmd and click OK.
4. Type ipconfig and press Enter to display your IP configuration.
Con iguring TCP/IP in Windows 7
1.
Open the Control Panel.
2.
Click Network and Internet to display the Network and Internet window.
3.
Click Network and Sharing Center to display the Network and Sharing Center
window.
4.
Click change adapter settings
5.
Right-click the network connection for the network interface you want to
change.

17
6.
Click Properties to display the Local Area Connection Properties window
7.
Select Internet Protocol Version 4(TCP/IPv4), double click it or click Properties
8.
Select Obtain an IP address automatically and Obtain DNS server address
automatically
.
9.
Click OK to save the TCP/IP settings and close the Internet Protocol Version 4
(TCP/IPv4) Properties window.
10.
Click OK to close the Local Area Connection Properties window.
11.
Close the remaining windows and exit the Control Panel.
12.
When you complete the TCP/IP configuration, continue with Verifying the IP
Address in Windows 7
Veri ying the IP Address or Windows 7
1. On the Windows taskbar, click Start.
2. Click All Programs.
3. Click Accessories.
4. Click Run to open the Run window.
5. Type cmd and click OK to open a command prompt window.
6. Type ipconfig and press Enter to display the IP Configuration.
Con iguring TCP/IP in windows 8
1.
Press Windows key on the keyboard to go into Desktop mode.
2.
ove the mouse’s cursor to the lower right corner of the screen. A right pane
will now appear. Click the settings icon. The settings pane will now appear.
3.
On the settings pane, click the Control panel link.
4.
Open The Control Panel.
5.
Click Network and internet to display the Network and Internet window.
6.
Click Network and sharing center to dsiplay the Network and Sharing Centre
window.
7.
Click change adapter settings.
.
8. Right click the network connection for the network interface you want to
.
change.
9. Click Properties to display the Local Area Connection properties window.
10. Select Internet Protocol Version 4 (TCP/IPv4),double click it or click properties.
11. Select obtain IP address automatically and obtain DNS server address
automatically.
12. Click ok to save the TCP/IP settings and close the internet Protocol Version 4
(TCP/IPV4) properties window.
13. Click ok to close the Local Area Connection Properties window.
14. Close the remaining windows and exit the control panel.
15. When you complete the TCP/IP configuration. Continue with verifying the IP
Address in windows 8.

Veri ying the IP Address in Windows
1. Press the
Windows
prompt” to display the
the screen will appear.
2. Click
Command Prompt
3.
In the Command Prompt,
Configuration
Renewing the IP Address or Windows XP
1. Open a command prompt window.
A. From the Windows taskbar, click
B. Select Run
to open the Run
C. Type cmd
and click
2. Type
ipconfig /renew
indicating that Internet access is available.
3. Type exit
and press
If,
after performing this procedure, your computer still cannot access the Internet,
call your service provider.
Setting Up a Wi-
Fi Network
Do the following to set up a Wi
1.
Power on the
CH6643
2.
Power on the WPS
such as a PC, router, or telephone.
The Wi-
Fi network will automatically detect the WPS devices.
3.
Press WPS
button on the
4.
If applicable,
press
Veri ying the IP Address in Windows
8
Windows
key
on your keyboard and then enter “command
prompt” to display the
Command Prompt shortcut.
A search box on right side of
the screen will appear.
Command Prompt
In the Command Prompt,
Type ipconfig and press
Enter
Renewing the IP Address or Windows XP
, Windows 7& Windows 8
1. Open a command prompt window.
A. From the Windows taskbar, click
Start.
to open the Run
window.
and click
OK
to open a command prompt window.
ipconfig /renew
and press Enter
. A valid IP address should appear
indicating that Internet access is available.
and press
Enter
to close the command prompt window.
after performing this procedure, your computer still cannot access the Internet,
call your service provider.
Fi Network
Do the following to set up a Wi
-
Fi network using the WPS button on the
CH6643
E.
Power on the WPS
-
enabled devices you want to have access to the network,
such as a PC, router, or telephone.
Fi network will automatically detect the WPS devices.
button on the
CH6643E.
press
WPS button on the other WPS devices.
18
on your keyboard and then enter “command
A search box on right side of
Enter
to display the IP
to open a command prompt window.
. A valid IP address should appear
to close the command prompt window.
after performing this procedure, your computer still cannot access the Internet,
Fi network using the WPS button on the
CH6643E:
enabled devices you want to have access to the network,
Fi network will automatically detect the WPS devices.

19
3.Basic Con iguration
For normal operation, you do not need to change most default settings. Carefully
consider the following caution statements:
Starting the CH6643E Con iguration Manager (CMGR)
The CH6643E Configuration anager (C GR) allows you to change and view the
settings on your CH6643E.
1.
Open the web browser on a computer connected to the CH6643E over an
Ethernet connection.
Note Do not attempt to configure the CH6643E over a
wireless connection.
2.
In the Address or Location field of your browser, type
http://192.168.0.1
and
press
ENTER,
and then you will get into homesection.
C GR provide more information and gateway functions for experienced users in
privileged mode, you can login by click the “LOGIN” button on the top of
window then input Username and Password.

There are is a
default privileged account in
Username
admin
CH6643E
Menu Options Bar
The CH6643E
enu Options bar is displayed at the top of the
Configuration anager window.
Con iguration Manager Menu Options Bar
Menu Option
Sections
CABLE MODEM
GATEWAY
HELP
default privileged account in
CH6643E:
Password Privilege
admin
Allow access gateway
Menu Options Bar
enu Options bar is displayed at the top of the
Configuration anager window.
Con iguration Manager Menu Options Bar
Function
The Cable odem section
s contain information
Status, Signals, Logs and Addresses.
The Gateway section
s contain information about LAN,
Firewall, Wireless configuration, and etc.
This section
provides an overview of the odem
Configuration anager, and brief troubleshooting
information.
20
Allow access gateway
sections
enu Options bar is displayed at the top of the
CH6643E
s contain information
about
s contain information about LAN,
provides an overview of the odem
Configuration anager, and brief troubleshooting
This manual suits for next models
1
Table of contents
Other CBN Gateway manuals
Popular Gateway manuals by other brands

Banner
Banner DX80N2X6S-PB2 quick start guide

Moxa Technologies
Moxa Technologies NPort 4511 Hardware installation guide

DEUTSCHMANN AUTOMATION
DEUTSCHMANN AUTOMATION UNIGATE CM - PROFINET 2Port instruction manual

Enernet
Enernet 13800 user guide

Polytron
Polytron HDI 8-8 IP user manual

Dinstar
Dinstar DWG2001 user manual

HP
HP A-F1000-E installation guide

SI
SI TRO.Y/2 Programming guide

Comelit
Comelit GDX Setup guide

ZyXEL Communications
ZyXEL Communications 802.11g ADSL 2+ 4-Port Security Gateway HW-D... user guide

suprema
suprema BioLite Net user guide

ZyXEL Communications
ZyXEL Communications EMG1302-R10A quick start guide