Celexon Professional Whiteboard User manual

celexon.
TM
Installation Guide
celexon whiteboard Professional
Thank you for purchasing this product. Before installing the whiteboard,
please read these instructions carefully and keep for future reference.

1
Safety instructions
Do not start installation before reading the complete installation guide.
This product should only be installed by qualied personnel (with mechanical and electrical
experience)
If necessary, carry out the installation with another person to ensure safe installation.
Tighten the screws but ensure that they are not overtightened as this may cause damage.
This product is designed for indoor use only. Outdoor use could result in damage to the
product and may cause injury.
Hanging loads must be tested at least twice a year for strength and carrying capacity.
This product may only be used when fully installed using the fall protection as described in
this manual. The manufacturer does not accept liability for improper installation.
DE:
Auf http://www.celexon.de nden Sie durch Eingabe der Identikationsnummer„CX1001“
im Suchfeld die jeweils aktuellste Fassung dieser Bedienungsanleitung zum Download.
EN:
At http://www.celexon.co.uk you can nd the latest version of the manual and download it
simply by searching the identication number“CX1001” in the search eld.
NL:
Op http://www.celexon.nl vind u door ingave van het identicatienummer„CX1001“ in het
zoekveld de actuele versie van deze gebruikershandleiding als download.
SE:
På http://uk.celexon.com hittar du den aktuella versionen av din bruksanvisning på ditt
spårk för nedladdning genom att skriva in identikationsnumret„CX1001“ i sökrutan.
PL:
Na stronie http://www.celexon.pl znajdą Państwo aktualną wersję instrukcji obsługi. W polu
szukaj należy podać następujący numer:„CX1001“.
FR:
En vous rendant sur http://www.celexon.fr et en entrant le numéro d‘identication
„CX1001“ dans la barre de recherche, vous pourrez télécharger la version française la plus
actuelle de cette notice d‘utilisation.
ES:
Puede descargar la versión actual de este manual de uso, en el idioma correspondiente en
http://www.celexon.de introduciendo el código de identicación“CX1001” en la barra de
búsqueda.

Disclaimer
Danger
Cleaning instructions
In the box
2
The information in this document is subject to change without prior notice. Changes will
be documented in future editions of this manual. The manufacturer does not guarantee
accuracy of the information contained in this document.
The whiteboard may only be used with erasable marker pens. Do not use permanent marker
pens as they cannot be erased from the whiteboard!
Erase the contents of the whiteboard after each use with the supplied sponge or use a soft
cloth. NEVER use alcohol or other detergents containing solvents. To clean or remove dirt
from the surface, use a mild soapy solution. Avoid contact with pointed or sharp objects;
these could permanently damage the projection surface.
Please check prior to installation that you have received all the components listed below. In
case one or more parts are missing, please contact your dealer from whom you purchased
the product.
a) Shelf (1 pc)
d) M5 x 8 cross-head
screws (11pcs)
g) Accessories
b) Mounting brackets (4 pcs)
e) M5 x 40mm cross-head
screws (11 pcs)
c) Wall plugs (11pcs)
f) M5 x 50mm cross-head
screws ( 2pcs)
h) 5x to 80„ / 8x from 96“

3
Installation
Step 1
Installation of shelf:
Attach the shelf to the bottom of the board using the M5x8mm screws (d) as shown in
Figure 1 and 2.
Step 2
Installation of the mounting brackets:
Attach the mounting brackets using the M5x8mm screws (d) to the top and bottom of the
board as shown in Figure 3.
Step 3
Wall installation:
Ideally the mounting brackets should be placed at a distance of approx. 35cm from either
side of the frame. Measure and mark the hole dimensions of the brackets onto your wall. For
the lower brackets, deduct 22mm from the total frame height (see g. 4). Mark this onto the
wall and drill a hole for the top brackets and then for the 2 holes of the lower brackets.
For mounting with a distance of 12mm between the wall and the writing board, use the
enclosed spacing bracket (h).
Insert the wall plugs C into the wall (as shown in g. 5 and 6) and secure the screws F into the
holes. Let the screw head protrude by about 5mm. Attach the lower mounting brackets with
the 5x40mm screws (e) to the wall (see g. 6).
Then hang the whiteboard on the wall and make sure that the screw heads are in the slots
provided on the brackets (see g. 7). Insert and tighten the screws into the underside of the
frame and secure the lower brackets using the M5x8mm screws (d).
The installation is completed. Please check that it is secure and safe.
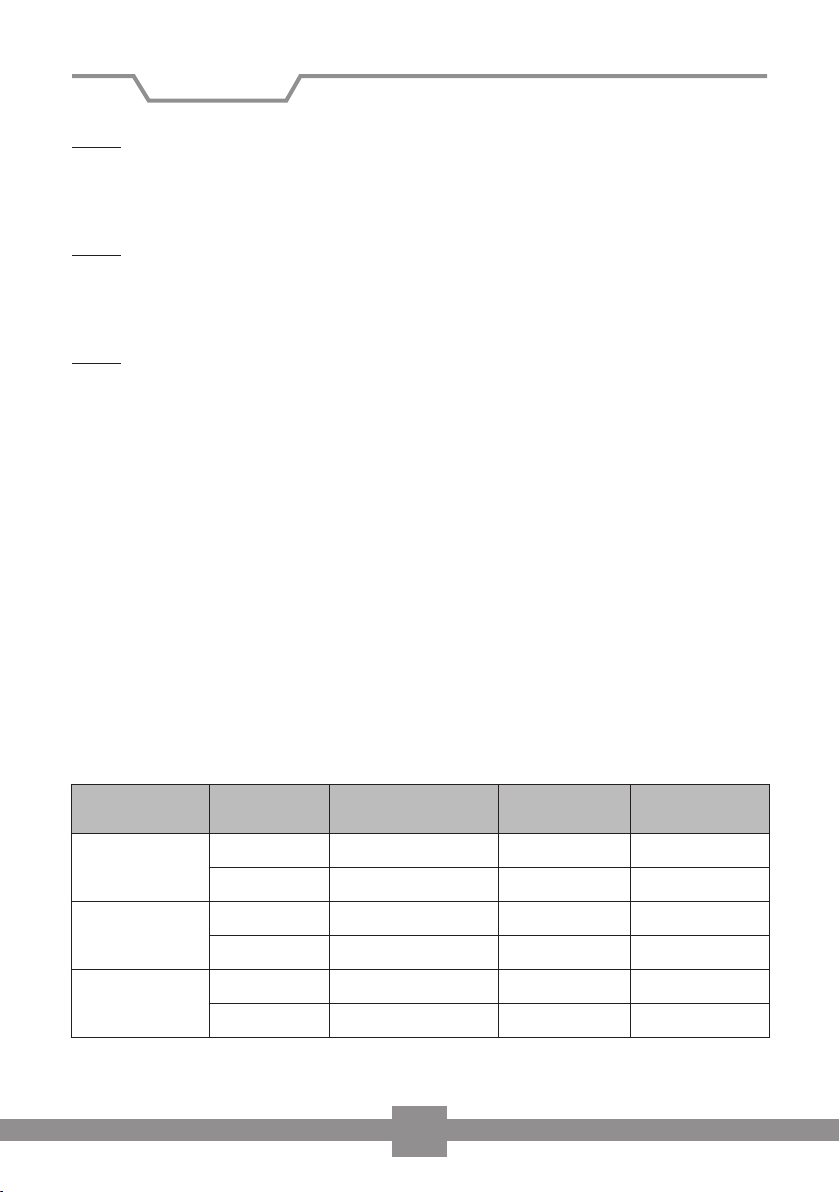
Format Diagonal Projection area (WxH) Size Size of shelf
(LxW)
2:1
177cm / 70” 197,4 x 98,7 cm 199,4 x 100,7 cm 62,5 x 6,1 cm
226cm / 89” 240 x 120,7 cm 242 x 122,7 cm 88 x 6,1 cm
16:9
203cm / 80” 175,5 x 98,7 cm 177,5 x 100,7 cm 62,5 x 6,1 cm
244cm / 96” 213,3 x 120,7 cm 215,3 x 122,7 cm 88 x 6,1 cm
16:10
223cm / 88” 150,4 x 94 cm 152,4 x 96 cm 62,5 x 6,1 cm
269cm / 106” 192 x 120,7 cm 194 x 122,7 cm 88 x 6,1 cm

4
Figures
Figure 1
Figure 2
(d)
WALL
WALL

5
H - 22mm
ln = W - 70cm
Figure 3
Figure 4
Figures
WALL

6
Figure 5
Figure 6
Figure 7
Figures
WALL
WALL
WALL

celexon.
TM
www.celexon.com
Table of contents