Celsius PC53 User manual

MODEL: CELSIUS PC53
INVERTER
PORTABLE AIR CONDITIONER
1
INSTRUCTIONS FOR USE

2
VERY IMPORTANT
Do not install or use your portable air conditioning unit
before carefully reading this instruction manual.
Please retain this manual for product warranty and future
reference
CAUTION
1." DO NOT BLOCK VENTILATION "! Please ensure the inlet and outlet ventilation is
not blocked.
2. Always operate this unit on a horizontal surface to avoid water leakage.
3. Do not operate this unit in a corrosive environment.
4. Operate this unit in an ambient of 32 degree centigrade or less when the unit is in
the cooling function. Contrarily, when the unit is in the heating function, the ambient
temperature is less 23 degree centigrade
5. Clean the air filter periodically to enjoy the most efficient cooling.
6. If you have turned the unit off, please wait at least 3 minutes before restarting.
This is to prevent any damage to the compressor.
7. This unit needs to be plugged into a 10 Amp power point. Please do not use
extension cords with this unit.
8. This unit is for indoor operation only.
9. Please ensure the adjustable air vent is open whilst in operation. The exhaust hose and
drain pipe must be extended to the closest window prior to use.
10. If the supply cord is damaged, it must be replaced by the manufacturer, service
agent or similarly qualified person.
11. The batteries from the remote control must be removed from the appliance
before it is scrapped and disposed of safely.
12. This appliance is not intended for use by persons (including children) with reduced
physical, sensory or mental capabilities, or lack of experience and knowledge, unless
they have been given supervision or instruction concerning use of the appliance by a
person responsible for their safety.
13. Children should be supervised to ensure that they do not play with the appliance.
3
14. Please do not turn off the unit at the power point when the unit is running. Use the
power button to turn unit off before turning off at power point.
15. If the unit was turned off at the power point please wait at least 3 minutes before
restarting the unit.
PORTABLE AIR CONDITIONER
Your Air Conditioner has been designed and manufactured to the highest
standards of modern engineering. This unit has been specifically designed
to provide comfort in any room, particularly in warmer conditions.
Features include:
- Easy glide castors – can be moved easily from room to room
- Simple DIY installation – no electrician required – just plug into a
standard 10 amp powerpoint!
- Powerful dehumidification process and filtered air cycle for
improved breathing conditions
- Remote control and soft touch control panel
- 24 hour programmable timer that can be used with either the air
conditioning or dehumidification setting
- Unique sleep control function
- Inverter technology for fast and efficient cooling
- Self evaporative system ensuring no drip tray or hose is required
- 220-240 Volt 50Hz operation
- 1.8 meter cord with plug
Important.
The air conditioning unit must always be stored and
transported upright.
In case of doubt we suggest to wait for at least 24
hours before you start the air-conditioning unit.

4
NAMES OF THE PARTS
1. Controls
2. Display screen
3. Adjustable air vent
4. Window kit adaptor
5. Exhaust tube
6. Drain hose
7. Cool air inlet
8. Cool air filter
9. Hot air inlet
10. Drain plug
11. Hot air filter
Note: Please ensure drain plug is fitted before use. ( 10 )
5
PUSH BUTTON SWITCHES & DESCRIPTION OF FUNCTION
1.POWERKEY Press to turn unit "ON" or "OFF".
2. FUNCTION Press this key to select cooling or Dehumidification.
During dehumidifying function, when “dh” is displayed, temperature cannot be
set.
3. TEMPERATURE This key raises the preset temperature by 1 each time it is
REGULATION pressed to a maximum of 30.
KEY (UP)
4. TEMPERATURE This key lowers the preset temperature by 1 each time it is
REGULATION pressed to a minimum of 17 during cooling.
KEY (DOWN)
In normal conditions, the temperature data which appears on the panel is the ambient
temperature, not the temperature which is set by the user. When the user has adjusted and

6
set the temperature to his requirement, the data on the panel will return to the ambient
temperature 5 seconds later.
The ambient temperature will descend or change according to the temperature which is set
by the user, but the temperature descendant time and speed will depend on the
environment and space where the unit is situated.
For example, if the ambient temperature is too hot or the room is too large, the speed for the
temperature descent is absolutely slow, and the cooling efficiency will be poor as well.
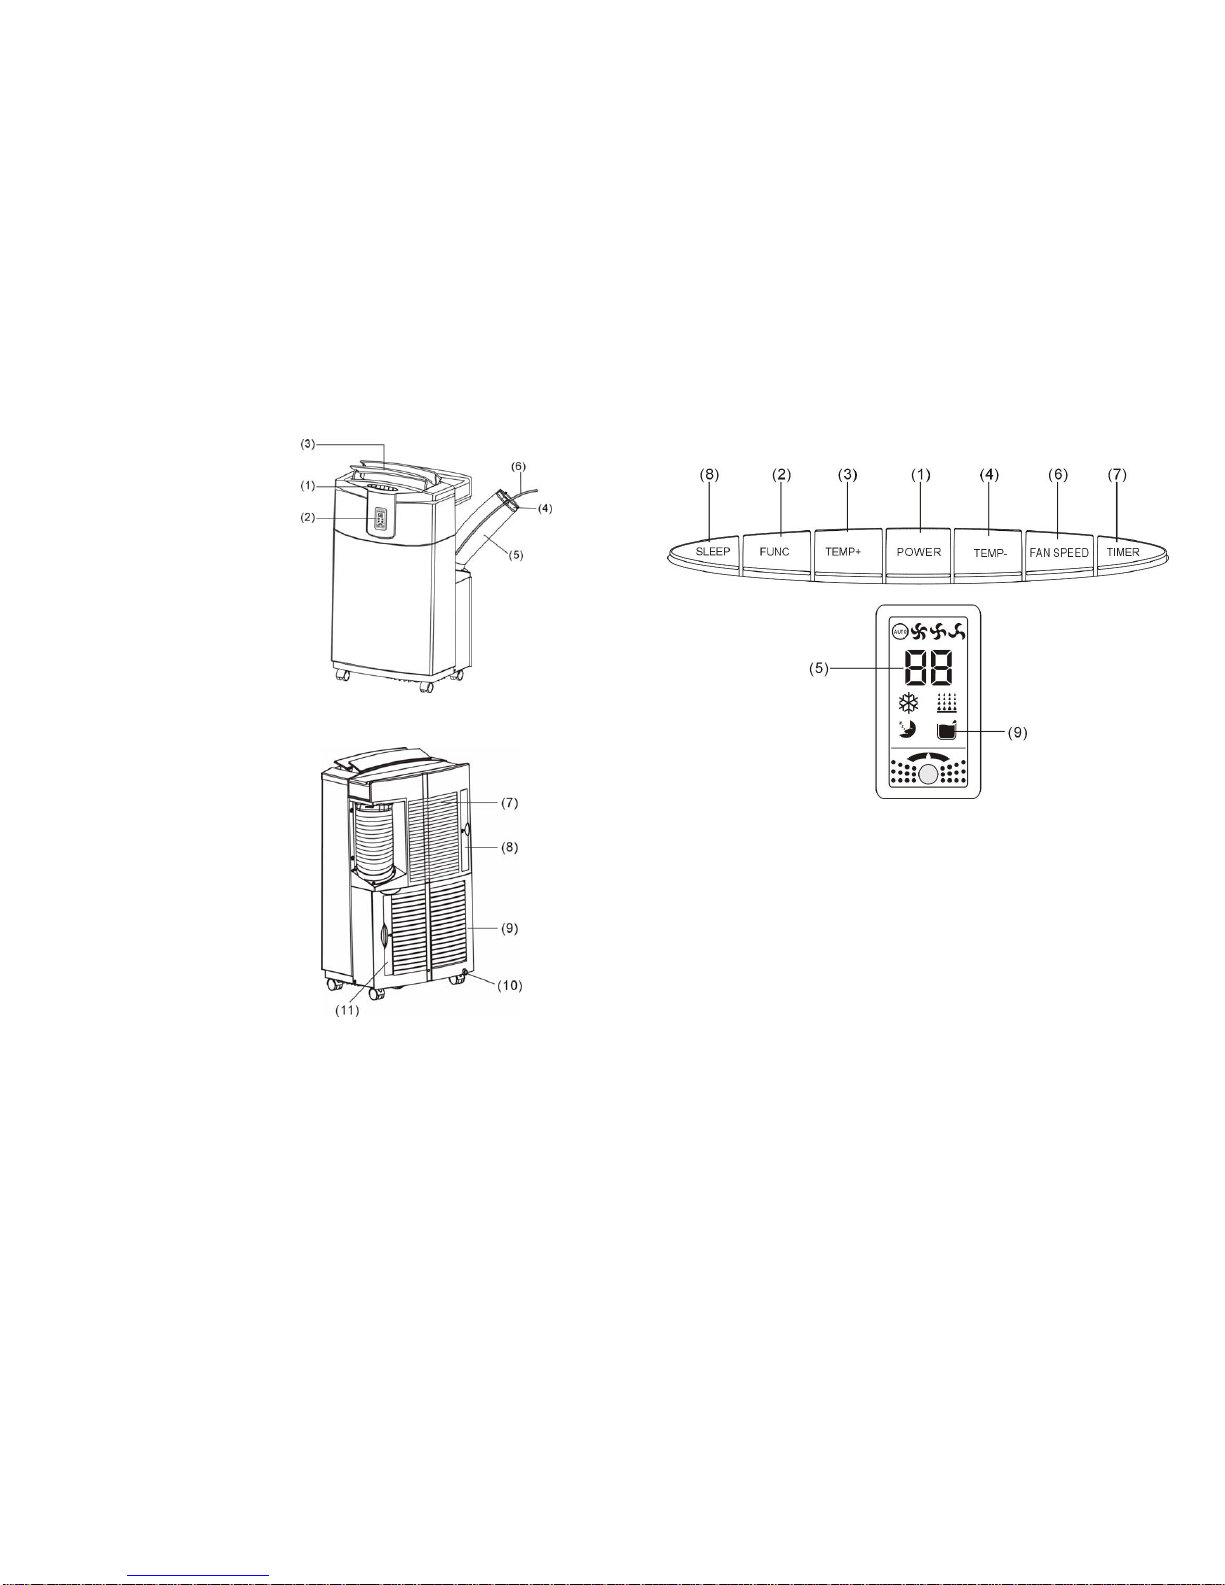
5. L.E.D. DISPLAY Indicates the temperature or the time setting. After any time set
the display will return to the room temperature.
Error self-check and display
Error display
When the air conditioning unit has problems, the cooling system will shut off, the show
PCB will desplay as below:
Error
code
eerror description failure diagnosis
E1
room temperature sensor
failure
E2
Evaporator temperature sensor
failure
E3
compressor air outlet
temperature sensor fault
display: open circuit or short circuit for 10s in
temperature sensor.
cleanup: temperature sensor get right for 5s.
E4
the data transmission eerror
between the compressor drive
plate and main PCB
Dispay: data transmission intermit for 20s.
Cleanup: data transmission ger right.
E7
Water tank full failure .
indicator.( Water tank full
indicator turn on).
Display: water level sensor short circuit for
3s.
Cleanup: water level sensor open circuit for
3s.
7
6.SPEED Press to select either LOW, MEDIUM, HIGH or AUTO fan speed.
If "AUTO" is selected, the unit will choose to operates at maximummiddle
or minimum fan speed automatically according to the difference between
room temperature and setting temperature.
If "HIGH" is selected, the unit operates at maximum cooling capacity no
matter what the setting temperature is. The "MEDIUM" OR “LOW" comes
to the same. Automatically setting Dehumidify function: fan speed at LOW.
Heating function: fan speed at LOW, MEDIUM, HIGH.
7. PROGRAMMABLE Programmable timer ON/OFF key.
TIMER TIMER-ON: The timer-on is used to turn on the unit automati-
cally after the set time is over.
(Timer-on key is correspond to the functional indicator light)
1. Press the "TIMER" key at stand-by status to set the time.
Choose the function desired (refrigeration, heat or dehumidification.)
2. Once the set hour has come to an end, the unit will turn on
automatically.
3. Press the "POWER" key before time out, the set time will
be cancelled and the unit will turn on.
TIMER-OFF: The timer-off is used to turn off the unit automati-
cally after the setting time is over.
1. Press the "TIMER" key at stand-by status to set the time
desired.
2. Once the set hour has come to an end, the unit will turn off automatically.
3. By pressing the "POWER" key before the time has been reached,
the set time will be cancelled and the unit will turn off.
8.SLEEP CONTROL 1. Sleep comfort mode under cooling setting , the temperature
FUNCTIE will be increased by 1 after 1 hour. Subsequently,the
temperature will be increased by 2 after 2 hours .And it thereafter
maintains this setting without further changes.
2. Under dehumidification mode, no sleep mode can be chosen.
3. Low fan speed is maintained under sleep comfort mode.
4. Sleep comfort mode under heating setting , the temperature will be

8
decreased by 1 after 1 hour. Subsequently,the temperature will be
decreased by 2 after 2 hours .And it maintains this setting without
further changes.
9.”E7” When the unit warns of ‘full water’, please unplug the water stopper at the back of
the unit and then lean the unit to drain the water out. Then the unit can be restarted. If
the E7 is presented again, your unit will need to be repaired by a qualified electrician
or returned to the store if still under guarantee.
REMOTE CONTROL FUNCTION
Note: Heating function does not operate if the ambient temperature is over 23.
The unit can defrost automatically and display “Df” if the ambient temperature is
above 20.
9
INSTALLATION
Install the portable air conditioner in a flat and spacious location where
1. POWER
2. FUNC
3. TIMER
4. AUTO
5. HI
6. MID
7. LOW
8. SLEEP
9. TEMP.
Stop/Start switch
Function “MODE” selector
Hourly programming
Automatic fan speed
High fan speed
Medium fan speed
Low fan speed
Night operation selector
Tem
p
erature selecto
r

10
the air inlets and outlets will not be blocked. A minimum clearance of
40cm from a wall or other obstacles should be kept (as depicted below).
The appliance should not be used in the laundry.
MAINTENANCE
PLEASE DISCONNECT THE POWER CORD BEFORE YOU PROCEED WITH
MAINTENANCE
AIR FILTER
The two air filters located at the back of the unit can be removed, simply
by gripping the filter handle and pulling the frame sideways.
CABINET
Wipe with a damp cloth and polish with a soft cloth.
11
To remove the air filter, please follow the arrow direction and push the
filter lightly, then take out the filter for cleaning.
POWER SUPPLY
(1) Confirm the correct power.
(2) Insert the plug into the power outlet firmly.
In case of a dangerous water leak, prevent the power cord from
getting wet.
(3) Do not pull the power cord with force as it may damage components
within the power cable.

12
PLACE OF USE
(1) Because the machine exerts hot air, please don’t operate it in a confined
place.
(2) Don’t place the machine in a sunlit corner otherwise the colours of the
cabinet will fade.
HELPFUL HINTS
This unit is fitted with a special thermal cut off device.
When selecting the refrigerating function, the unit should operate in room
temperatures between 17-32.
Please ensure the unit is not placed against objects which will obstruct air
intake (i.e. furniture or curtains) as this will affect its performance.
Do not place the unit in direct sunlight, as this may cause the unit to overheat
and turn off.
13
EXHAUST PIPE AND DRAIN PIPE
●To remove the exhaust pipe, press down slightly and pull away from the
unit – turn anti-clockwise.
●Picture indicates the removal of the exhaust pipe.
●Please ensure the exhaust pipe is extended to the closest window before
operating this unit.

15
TROUBLE SHOOTING
Never try to repair or dismantle the air conditioner yourself. Unauthorized repairs may
result in the loss of warranty and can endanger the user and the property.
Problem Cause Solution
No power supply. Connect to a functioning power
outlet and switch on.
The alarm light is on. Empty the internal water
container.
The air
conditioner does
not function.
Timer function is active. Deactivate TIMER function.
In direct sunlight. Close curtains.
Windows or doors open or
another cooling source in the
room.
Close doors and windows, turn off
alternate cooling sources.
Dirty filter Clean the filter(s).
Air inlet or air outlet blocked. Remove the blockage.
The air
conditioner does
not seem to
perform.
Room temperature lower
than the selected value.
Change temperature selection.
The unit is noisy. Unit is not level. Place on an even, solid surface
(less vibrations.)
The compressor
does not work.
The overheat protection is
activated.
Wait 30 minutes until the
temperature has decreased, then
turn the unit on again.
Distance too long.
Remote control signal not
detected by the control panel.
Make sure the remote control is
correctly aimed at the control
panel.
The remote
control does not
function.
The batteries have drained Replace the batteries.
To correct problems not mentioned in the table and/or if the recommended solutions fail
to solve the problem, please contact an authorized service centre.
SPECIFICATIONS

16
Model No. PCI53-06MI
Power Source 220-240V~50Hz AC
Power Consumption(EN14511)
Rated Power(EN60335)
2200W
2300W
Cooling Capacity 5300W
Air Flow 600 M3/H
Moisture Removed 70 L/DAY
Refrigerant R410A
Dimensions (mm) 476W x 358D x 840H
(CE) N 842/2006:
R410A is a kind of fluorinated greenhouse gases covered by
the Kyoto Protocol.
Its total global warming potential (GWP) is 1975.
17
This marking indicates that this product should not be disposed with
other household wastes throughout the EU. To prevent possible
harm to the environment or human health from uncontrolled waste
disposal, recycle it responsibly to promote the sustainable reuse of
material resources. To return your used device, please use the return
and collection systems or contact the retailer where the product was
purchased. They can take this product for environmental safe
recycling.
Table of contents
Other Celsius Air Conditioner manuals