CenturionPro GC1 User manual

OWNERS MANUAL
BUCKERS: GC1, GC3
G
o
o
d
M
a
n
u
f
a
c
t
u
r
i
n
g
P
r
a
c
t
i
c
e
C
o
m
p
l
i
a
n
t

2cprosolutions.com1 855 535 0558
GENERAL
• Do not move, disassemble, clean or inspect the Bucker while the power is still connected to the machine.
• The Buckers are very heavy - Never lift alone and always use proper lifting techniques.
• Ensure unit is secured to the stand, or is on a hard and leveled surface.
• Replacement parts are specic to The Buckers and must be purchased from an authorized dealer only.
• Substituting factory parts with non-approved third-party replacements may result in damage to the
machine or bodily harm.
• Keep all individuals a safe distance from the work area. Do not operate the machine around children.
• Do not remove safety labels. Replace any and all labels if they become damaged or obscured
CONNECTION
• As with home appliances, GC Buckers must be used in connection with a properly
grounded receptacle.
• Never plug in or power up your Bucker machine if the protective shrouds are removed.
• Do not use extension cords smaller than 12 gauge or longer than 7.6m (25ft) in length
to power the Bucker.
• Using unrated extension cords can cause motor overheating and premature failure.
The GC Buckers are a high-powered machines that require special safety precautions to be practiced while in operation to reduce the risk of personal injury.
Improper use of the GC Bucker may cause serious or fatal injury. Please read the precautions and warning labels before using the GC Bucker.
IMPORTANT SAFETY INFORMATION
CENTURION PRO SOLUTIONS:
GC BUCKERS
OPERATION
• GC Buckers comes from the manufacturer set with the optimal blade rotation. The initial set up will
show assembly instructions.
• Safety glasses and dust masks must be worn at all times when operating Buckers.
• Do not operate any Bucker machine while tired or under the inuence of medication, drugs
or alcohol.
• Do not put anything other than plant material into the Bucker. Doing so may cause damage to the
machine or result in bodily harm.
• Operate the Bucker in a well ventilated area in order to prevent overheating.
MAINTENANCE
• Never leave the GC Bucking system running unattended.
• Never conduct maintenance or cleaning while the machine is plugged in.
• Do not modify or adapt any part of the Bucker or its accessories. Doing so may cause irreversible
damage to the machine or result in bodily harm.
DO NOT LEND OUT OR RENT YOUR GC BUCKER WITHOUT THIS OPERATING MANUAL.
A FIRST TIME USER SHOULD OBTAIN PROPER INSTRUCTION PRIOR TO USE.
0PERATING THE GC BUCKER WITHOUT READING THE INSTRUCTIONS THAT ACCOMPANY A CAUTIONARY LABEL
(IE. "DANGER", "CAUTION", "WARNING", OR "NOTICE" SYMBOL), MAY RESULT IN SERIOUS OR FATAL INJURY.
FOR OPTIMAL PERFORMANCE AND LIFE, THE BUCKER BLADE
MUST BE REMOVED AND CLEANED AFTER DAILY USE.
GC BUCKER AIR BLOWER
G
o
o
d
M
a
n
u
f
a
c
t
u
r
i
n
g
P
r
a
c
t
i
c
e
C
o
m
p
l
i
a
n
t

For more information or to watch our video tutorials visit cprosolutions.com
OWNERS MANUAL
GENTLE CUT - GC BUCKERS
3
TABLE OF CONTENTS
IMPORTANT SAFETY INFORMATION
TABLE OF CONTENTS
COMPONENT OVERVIEW
CLEANING MAINTENANCE
BLOWER CLEANING MAINTENANCE
ASSEMBLY TO ONE STAND - GC1
ASSEMBLY TO THREE STANDS - GC3
GENERAL OPERATIONS
GENERAL PERFORMANCE SPECIFICATIONS GC1
GENERAL PERFORMANCE SPECIFICATIONS GC3
TROUBLE SHOOTING
FREQUENTLY ASKED QUESTIONS
ADDITIONAL ASSISTANCE
WARRANTY
2
3
4
5
6
7
8
9
10
11
12
12
13
13
GC3 - ADDITIONAL REQUIREMENTS
EXTENSION CORD
12 AWG (min AWG SIZE)
7.6m/25ft MAX LENGTH
GC1 - ADDITIONAL REQUIREMENTS
EXTENSION CORD
14 AWG (min AWG SIZE)
7.6m/25ft MAX LENGTH
HP BUCKER CONNECTIONS
EUROPE, SOUTH AMERICA & ASIA
CONNECTOR PLUG
REGULAR WALL OUTLET
HP BUCKER CONNECTIONS
CANADA, USA, MEXICO & JAPAN
CONNECTOR PLUG
REGULAR WALL OUTLET

4cprosolutions.com1 855 535 0558
COMPONENT OVERVIEW
GC3
GC1
CP-7012
BLOWER
NA (1HP 60HZ)
EU/ AUS (1HP 50HZ)
CP-7018
SIDE PLATE
RIGHT
CP-7022
TOP PLATE CP-7019
BOTTOM PLATE
LEFT
CP-7023
BEARING BAR
CP-7015
CROSS BAR
FRONT
CP-7020
BOTTOM PLATE
RIGHT
CP-7024
COVER
CP-7016
CROSS BAR
BACK
CP-7026
LEG
CP-7027
MOTOR
CP-7021
CUTTING BLADE
CP-7025
PULLEY
0.625-2 OD
CP-7014
MOTOR PLATE
CP-7017
SIDE PLATE - HOLE
LEFT

For more information or to watch our video tutorials visit cprosolutions.com
OWNERS MANUAL
GENTLE CUT - GC BUCKERS
5
FOR OPTIMAL PERFORMANCE AND LIFE, THE BUCKER BLADE
MUST BE REMOVED AND CLEANED AFTER DAILY USE.
CLEANING & MAINTENANCE
STEP 1:
REMOVE
BEARING BAR
STEP 4:
BLADE
CLEANING
4 - 3/16" x 0.75" bolts 10 - 3/16" x 0.5" bolts
Clean the BLADE of
debris by soaking
in warm water and
wiping down with
alcohol.
Re-assemble bucker
in reverse order.
Please refer to
"Blower Maintenance & Cleaning"
section of the manual.
2 - 1/8" x 0.5" bolts
STEP 2:
REMOVE TOP
PLATE
STEP 5:
CLEAN
BLOWER
STEP 3:
BLADE
REMOVAL
STEP 6:
REASSEMBLE
BUCKER
*Ensure machine is unplugged before cleaning.

6cprosolutions.com1 855 535 0558
STEP 1:
DISASSEMBLE BLOWER
Remove 3 - Hexagon cap screws
6mm x 20mm bolts from inside of
machine to detach blower.
STEP 2:
CLEANING STEP 3:
REASSEMBLE
BLOWER CLEANING & MAINTENANCE
Thoroughly clean inside bucker by
removing all loose debris & blockage.
Reassemble blower
as per step 1.
CLEAN LOOSE DEBRIS AFTER 10 HOURS OF USE.
*Ensure machine is unplugged before cleaning.

For more information or to watch our video tutorials visit cprosolutions.com
OWNERS MANUAL
GENTLE CUT - GC BUCKERS
7
STEP 1:
REMOVE
LEGS
STEP 2:
MOUNT BUCKER
ONTO STAND
ASSEMBLEY TO ONE STAND
Unscrew
legs from
the inside.
A) Line up existing holes on the
Bucker to the holes on the
adapter plate. Attach using:
4 - 3/8" x 1" bolts
4 - 3/8" nuts
4 - 3/8" x 7/8" washers
B) Line up existing holes
on the stand to the
holes on the adapter
plate. Attach using:
7 - 3/16" x 0.75" bolts
Repeat 3x for the Triple Stand
GC1
Re-assemble bucker
in reverse order as
per "Cleaning &
Maintenance".
STEP 3:
REASSEMBLE
BUCKER
*STAND SOLD SEPERATELY
*Ensure machine is unplugged before cleaning.

8cprosolutions.com1 855 535 0558
STEP 1:
MOUNT BUCKER
ONTO TRIPLE
STAND
STEP 3:
CONNECT FLEX
DUSTING HOSE
TO BLOWER
Attach ex dusting hose
to all 3 workstations on
bottom of Bucker using
??? screws.
Re-assemble bucker in
reverse order.
STEP 2:
CONNECT FLEX
DUSTING HOSE
TO BUCKER
STEP 4:
REASSEMBLE
BUCKER
ASSEMBLEY TO THREE STANDS
GC3
A) Line up existing holes on the
Bucker to the holes on the
adapter plate. Attach using:
4 - 3/8" x 1" bolts
4 - 3/8" nuts
4 - 3/8" x 7/8" washers
A) Attach 3-head diverter to
blower using: 1 - 0.25"
phillips head screw
B) Line up existing holes
on the stand to the
holes on the adapter
plate. Attach using:
7 - 3/16" x 0.75" bolts
B) Attach the other end of
the ex dusting hose
from each Bucker, to
the Blower's diverter
ports by securing it
with a 3" hose clamp.
3" hose clamp.
3" hose clamp.
*Ensure machine is unplugged before cleaning.

For more information or to watch our video tutorials visit cprosolutions.com
OWNERS MANUAL
GENTLE CUT - GC BUCKERS
9
Directions for cleaning:
A thorough cleaning of the GC Bucker should be performed after each use. Any resin build-
up on the machine attracts more resin, compounding the problem. Build-up can cause
decreased performance, overheating and could trip your circuit breaker. Future cleaning
also becomes more dicult if build-up is given a chance to dry out and harden. Operating
the GC Bucker in a cold environment will also reduce resin build-up.
After disassembly, all chutes, springs and guards can be soaked using hot water and, or
wiped with isopropyl alcohol. Soak all other surfaces with soap and warm water and let sit
for 5-10 minutes. Repeat 2-3 times to soften the resin, then powerwash to remove debris.
Be sure to wash the under side of the cartridge also. Any stubborn areas, such as the top
plate, may require scrubbing with a sti bristled or a plastic scraper (do not use a metal
scraper). Plant matter build-up is the most obvious sign that more attention is needed in a
particular area. Dry the machine with compressed air or a soft cloth.
• There are a series of holes located on the front of the top plate for bucking
• Stems are fed through the holes of the machine by hand
• Each plant must have 3 inches of base stem to clear the buckers
• Please note all strains run dierently and certain denser strains can need the top
colas taken o before being run
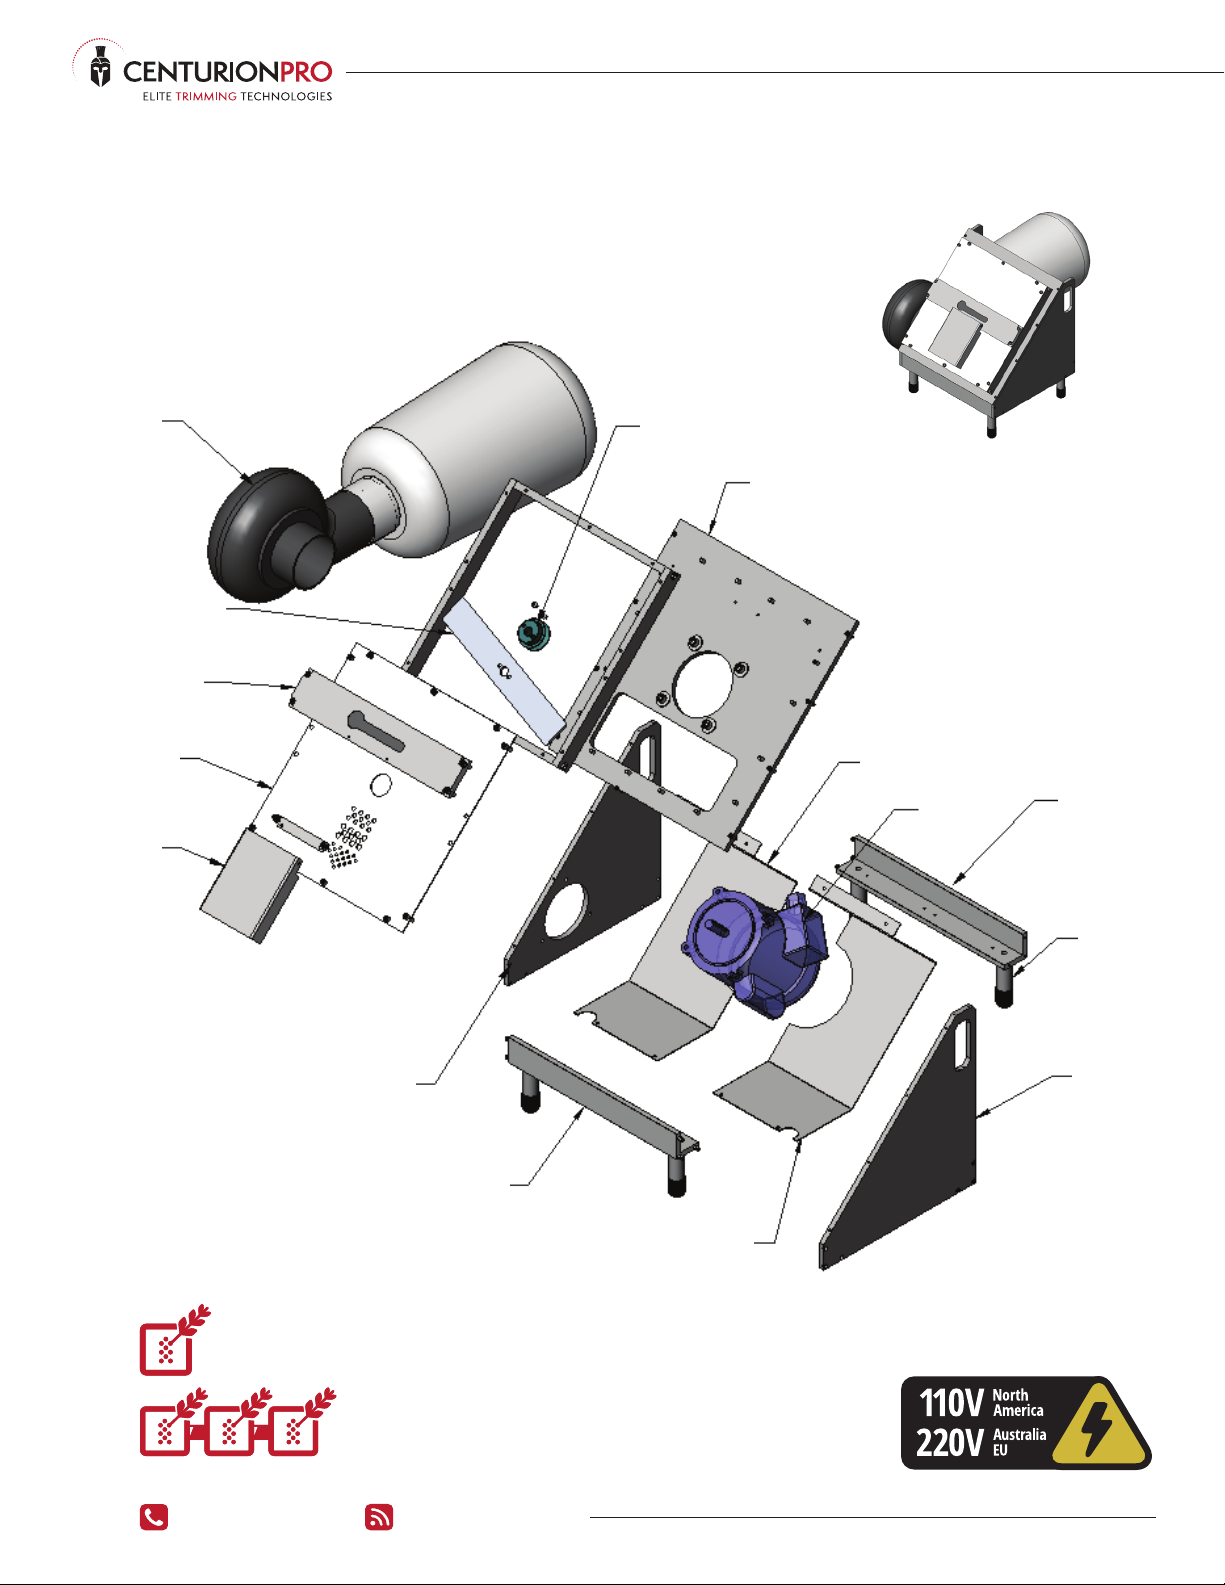
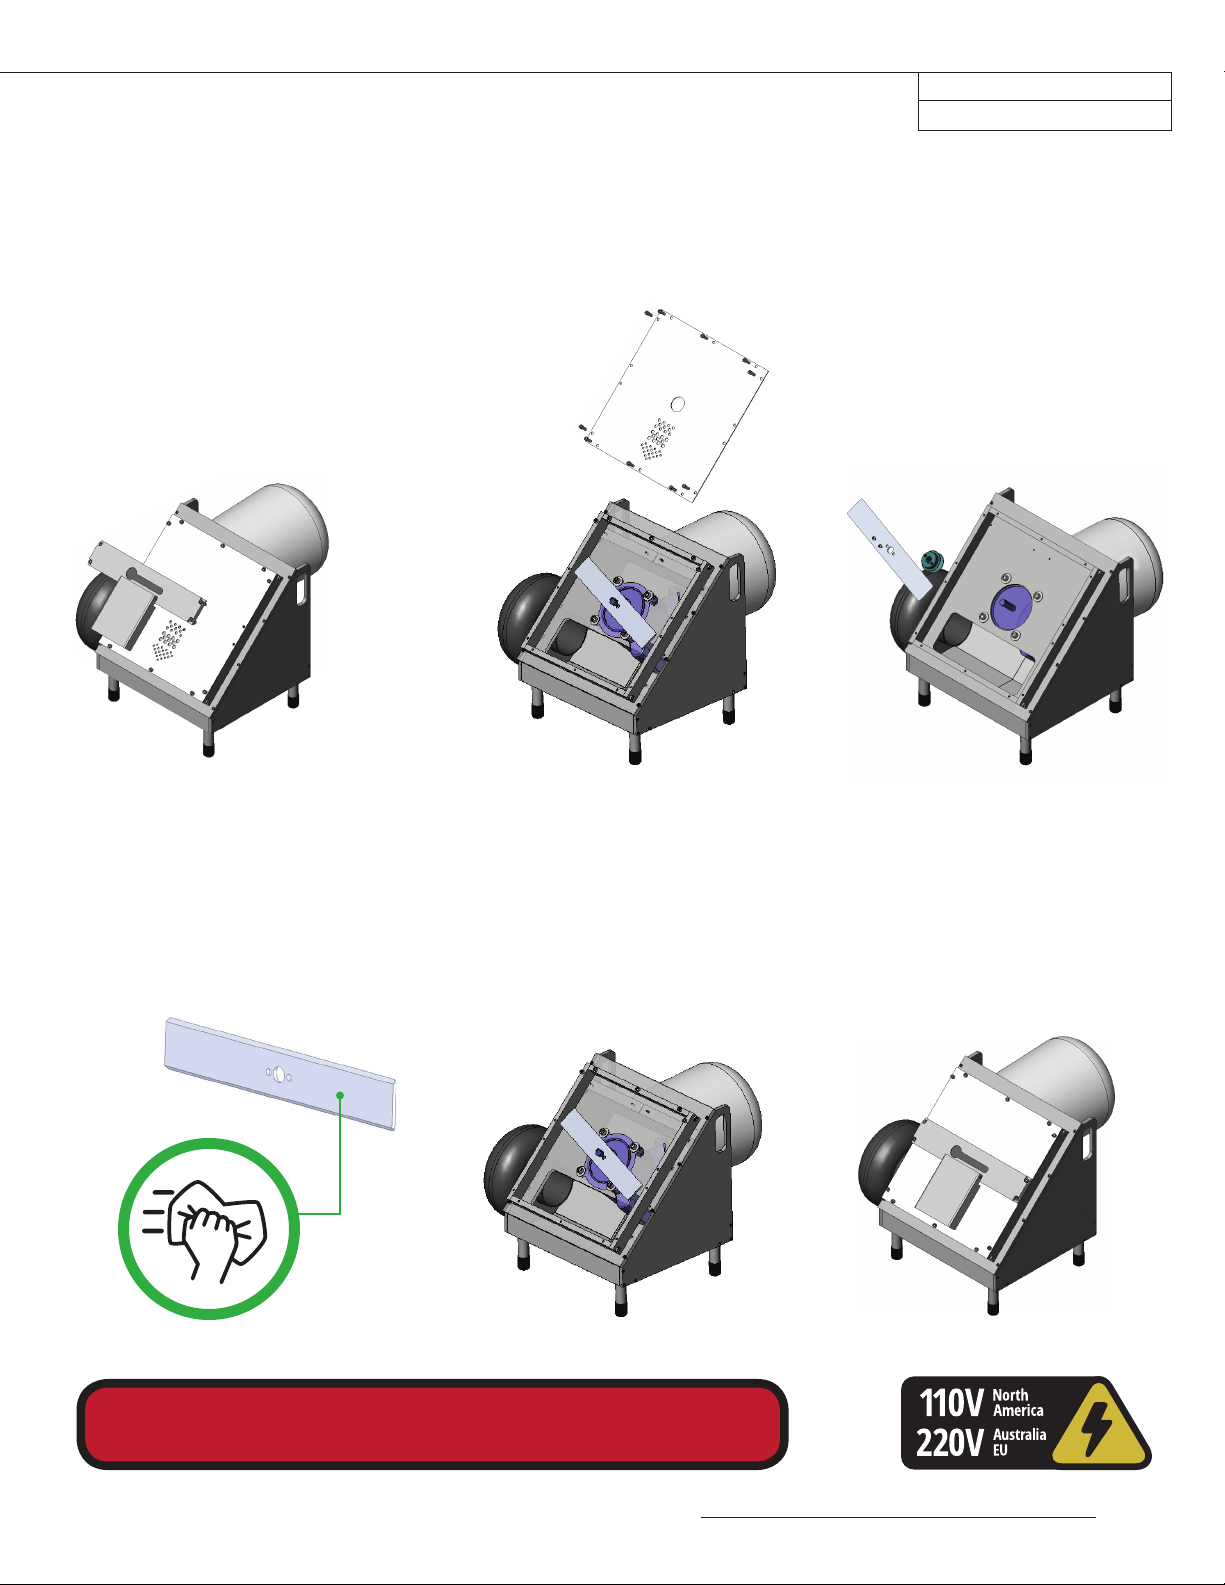
1. Make sure Bucker is turned o
2. Using provided tools, remove Bearing Bar and then the Top Plate
3. Clean Top Plate with isopropyl alcohol using brushes provided
4. Spray Top Plate liberally with isopropyl alcohol
5. Wipe down using a soft cloth, making sure the machine is dry completely
6. Clear out any debris on the bottom of the chute
7. Spray blade liberally with isopropyl alcohol
8. Wipe down using a soft cloth, making sure the machine is dry completely
The GC Bucker is a precision machine. It is essential that it is operated and maintained
with this in mind. The machine has been adjusted and tested by the manufacturer prior to
shipping to ensure optimal performance. However, it is important to inspect the machine at
initial start-up and after each use to ensure that no damage or plant material build-up has
occurred and that the blades spin freely.
In addition, it is highly recommended to clean the machine at the end of every use. This
ensures that the blades are kept lubricated and that resin does not build-up and aect
performance. This is especially important if the machine has been stored for an extended
period of time.
Resins and other plant by-products will build up and harden, becoming dicult to remove.
Cold water is recommended to spray on blades during harvest to reduce build-up.
MACHINE MAINTENANCE
Inspection of the either GC Bucker should be conducted prior to each
use following the upcoming disassembly section and these steps:
1. Unplug the Bucker and visually inspect all of the components for wear, damage and plant
matter build-up.
2. Remove the bearing plate, top plate. See disassembly section for instructions.
3. Inspect the blade for damage or cracking.
4. Remove springs and ensure the upper jaw rotates up and down freely.
5. Ensure the blade spins freely
6. Visually inspect the blower and ensure the Bucker is free of loose debris.
INSPECTION
CLEANING
NOTE
• Tool kit provided with Bucker
• Brush / Plastic scraper
• Spray bottle lled with isopropyl alcohol
• Soft cloths
MATERIALS NEEDED
PREPPING YOUR PLANT:
2 STEPS FOR OPTIMAL PROCESSING
1) ENVIRONMENT PREPARATION
• Ensure adequate space
• Review electrical requirements
• Have adequate bins for product transport
• Cooler temperatures in processing room is benecial
2) PLANT PREPARATION
• Cut main stalk
• Seperate each individual stem (no 'Y' junctions)
• Leave enough stem for clearance into machine
• Ensure clean angled cuts for precise feeding
• Keep prepped product stem side up for eciency
• Size the stem to t the ideal hole
• Feed end rst into machine
GENERAL OPERATIONS

10 cprosolutions.com1 855 535 0558
GC1 BUCKER SPECIFICATIONS
GC1 BUCKER
Input Voltage NA: 120V, 60Hz Single Phase
EU, AUS: 240V/50HZ, Single Phase
Current Draw < 3A Operating
Drive Motor 0.25HP
Motor RPM 1750 RPM
Weight (w/o stand) 40lbs /18kg
Length 28in / 71cm
Width 14in / 36cm
Height 15in / 38cm
Circuit Breaker Required NA: 15A/120V
EU, AUS: 15A/220V
GC1 BUCKER FEATURES
Feed Throughput +40lbs/hr (Hydrated)
Feed Entry Sizes 3-hole (3/16”, 1/4”, 3/8”)
Feed Types Wet/Dry
GMP Compliant* Yes
UL Compliant* Yes
CE Compliant* Yes
RoHS Compliant* Yes
Primary Material 304 Stainless Steel / Aluminum

For more information or to watch our video tutorials visit cprosolutions.com
OWNERS MANUAL
GENTLE CUT - GC BUCKERS
11
GC3 BUCKER SPECIFICATIONS
GC3 BUCKER
Input Voltage NA: 120V, 60Hz Single Phase
EU, AUS: 240V/50HZ, Single Phase
Current Draw < 23A
Drive Motor 0.25HP (x3)
Motor RPM 1750 RPM (x3)
Weight (w/ stand) 520lbs /236kg
Length 32in / 82cm
Width 85in / 216cm
Height 51in / 130cm
Circuit Breaker Required NA: 30A/120V
EU, AUS: 20A/220V
GC3 BUCKER FEATURES
Feed Throughput +120lbs/hr (Hydrated)
Feed Entry Sizes 3-hole (3/16”, 1/4”, 3/8”)
Feed Types Wet/Dry
GMP Compliant* Yes
UL Compliant* Yes
CE Compliant* Yes
RoHS Compliant* Yes
Primary Material 304 Stainless Steel / Aluminum

12 cprosolutions.com1 855 535 0558
FREQUENTLY ASKED QUESTIONS
WE ARE OPEN MONDAY THROUGH FRIDAY FROM 9AM TO 5PM PST - PH: 1-855-535-0558
FILLING OUT THE “CONTACT US” FORM ON THE WEBSITE, IS ANOTHER SURE WAY TO GET IN TOUCH.
1) MOTOR IS VERY HOT
The motor is designed to operate at higher temperatures, avoid contact with the motor during regular operation. The motor is thermally fused and will shut down
automatically if overheating occurs
2) MACHINE IS JAMMED, OR MISFED WITH PLANT MATTER
This can happen when too large of a branch is put through the machine.
3) THERE IS A GRINDING SOUND COMING FROM THE MACHINE
This can be caused by worn out bearings, misaligned gears or improperly installed components. With the machine turned 'O' and unplugged, try removing the Bearing Bar
and Top Plate and spin the blade by hand, if the blade rotates smoothly there is an issue with the drive assembly. If the blade was recently replaced / cleaned; then it is likely
an alignment issue, otherwise the bearings are damaged and need replacement.
4) THE PULL FORCE SEEMS WEAK
This could be caused by excessive debris build-up in the blower or the blade has been damaged. Disassemble, clean and inspect machine to determine the issue.
5) DOES THE STEM HAVE TO BE A CERTAIN LENGTH TO FEED TO THE BUCKER?
Yes, there must be 3 inches of base stem to clear the cutters.
6) DO I NEED A SPECIAL OUTLET FOR THE BUCKER?
CenturionPro Buckers can be plugged into any standard 110V wall outlet (220V AUS/EU).
7) DO THE GC BUCKER WORK BEST WITH A PARTICULAR STRAIN?
GC Buckers can handle any strain but please note that all strains run dierently and denser strains may need the top colas taken o before being run.
TROUBLE SHOOTING
HOW EASY IS IT TO CLEAN?
Our machines can be taken apart and cleaned within 10-15 minutes. The Bucker must be cleaned
after daily use. Just spray the rollers liberally with isopropyl alcohol, then wipe with a soft cloth. We
recommend to clean every 4-6 hours of use, but it depends on your strain. We know the importance of
down time during a harvest so we wanted to make this process extremely quick and easy
DO YOUR MACHINES TRIM WET OR DRY?
All CenturionPro Buckers trims both wet and dry to t your processing needs.
ARE YOUR MACHINES BUILT TO AN INDUSTRIAL STANDARD?
We do not compromise quality for cost savings. All CenturionPro Solutions machines are composed
of the highest quality materials available in North America and each machine is put through a
comprehensive quality control inspection. We only use brand name components in the build out of
our Bucker machines which enables us to have the comfort in giving you a 2 year warranty. With proper
maintenance these machines will last you well over a decade.
WHAT IS THE OPTIMAL ROOM TEMPERATURE TO TRIM?
Use your CenturionPro Bucker in 50-60 °F (10- 15 °C) room to get the best performance.
Cooler temperatures prevent excessive sticking to machine components.
MY MACHINE IS NOT WORKING LIKE IT DID WHEN IT WAS NEW, WHY?
Make sure to fully clean the machine and rollers. If the machine is clean and the rollers are free of
debris, then your machine should trim exactly like it was new.

For more information or to watch our video tutorials visit cprosolutions.com
OWNERS MANUAL
GENTLE CUT - GC BUCKERS
13
YOU MUST REGISTER YOUR BUCKER WITHIN 30 DAYS OF YOUR PURCHASE
WARRANTY
YOU HAVE JUST MADE A SMART DECISION BY PURCHASING THE BEST BUCKER IN THE WORLD. FAILURE TO REGISTER YOUR MACHINE WITHIN 30
DAYS OF PURCHASE WILL VOID YOUR 10 YEAR WARRANTY. PROTECT YOUR INVESTMENT. THIS PROCESS WILL ONLY TAKE 3 MINUTES TO COMPLETE.
TO REGISTER GO TO:
cprosolutions.com/warranty
WARRANTY TERMS AND CONDITIONS
LIABILITIES
LEGALITIES
CenturionPro Solutions (the manufacturer) will repair or replace, without charge, any parts
proven defective in material or workmanship for a period of 2 years on the Bucker Machine
and 1 year on the Blower.
The warranty period will begin on the date the machine(s) is purchased by the initial
purchaser. Product or component warranty defects can be remedied at any authorized
service dealer, or directly at the manufacturer. Any service work performed, and deemed
valid due to a defective part, will be free of charge. CenturionPro Solutions reserves the right
to use any manufacturer-approved replacement part for the warranty repair
The machine or defective part then must be returned to the manufacturer for analysis or
replacement at the cost of the owner. Parts deemed to be covered under the warranty will
be provided for free excluding shipping costs.
Do not return the machine to the place of purchase for repair or warranty claims, unless
you have been authorized by CenturionPro Solutions to do so. The place of purchase can
only sell replacement parts and will not repair any warranty issues, unless it is noted as an
authorized repair dealer and has been authorized to work on your machine.
CenturionPro Buckers are intended for use on legal aromatic herbs and hops. Please check all municipal, provincial/state and federal laws and regulations
before using these machines. CenturionPro Solutions does not promote or condone the use of these products in any way that may be deemed illegal.
To receive maximum performance and satisfaction from the Buckers, it is important that you read and understand the safety and manitenance precautions
before using the machine.
The manufacturer assumes no risk and shall be subject to no liability for damages or loss resulting from the specic use or application made of the
product. In no event will the manufacturer be liable for any special, incidental or consequential damages (including loss of use, loss of prot and claims of
third parties) however caused - whether by negligence of the manufacturer or otherwise. If you have any questions regarding your warranty rights and
responsibilities, please contact the manufacturer.
IF WARRANTY REPAIR IS REQUIRED, PLEASE CONTACT THE MANUFACTURER AT 1-855-535-0558 OR
1. Model and serial number
2. Proof of purchase date
3. A copy of the original Warranty Registration Card or Online Submission
4. Details of the defect or problem (include photos and videos)
YOU MAY BE DENIED WARRANTY COVERAGE IF YOUR MACHINE HAS FAILED
DUE TO ANY OF THE FOLLOWING:
Product abuse Normal wear
Product neglect Accidental damage
Improper maintenance Unapproved modications
Improper electrical connection
!! IMPORTANT !!
Other manuals for GC1
1
This manual suits for next models
1
Table of contents
Popular Laboratory Equipment manuals by other brands

Sheldon
Sheldon Shel-Lab SVAC1-2 Installation and operation manual

Fluke
Fluke PTi120 user manual

Metrohm
Metrohm 726 manual

Gilson
Gilson Pipetman Classic Series user guide

Thermo Scientific
Thermo Scientific 3960 Operating and maintenance manual

Visionix
Visionix VX90 Instructions for cleaning and sterilization