Pelton & Crane Magna-Clave User manual

Magna-Clave
Use & Care
Manual

2
TABLE OF CONTENTS
Visual Index .................................................................................................................................................... 3
Section I - Familiarization ................................................................................................................................... 4
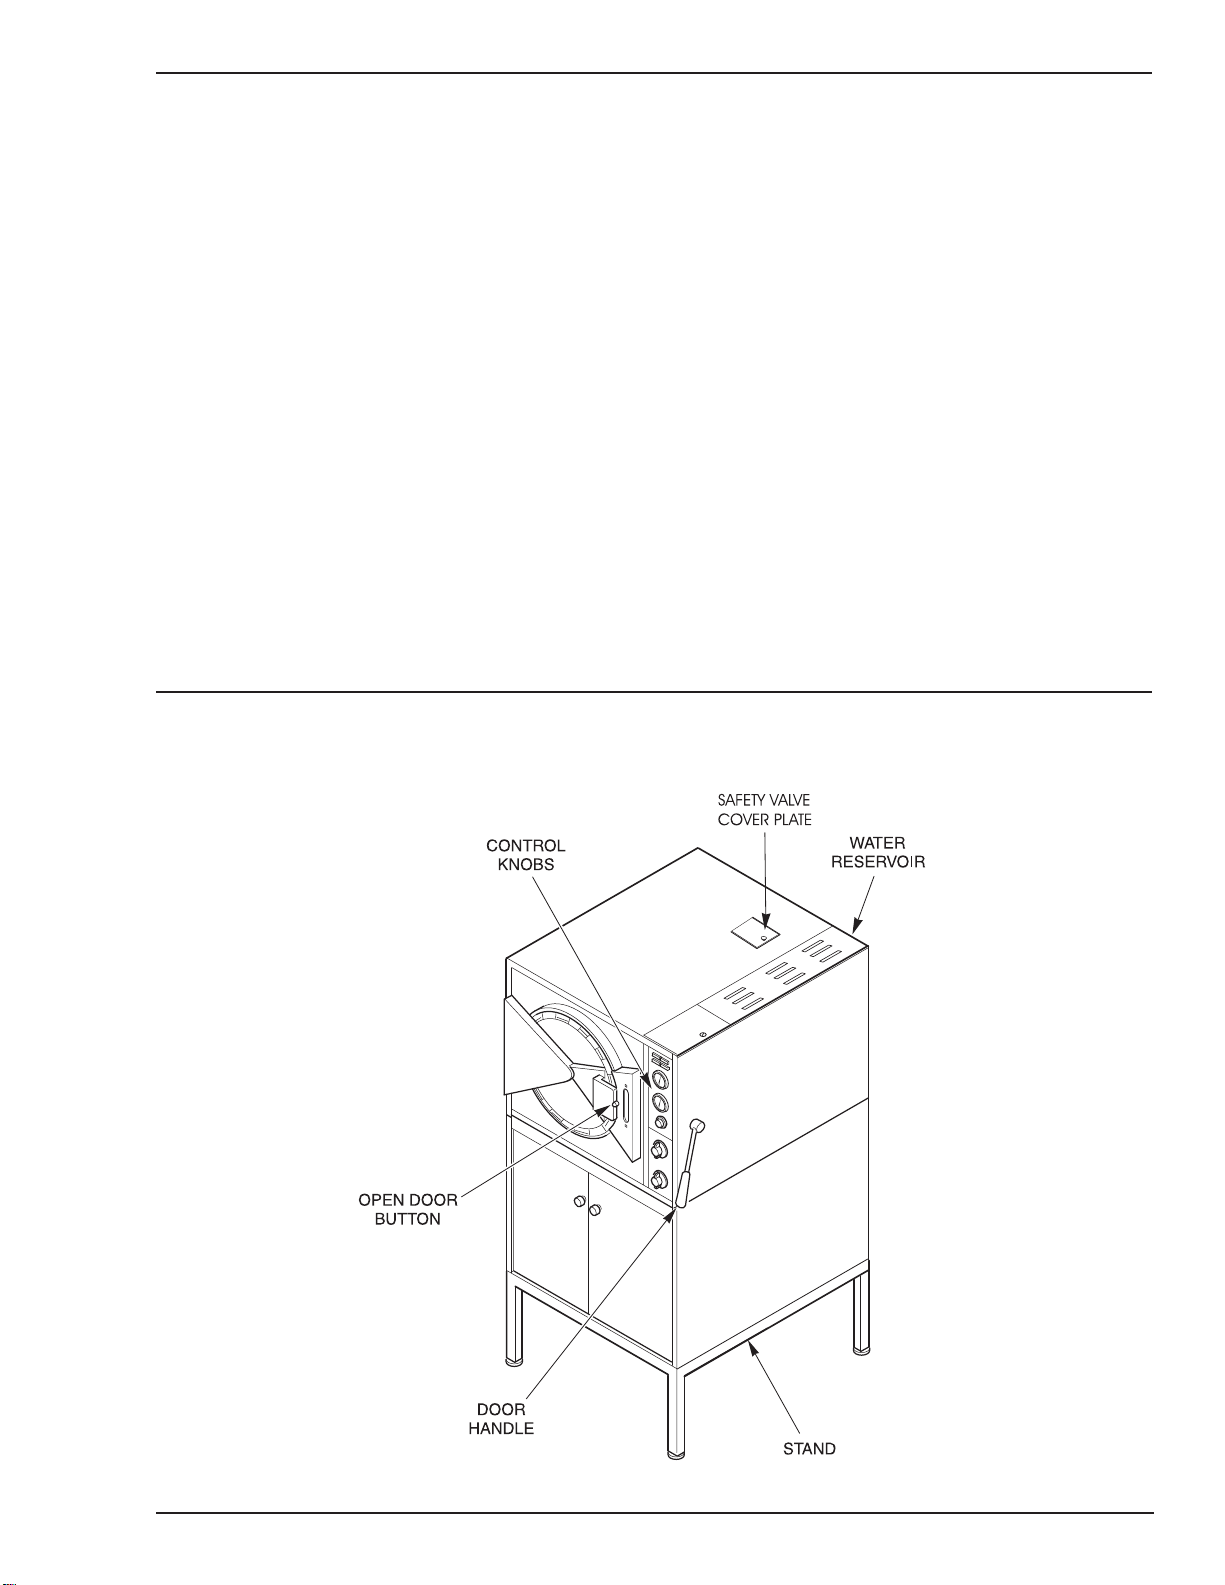
I. Safety Features ..................................................................................................................................... 4
A. DoorClampRing..................................................................................................................... 4
B. OpenDoorButton ................................................................................................................... 4
C. DoorHandle ............................................................................................................................ 4
D. RelayControl .......................................................................................................................... 4
II. Physical Characteristics ....................................................................................................................... 5
A. Exterior ................................................................................................................................... 5
B. Interior .................................................................................................................................... 5
C. InstallationRequirements........................................................................................................ 5
III.Electrical Requirements ....................................................................................................................... 6
IV.Controlsand Indicators......................................................................................................................... 6
A. Indicator Lights ....................................................................................................................... 6
B. Gauges ................................................................................................................................... 6
C. ControlKnobs ......................................................................................................................... 7
D. Audible Signal ......................................................................................................................... 7
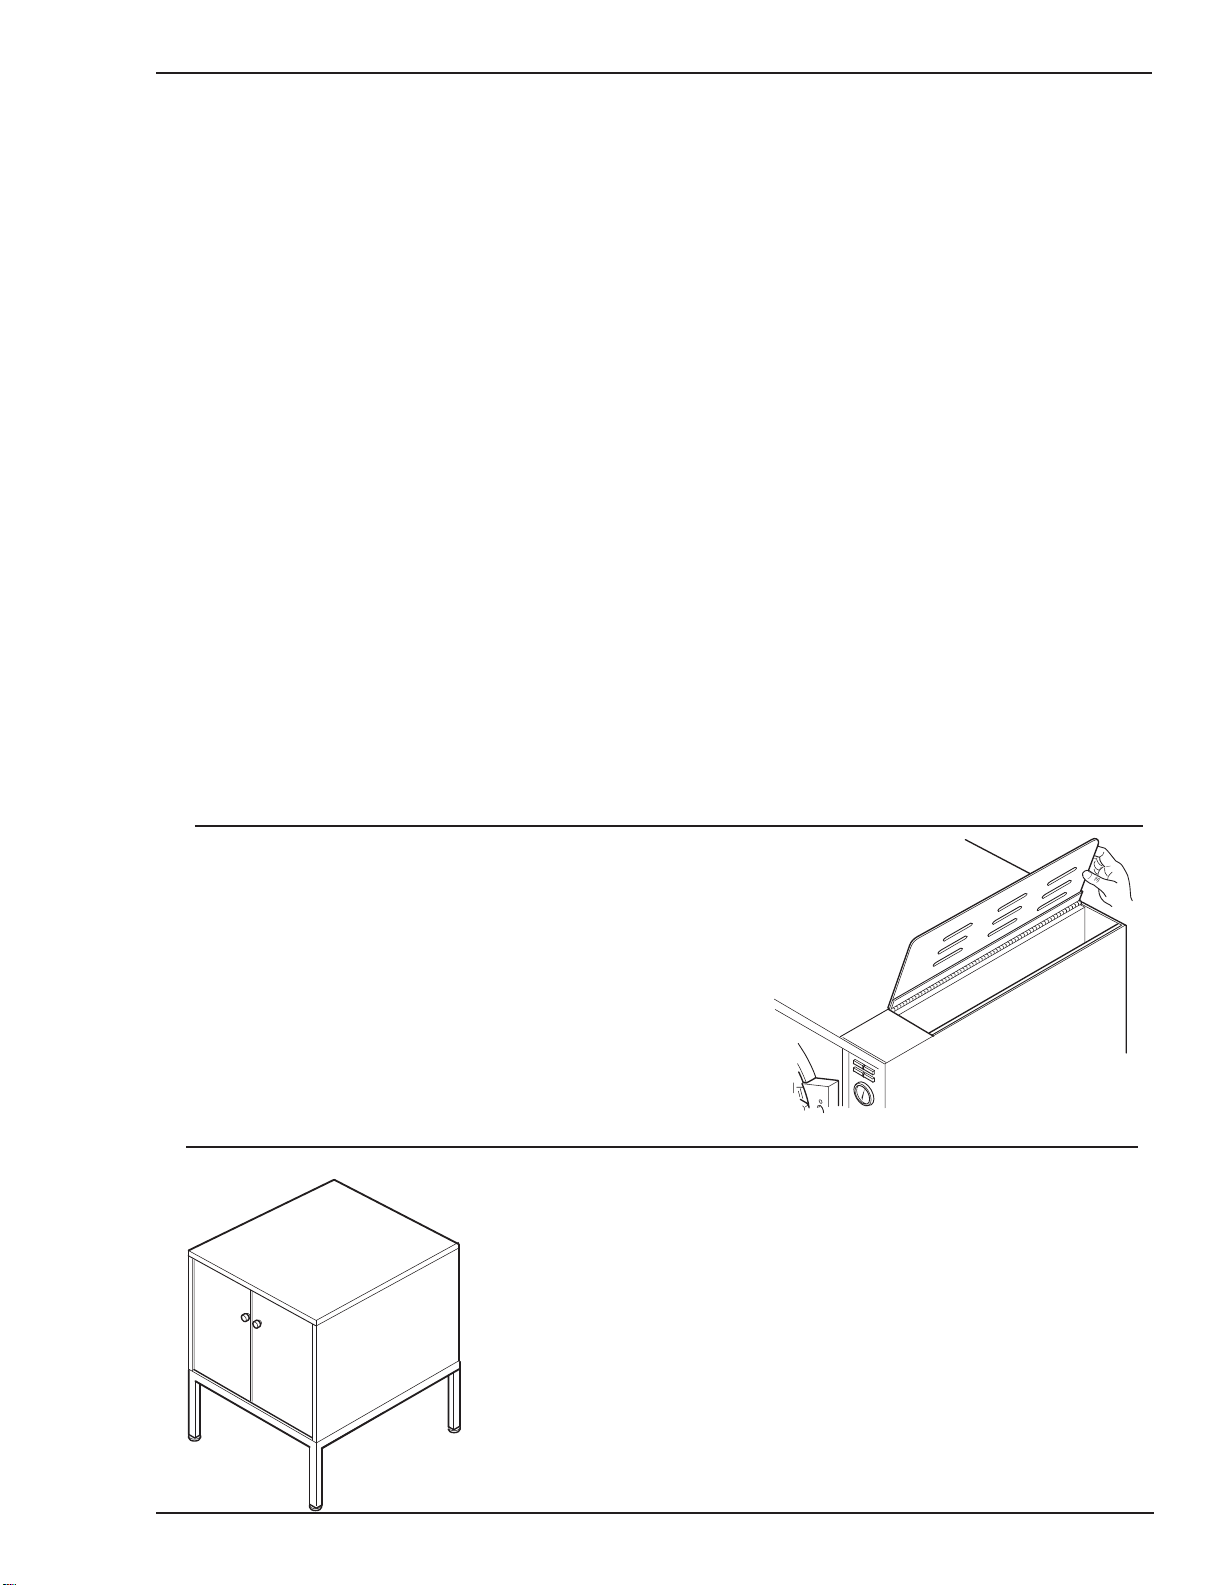
E. WaterReservoir....................................................................................................................... 7
F. Stand....................................................................................................................................... 7
Section 2 - Preparation for Sterilization ............................................................................................................. 8
I.Handlingand Cleaning of Instruments ....................................................................................................
8
A. Handling..................................................................................................................................
8
B. Cleaning.................................................................................................................................. 9
II.Preparation Guide for CarbonSteelInstruments.................................................................................... 9
A. Handling.................................................................................................................................. 9
B. Cleaning.................................................................................................................................. 9
C. SterilizationPreparation .......................................................................................................... 9
D. InstrumentWrapping ...............................................................................................................
9
III.TrayPreparation and Loading ............................................................................................................... 9
A. GeneralGuidelinesforTray Preparation................................................................................... 9
B. UnwrappedTrays ................................................................................................................... 10
C. WrappedTrays and Instruments ............................................................................................ 11
D. Packs.................................................................................................................................... 12
IV.LiquidsPreparation............................................................................................................................. 13
Section 3 - Operation ......................................................................................................................................... 15
I.General ................................................................................................................................................ 15
II.OperatingProcedures for Normal Sterilization ..................................................................................... 15
A.UnlockDoor ........................................................................................................................... 15
B. Fill.......................................................................................................................................... 15
C.Load....................................................................................................................................... 15
D.LockDoor............................................................................................................................... 16
E.SetTime Control .................................................................................................................... 16
F.SetTemperature...................................................................................................................... 16
G.Vent ....................................................................................................................................... 16
H.UnlockDoor ........................................................................................................................... 16
I.Drying...................................................................................................................................... 16
III.Operating Procedures for LiquidsSterilization .................................................................................... 17
A. PreparationandSterilization .................................................................................................17
B. Vent ...................................................................................................................................... 17
C. CoolDown ............................................................................................................................ 17
D. Unlock Door .......................................................................................................................... 17

3
TABLE OF CONTENTS
E.Drying .................................................................................................................................... 17
Section 4- Care and Maintenance...................................................................................................................... 18
I.PreventiveMaintenance Schedule ....................................................................................................... 19
II. Cleaning .............................................................................................................................................. 19
A. CleaningProcedure............................................................................................................... 19
B. DrainingReservoir................................................................................................................. 19
C. CleaningFill Filter ................................................................................................................. 19
D. CleaningExteriorSurface...................................................................................................... 19
III. Sterilization Assurance ...................................................................................................................... 20
A. ClinicalRecordKeeping ........................................................................................................ 20
B. Techniques............................................................................................................................ 20
IV. Optional Accessories ......................................................................................................................... 20
A. Trays..................................................................................................................................... 20
B. TemperatureRecorder ........................................................................................................... 20
V.Inspection ........................................................................................................................................... 20
A. General ................................................................................................................................. 20
B. InspectingtheChamber ........................................................................................................20
C. DoorInterlock Check ............................................................................................................ 20
Glossary ............................................................................................................................................................. 21
Autoclavable Conversion Scale......................................................................................................................... 22
VISUAL INDEX

4
I. SAFETY FEATURES
TheMagna-Clave design offersseveral safety features
foryour protection.
A. Door Clamp Ring
Apatented door clampring provides maximum
safety by locking the entire rim of door. When
activated by the door handle, the door clamp ring
expands in diameter,allowingthedoor to open.
B. Open Door Button
Theopen door button energizesthedoor interlock
solenoid. It must be depressed before moving the
door handle up into the open position. The button is
operative only when the Open Door light is illumi-
nated.
C. DoorHandle
When door handle is in down position, the door is
locked and the rim is completely sealed. When
door handle is in up position, the door clamp ring is
expanded. Toopen door,move door handle to
upwardposition by the followingmethod:
·Ensure that Power On light is illuminated
·Open Door light must be illuminated
·DepressOpen Door button
WARNING: Do not attempt to move door handle
upward until:
·Open Door light is illuminated
·Pressuregaugeindicates‘0’
·Function is in Vent or Fill position
D. RelayControl
The relay controls supply power to the main heaters only when proper start up procedures have been
followed. It senses when the “Door Open” light is on and power is made available to the main heaters for
normaloperation.
·Overheat protector:If unit trips the overheat protector, the main heater is removed by relay controls
andcannot be restored withoutgoing through thestart-up procedure.This insures when thesterilization
cycle is interrupted by an out of water condition or similar failure, the Magnaclave will remain off until
the operator restarts the cycle.
·Main Heater: The timer activates the relay controls at the end of the cycle.Power is removed from the
main heaters and the buzzer notifies the operator that the sterilization cycle is completed.The buzzer
will continue to sound until the operator turns unit to vent.With the heater power removed the
Magnaclave will start cooling down.For proper drying of the contents, the unit should be vented within
15 minutes of the completion of the cycle.
·Fail Safe Operation: In the event of a power failure, the power to the main heaters is removed by the
relay control if there is an interruption to the incoming power.The heater will remain off until operator
restarts the unit.
TO OPEN PUSH
BUTTON FIRMLY WHEN
DOORLIGHTISON
OPEN
DOOR
BUTTON
DOOR
CLAMP
RING
SECTION 1
FAMILIARIZATION

5
SECTION 1
FAMILIARIZATION
II. PHYSICALCHARACTERISTICS
Exterior:
Theoverall dimensions are 28"(71.1 cm) wide X341/2'
(87.6 cm) deep X 53" (134.6 cm) high (with stand), 23'
(58.4cm) high (without stand).
Interior:
Theoverall chamber shallmeasure30" (76.2 cm)deep
X16' (40.6 cm)diameter.
InstallationRequirements:
A space 46" (116.8 cm) wide X 541/2'
(138.4 cm) deep X 65" (165.1 cm) high (with stand),
35'(88.9 cm) high (withoutstand)should be provided
toproperly operateandmaintainthe sterilizer.
23"
(58.4 cm)
28"
(71.1 cm)
34½"
(87.6 cm)
30"
(86.2 cm)

6
Ill. ELECTRICAL REQUIREMENTS
The Magna-Clave requires 5000 watts at 208 volts or 220-240 volts, 50-60 cycles, single phase. Line voltage
mustbespecifiedwhenordering. Anoutletboxwithconduitknockouts,groundingscrewandacoverisprovided
on the rear of the sterilizer. This outlet box is used for connecting a power line to the Magna-Clave.
IV. CONTROLS ANDINDICATORS
A. Indicator Lights
1. Power On - The Power On light indicates thatelectrical
power is being supplied to the autoclave. It is illumi-
nated when the Function control is in the Fill, Sterilize
or Vent position. When the Power On light is illumi-
nated,thewallheatersofthe autoclave are energized to
maintaina warm, standbycondition.
2. Heat On - The Heat On light indicates that electrical
power is being supplied to the main heating elements
whichgeneratesteaminsidetheboiler. Whenthe Func-
tioncontrolisintheSterilizepositionandthedoorhandle
inthe down position (doorlocked),theHeat On light will
beilluminated and themain heating elementsare ener-
gized. Thelight remains illuminateduntilthesteamtem-
perature inside the chamber reaches the setting on the
Temperature control. The main heating elements will
cycleoff-and-on to maintain thedesired temperature.
3. Sterile - The Sterile light isilluminatedwhen:the Func-
tion control is in the Sterile position, the desired tem-
perature is reached and the Time control indicates “0.’
At the beginning of the cycle, the Time control should
be set at the desired time for sterilization. When the
Time control turns to “0,” the Sterile light illuminates
and the buzzer or chime sounds to indicate the end of
the sterilization cycle.
*Determinedby manufacturing date ofunit.
4. Open Door - The Open Door light is illuminated when
the Function control is in the Vent or Fill position and
pressureinthe chamber is lowenoughto allow the door
to be safely opened.
CAUTION:The door cannot be opened and no attempt
shouldbemadetooperatethedoorhandleuntiltheOpen
Door buttonis depressed.
B.Gauges
1. Temperature Gauge - TheTemperature gaugemeasures the steam temperature in thedischargeline
from the chamber. It is marked with a green area from 250’F to 270’F to indicate normal sterilizing tem-
peratures.
2. Pressure Gauge - The Pressure gauge measures pressure within the chamber. It is markedwith a green
area between 15and 31 PSI (pounds per squareinch).
TEMPERATURE
GAUGE
INDICATOR
LIGHTS
PRESSURE
GAUGE
TEMPERATURE
CONTROL
DOOR
HANDLE
TIME
CONTROL
FUNCTION
CONTROL
CONTROLKNOBS

7
1. Temperature Control -Temperatureandpressureinsidethe chamber are controlled bytheTemperaturecontrol.
It may be set from approximately 240cF to 270"F. Markings on the control indicate approximate settings. For a
more precise setting, refer to Section 3.
2. Function Control - All operations of the Magna-Clave are controlled by the Function control as follows:
a. Power Off - All power is turned off;door cannot be opened.
b. Fill-Waterfromreservoiris allowedtoenter chamber;wallheatingelementsare energized.
c. Sterilize - Power is supplied to all heating elements as required;door cannot be opened.
d.
Vent
-Unusedwaterand steaminchamberare returnedto reservoirafter sterilizing cycle is complete. The
door can be opened when the pressure decreases to a safe level and the Open Door light is illuminated.
The wall heaters remain energized. This reduces pressure build up time for successive sterilizing cycles
and promotes drying of the sterilized material.
3. Time Control - The Time control is manually set at the beginning of each sterilizing cycle. Timing begins
when the preset temperature is reached and time control counts down to “0.’
NOTE: Do not set the time control for an interval of less than five minutes.
D. Audible Signal
1. Buzzer - When the Time control returns to “0”, a buzzer will sound to indicate the end of the cycle. The
buzzer sounds continuously until the Function control is turned toVent. TheTime control must be set at
the beginning of each sterilizing cycle. If it is not set, the buzzer will indicate end of sterilizing cycle when
the preset temperature is reached, and the sterilizing cycle will not be complete. Once buzzer sounds the
main heater will turn off.
E. Water Reservoir
1. Thewater reservoir provides anample water supply for
coolingdischarged steam and water. The reservoir
should be filled with distilled or demineralized water to
pre-’ vent corrosion. It should be filled to the line marked
at the rear of the reservoir, and should never drop more
than four inches below the line. A rubber and drain hose
attached to the brass fitting beneath the autoclave
facilitatesproperdrainage and cleaning. Forinstallation
information,refer to 094075,Installationof the Magna-
Clave.
F. Stand
1. The Magna-Clave stand provides a convenient storage com-
partment to house trays or supplies.

8
I HANDLING AND CLEANING OF INSTRUMENTS
NOTE:Instruments must be thoroughly cleaned prior to placement in the sterilizer.
A. Handling
1. Wear heavyrubbergloves while handling instruments.Cleangloved hands with agermicidalcleaner
(iodophorsurgicalscrub).Washgloved handswellwhen instrumentshandlingis complete.
2. Transport soiled instruments on a tray to the cleanup area.Protect your hands from contact with soiled
instruments to prevent any serious infection.
3. Sort out any nonsurgical devices or other instruments that cannot withstand immersion without rusting.
Refer toTable2—1.
NOTE:Checkmanufacturer’srecommendationsforindividualitems beforeautoclaving.
B. Cleaning
Items must be completely cleaned before sterilizing. Processing instruments with debris or blood contamina-
tion may result in staining and/or damage to instruments or sterilizer.
1. Rinse instruments with hard stream of water immediately after use to remove debris. Handle soiled
instrumentsfollowingprocedure outlined in Section2-1-A.
2. Wash instruments in an ultrasonic cleaner for five to 10 minutes immersed in a fresh solution of deter-
gentand distilled ordemineralized water or a germicide solution. Followmanufacturer’srecommended
procedures.Clean all instruments inanopen position.
NOTE:For best results, use a detergent specifically designed for use in an ultrasonic cleaner with a
neutralph(7).
(Health Sonics, Pleasanton, CA;L&R, Kearny, NJ, or comparable brand).A Germicide, 2% glutaralde-
hyde or equivalent may also be used.Be sure to follow manufacturer’s instructions for mixing and use.
Otherwise,unsatisfactory results and/or damage mayoccur.Discard and replaceultrasoniccleaning
solution daily.
3. After cleaning, rinse instruments very thoroughly for 30 seconds in tap water.Then perform a final rinse
with distilled or demineralized water after the 30 second rinse to remove impurities found in most tap
water. Inspect instruments to ensure removal of all debris. Repeat cycle as necessary.
NOTE:Toprevent staining, instruments shouldbe rinsed withdemineralized(distilled) waterand dried.
After rinsing in tap water in areas with hard water (water with a high mineral/salt content), dry the instru-
ments.(Drying should not be a substitute for rinsing.)When autoclaving instruments which are not
stainless steel, use a corrosion inhibitor pre-dip for two or three minutes. (This may be 2% solution of
sodium nitrite in distilled water.) Allow the pre-dip to dry on the instruments without wiping.
4. Follow the recommendations by the instrument manufacturer on the use of lubricating products after
instrumentshave been ultrasonically cleaned.
SECTION 2
PREPARATIONS FOR STERILIZATION
Table 2-1 ITEMS RECOMMENDED FOR STEAM STERILIZATION
!Straight stainless steel instruments
!Surgical stainless steel hinged instruments.
!Airpowered instruments made forautoclaving e.g. hand pieces).
!Heat resistant plastic items
!Rubbergloves
!Rubbertubing
!Glass slabs, beakers and stones.
!Gauze
!Liquids

9
SECTION 2
PREPARATIONS FOR STERILIZATION
B. Cleaning
5. With the increasing concern for asepsis, offices are using more disinfectants and instrument soaks. If
any of the disinfectants are introduced into the autoclave during the cycle (either directly or by incom-
plete rinsing after soaks), corrosion of the stainless steel chamber, instruments and trays or baskets
may occur.There are several chemicals commonly used as disinfectants which may break down under
temperature and pressure to cause corrosion to the stainless steel trays and instruments, even in a
properly passivated 304 stainless steel chamber.These chemicals include:
"AnydisinfectantcontainingZephiran Chloride (Benzalkonium Chloride), aquaternaryammonium
compound. (A number of practices still use quaternary ammonium com pounds, although this is no
longerrecommendedbyprofessionalorganizations.)
"AnyAmine based disinfectant containingquaternaryamine hydrochlorides.
"Any disinfectants containing sulfite products.
"Any disinfectants containing phenolic products. Some disinfectants commonly used in practices
containingphenolsare:
"Any disinfectants containing active hydrogen halide group.
"Sporicidin@, Lysol@, and Omni II@.
II.SPECIAL PREPARATION GUIDE FOR CARBON STEEL INSTRUMENTS
A. Handling
1. Handleand thoroughly clean instrumentsas outlined above. (Referto Section 2-1.)
B. Cleaning
1. Prepare a 2% solution of sodium nitrite (one tablespoon per quart of water). Immerse instruments in
the solution and allow them to remain for three minutes.
C. Sterilization Preparation
1. Removeinstruments and preparefor sterilization. (Refer to Section2-Ill.) Do notrinse or wipe instru-
ments prior to sterilization.
NOTE:Do not place carbon steel instruments directly on the MagnaClave’s stainless steel tray. Before
placing instruments on the tray, line the tray with a towel or paper wrap.
D. InstrumentWrapping
1. Instruments which will be wrapped for sterilization should be packaged in a material which promotes
drying.
NOTE:Instruments in packages may not dry well and may require use of an atmosphere reducer
(Vapor Phase, Lorvic Corporation, St.Louis, MO,) for best drying results.
III. TRAY PREPARATION AND LOADING
A. General Guidelines forTray Preparations
•An internal process indicator strip should be in-
cluded with each sterilizer load to verify gross
heatpenetration.
•A biological spore test indicator should be used
weeklyin a representative sterilizerload for ster-
ilizationassurance.
•Date packages and re-sterilize after one month,
oraccording to packaging manufacturers’speci-
fications.
•Sterilizationindicators/monitorsshouldbeplaced
in the front bottom area of the sterilizer.
•DO NOT mix or cause contact of dissimilar met-
als (i.e. metals such as carbon steel and stain-
less steel) during sterilization or storage.
•Makesurethatall instruments are sterilized inan
openposition.(Referto AORN guidelines.)
•Place all sharps (scissors, knives, skin hooks) so
theydonottouchduringautoclaving. Cottonor gauze
may be used to isolate and protect the sharp edges
and the smaller instruments.
•Donotplace metal instruments, other thanstainless
steel,directly on stainless steelautoclave trays. The
trays should be lined with thin cloth or paper liners.
•Anyitemwhichmightholdwatershouldbeplacedso
the water will drain out.
•Usesmallpacksto separate largerones.Seeinstruc-
tionsforpreparing wrapped trays.
•Neverstack trays on topofone another.At least one
inch should separate trays.
•Wrapped trays and packs must not touch the sides
of the sterilizer.
•Donotoverloadtrays.Overloading may cause steril-
izationfailure.

10
SECTION 2
PREPARATIONS FOR STERILIZATION
B. UnwrappedTrays
These trays are prepared for sterilization of nonsurgical instruments and canisters to prevent transmitting
infectious disease. Always include a process or spore test indicator with every sterilizer load.
1. LooseInstruments
a. Distribute a single layer of instruments in
the bottom of a perforated tray. Instru-
ments made of metal other than stainless
steel should not contact the stainless
steel autoclave tray. A very thin liner of
paperor cloth shouldbeused for separa-
tion. Provideadequatespace between
instruments for steam circulation. Do not
overload. Be sure to include a process or
sporetestindicator.
b. Place tray on rack in sterilizer.
NOTE:If multiple layers of instruments
are to be separated by fabric, see
instructionsfor preparing wrappedtrays.
c. Refer to Section 3 for operating instructions.
2. Open Metal or Glass Canisters
a. Place open metal and glass canisters on
a perforated tray.Tilt canisters down for
adequatesteampenetration. Be sure to
include a process or spore test indicator.
b. Place tray on rack in sterilizer. Do not
overloadorinadequatesterilizationand
drying may result.
c. Make sure containers are placed so they
willdrainanddry adequately.
d. See Section 3 for operating instructions.
3. RubberTubing
a.Clean tubing thoroughly.
b. Rinse withpyrogenfree water leave wet.
Leavebothendsopen. Coil and wrap
without kinks or sharp bends.
c. Place tubing on an autoclave tray. Be
sure to include a process or spore test
indicator.
d. Place tray on rack in sterilizer. Do not
overloadorinadequatesterilizationand
drying will result.
CAUTION:Tubing which will come in
contact with a surgical wound should
be prepared as outlined above, and
wrapped to maintain sterility.
e. Refer to Section 3 for operating instructions.

11
SECTION 2
PREPARATIONS FOR STERILIZATION
C. WrappedTrays and Instruments
There are several ways to prepare wrapped trays. Refer toTable 2-2 for acceptable wrapping materials.
a. Individually wrapinstruments,which have beencleaned
according to Section 2-1, in autoclave bags or paper
(3M, St.Paul, MN;Propper, Long Island City, NY). Do
not tightly roll instruments in paper.
b. Seal with autoclave tape or heat sealer (3M, St.Paul,
MN;Propper, Long Island City, NY).
CAUTION: Do not use staples,pins or other devices
which will puncture the packaging material. Other-
wise, sterility may be compromised.
c. Place individually wrappedinstrumentsonperforated
trays. Provideadequate space betweeninstruments for
steam circulation.
CAUTION:Do not overload trays or inadequate sterilization may result.
d. Include a process or spore test indicator. Place the indicator inside an individually wrapped instru-
ment which will be placed in the front of the bottom tray.
e. Place trays on the rack in the sterilizer. Provide adequate space between trays to allow steam
circulation.
f. Refer to Section 3 for operating instructions.
2. Wrapped Instruments
a. Collect a group of similar instruments which have been
cleanedaccording to Section2-1.
or
Collectinstruments usedfor a particularprocedure (i.e.
amalgam,exam, etc.) which have been cleaned
according to Section 2-1. Do not mix dissimilar metals.
b. Place instruments in autoclave bag (3M, St.Paul, MN;
Propper, Long Island City, NY).
or
Loosely wrap instruments in two to four layers of muslin towels or autoclave paper (3M, St.Paul,
MN;Propper, Long Island City, NY).
CAUTION: Do not wrap instruments too tightly.Inadequate sterilization may result from
improper wrapping or placing too many instruments per package. (If a large number of
instruments per package are desired,refer to Section 2-II-D for PACKS).
c. Place a process or spore test indicator inside a representative bag.
d. Seal with autoclave tape (3M, St.Paul, MN;Propper, Long Island City, NY) or heat sealer.
CAUTION:Do not use staples,pins or other devices which will puncture the packaging
material. Otherwise, sterility may be compromised.
e. Placepackageson perforated trays.Ensure adequate space betweenpackages to allowsteam
circulation.
NOTE:Place the package containing the sterilization monitor in the front of the bottom tray.
f. Load tray in the rack in the sterilizer.Ensure adequate space between packages to allow steam
circulation.
CAUTION:Do not overload or adequate sterilization may result.
g. Refer to Section 3 for operating instructions.

12
SECTION 2
PREPARATIONS FOR STERILIZATION
3. WrappedTrays
a. Place instruments, cleaned according to Section 2-I, in a
perforatedtray.Allow adequate spacebetweeninstru-
ments for steam circulation.
b. Place a process or spore test indicator in at least one tray
to be cycled.
c. Wrap the tray in two to four layers of towels or other
wrappingmaterial.(RefertoTable 2-2.) Close using
autoclavetape.
d. Place wrapped trays on the rack in the sterilizer.Ensure
that the wrapping does not touch the sides of the cham-
ber.Allow adequate space between trays for steam
circulation.
NOTE:Place the tray containing the sterilization monitor in the bottom of the sterilizer.
CAUTION:Do not overload or inadequate sterilization may result.
e. Refer to Section 3 for operating instructions.
D. Packs
Packs are for sterilizing surgical instruments, gloves and textiles.
1. Instruments and textiles
a. Clean instruments according to Section 2-I. Textiles should be laundered prior to sterilization.
NOTE: Donotuse high chlorine orphosphate content detergents chlorinebleachin laundering
items prior to sterilization. Staining of the autoclave and instruments or more severe damage
may result. The use of chlorides may also result in cracks in the chamber.
b. Loosely package instruments with not more than 10 per pack. Instruments of the same type
which are nested should be separated by a layer of absorbent towels and placed so that water
will run out. Loosely roll or fold textiles.
CAUTION:Density should not exceed 1/2 the capacity of the pack and the packs should not
exceed 1/2 the capacity of the tray. Otherwise inadequate sterilization could result.
Or
Wrap properly cleaned articles in two to four layers of muslin towels or other packaging material.
(RefertoTable2-2.)
c. Place a process or spore test indicator inside a representative pack.
d. Seal with autoclave tape or heat sealer (3M, St.Paul, MN;Propper, Long Island City, NY).
CAUTION:Do not use staples,pins or other devices that could puncture packaging mate-
rial. Otherwise sterility could be compromised.
e. Place packs on perforated trays. Leave adequate space between packs to allow steam to circu-
late.Load packs upright, side-by-side on the tray. Do not stack.
CAUTION:Adequate drying will not occur unless space is left between packs. Metal and
glass containers should not be used to separate packs as these will inhibit drying. Packs
should not exceed 1/2 the capacity of the tray.Otherwise, sterilization could be compro-
mised.
f. Load trays onto the racks in the sterilizer.Ensure that packs do not touch the sides of the
chamber.Allow adequate space between trays for steam circulation.If packs are large, some
trays may be omitted to allow more clearance.
CAUTION:Do not overload or inadequate sterilization may result.
g. Place pack containing sterilization monitor in the bottom front of the sterilizer.
h. Refer to Section 3 for operating instructions.

13
SECTION 2
PREPARATIONS FOR STERILIZATION
2. Surgical gloves
NOTE:Disposable gloves should not be sterilized.
a. Clean anddry gloves.
b. Place a square of muslin or other absorbent towel into the glove up to the finger.
c. Place a strip of muslin or other absorbent towel around the cuff and fold it back.
d.Place a process or spore test indicator one glove. Wrap gloves in muslin or other packaging
material.(RefertoTable2-2.)
e. Place wrapped packs of gloves on end in a perforated tray. Leave space between packs to allow
steam to circulate.
f. Load trays onto rack in the sterilizer. Leave adequate space between trays for steam circulation.
Ensure that packs do not touch sides of chamber.
CAUTION:Donot overload.Do notseal container.Inadequate sterilization mayresult.
g. Place pack containing sterilization monitor in the front bottom of the sterilizer.
h. Refer to Section 3 for operating instructions.
IV. LIQUIDS PREPARATION
A.Place liquids in a heat proof glass container, filled 2/3 full.
B.Cover container loosely using a paper or metal cap.Do not seal container.
C.Place container on a perforated tray. Include a process or spore test indicator.Load onto the rack in the
sterilizer.(Refer to Section 3 for operating instructions.)

14
Table 2-2WRAPPING MATERIALS FOR STEAM STERILIZATION
SUITABLE UNSUITABLE
Muslin2 (layers) Canvas
Nylonbaggingmaterial Aluminumfoil
Kraftpaper Steamimpermeable plastics
Commercial autoclavepaper (must Sealed tubes, jars and cannisters
beas permeable asmuslin) Drumsnotrecommended
Plastic and paper bags
(mustbepermeable)
SECTION 2
PREPARATIONS FOR STERILIZATION
Table 2-3 RECOMMENDED PERIODS OF EXPOSURE
KPa 103 138 172
Material to be Sterilized PSI 15 20 25
VS. F° 250 260 267
Time in Minutes C° 121 127 131
Fabrics- Looselywoven- 30 20 -
Wrappedinmuslin
Fabrics- Tightlywoven 40 30 -
Instruments- In tray - Muslin cover 15 10 3
Instruments- Individuallywrapped 30 15 10
in muslin
Syringes and Needles 15 10 7
Drums - Loosely woven contents 30 20 -
Drums -Tightly woven contents 40 30 -
Utensils - Loosely woven contents 30 20 10
Rubber - In muslin packs 15 - -
Gloves
Rubber In muslin packs 15 - -
Covers-
Brushesand Miscellaneous Articles
Wrapped- 15 -
Solutions 1000 cc flasks 30 25 -

15
SECTION 3
OPERATIONS
WARNING: Do not attempt to bypass any of the safety interlock systems described below. Failure to do
so could result in personal injury.
I.GENERAL
A. Whenthe Function control is in thePower Off position, all electricalpower is offand the doorcannot be
operated. Anadditional safety interlock isincluded to preventthe door from beingopened when thereis
an unsafe level of pressure in the chamber. Another interlock prevents the main heaters from becoming
energized to generate steam unless the door is fully locked. The Open Door light will illuminate when it
issafe to opentheautoclave door. When the Function controlis in the Fill position,waterflowsfromthe
reservoir into the chamber. When the water level indicator in the chamber is covered, the Function
controlshouldbeturned to Sterilize to stop the flow ofwater. Togeneratesteam, the door must beclosed
and locked. The Time control should be set at the beginning of the sterilizing cycle. Timing will begin
when the preset temperature has been reached, and will continue until theTime control returns to“0.”
B. Whenthesterilizing procedure iscomplete,theSterilelight will illuminate andthechimewillsound.When
the buzzer sounds, turn the Function control toVent to cut off the Sterile light and the buzzer. Steam
andunusedwaterwillthenbe returned to thereservoirfromthechamberandpressureinsidethechamber
willbe reduced tonearzero. Whenthe chamber pressurereaches a safe level,the Open Door light will
becomeilluminated.
WARNING: Never attempt to open door unless open door light is illuminated and pressure gauge
indicates“0.’
To aid in absorbing moisture, the door can now be slightly opened. The chamber heaters will remain
energized. Leave materials inside the chamber until dry. Drying time is determined by the size of the
material and manner in which it was packed. Drying times have not been established due to varying
conditions. WhentheFunction controlisleft in the Vent position,theMagna-Clavewillremain in a warm,
standbycondition.
II. OPERATING PROCEDURES FOR NORMAL STERILIZATION
WARNING: Burns and bodily injury can occur if a sterilizing cycle is interrupted or“aborted”in the follow-
ing manner:
"Autoclave has been in Sterilize mode for five minutes or more
after a cold start.
"Function control is then turned to Vent and Open Door light is
illuminated. If this situation develops, DO NOT open door even
though Open Door light is illuminated. Wait ten minutes before
attempting to open door.
A.Unlock door
Turn Function control to Vent or Fill. Depress and hold Open Door
buttononfrontofMagna-Claveandliftdoorlockinghandleonright side
of unit.
B. Fill
Turn Function control to Fill. When water in chamber covers water
level indicator, rotate Function control to Sterilize.
Note:Ensure wa-
ter level indicator is completely submerged in water.
C.Load
Load chamber. Refer to Section 2-III.
WATER LEVEL
INDICATOR
FUNCTION
CONTROL
TIME
CONTROL

16
SECTION 3
OPERATIONS
D. Lock Door
Closedoor and push down the door lockinghandle on the right sideof the Magna-Clave.
E. SetTime Control
RotateTime controlclockwisetodesiredsterilizing time. The Timecontrolwillstartwhen the preset tempera-
tureis reached.
NOTE:IfTime control is not set at the beginning of the sterilizing cycle, the buzzer will sound and the Sterile
light will illuminate as soon as the preset temperature is reached.
F. SetTemperature
Turn Temperature control to the desired temperature. When a more pre-
cise setting is desired, turn Temperature control fully clockwise. When
temperaturegauge reachesdesiredtemperature,rotateTemperature con-
trol slowly counterclockwise until the Heat-On light goes off. Once the
control is set, it is not necessary to move it unless a change in sterilizing
temperatureisdesired.
CAUTION:Unit should be periodically monitored during sterilization
to ensure temperature gauge is climbing until the preset temperature
isobtained.Oncethetemperature gauge reaches approximately 220°
F, the pressure gauge should start climbing. If pressure fails to in-
crease within 30 minutes, turn function control to vent and recheck
waterlevel.Ensure water is to the waterindicator.Thepressure rising
may vary due to line voltage or unit load.
Monitor unit according to the time indicated below:
(Rising pressure may vary due to line voltage or unit load.)
15 Minutes: Unit should be monitored to determine the unit is heating by
observingtemperaturegauge.
30 Minutes: Bothtemperature and pressuregauges should be obtaining
temperatureandpressure.Unitshouldread preset temperature and corre-
spondingpressure.
NOTE:If unit is not building pressure but temperature is climbing, turn unit off.Turn Function control to vent
and check water level.
G. Vent
After the buzzer sounds and Sterile light illuminates, turn the Function control to Vent.
H. UnlockDoor
After ensuring that the Open Door light is illuminated and that the pressure gauge indicates “0,“ lift door
lockinghandle while depressing Open Door button onfrontof Magna-Clave.
I. Drying: After unlocking door, allow door to stand partially open with Function control still in the Vent
position.
TEMPERATURE
GAUGE
INDICATOR
LIGHTS
PRESSURE
GAUGE
TEMPERATURE
CONTROL
DOOR
HANDLE
TIME
CONTROL
FUNCTION
CONTROL

17
III. OPERATING PROCEDURES FOR LIQUID STERILIZATION
WARNING: Burns and bodily injury can occur if a sterilizing cycle is interrupted or“aborted”in the follow-
ing manner:
"Autoclave has been in Sterilize mode for five minutes or more after a cold start.
"Function control is then turned toVent and Open Door light is illuminated.If this situation develops,
DO NOT open door even though Open Door light is illuminated.Wait ten minutes before attempting to
open door.
NOTE:Use only Pyrex®or stainless steel containers for liquids sterilization. Containers should only be cov-
eredwith paper caps.
A. Preparation and Sterilization
1. To sterilize liquids, follow the procedures A-F, Section 3-II“Operating Procedures For Normal Steriliza-
tion.”
B. Vent
1. After the buzzer sounds and Sterile light illuminates, turn the Function control quickly past the Vent
position to Off position.
C. Cool Down
1. Allowautoclave to cool down untilpressure gauge indicates“0” (approximately 25minutes).
D. Unlock Door
1. After ensuring Open Door light is illuminated and pressure gauge indicates “0,” lift door locking handle
whiledepressingOpen Door buttonon front ofMagna-Clave.
E. Drying
1. After unlocking door, allow door to stand partially open with Function control still in the Vent position.
IV. OPERATING GUIDELINES
A. The Magna-Clave may be preheated by turning the Function control to Vent 30minutesbefore the
autoclave is needed. This will allow for a faster desired sterilizing temperature.
B. Water should onlybe added to thereservoirwhen theFunction
control is in theVent or Power Off position. Demineralized or
distilled water must always be used to prevent corrosion.
The minimum water level should always reach the level
indicating mark on the back of reservoir.
C. Do not attempt to turn the Function control from Sterilize to
Fill or from Vent to Sterilize. There are mechanical stops
which prevent the Function control from being turned in this
manner.
D. Improper sterilization may result if chamber is overloaded or
toocrowded.
E. TheTime control must be set at the beginning of each cycle
to the desired sterilizing time. If the Time control is not
properly set, the buzzer or chime will sound and the Sterile
light will illuminate. This indicates the end of the sterilizing
cycle, and will not allow completion of the cycle.
NOTE: Do not set the Time control for an interval of less
than five minutes.
SECTION 3
OPERATIONS
TEMPERATURE
GAUGE
INDICATOR
LIGHTS
PRESSURE
GAUGE
TEMPERATURE
CONTROL
DOOR
HANDLE
TIME
CONTROL
FUNCTION
CONTROL

18
1. PREVENTIVE MAINTENANCE SCHEDULE
CHECK FREQUENCY PROCEDURE ACTION
Cleanandinspect Weekly 12oz..Omni-Cleaner See Sections 4-Il and
chamber to I gallon distilled water 4-IV.Call authorized
on 20 minute cycle. servicerepresentative
cracks or fissures are
found.Donotoperate
unit.
Safety valve ring Every 3 months Removecasing plate (located If valve does not
WARNING:When ontop rear ofunit). Manually open, turnoff POWER
ring is pulled on pullring while chamberisun- and call for service
safetyvalvewith derpressure. representative.
unit under pressure
steam is discharged
fromthe chamber
at a high tempera-
ture. Keep clear of
steamdischarge
path to avoid burns.
Use of a hot pad or
instrument to pull
ring is suggested.
Doorgasket Weekly Inspect and clean using Call authorizedservice
Omni-Cleanerormild representativeforre-
detergentanddistilledwater. placement gaskets.
Check for leaks (have
leakinggasketreplaced).
Chamberfill filter Weekly Inspect and clean. See Section 4-Il.
Doorinterlock Weekly Inspect. See Section 4-II. Callauthorizedservice
representativeforim-
properclosureor signs
ofwear.
Boilerring Weekly Inspect and clean using
nonchlorinatedpadwhich
contains no metal.
SECTION 3
CARE AND MAINTENANCE

19
II. CLEANING
It is highly recommended that the autoclave be cleaned a minimum of once a week with Omni-Cleaner (Part No.
WZI-091295)anddistilledordemineralizedwater.TheOmni-Cleanerisamildlyalkalineconcentrateusedtoclean
anddescaleautoclaves. Minerals,especially chlorides,arecorrosivetostainlesssteel. Therefore,tapwaterwith
ahighmineralcontentshouldnotbeused. Whensterilizingsalinesolutions,it isimperative that theautoclavebe
cleanedafter each use. Withproper cleaning, the autoclavewillprovidehigherperformanceand longer life.
A. CleaningProcedures
1. Mix12 ounces ofOmni-Cleaner in one gallon ofdistilled, demineralizedwater.
2. Drain waterfrom reservoir. Refill reservoir with a solutionofOmni-Cleaner and water.(Thereservoirwill
not be full.However, the level will be adequate.)
3. Runone- 20 minute sterilizingcycle to remove allgrease and grimefromthe system. If the autoclaveis
extremely dirty, it may require a second cleaning. Do not sterilize instruments while cleaning the auto-
clave.
4. Draincleaningsolutionfromreservoirandchamber. Rinsethoroughlywithclean,mineral-freewater,and
run a rinse cycle for fifteen minutes.
5.
Drain rinse solution and wipe inside of boiler thoroughly. If scale or lime deposits remain on inside of
chamber, ensure that autoclave is cool. Then clean with water, plastic or nylon scouring pads and a
nonchlorinateddetergent.
NOTE:Detergents containing chlorine are corrosive to stainless steel and should not be used. Do not
use ordinary steel wool or steel brushes on stainless steel. Pads containing metal may damage cham-
ber.
6. Refill reservoir with clean, mineral-free water. The Magna-Clave is now ready for use.
B. DrainingReservoir
1. Thereservoir drain hose islocated inside the right-handdoor of stand, nearthe top. For Magna-Claves
which do not have a stand, the hose will be located under the front edge and to the left of the unit. The
drain hose may be drained by removing it from its clip and unscrewing the tip end. The hose should be
drainedinto a 10quart capacity container. Whenthereservoiris completely drained, replace tipandclip
drain hose in place.
C. Cleaning Fill Filter
1. Pull out fill tube and filter assembly from inside of chamber and clean filter with a stiff brush and
nonchlorinateddetergent.
2. Replace fill tube and filter assembly. Make sure filter is flat against bottom of chamber. If the filter does
notlie flat against bottomofchamber,an excessiveamountofwaterwill remain in thechamberafter the
sterilizingcycles. Failure tocleanthis filter regularlywill result in excessive time to fillandventchamber.
C. Cleaning Fill Filter
1. Clean all exterior surfaces with mild detergent and water using a sponge or cloth.
2. Exterior surfacesmay be disinfected using aniodophor (Biocide, Biotrol, Inc., N.SaltLakeCity, Utah, or
equivalent),glutaraldehyde(Cidex,Surgicos,Dallas,Texas,orequivalent)orsodiumhypochlorite(house-
holdbleachdiluted1:10-1:100. Be sure tofollowmanufacturer’s instructionsformixing anduse. Other-
wise, unsatisfactory results and/or damage may occur. Do not use household bleach on interior stain-
less steel surface.
SECTION 3
CARE AND MAINTENANCE

20
SECTION 3
CARE AND MAINTENANCE
III. STERILIZATION ASSURANCE
A. Clinical Record Keeping
Validate daily and weekly records to assure and substantiate sterilization procedures.
B. Techniques for sterilization assurance:
1. Use dated color change indicator closure tapes (3M, St.Paul, @;Propper, Long Island City, NY) on all
packs, or use bags with process indicators.
2. Use internal process indicator strips inside all sterilizer loads to verify gross heat penetration.
3. Use a biological spore test indicator (Attest®Biological Monitoring System, 3M, St. Paul, MN;
Propper, Long Island City, NY,) inside a representative sterilizer load weekly.
4. Follow manufacturer’s instructions for using all test materials and maintaining good clinical records.
Contact dealer to obtain biological test indicators that meet AAMI standards.
5. FollowPreventive Maintenance schedule (Section4-I,) to ensure properoperation of theautoclave.
IV. OPTIONAL ACCESSORIES
A. Trays
A basket tray and shallow flat tray are standard equipment. A bedpan tray is available as an option.
B. Temperature Recorder
A recording thermometerwhich provides a permanent recordof thesteam temperature may be factoryor
field installed.The steam temperature is recorded on a circular chart for a 24 hour period.
V. INSPECTIONS
A. General
1. The Magna-Clave is a pressure vessel that falls under various state and/or local laws which differ in
inspection requirements. Some laws require complete periodic inspection of a pressure vessel. The
inspectionperiodvariesaccordingto individual laws. Thisinspectionisusually performed by a qualified
inspector commissioned by the National Board of Boilers and PressureVessels. Insurance companies
may also require a similar type of inspection. The governmental agency in yourarea and/or your insur-
ancecompany will determine theinspectionrequirements for your Magna-Clave.
2. For additional information concerning the Magna-Clave, contact Pelton & Crane, A DCI Company P.0.
Box 241147, Charlotte NC, 28224 or your full service dealer. When ordering service or parts, always
include the serial number of your unit.
B. Inspecting the Chamber
1. Inside Chamber Inspection
Make a thorough inspection inside the chamber every six months. If cracks or fissures are found, call
a qualified service technician. Do not operate a unit with cracks in the chamber.
WARNING: Do not perform the following test with any pressure in the chamber.
C. Door Interlock Check
1. With the unit cold, open door and push down on door locking handle.
2. Rotate Function control counterclockwise to Sterilize.
3. DepressandholdOpen Door buttonandpullupondoorlockinghandleasiftoopen door. Do not force
door handle. Use no more force than it takes to open the door normally.
4. If door locking handle can be pulled all the way up and the clamp ring expanded, turn the Function
controltoPower Offand call a qualified servicetechnician immediately. Never operate a Magna-Clave
in this condition.
5. If door locking ring cannot be opened, rotate the Function control to Vent, depress Open Door button,
lift door locking handle up, and open door locking ring. The Magna-Clave is now ready for use again.
Table of contents
Other Pelton & Crane Laboratory Equipment manuals