Certa CTPSWAVINVA User manual
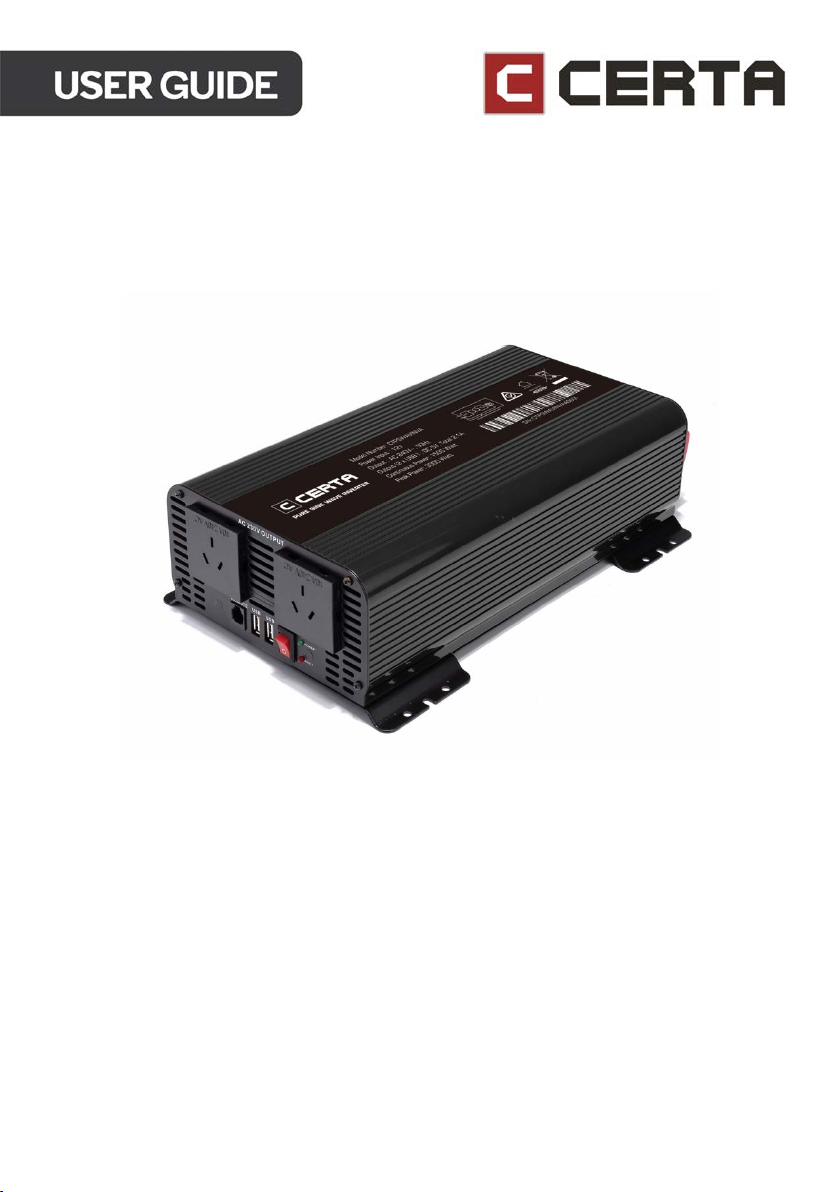
3000W PURE SINE WAVE
POWER INVERTER
(12V TO 240V)
CTPSWAVINVA


Before first use, read all safety warnings and instructions in this user guide. Retain this user
guide for future reference.
It is high recommended to have this product installed by a licenced electrician or auto-
electrician.
• Keep out of reach of children.
• Use the inverter in a dry, dust-free location. Ensure proper ventilation by not covering or
blocking ventilation openings. Install the inverter in a compartment with enough
clearance.
• The wiring used with the inverter must be correctly sized and in good condition to avoid
the risk of electric shock and fire.
• Avoid installing the inverter in compartments that contain batteries or flammable
materials or atmospheres as the components of the inverter can produce arcs or
sparks.
• This inverter incorporates standard AC short circuit protection. It is recommended to
use additional over-current circuit breaker protection or fusing. Consult a qualified
electrician if needed.
• When working on the inverter, remove metal objects, use insulated tools, wear rubber
gloves and rubber-soled shoes.
• If this product shows any signs of damage, cease use immediately and contact
help.Kogan.com for support.
• Do not operate the inverter near water, with wet hands or in areas with high humidity.
• This product does not contain user serviceable parts, do not attempt to open, modify or
disassemble.
• Check the DC input connections to ensure they are secure and correctly oriented to
positive and negative.
• Avoid dropping any metal tool on the battery posts as it can cause a violent short
circuit that can result in sparks, fire, explosion causing severe injuries.
• Install the inverter in a well-ventilated area and avoid blocking the front or rear air vents.
• Ensure the inverter receives adequate DC input power by using appropriately sized
cable.
• Mount the inverter horizontally if possible to prevent debris from falling in ventilation
holes.
• Do not operate the inverter near combustible gas, explosives or fire.
• Do not connect appliances that may feed power back into the inverter.
SAFETY & WARNINGS
• Operating the inverter outside the temperature range of -15C to 35C will reduce the
output efficiency.
• To extend the lifespan of the inverter, it is recommended to keep the load usage under
85% of the rated output level.
• The temperature of the inverter will be high after operating for a long time; do not touch
it due to risk of burns.
• To avoid electric shock, do not place metal objects into the inverter.
• Do not touch the metal of the socket while inserting the plug into the socket.
Disposal
This marking indicates that this appliance should not be disposed with other
house-hold wastes. To prevent possible harm to the environment or human
health from uncontrolled waste disposal, recycle it responsibly to promote
the sustainable reuse of material resources.

OVERVIEW
AC socket
AC socket
Remote
port
USB
ports
Power
switch
Fault indicator
(RED)
Power
indicator
(GREEN)
DC input “+”
terminal
DC input “-”
terminal
Fan
Ground

Choosing a Location
When choosing a location for the power inverter, keep in mind the following
recommendations:
• Make sure it has enough ventilation. Ideally, there should be at least 50cm of clear
space behind the exhaust vents to allow proper heat dissipation. Overheating can
reduce the inverter's output capacity.
• Protect it from dust, debris, water, and moisture.
• Do not install it in the same enclosure as the batteries.
INSTALLATION
WARNING: Ensure all DC connections are tight. Loose connections
can cause overheating and pose a hazard. Only use high-quality
copper wire and keep the cable in a suitable length.
≥50cm
<50cm

Connecting the Inverter
1. Mount the inverter using 4mm screws appropriate for the surface the inverter will
be on. Orient the inverter so that objects cannot fall into the ventilation holes.
2. Ensure the inverter power switch is in the OFF position.
3. Using the table below as a reference, select the correct cable size, then measure,
cut and terminate the required cable length. Note: If in doubt use a larger size.
Ouput (Max
AC Watts)
Ouput (Continous AC
Watts)
Load (Max Cont. DC
Amps)
Cable Gauge
Nominal Area
600
300
25
8 B&S
10mm2
1200
600
50
6 B&S
15mm2
2000
1000
83
4 B&S
20mm2
3000
1500
125
3 B&S
25mm2
4000
2000
166
2 B&S
35mm2
6000
3000
250
1 B&S
50mm2
4. Connect the positive (+) cable to the RED DC input positive (+) terminal located on
the rear of the inverter.
5. Connect the negative (-) cable to the BLACK DC input negative (-) terminal on the
rear of the inverter.
6. Ensure connections are secure.
7. Connect the positive (+) and negative (-) cables to the corresponding terminals on
the battery. Ensure all connections are secure.
8. Ensure that all cables are connected to the correct polarity.
9. Ensure all devices and appliances are disconnected from the inverter. Turn on the
inverter to confirm its functionality.
10. If the GREEN power indicator is on the inverter is functioning correctly and ready
for devices to be connected.
11. If the RED fault indicator is on, do not connect any devices to the inverter and refer
to the “Troubleshooting” section of this guide.

1. Ensure the inverter is switched OFF before connecting any devices.
2. Ensure that the devices to be powered by the inverter are in a safe and functional
condition.
3. Check the electrical requirements of the devices by examining the compliance
plate or sticker. If unsure, contact the manufacturer for guidance. It's important to
note that the inverter must be able to produce the required amount of continuous
power. For example, if the appliance needs 650 watts, a 1000W inverter would be
necessary.
4. Connect the appliance to the inverter. If there are multiple devices, start by
connecting the one with the largest electrical load.
5. Turn on the inverter.
6. Once it's operating normally, turn on the next device, and continue in this way for
the remaining devices.
• Check that the fan vents are unobstructed to ensure proper airflow within the inverter.
• Use a vacuum cleaner to remove any dust or debris from the fan area to maintain the
efficiency of the fan.
• When cleaning the case or front panel, use a soft and dry cloth. If the case or front
panel is very dirty, clean it with a neutral and non-abrasive detergent. Do not use
alcohol or ammonia-based solutions.
• Avoid introducing any liquid or metal objects into the inverter to prevent damage to the
unit.
• Confirm that the screws on the DC input terminal are secure and verify that the inverter
power indicator is functioning correctly.
CLEANING & CARE
OPERATION

Power
indicator
(GREEN)
Fault
indicator
(RED)
Alarm
AC
output
Problem
Solution
ON
OFF
Continuous
Yes
Low input
voltage alarm
Cease use, recharge the battery
or replace with a charged
battery.
ON
ON
Beeping
No
Low input
voltage shut
down.
Cease use, recharge the battery
or replace with a charged
battery.
ON
ON
Beeping
No
High voltage
input shut down
Cease use, check that the
battery is not damage. Replace
with the correct voltage battery.
ON
ON
Beeping
No
Output overload
shut down
The connected devices are
drawing too much power or
there are too many connected
devices. Reduce the output, turn
off the inverter, wait 4-6 minutes
before restarting.
ON
ON
Beeping
No
High temp shut
down
Cease use, turn off the inverter
and wait for it to cool down
before restarting.
ON
ON
Beeping
No
Output short
circuit
Cease use and turn off the
inverter. Inspect all connections,
cables and devices for signs of
damage. Restart the inverter.
TROUBLESHOOTING
Input
Input voltage
DC 13V
Operating voltage range
DC 11-15V
Output
No-load output voltage
AC 230V +/- 10V
Load output voltage
AC 215V~240V
Output frequency
50 ± 3Hz
USB output (total max)
DC 5V MAX 2100mA
Continuous power
1500W
Peak power
3000W
Output wave
Pure sine wave
Efficiency
≥85%
12V Input no load
current draw
≤1.3A
Low voltage
Input low voltage alarm
DC 10.5V +/- 0.3V
Input low voltage shutdown
DC 9.5V +/- 0.3V
Low-voltage recovery
voltage
When the input voltage rises to
12V +/- 0.3V, the inverter will
automatically resume operation.
Over voltage
Input over voltage shutdown
DC 16V +/- 0.3V
Over-voltage recovery
voltage
When the input voltage drops to
14V +/- 0.3V, the inverter will
automatically resume operation.
SPECIFICATIONS

Over-load
Over-load shutdown
Yes (1550-1800W)
Over-load recovery
Reduce the load in the rated
power range.
Restart inverter recovery work. Or
Wait 6 - 7 minutes for the inverter
to recover automatically.
Over temp
Over-temperature protection
Yes
Over- temperature recovery
When the temperature inside the
inverter decreases to the set point,
the inverter will recover
automatically.
Short circuit
Output short circuit
protection
Yes
Short circuit recovery
After troubleshooting, restart the
inverter by manual to resume
work.
Reverse protection
Reverse connection will blow the fuse, fuse replacement with the
same specifications can fix the inverter.
Operating temperature
5 - 35°C
Fuse
40A x4
Cooling method
Fan
Remote control
(Optional)
RJ12 port, 6m cable

Need more information?
We hope that this user guide has given you
the assistance needed for a simple set-up.
For the most up-to-date guide for your product,
as well as any additional assistance you may require,
head online to help.kogan.com
Table of contents
Other Certa Inverter manuals


Popular Inverter manuals by other brands


Coleman
Coleman CM04143N Operator's manual

Hitachi
Hitachi UTOPIA RASC Series Installation and operation manual

Atlas Copco
Atlas Copco QAX 12 Dd S2 APP instruction manual

Ginlong
Ginlong Solis-100K-5G Installation and operation manual

Shindaiwa
Shindaiwa DGK11F Service manual

YOLK
YOLK Solar Paper quick start guide


