manuals.online logo
Brands
  1. Home
  2. •
  3. Brands
  4. •
  5. Chamberlain
  6. •
  7. Lighting Equipment
  8. •
  9. Chamberlain MyQ deltadoors 827EV User manual

Chamberlain MyQ deltadoors 827EV User manual

MyQ Remote LED Light
MyQ-Remote LED-Leuchte
Le voyant à LED de la télécommande MyQ
MyQ Remote LED Light
Fjernstyrt LED-lampe for MyQ
Fjärrstyrda MyQ-lampan
Zdalnego oświetlenia LED MyQ
Světla LED dálkového ovládání MyQ
LED lučke MyQ remote
La luce a LED remota MyQ
La luz LED remota MyQ
MyQ Remote LED világítást
MyQ kauko-ohjattavan LED-valon
LED diódy diaľkového ovládania MyQ
Установка светильника MyQ
LED lampe za MyQ daljinski upravljač
Lămpii cu led MyQ controlată de la distanță
LED-ljósi MyQ-fjarstýringar
Note:
The original installation and operating instructions were compiled in English.
Any other available language is a translation of the original English version.
Model 827EV
en
cs
de
sl
fr
it
nl
es
da
hu
no

hr
sv
sk
ro
pl
rus
is
2
15.6 cm
1 2
CAUTION
DO NOT open, risk of electric shock.
Designed for dry areas only
ACHTUNG
NICHT ö󰀨nen, Stromschlaggefahr.
Nur für trockene Bereiche geeignet
ATTENTION
NE PAS OUVRIR, risqué d’électrisation.
Uniquement pour les zones sèches
OPGEPAST
NIET openen, risico op elektrische schok.
Alleen geschikt voor droge ruimtes
FORSIGTIG
Åbn IKKE, risiko for elektrisk stød.
Kun egnet til tørre områder
FORSIKTIG
MÅ IKKE åpnes. Fare for elektrisk støt.
Kun egnet for tørre områder
VARNING
Öppna INTE på grund av risken för elstötar.
Endast lämplig för torra områden
OSTROŻNIE
NIE otwierać, ryzyko porażenia prądem
elektrycznym.
Nadaje się tylko do obszarów suchych
ОСТОРОЖНО
НЕ открывать, риск поражения
электрическим током.
Только для сухих помещений
OPREZ
NEMOJTE otvarati, postoji rizik od strujnog
udara.
Pogodno samo za suhe dijelove
ATENŢIE
NU deschideți, pericol de electrocutare.
Doar potrivit pentru zonele uscate
VIÐVÖRUN
EKKI opna, hætta á raosti.
Aðeins hentugur fyrir þurra svæði
POZOR
NEOTVÍREJTE, nebezpečí úrazu elek-
trickým proudem.
Pouze pro suché prostory
PREVIDNOST
NE odpirajte, nevarnost električnega šoka.
Primerno le za suhe površine
ATTENZIONE
NON aprire, rischio di scossa elettrica.
Adatto solo per ambienti asciutti
CUIDADO
NO abrir, riesgo de descarga eléctrica.
Solo apto para zonas secas
FIGYELEM
NE nyissa ki – áramütésveszély.
Csak száraz területekre alkalmas
VARO
ÄLÄ avaa, sähköiskun vaara.
Sopii vain kuiville alueille
POZOR
NEOTVÁRAJTE, vzniká riziko zasiahnutia
elektrickým prúdom.
Vhodné pre suché miesta
3
LEARN Button (L)
Input Voltage: 220-240 VAC, 50 Hz
Power: 19 W
Current: 0.16A, 0.5 Pf
Light: LED, 1500 lm, 4000 k
Temperature: - 40 / +55°C
Dimensions: 21,59 x 21,59 x 6,35 cm
3
en de
The external cord of this luminaire cannot be replaced, if cord is
damaged the luminaire shall be replaced. The light source contained in this luminaire shall
only be replaced by the manufacturer or his service agent or a similar qualied person.
Das externe Kabel dieser Leuchte kann nicht ausgetauscht werden.
Ist das Kabel beschädigt, ist die Leuchte auszutauschen. Die Lichtquelle in dieser Leuchte
darf nur vom Hersteller oder seinem Kundendienst oder einer Person mit vergleichbarer
Qualikation ausgetauscht werden.
The MyQ Remote LED Light is designed to plug directly into a standard 230V outlet.
Select an appropriate location on the ceiling or wall to mount the light within 1.83 m of an
electrical outlet so that the cord and light are away from moving parts. MyQ Remote LED
Light installation is required to enable MyQ and Timer-to-Close (TTC) operation.
NOTE: If installing light on drywall and a ceiling joist cannot be located, use drywall
anchors provided. No pilot hole is required for drywall anchors.
1. Drill pilot holes 15.6 cm apart if mounting to joist.
OR
Screw in drywall anchors 15.6 cm apart if mounting to drywall.
2. Determine the length of power cord needed to reach the nearest outlet. Wind any
excess cord around cord retainer on the top side of the light base. Route the cord
through the channel so the light mounts ush.
3. Open the light lens.
4. Mount the light with the screws provided (11+12).
5. Close the light lens.
6. Plug in the light to the outlet.
NOTE: The LED light is very bright. DO NOT stare at the light while on a ladder.
1. Press the LEARN button (L) on the light until the green LED comes ON.
2. Press the LEARN button (L) on the door opener. OR
press the LEARN button on the door control (78EV) twice.
3. The code has been programmed when the remote light blinks once.
1. Press the LEARN button (L) on the light until the green LED comes ON.
2. Press the button on the remote control that you wish to operate the light.
3. The code has been programmed when the remote light blinks once.
4. Add The LED Light to MyQ Account
1. Press the LEARN button (L) on the light until the green LED comes ON.
2. Login to the MyQ app and add the MyQ Remote LED Light.
5. To Erase All Programming From The LED Light
1. Press and hold the LEARN button (L) until the LED turns off (6-10 seconds). All
programming is now erased.
Die MyQ-Remote-LED-Leuchte wird direkt an eine Standard- 230 V Steckdose an-
geschlossen. Wählen Sie einen geeigneten Ort an der Decke oder der Wand für die
Anbringung der Leuchte in einem Abstand von maximal 1,83 m von einer Steckdose, so
dass Kabel und Leuchte nicht in der Nähe von beweglichen Teilen sind. Die Installa-
tion der MyQ-Remote-LED-Leuchte ist für MyQ und die automatische Schließfunktion
Timer-to-Close (TTC) erforderlich.
HINWEIS: Wird die Leuchte an einer Trockenwand angebracht und ist kein Deckenbalk-
en zu nden, verwenden Sie die mitgelieferten Anker. Für Trockenwandanker ist keine
Vorbohrung erforderlich.
1. Bei der Montage an einem Balken bringen Sie die Vorbohrungen in einem Abstand von
15,6 cm an.
ODER
Schrauben Sie bei der Anbringung an einer Trockenwand die Trockenwandanker in
einem Abstand von 15,6 cm ein.
2. Ermitteln Sie die bis zur nächsten Steckdose erforderliche Stromkabellänge. Wickeln
Sie das überschüssige Kabel um die Kabelhalterung oben an der Leuchtengrund-
äche. Führen Sie das Kabel durch den Kanal, so dass die Leuchte bündig ist.
3. Öffnen Sie die Leuchtenlinse.
4. Montieren Sie die Leuchte mit den mitgelieferten Schrauben (9+10).
5. Schließen Sie die Leuchtenlinse.
6. Stecken Sie den Stecker der Leuchte in die Steckdose.
HINWEIS: Die LED-Leuchte ist sehr hell. Blicken Sie NICHT in das Licht, wenn Sie auf
der Leiter stehen.
1. Drücken Sie die Lerntaste (L) an der Leuchte, bis sich die grüne LED einschaltet.
2. Drücken Sie die Lerntasten (L) am Torantrieb oder
drücken Sie zwei Mal die LERN-Taste an der Torsteuerung (78EV).
3. Der Code wurde programmiert, wenn die Remote-Leuchte einmal blinkt.
11
Install MyQ Remote LED Light
Installation MyQ-Remote-LED-Leuchte
2
3
3
Programm A Door Opener To The LED Light
Programm A Remote Control To The LED Light
Programmierung eines Handsenders für MyQ-Remote-LED-
Leuchte
2Programmierung eines Torantriebs für MyQ-Remote-LED-
Leuchte
1. Drücken Sie die Lerntaste (L) an der Leuchte, bis sich die grüne LED einschaltet.
2. Drücken Sie die Handsender-Taste, mit der Sie die Leuchte bedienen möchten.
3. Der Code wurde programmiert, wenn die Remote-Leuchte einmal blinkt.
4. Hinzufügen der MyQ-Remote-LED-Leuchte zum MyQ-Konto
1. Drücken Sie die Lerntaste (L) an der Leuchte, bis sich die grüne LED einschaltet.
2. Loggen Sie sich in die MyQ-App ein und fügen Sie die MyQ-Remote-LED-Leuchte
hinzu.
5. Löschen der Porgrammierung der MyQ-Remote-LED-Leuchte
1. Halten Sie die Lerntaste (L) gedrückt, bis sich die LED ausschaltet (6-10 Sekunden).
Nun ist die gesamte Programmierung gelöscht.
6. Wartung und Pflege
• Ziehen Sie vor der Reinigung den Stecker der Leuchte aus der Steckdose.
• Verwenden Sie zur Reinigung einen angefeuchteten Lappen.
• Verwenden Sie für die Leuchtenlinse KEINE Flüssigreiniger.
6. Maintenance
• Unplug the light before cleaning.
• Use a lightly dampened cloth for cleaning.
• DO NOT use liquid cleaners on the light lens.
The product is in compliance with the essential requirements and other relevant provisions
of Directive 2014/35/EU, 2014/53/EU, 2014/30/EU. The CE Declaration of Conformity can
be obtained from [email protected]
Das Produkt entspricht den grundlegenden Anforderungen und den übrigen einschlägigen
Bestimmungen der Richtlinie 2014/35/EU, 2014/53/EU, 2014/30/EU. Die CE-Konformität-
serklärung kann unter [email protected] gefordert werden.
The packaging must be disposed of in the local recyclable containers. According
to the European Directive 2002/96/EC on waste electrical equipment, this device
must be properly disposed of, after usage in order to ensure a recycling of the
materials used.
7. Disposal
7. Entsorgung
Die Verpackung muss in den örtlichen Recycle-behältern entsorgt werden. Ge-
mäß der Europäischen Richtlinie 2002/96/EG über Elektro-Altgeräte muss dieses
Gerät nach Verwendung ordnungsgemäß entsorgt werden um eine Wiederver-
wertung der verwendeten Materialien zu gewährleisten.
4
fr
Le câble d’alimentation externe de ce luminaire ne peut pas être remplacé. Si le câble
d’alimentation est endommagé, le luminaire doit être remplacé. La source lumineuse dans
ce luminaire ne doit être remplacée que par le fabricant ou son agent de maintenance, ou
par une autre personne possédant des qualications équivalentes.
Le voyant à LED de la télécommande MyQ est conçu pour un branchement directement à
une prise électrique standard de 230 V. Sélectionnez un endroit adapté au profond ou sur
le mur, pour monter le voyant à une distance maximale de 1,83 m d’une prise électrique,
de sorte que la corde et le voyant lumineux se trouvent à l’écart des éléments techniques.
L’installation de voyant à LED de ma commande est nécessaire pour permettre le foncti-
onnement avec MyQ et Timer-To-Close (TTC).
REMARQUE : Si le montage sur un mur intérieur ou une solive plafond n’est pas
possible, utilisez les tire-fonds pour cloisons creuses fournis. Aucun trou d’ajustage n’est
nécessaire aux tire-fonds pour cloisons intérieures.
1. Percez des trous de perçage à une distance de 15,6 cm pour le montage sur une
solive.
OU
vissez les tire-fonds pour cloisons intérieures à une distance de 15,6 cm lors du
montage sur une cloison intermédiaire.
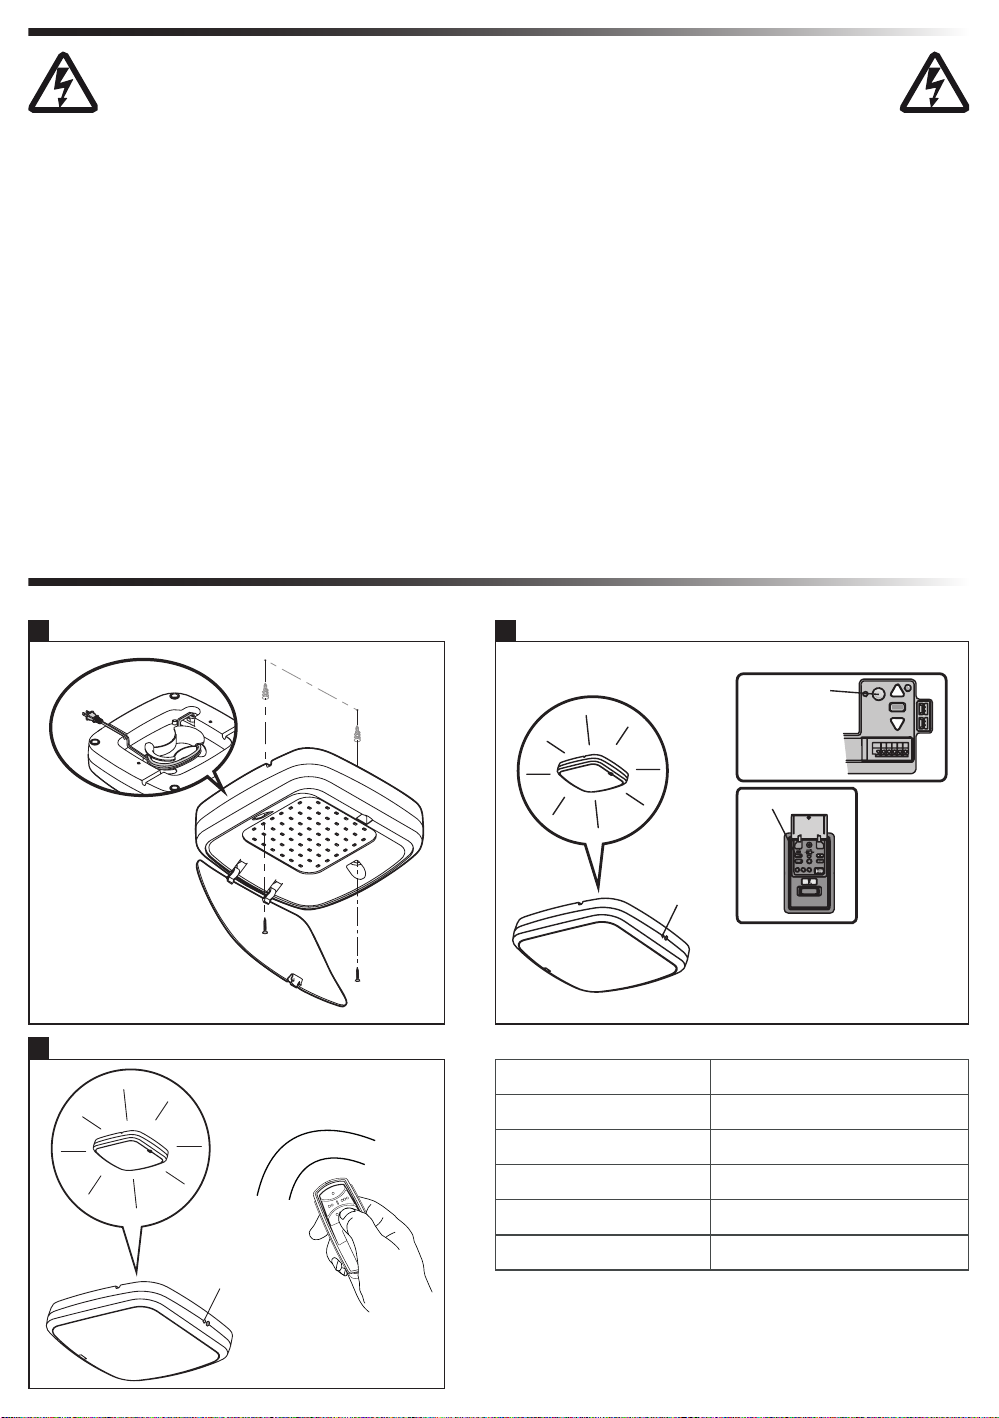
2. Déterminez la longueur du câble d’alimentation nécessaire jusqu’à la prise la plus
proche. Enroulez l’excédent de câble autour de l’enrouleur sur le côté supérieur de
l’embase de l’éclairage. Posez le câble dans le chemin de câble de sorte que les
embases d’éclairage soient afeurant.
3. Ouvrez la lentille de l’éclairage.
4. Montez l’éclairage avec les vis fournies (9+10).
5. Ouvrez la lentille de l’éclairage.
6. Branchez l’éclairage à la prise électrique.
REMARQUE : L’éclairage à LED est très lumineux. Ne regardez pas dans la lumière
lorsque vous êtes sur une échelle.
1. Actionnez le bouton d’APPRENTISSAGE (L) de l’éclairage jusqu’à ce que la LED verte
s’ALLUME.
2. Actionnez le bouton d’APPRENTISSAGE (L) sur le système d’ouverture de porte ou
appuyez deux fois sur le bouton APPRENTISSAGE de la commande de porte (78EV).
3. Le code a été programmé lorsque le voyant de la télécommande clignote une fois.
1. Actionnez le bouton d’APPRENTISSAGE (L) de l’éclairage jusqu’à ce que la LED verte
s’ALLUME.
2. Actionnez le bouton de la télécommande qui doit commander l’éclairage.
3. Le code a été programmé lorsque le voyant de la télécommande clignote une fois.
4. Ajout de l'éclairage led déporté MyQ à mon compte MyQ
1. Actionnez le bouton d’APPRENTISSAGE (L) de l’éclairage jusqu’à ce que la LED verte
s’ALLUME.
2. Connectez-vous à l’application MyQ et ajouter l’éclairage LED déporté MyQ.
5. Suppression de toute la programmation de l'éclairage LED
déporté MyQ
1. Press and hold the LEARN button (L) until the LED turns off (6-10 seconds). All
programming is now erased.
6. Nettoyage et maintenance
• Débranchez l’éclairage avant de le nettoyer.
• Utilisez un chiffon légèrement humide pour le nettoyage.
• N’utilisez PAS de détergents liquides sur la lentille de l’éclairage.
1Installer le voyant à LED de la télécommande MyQ
2
3
Programmation de l’éclairage LED déporté MyQ
Programmation d’une télécommande pour l'éclairage led
déporté MyQ
nl
Het externe stroomsnoer van deze armatuur kan niet worden vervangen. Als het snoer
beschadigd is, moet de armatuur worden vervangen. De lichtbron in deze armatuur
mag enkel worden vervangen door de fabrikant of zijn serviceagent of een persoon met
vergelijkbare kwalicatie.
De MyQ Remote LED Light is ontworpen om rechtstreeks in een standaard 230V stop-
contact te steken. Selecteer een geschikte locatie op het plafond of de muur om het licht
binnen 1,83 m van een stopcontact te monteren, zodat het snoer en het licht uit de buurt
van bewegende onderdelen zijn. MyQ Remote LED Light moet worden geïnstalleerd om
MyQ en Timer-to-Close (TTC) te kunnen gebruiken.
OPMERKINGEN: Als u het licht op een droge muur installeert en er geen plafondbalk te
vinden is, gebruikt u de meegeleverde muurankers. Voor muurankers is er geen pilootgat
vereist.
1. Boor pilootgaten op een afstand van 15,6 cm als u op een balk monteert.
OF schroef in muurankers op een afstand van 15,6 cm als u op een droge muur
monteert.
2. Bepaal de vereiste lengte van het stroomsnoer om het dichtstbijzijnde stopcontact te
bereiken. Draai eventueel overtollig snoer rond de snoerhouder aan de bovenkant van
de voet van het licht. Breng het snoer door het kanaal , zodat het licht vlak kan worden
gemonteerd.
3. Open de lichtlens.
4. Monteer het licht met de meegeleverde schroeven (11+12).
5. Sluit de lichtlens.
6. Steek het licht in het stopcontact.
OPMERKINGEN: Het LED-lampje is heel helder. Staar NIET in het licht terwijl u op een
ladder staat.
1. Druk op de knop LEREN (L) op het licht tot de groene LED AAN gaat.
2. Druk op de knop LEREN (L) op de poortopener of
druk twee keer op de knop LEREN op de poortbediening (78EV).
3. De code is geprogrammeerd wanneer het licht van de afstandsbediening één keer
knippert.
1MyQ Remote LED Licht installeren
3Een afstandsbediening in het MyQ remote LED-Licht
programmeren
2Een poortopener in het MyQ remote LED-Licht programmeren
1. Druk op de knop LEREN (L) op het licht tot de groene LED AAN gaat.
2. Druk op de afstandsbediening op de knop waarmee u het licht wilt bedienen.
3. De code is geprogrammeerd wanneer het licht van de afstandsbediening één keer
knippert.
4. Het MyQ remote LED-Licht aan MyQ account toevoegen
1. Druk op de knop LEREN (L) op het licht tot de groene LED AAN gaat.
2. Meld u aan bij de MyQ app en voeg het MyQ Remote LED-licht: toe.
5. Alle programmeringen uit het MyQ remote LED-Licht wissen
1. Houd de knop LEREN (L) ingedrukt tot de LED wordt uitgeschakeld (6-10 seconden).
Alle programmeringen zijn nu gewist.
6. Reiniging en onderhoud
• Koppel het licht af voordat u het reinigt.
• Gebruik een licht bevochtigde doek om te reinigen.
• Gebruik GEEN vloeibare reinigingsmiddelen op de lens van het licht.
Le produit correspond aux exigences fondamentales et aux autres dispositions applica-
bles de la directive 2014/35/EU, 2014/53/EU, 2014/30/EU. La déclaration de conformité
CE peut être obtenue sur simple demande à l’adresse suivante : [email protected].
Het product voldoet aan de basisvereisten en de overige toepasselijke bepalingen van
Richtlijn 2014/35/EU, 2014/53/EU, 2014/30/EU. De CE-conformiteitsverklaring kan via
[email protected] aangevraagd worden.
7. Elimination
7. Verwijdering
L‘emballage doit être jeté dans les poubelles à emballages recyclables locales.
Conformémement à la directive (CE) n° 2002/96 relative aux déchets d‘équipe-
ments électriques et électroniques, cet équipement doit être éliminé comme il se
doit après utilisation, an de garantir la valorisation des matériaux employés.
De verpakking moet worden weggegooid in de plaatselijke recyclingscontainers.
Volgens de Europese richtlijn 2002/96/EU betreffende afgedankte elektrische
en elektronische apparatuur moet dit apparaat na gebruik op de juiste manier
worden verwijderd om recycling van de gebruikte materialen te garanderen.
12
is
Ekki er hægt að skipta um rafmagnssnúruna á lampanum. Ef snúran skemmist skal skipta
lampanum út. Aðeins framleiðandi, þjónustufulltrúi hans eða álíka hæfur einstaklingur skal
skipta um ljósgjafann í lampanum.
LED-ljósi MyQ-fjarstýringarinnar má stinga beint í samband við hefðbundna 230V
innstungu. Veljið viðeigandi staðsetningu í loftinu eða á veggnum og festið ljósið í innan
við 1,83 m fjarlægð frá rafmagnsinnstungu til að snúran og ljósið verði ekki fyrir hlutum á
hreyngu. Setja verður upp LED-ljós MyQ-fjarstýringarinnar til að hægt sé að nota MyQ
og TTC-tímalokun.
ATHUGIÐ: Þegar ljós eru fest á gifsveggi og enginn loftbiti er til staðar skal nota festitappa
fyrir gifsveggi sem fylgja með. Ekki er þörf á að bora undirbúningsgöt fyrir festitappa fyrir
gifsveggi.
1. Borið fyrst lítil göt með 15,6 cm millibili ef fest er við loftbita.
EÐA
skrúð í festitappa með 15,6 cm millibili ef fest er við gifsvegg.
2. Mælið hversu langa rafmagnssnúru þarf til að ná til næstu innstungu. Vefjið snúrunni
um snúrugróna efst á ljósasætinu. Þræðið snúruna um brautina þannig að ljósið sé
í útti.
3. Opnið linsuna á ljósinu.
4. Festið ljósið með skrúfunum sem fylgja með (9+10).
5. Lokið linsunni á ljósinu.
6. Stingið ljósinu í samband.
ATHUGIÐ: LED-ljósið lýsir mjög skært. Horð EKKI beint í ljósið á meðan unnið er í stiga.
1. Ýtið á FORRITUNARHNAPPINN (L) á ljósinu þar til græna LED-ljósið KVIKNAR.
2. Ýtið á FORRITUNARHNAPPINN (L) á hurðaropnaranum eða
ýttu tvisvar á takkann LÆRA á hurðarstýringunni (78EV).
3. Kóðinn hefur verið forritaður þegar fjarstýringarljósið blikkar einu sinni.
1Uppsetning á LED-ljósi MyQ-fjarstýringar
3Fjarstýring forrituð fyrir LED-ljós MyQ-fjarstýringar
2Bílskúrshurðaopnari forritaður fyrir LED-ljós MyQ-fjarstýringar
1. Ýtið á FORRITUNARHNAPPINN (L) á ljósinu þar til græna LED-ljósið KVIKNAR.
2. Ýtið á hnappinn á þráðlausu fjarstýringunni sem á að nota til að kveikja ljósið.
3. Kóðinn hefur verið forritaður þegar fjarstýringarljósið blikkar einu sinni.
4. LED-ljós MyQ-fjarstýringar bætt við MyQ-reikninginn
1. Ýtið á FORRITUNARHNAPPINN (L) á ljósinu þar til græna LED-ljósið KVIKNAR.
2. Skráið ykkur inn á MyQ-forritið og bætið LED-ljósi MyQ-fjarstýringarinnar við.
5. Öllum forrituðum stillingum fyrir LED-ljós MyQ-fjarstýringar eytt
1. Ýtið á FORRITUNARHNAPPINN (L) og haldið honum inni þar til slokknar á LED-
ljósinu (eftir 6-10 sekúndur). Nú er öllum forrituðum stillingum eytt.
6. Þrif og viðhald
• Takið ljósið úr sambandi áður en það er þrið.
• Notið rakan klút við þrin.
• EKKI NOTA hreinsivökva á linsuna á ljósinu.
Varan er í samræmi við helstu kröfur og önnur viðeigandi ákvæði í tilskipun 2014/35/
EU, 2014/53/EU, 2014/30/EU. Hægt er að óska eftir CE-samræmisyrlýsingu með því að
senda tölvupóst á netfangið [email protected]
7. Förgun
Farga verður umbúðum í þar til gerð endurvinnsluílát. Samkvæmt tilskipun
Evrópusambandsins 2002/96/ESB varðandi raf- og rafeindabúnaðarúrgang skal
farga þessu tæki á fullnægjandi hátt eftir notkun til að tryggja endurvinnslu á
efnum þess.
114-5262B 2019, all rights reserved
Chamberlain GmbH
Saar-Lor-Lux-Str. 19
66115 Saarbrücken
Germany
WEEE-Reg.Nr. DE66256568
www.liftmaster.eu
info@liftmaster.eu

Other Chamberlain Lighting Equipment manuals

Chamberlain SLA230E User manual

Chamberlain

Chamberlain SLA230E User manual

Chamberlain FLA1-LED User manual

Chamberlain

Chamberlain FLA1-LED User manual

Chamberlain Secure Home SH-9511AU User manual

Chamberlain

Chamberlain Secure Home SH-9511AU User manual

Popular Lighting Equipment manuals by other brands

SLC LogiQ S37020 quick start guide

SLC

SLC LogiQ S37020 quick start guide

Blizzard Lighting The Puck RGB Unplugged manual 

Blizzard Lighting

Blizzard Lighting The Puck RGB Unplugged manual 

Chauvet COLORdash Par Hex 7 Quick reference guide

Chauvet

Chauvet COLORdash Par Hex 7 Quick reference guide

VelLight LEDS06RGB user manual

VelLight

VelLight LEDS06RGB user manual

Pentair IntelliBrite Installation and user guide

Pentair

Pentair IntelliBrite Installation and user guide

Pentair Pool Products IntelliComm Communication Center installation guide

Pentair Pool Products

Pentair Pool Products IntelliComm Communication Center installation guide

Acclaim Lighting Ai Flex Interior user guide

Acclaim Lighting

Acclaim Lighting Ai Flex Interior user guide

obsta OBSTAFLASH Led Installation and operation guide

obsta

obsta OBSTAFLASH Led Installation and operation guide

Vaxcel T0636 Assembly and installation instructions

Vaxcel

Vaxcel T0636 Assembly and installation instructions

EuroLite Light-Module-Set RFL user manual

EuroLite

EuroLite Light-Module-Set RFL user manual

HEPER NORMA S Installation & maintenance instructions

HEPER

HEPER NORMA S Installation & maintenance instructions

ENERGY FOCUS RedCap LEDFLT8-8 Series quick start guide

ENERGY FOCUS

ENERGY FOCUS RedCap LEDFLT8-8 Series quick start guide

ZOLAR Blade 60C Quick user guide

ZOLAR

ZOLAR Blade 60C Quick user guide

Godox SL Series instruction manual

Godox

Godox SL Series instruction manual

Bresser BR-S COB LED instruction manual

Bresser

Bresser BR-S COB LED instruction manual

KAM KML412 manual

KAM

KAM KML412 manual

Emos Z73211 instruction manual

Emos

Emos Z73211 instruction manual

BEKA Schreder OMNISTAR MIDI installation instructions

BEKA Schreder

BEKA Schreder OMNISTAR MIDI installation instructions

manuals.online logo
manuals.online logoBrands
  • About & Mission
  • Contact us
  • Privacy Policy
  • Terms and Conditions

Copyright 2025 Manuals.Online. All Rights Reserved.