Chard 12 Guide

- 1 -
Care and Use Guide
Features:
- Reversible auger
- 3/4 HP motor
- All metal gear construction
- Food pusher and sausage attachments included
- Thermal reset button provides overload protection
For your safety and continued enjoyment of this product,
always read the instruction book carefully before using.
POWERFUL
#12#12

- 2 -
IMPORTANT SAFEGUARDS
READ ALL INSTRUCTIONS AND SAVE FOR FUTURE REFERENCE.
When using electrical appliances, basic safety precautions must
always be followed, including the following:
1. Before rst use, check that the voltage of the wall outlet corresponds to
the one shown on the appliance rating plate located on the underside of
the motor housing body.
2. Before assembling, removing parts or cleaning, make sure the appliance is
unplugged from the wall outlet.
3. Make sure all appliance parts are correctly assembled and the locking knob has
been securely placed before you switch on the appliance.
4. Switch off the appliance and unplug before changing parts or accessories to
ensure that all moving parts are no longer operating or in motion.
5. To avoid damage to the appliance such as an abnormal noise, vibration or an
electric spark inside the appliance, please wait at least six seconds before
switching the appliance from the ‘ON’ function to the ‘REVERSE’ function.
6. The appliance blade is very sharp, please store the appliance properly, out of
the reach of children.
7. DO NOT grind hard foods or bones. Damage to appliance may occur.
8. DO NOT grind ginger and other materials with hard ber. Damage to appliance
may occur.
9. This appliance will power off automatically if the motor is overheating. Once
the temperature drops, the appliance will resume operation. If the appliance
overheats and stops running, please set the power switch to the “OFF” position,
and wait until the appliance has cooled down before operating again. DO NOT
operate this appliance for more than one hour at a time
.
10. This appliance is tted with a safety feature which safeguards against
excessive use. In the case of excessive use, the appliance will automatically
activate the overload protection and switch itself off. If this occurs, please set
the power switch to the “OFF” position, unplug the appliance and allow it to
cool down for 30 minutes. Then press the “RESET” button on the bottom of
the motor housing. DO NOT operate this appliance for more than one hour at
a time.
11. Before plugging the cord into a wall outlet, or disconnecting, make sure the
control is OFF, unplug from the outlet when not in use or before cleaning.

- 3 -
12. This appliance is not a toy, when used by or near children close attention is
necessary, store this appliance in a safe place, out of the reach of children.
13. DO NOT use any attachments that are not recommended, and don’t use this
appliance for any other purpose except its intended use.
14. Stop using the appliance immediately if the cord is damaged. Have it replaced
by a professional or contact Customer Service.
15. Keep away from moving parts. Keep hands, hair, clothing, as well as utensils
and other tools away from the appliance during operation to reduce the risk of
injury to the operator, and damage to the appliance.
16. DO NOT try to repair this appliance by yourself.
17. DO NOT use the appliance if it has been dropped or if it appears to be
damaged.
18. Avoid the following: pulling or carrying by the cord, using the cord as a handle,
closing a door on the cord, or pulling the cord around sharp edges or corners.
DO NOT operate this appliance if the cord or plug is wet.
19. Keep away from hot gas, heated oven, electric burner or any other hot surfaces.
20. It’s better not to use an extension cord with this unit. However, if one is used, it
must have a rating equal to or exceeding the rating of this appliance.
21. When disconnecting, to avoid any injury, please unplug by grasping the plug,
not the cord.
22. Before plugging the appliance in or operating, make sure your hands are dry
and safe to do the actions.
23. Be sure the appliance is on a stable surface, such as a table or counter when
the unit is “ON” or in working condition.
24. DO NOT use any lubricant, such as lubricating oils or water, on this appliance.
25. When cleaning, DO NOT immerse this appliance in water or any other liquid. DO
NOT clean the appliance parts in the dishwasher. Clean the motor housing with
wet cloth, and wipe dry.
26. DO NOT use this appliance outdoors or on a wet surface, it’s recommended for
household, indoor use only.
27. This appliance is not intended for use by persons (including children) with
reduced physical, sensory or mental capabilities, or lack of experience and
knowledge, unless they have been given supervision or instruction concerning
the use of the appliance by a person responsible for their safety.
28. Close supervision is required when this product is used near children.
(continues on next page)
- 4 -
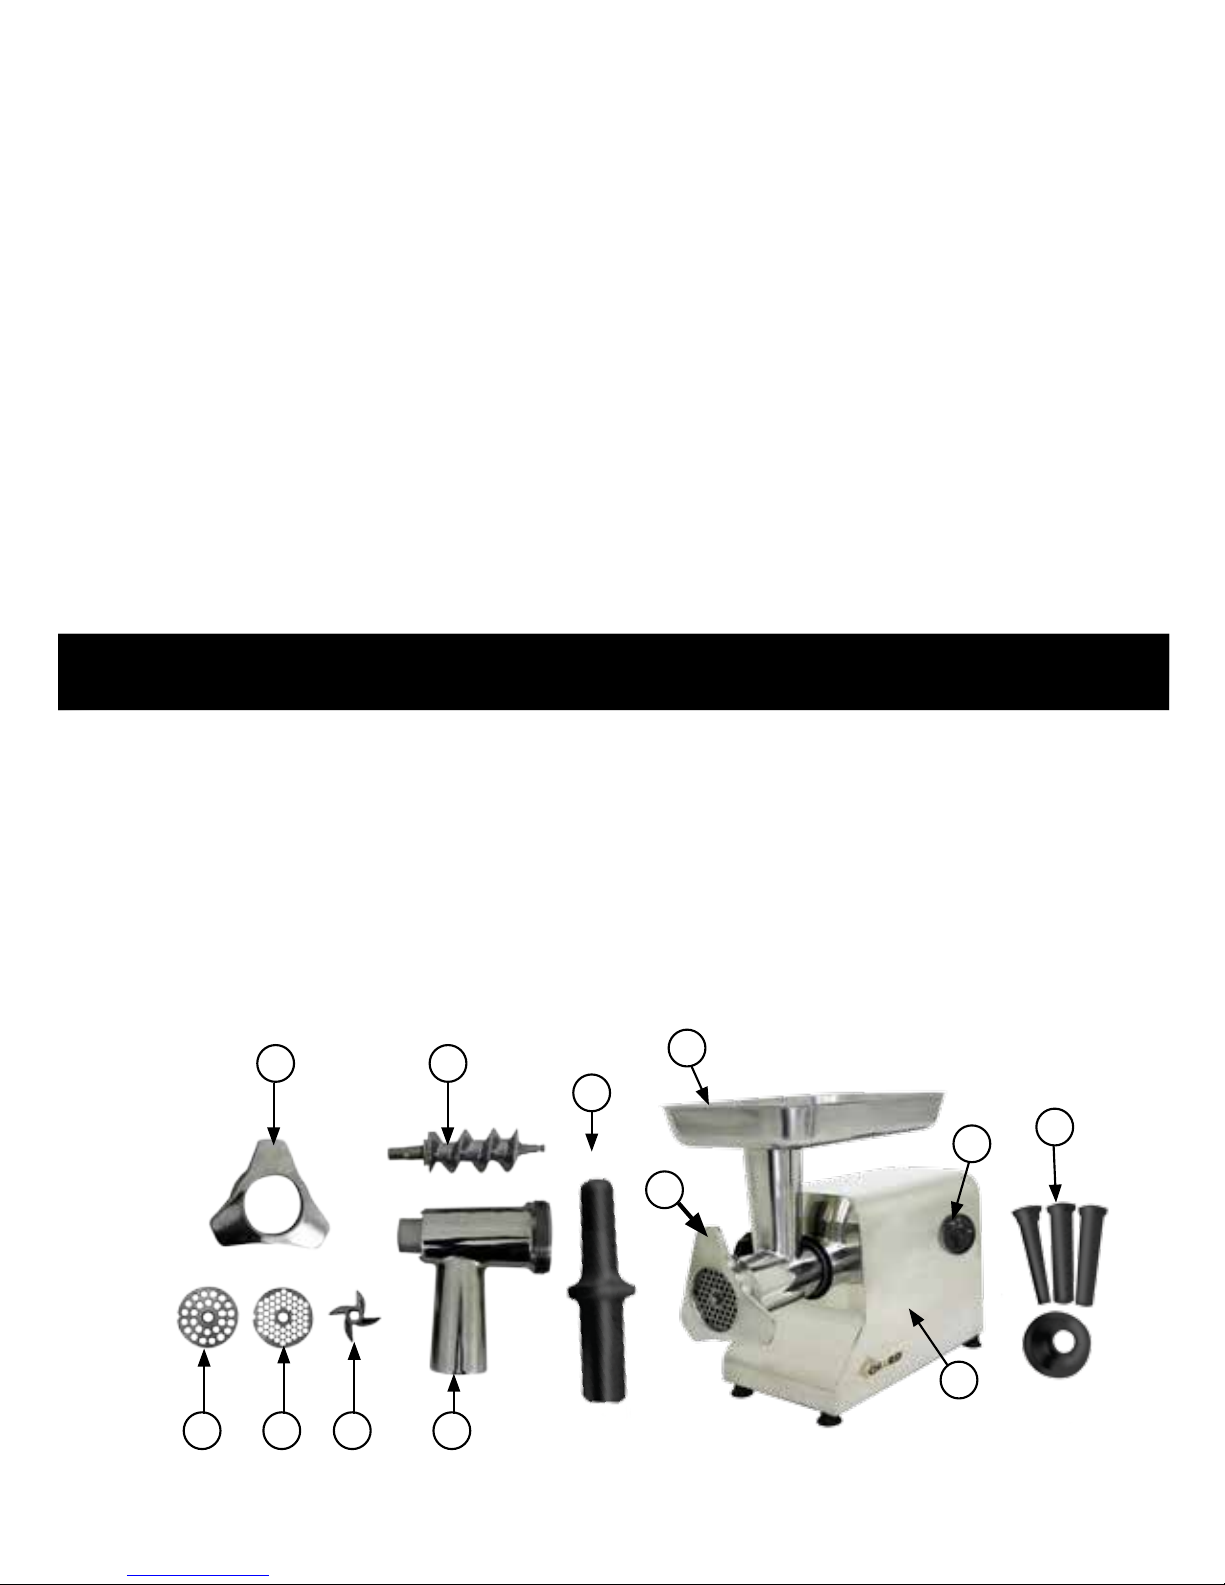
1. HEAD COLLAR
2. CUTTING PLATE (COARSE)
3. CUTTING PLATE (MEDIUM)
4. CUTTING BLADE
5. AUGER
6. AUGER HEAD
29. If the power cord is damaged, it must be replaced by the manufacturer, its
service agent or similarly qualied persons in order to avoid a hazard.
30. Cleaning and user maintenance shall not be done by children without
supervision.
31. To reduce the risk of electric shock, this product has a polarized plug (one blade
is wider than the other). This plug is intended to t in a polarized outlet only one
way. When the plug does not t fully in the outlet, reverse the plug. When it still
does not t, contact a qualied electrician to install the proper outlet. DO NOT
modify the plug in any way.
SAVE THESE INSTRUCTIONS.
THIS APPLIANCE IS FOR HOUSEHOLD USE ONLY.
LIST OF COMPONENTS
(continued from previous page)
7. HOPPER
8. FOOD PUSHER
9. LOCKING KNOB
10. MOTOR HOUSING
11. ON / OFF / REVERSE SWITCH
12. SAUSAGE RING AND ATTACHMENTS
11
10
9
12
8
7
62 3 4
51

- 5 -
HOW TO ASSEMBLE
Assembly:
1. Before each use wash all parts with warm soapy water before assembly.
2. Ensure grinder is unplugged before performing any assembly.
3. Loosen the LOCKING KNOB and install the AUGER HEAD into grinder body until
completely engaged with drive mechanism.
4. While holding grinder head with one hand, turn AUGER HEAD LOCKING KNOB
clockwise until tight. There is a small recess in the AUGER HEAD that will align
with the screw.
5. Insert the AUGER into the AUGER HEAD and align the spindle with internal gear
drive.
6. Install the CUTTING BLADE with at surface facing away from grinder body onto
the square drive of the AUGER.
7. Position the CUTTING PLATE onto the spindle at the end of the AUGER so that
the plate sits ush against the at portion of the CUTTING BLADE. Ensure that
the notch on the CUTTING PLATE lines up with the notch on the AUGER HEAD.
The plate should sit approximately ush with the end of the AUGER HEAD.
8. Install the grinder HEAD COLLAR over the CUTTING PLATE by turning
clockwise on the threads of AUGER HEAD.
NOTE: DO NOT over tighten the grinder HEAD COLLAR.
9. Place the HOPPER on top of the AUGER HEAD.
10. Use the FOOD PUSHER to gently feed food, one piece at a time. DO NOT force
the food into the AUGER HEAD. Meat pieces should be no larger than 1" x 1".

- 6 -
TIP: Partially frozen food grinds much more efciently than fully thawed food. We
recommend that frozen food be partially thawed before grinding or thawed food
be partially frozen prior to grinding. Never attempt to grind fully frozen food.
1. After unit is fully assembled per instructions above, conrm that power switch is
in the OFF position.
2. Insert the plug into a wall outlet.
3. Conrm that the grinder is on stable work surface.
4. Place a wide shallow bowl or plate directly below the grinder head.
5. Turn power switch to the ‘ON’ position. The grinder must always be in the ON
position before adding food.
6. Place food to be ground into HOPPER and use FOOD PUSHER to push food
through opening.
Reverse Switch:
If food becomes jammed, turn the switch to the OFF position. To clear the jam, turn
the switch to reverse until food is cleared. Disassembly may be required to clear jam.
Note: Always unplug the cord from the outlet before disassembling.
TIP: Never attempt to grind bone or other solid objects, as this will cause
permanent damage to the grinder.
TIP: If the ground meat is not discharging smoothly check to see if the head
collar is too tight. Readjust as needed. Also check to see if the discharge cutting
plate is blocked and needs to be cleaned. If blades are dull and not cutting
smoothly, they may be ground sharp or replaced. Contact Chard Customer Care
if replacement parts are needed.
HOW TO USE
CUTTING PLATES
Medium Cutting Plate- Great for ground meat used in soups, or for relishes.
Coarse Cutting Plate - Great for ground meat used in chili, or for vegetables.
CUTTING PLATES ARE NOT DISHWASHER SAFE.
PLEASE HAND-WASH ONLY!

- 7 -
HELPFUL HINTS
TO MAKE SAUSAGES
• Grinding stale bread pieces may help remove food residue left in the appliance
after use.
• Food or meat should be cut into strips or cubes slightly smaller than the opening
on the HOPPER. NO larger than 1"x 1"pieces.
• Make sure food is free of bone, tough tendons, nutshells, etc. before grinding.
• Raw meat and sh should be thoroughly chilled (not frozen) before grinding to
reduce the loss of juices.
• Freshly ground meat should be refrigerated and cooked within 24 hours.
• During extended grinding, fats from meats can build up inside the grinder tube,
slowing down grinding and straining the motor. If this happens, you should stop the
appliance, wash the parts in hot water, and reassemble. Alternate bread with meat
whenever possible, this helps keep the auger clean.
• Trim a handful of fat from meat. Process the fat through the hopper to lubricate
grinding mechanism for better processing results.
• For best drying results, prepare sausage a day or two prior to use.
• Meats can be seasoned before or after grinding.
Sausage attachments allow you to blend meat and spices for homemade sausages.
1. Make sure the unit is turned off and unplugged. Remove the HEAD COLLAR,
CUTTING PLATE and CUTTING BLADE.
2. Insert the sausage making ring attachment into the HEAD COLLAR. Make sure
that the sausage making ring attachment aligns correctly on the HEAD COLLAR.
3. Insert the desired sausage attachment tube into the HEAD COLLAR and
attachment ring and screw onto the grinder/feeder head.
4. Slide casing over the end of the sausage attachment, leaving approximately
2"overhanging the end of the attachment.
(continues on next page)

- 8 -
5. Place seasoned meat into the large die cast HOPPER and turn the unit on. Push
the meat into the opening of the HOPPER using the FOOD PUSHER until the
mixture appears at the end of the sausage attachment. Keep casing moist by
watering frequently. Turn the unit off and tie a knot at the end of the 2" casing
overhang.
6. Continue step #5 until all the meat has been used or the casing is approximately
2" away from being completely full.
7. Turn the unit OFF, and remove the end of the casing from the sausage
attachment, and tie a knot on the open end of the casing.
8. Sausage can be made to the desired length by twisting the casing at intervals.
NOTE: To avoid over-stretching and splitting the casing, do not make the
sausage too thick. Keep casings moist by watering frequently. The meat
mixture will expand slightly during cooking.
Sausage making accessories, such as casings and seasonings, are not included.
Additional Sausage Making Tips can be found Online.
(continued from previous page)
CLEAN AND CARE
• Always unplug the appliance when not in use, or before inserting or removing
parts, and before cleaning.
• Never immerse the MOTOR HOUSING in water or other liquid.
• Wash all parts except MOTOR HOUSING by hand in hot soapy water, using care
when handling the sharp blades.
• Rinse these parts with clear hot water, and then dry.
REMOVABLE PARTS ARE NOT DISHWASHER SAFE!
• Wipe the MOTOR HOUSING with a damp cloth. DO NOT use harsh or abrasive
cleaners.
• CUTTING BLADE and CUTTING PLATES should be coated with cooking oil or
food grade silicone spray after washing and then wrapped in grease-proof paper
to keep them lubricated and rust-free.

- 9 -

© 2016 Chard International, P.O. Box 444, Two Rivers, WI 54241-0444 1-888-815-4252
Your product is warrantied for one year from date of purchase against all defects
in material and workmanship. Should your product prove defective within one
year from date of purchase or receipt, return the unit, freight prepaid, along with
an explanation of the claim. Please package your product carefully in its original
box and packing material to avoid damage in transit. We are not responsible for
any damage caused to the product in return shipment. Under this warranty, we
undertake to repair or replace any parts found to be defective.
This warranty is only valid if the product is used solely for household purposes in
accordance with the instructions. This warranty is invalid if the unit is dismantled
or interfered with in any way or damaged through misuse.
We ask that you kindly ll in the details on your warranty card and return it within
one week from date of purchase. Send warranty card to:
CHARD FGC-12 / #12 Power-Pro™Grinder
C/O CI
PO Box 444
Two Rivers, WI 54241-0444
WARRANTY
Table of contents
Other Chard Meat Grinder manuals


