CHARLY DIAMONDcross 100 Basic Instruction Manual

Models
DIAMONDcross 100 / 125 / 160 / 220 Basic
DIAMONDcross 100 / 125 / 160 / 220 ST
DIAMONDcross 160 ST Tandem
DIAMONDcross 125 / 160 / 220 HG
Certication standards EN 12491 and LTF NFL II 91/09
Version 07/2022 | Valid from year of manufacture 2017
OPERATING & PACKING INSTRUCTIONS
Reserve parachute DIAMONDcross


Thank you for your condence!
Thank you for choosing a CHARLY product!
These operating and packing instructions provide important information on the use of
your rescue system. It has been written to inform you comprehensively about the correct
use and must be read before installation!
If you have any questions related to the use of this rescue system, please contact CHARLY
directly. If you need professional packing or repair service, please contact your certied
dealer or CHARLY.
For more information about this and other CHARLY products, please visit our website. We
wish you great ights and always safe landings.
CHARLY product design / test pilot
Tom Grabner
Operating & packing instructions | DIAMONDcross03
TABLE OF CONTENTS
STRUCTURAL SETUP
TECHNICAL DATA
INTENDED USE & GENERAL SAFETY INSTRUCTIONS
PERMISSIBLE OPERATING TIME
INNER CONTAINER & INSTALLATION OF THE RESERVE IN THE HARNESS
Constructional features of CHARLY inner containers
Connecting the reserve to the harness
Connecting the inner container to the release handle
Repacking into third-party inner containers
Compatibility test of reserve, harness & pilot
PRE-FLIGHT CHECK
INFORMATION FOR WINCH TOWING
FEATURES OF THE DIAMONDCROSS CANOPY & FLIGHT CHARACTERISTICS
GENERAL ADVICE FOR THE USE OF A STEERABLE RESERVE
MAINTENANCE
Packing & inspection record booklet
Packing & inspection intervals
Care & cleaning
Storage & transport
Repairs
Disposal
Optional riser cover
PACKING INSTRUCTIONS
Packing preparation
Packing procedure
05
06
08
08
08
08
10
12
13
16
16
17
17
19
20
20
20
21
21
21
22
23
25
25
26
Operating & packing instructions | DIAMONDcross 04

Stabilo
Stabilo
Rear vent
Main & center lines
Control lines
Control riser
Flight direction indicator (red marking)
STRUCTURAL SETUP
The gure shows the structural setup of the steerable DIAMONDcross ST. The steerable
Basic and HG versions are not equipped with control risers.
Control handle
Main riser
Lower center lines
Suspension points
Operating & packing instructions | DIAMONDcross05
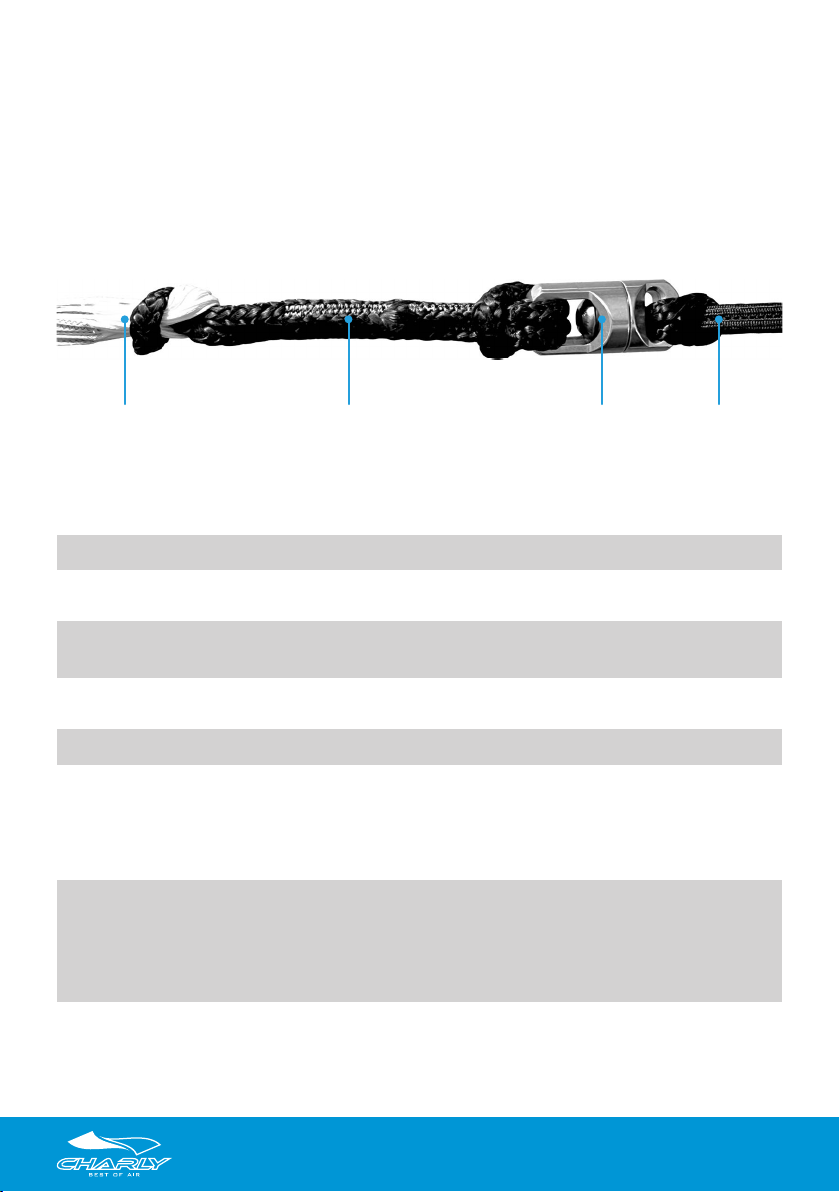
As an additional safety feature for the DIAMONDcross HG versions, we strongly
recommend the use of a swivel (Rotor), as hang gliders in emergency situations often get
into rotating twisting motions, which can entangle the rescue parachute.
The Rotor (CHARLY art.no. HFa160) has been tested and approved for a breaking load of
up to 50 kN. The DIAMONDcross HG can be purchased directly ex works with the Rotor
looped in, but it is also possible to loop it in at a later date between the reserve lines and
the main riser as shown in the picture below.
Please note that for the connection between the suspension lines and the Rotor, the
special swivel line loop is required (CHARLY art.no. HFa161s).
Suspension lines Swivel line loop Swivel Main riser
Surface
Load max. / min.
Sink rate
Max. use speed
Certication
Approval no. ST
Basic
ST Tandem
HG
Weight ST
Basic
ST Tandem
HG - without Rotor
HG - incl. Rotor
Volume
DC100
25,2 m2
100 / 50 kg
4,6 m/s @ 100 kg
3,6 m/s @ 70 kg
115 kmh / 32 m/s
EN / LTF
EP 157.2016
EP 178.2017
---
---
1,17 kg
1,14 kg
---
---
---
3.900 ccm
DC125
30,7 m2
125 / 60 kg
4,5 m/s @ 125 kg
3,5 m/s @ 85 kg
115 kmh / 32 m/s
EN / LTF
EP 158.2016
EP 179.2017
---
EP 184.2016
1,39 kg
1,35 kg
---
1,43 kg
1,60 kg
4.700 ccm
ST = steerable, Basic = not steerable, HG = hang glider (not steerable)
TECHNICAL DATA
Operating & packing instructions | DIAMONDcross 06

DC160
41,0 m2
160 / 80 kg
4,8 m/s @ 160 kg
3,5 m/s @ 110 kg
115 kmh / 32 m/s
EN / LTF
EP 173.2017
EP 180.2017
EP 225.2018
EP 185.2017
1,78 kg
1,75 kg
1,85 kg
1,83 kg
1,97 kg
5.300 ccm
DC220
59,2 m2
220 / 100 kg
4,6 m/s @ 220 kg
3,6 m/s @ 160 kg
115 kmh / 32 m/s
EN / LTF
--
EP 182.2017
EP 181.2017
EP 186.2017
--
2,46 kg
2,57 kg
2,57 kg
2,71 kg
7.300 ccm
Surface
Load max. / min.
Sink rate
Max. use speed
Certication
Approval no. ST
Basic
ST Tandem
HG
Weight ST
Basic
ST Tandem
HG - without Rotor
HG - incl. Rotor
Volume
ST = steerable, Basic = not steerable, HG = hang glider (not steerable)
Operating & packing instructions | DIAMONDcross07
This rescue system is certied according to the standards EN 12491 and LTF NFL II
91/09, and has been specially developed as a manually deployable rescue parachute for
paragliding, powered paragliding and hang gliding. Its use in connection with other ying
activities, such as parachuting, skydiving or base jumping, is not permitted!
The use of this rescue system requires appropriate ight training.Before each take-off, the
pilot must check all parts of the ight equipment for airworthiness.
The permissible operating time of the rescue system is ten years, starting with the rst
commissioning.This also applies if the rescue system has never been deployed.
The date of the rst commissioning must be noted on the approval label on the reserve
riser at the time of purchase. This date is decisive for the ten-year operating period as well
as the regular packing intervals, which are documented in the packing and inspection
record booklet.
After ten years, the operating time can be extended by the manufacturer for a further two
years. For this, it is required that the rescue system undergoes a factory inspection, and
is extensively tested and re-measured. If the condition proves satisfactory, the two-year
operating time extension will be guaranteed and documented.
Depending on the intended use, two different inner containers are available for the
DIAMONDcross:
• Standard at container for harnesses with integrated container compartment
• Inner container for external containers and front containers
Both containers are designed as pocket containers with separate compartments for
the lines and the canopy, so that the canopy is released only after the lines have been
stretched. This ensures a controlled opening of the canopy and reduces the risk of
the reserve becoming entangled in the glider, especially when deploying in SAT-like
rotations.
Inside the CHARLY pocket container, the canopy is protected from dirt in the best possible
way, and unintentional release of the line bundles is reliably excluded.
PERMISSIBLE OPERATING TIME
INTENDED USE & GENERAL SAFETY INSTRUCTIONS
CAUTION: When practicing air sports, the pilot bears sole responsibility for
all risks, up to and including injury and death.Neither the manufacturer nor
the seller of a rescue system can be held responsible, nor can they guarantee
the safety of the pilot.
INNER CONTAINER & INSTALLATION OF THE RESERVE IN THE HARNESS
Constructional features of CHARLY inner containers
Operating & packing instructions | DIAMONDcross 08
In addition, CHARLY inner containers are equipped with fabric-protected rubbers diameter
3 mm, which can be easily replaced as they age. Closure rubbers without protection have
often led to accidental deployments in the past.
The CHARLY standard flat container has been developed on the G-Force trainer
and is the result of years of experience with reserve deployments under centrifugal
force.
The deployment tests have shown that pulling out the rst third of the container requires
the most energy, as the inner container often gets caught in the container compartment
during this rst phase of the deployment. The very at and in the front area conical shape
with a small cross-section of the CHARLY standard at container counters this danger in
the best possible way.
The tests prove that the at container can be pulled out of the reserve compartment in the
harness much better and with less effort than a cube-shaped container - even if the latter
has a signicantly smaller volume.
Thanks to its centered, triangular pull tab, the CHARLY at container will slide out of the
harness even if the deployment handle is intuitively pulled upward instead of outward.
The alternative CHARLY front inner container has the conventional round shape, which
is ideal for front outer containers.
A detailed description for repacking from the standard at container to the front inner
container is available on CHARLY’s website.
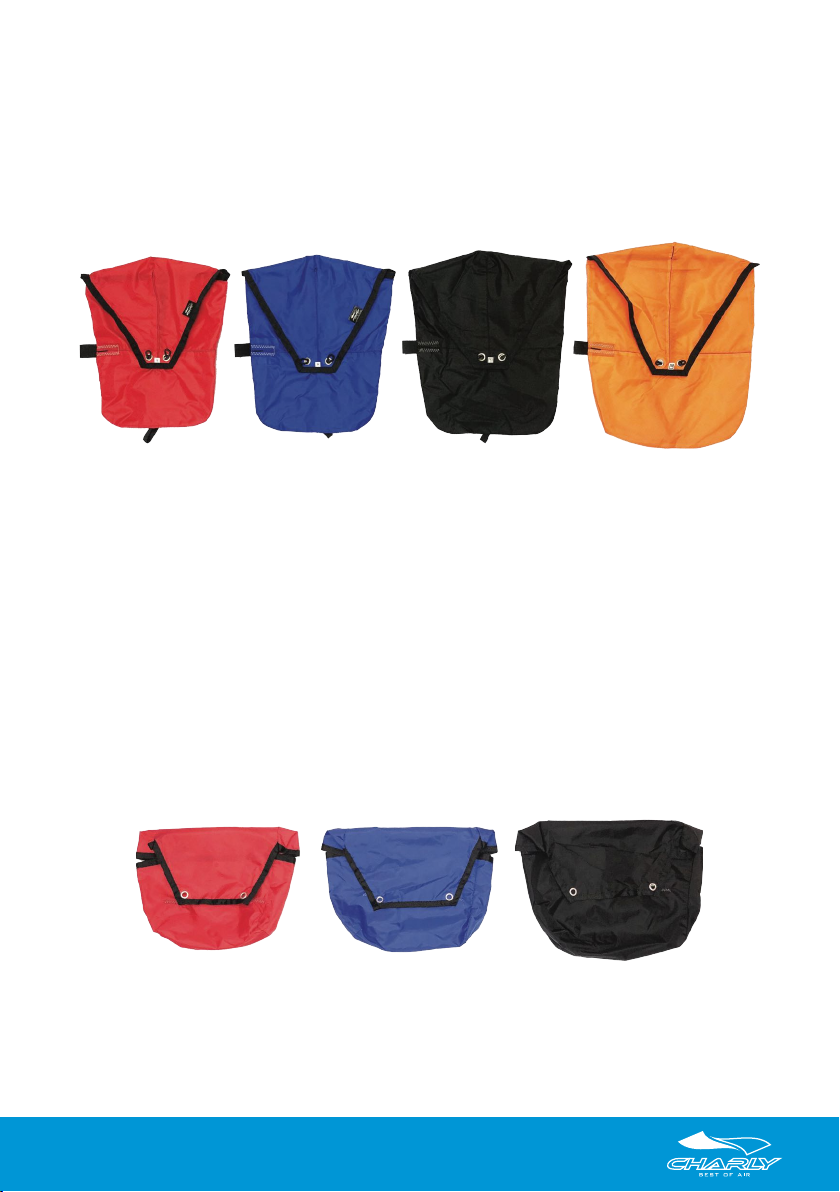
S = red
For DC100
M = blue
For DC125
L = black
For DC160
S = red
For DC100
M = blue
For DC125
L = black
For DC160
XL = orange
For DC220
Operating & packing instructions | DIAMONDcross09

Harnesses with attachment points on the shoulder straps
Harnesses with an integrated container have the reserve compartment either under the
seat or on the side of the back. Such harnesses usually have attachment points for the
rescue system on the shoulder straps. From there, a V-line is led through a dedicated
channel at the harness to the reserve compartment, where the main riser of non-steerable
rescuers (e.g. the DIAMONDcross Basic) is looped in.
The steerable DIAMONDcross ST has two separate risers that are attached directly to the
shoulder attachment points. The V-line is not needed and its weight can be saved. If a
V-line is attached to the harness ex factory, it can be removed.
The risers of the DIAMONDcross ST, marked with the colors green (right) and red (left),
are connected to the shoulder straps of the harness by means of connecting links with
a suitable breaking load (e.g. CHARLY art.no. Be31) or with “soft links” (usually made of
Dyneema material) at the attachment points provided for this purpose. From there, they
are led to the reserve container via the dedicated channel which is otherwise used for the
V-line.
Attachment to the carabiners
For paraglider harnesses with outer container or front container, where the attachment
points on the shoulder straps are missing, the riser of the DIAMONDcross Basic is
connected to the carabiners of the harness using a V-line.
With the steerable DIAMONDcross ST, the V-line is obsolete, but please note that the right
and left risers have to be extended by means of special front container extension loops
(CHARLY art.no. HFa165) before they are each hooked to the corresponding paragliding
carabiner. Otherwise problems may arise with the red connection line between the risers
(see information below).
Removal of the connection line is not recommended, but may be considered if
necessary, e.g. if a harness does not allow the installation of the DIAMONDcross ST
in another way. The connection is not required by construction regulations, therefore
removing it does not invalidate the approval.
For the DIAMONDcross HG, the riser is connected directly to the main suspension of the
harness using a suitable connecting link (breaking load min. 2.5 t).
Note: The red connection line between the two risers of the DIAMONDcross
ST has the purpose that the reserve parachute remains functional, at least to
a limited extent, should one of the two suspension points on the harness fail
(e.g. due to carabiner breakage). In addition, it helps to untangle possible
line twists more easily. CHARLY explicitly points out that if the connection
line is removed, an additional safety and backup feature is lost! The Tandem
version does not have the connection line due to characteristics of the
system.
Connecting the reserve to the harness
Operating & packing instructions | DIAMONDcross 10

Twists are often unavoidable
when deploying the reserve.
However, the described
installation method helps avoid
them as much as possible.
Position the harness and
container as shown on the left.
Then turn the container over so
that the closure points to the
ground. When installing the
container on the right side of the
harness as seen in direction of
ight, the rotation must be made
to the left (from the perspective
of the photo), when installing the
container on the left side of the
harness as seen in direction of
ight, the rotation must be made
to the right.
Avoiding twists when installing the inner container in the harness
Then move the container to the harness as shown, attach the release handle to it
as described below, and nally install the inner container according to the harness
manufacturer’s instructions.
Container compartment
Operating & packing instructions | DIAMONDcross11
Outer containers and front containers as well as harnesses with integrated container
compartment are equipped with a release handle, which must be connected to the inner
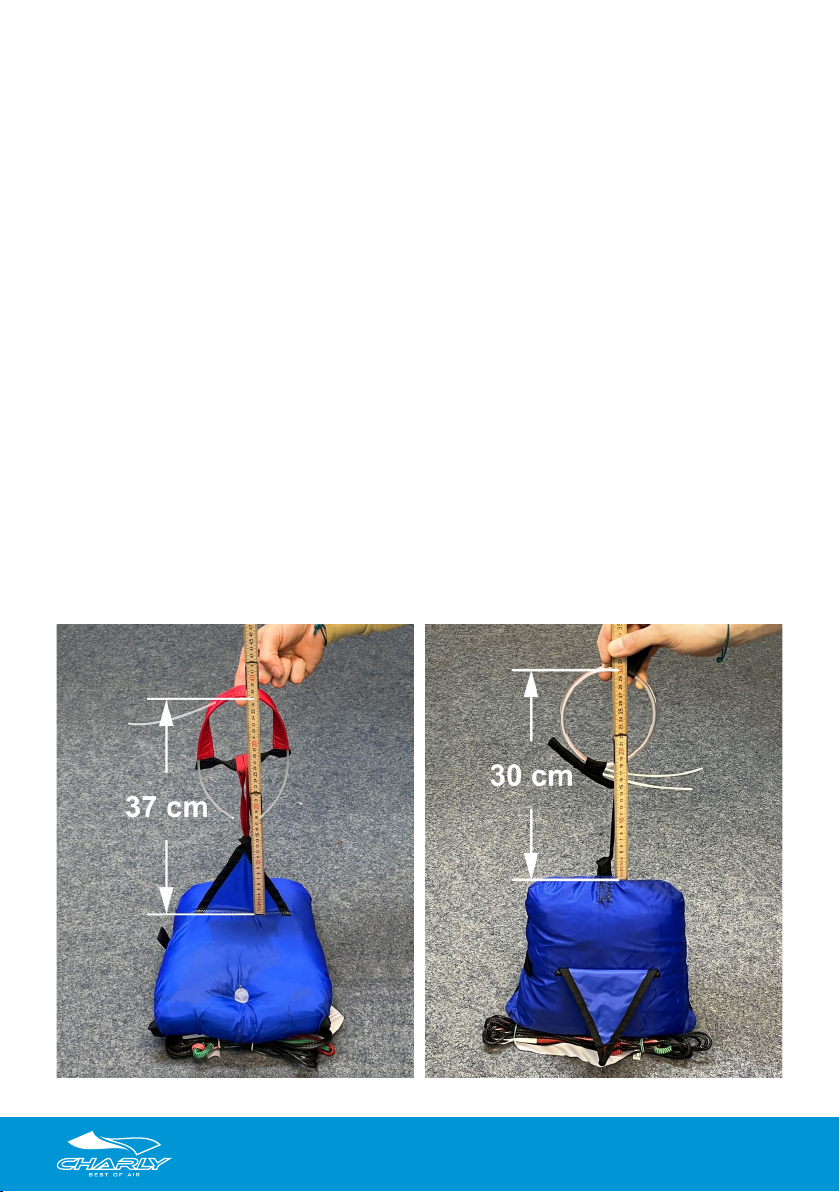
container of the reserve. The use of original release handles is mandatory.
Release handles with possibility of looping in the original inner container
If there is a possibility of looping in the deployment handle, it is recommended to attach
the CHARLY inner container to it. It is then very important to check the length between the
handle and the inner container.
The shorter the connection from the release handle to the inner container, the easier it is
to pull out and throw the reserve. However, the connection must be at least long enough
to ensure that that the locking pins are released when the handle is pulled. To prevent an
entanglement of the release handle in the suspension lines while they are stretching, the
maximum length of the connection from the release handle to the inner container must
not exceed 37 cm.
There are three loop-in options on the CHARLY standard at container:
• The attachment to the triangular pull tab is preferable, as it is the best prevention
against the container getting stuck during the extraction from the harness.
• The attachment point on the side is intended for harnesses with a rear container
compartment.
• The bottom attachment point is used when the 37 cm would be exceeded when using
the triangular pull tab. How to measure the length of the connection is shown in the
pictures.
Connecting the inner container to the release handle
Operating & packing instructions | DIAMONDcross 12

Please contact the harness manufacturer if the release handle connection is too long. If it
is necessary to shorten the connection between the handle and the inner container, this
must be done by the handle manufacturer or another qualied specialist. It is required to
use a high-strength sewing thread (Art.No. HNae40) for this purpose.
Release handles and third-party inner containers
In modern harnesses with integrated container compartment, the release handle and
inner container usually are a single unit, which has been specially tested during the
approval of the harness or front container. The CHARLY pocket container can no longer
be used for these harnesses. Rather, it is necessary that the reserve is repacked into the
harness manufacturer’s inner container. CHARLY permits this, provided that it is a standard
cloverleaf inner container and its volume is not less than that of the CHARLY rescue system
(see technical data). If the design of the third-party inner container differs signicantly
from the usual cloverleaf containers, the handle-inner container combination must be
sent to CHARLY for approval.
The following steps describe the repacking of a DIAMONDcross ST from the CHARLY
standard at container into the GIN Genie Lite 3 cloverleaf inner container (CHARLY Art.
No. HFa1952).
It is not a problem that third-party containers usually have only one closure for the two line
bundles. The bundles can simply be put together in the closure rubber.
Unpacking from the CHARLY standard at container
Please note: The following steps for repacking the reserve into a third-party
cloverleaf inner container are to be understood as an example only. Detailed
instructions must be obtained from the respective manufacturer of the third-
party container.
Repacking into third-party inner containers
Reserve packed inside the CHARLY
standard at container
Tie both line bundles together with
packing cords
Operating & packing instructions | DIAMONDcross13
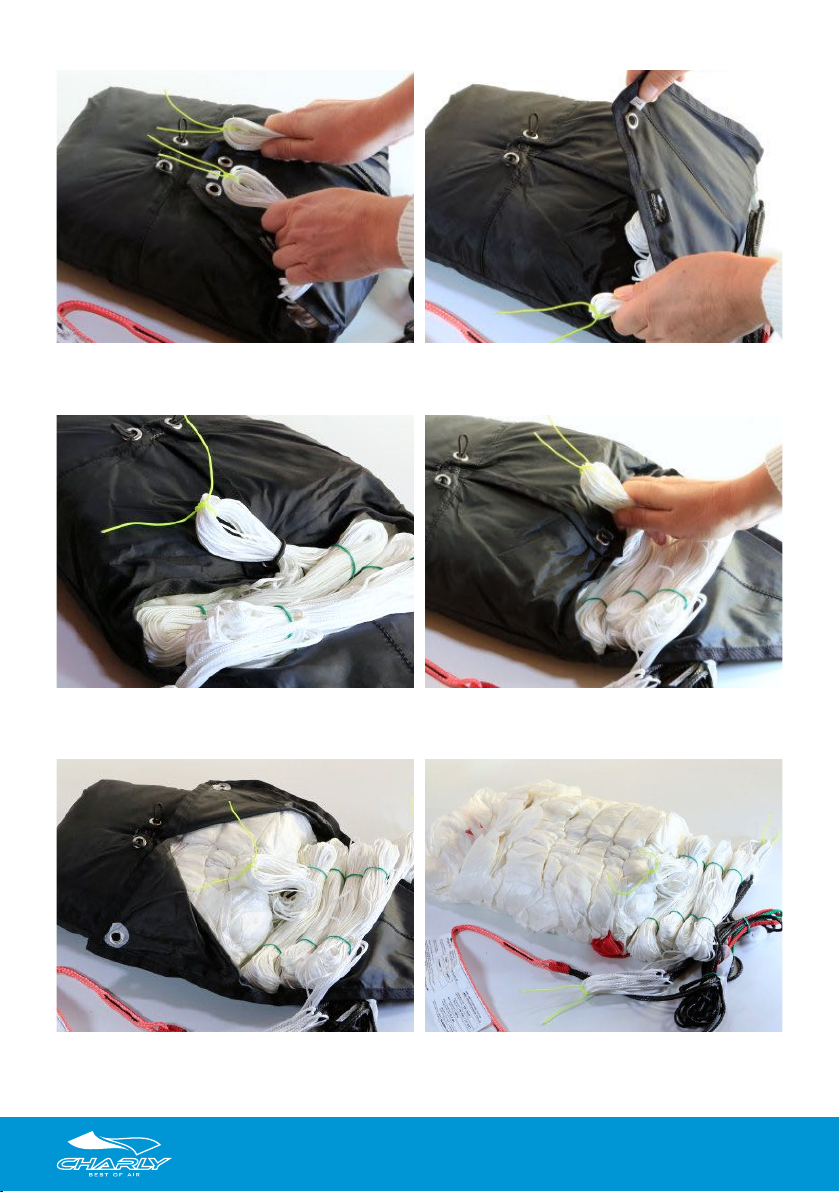
Tie the central line bundle together with a
packing cord
Gently pull the line bundles from the
closure loops
Gently pull the central line bundle from its
closure loop
Open the line compartment
Open the inner container aps Carefully remove the cap from the inner
container
Operating & packing instructions | DIAMONDcross 14

Packing into the cloverleaf inner container
Inser the looped line bundles Close the container and make sure that all
packing cords have been removed
Carefully insert the cap into the cloverleaf
container and remove the 3 packing cords
Guide the closure loop through the central
eyelet, and secure it with the line bundle
Reserve packed inside the cloverleaf inner
container from GIN
When lifting the reserve up by its lines,
the closure must open under the its own
weight
Operating & packing instructions | DIAMONDcross15

There have been several issues reported associated with the recombination of reserves
with harnesses with an integrated container compartment. Also special characteristics
of the pilot, e.g. his strength or arm length, or a changed packing volume after the rst
repacking of the reserve can cause problems related to the deployment of the rescue
system. A compatibility check by a qualied specialist is therefore mandatory. Qualied
specialists are active ight instructors and authorized employees of ight schools who
have received comprehensive instruction in the task of compatibility testing. The reserve-
harness-pilot combination must be tested in a realistic arrangement. That is, the pilot is in
normal ight position while the harness is hooked to its main carabiners.
It has to be checked:
• That the release handle is easy to reach and grasp.
• That the inner container can be pulled out of the outer container easily and effortlessly.
The pulling power on the release handle should be between 4 and 8 daN. During the
release test, the inner container must be fully extracted.
• That the conguration of the release handle, the inner container and their connection
allows for the powerful throwing away of the inner container in one pull with the
extraction.
• Which pilot position results with the selected harness settings when the harness is
hooked to the attachment points of the reserve.
After the compatibility check has been completed and passed, the rescue parachute
inside its inner container is reinstalled in the harness container compartment or external
outer container in accordance with the operating instructions. Particular attention must be
paid to the following:
• That the packing volume indicated on the CHARLY reserve’s approval label is consistent
with the allowed volume indicated in the operating instructions of the harness/
container.
• That the volume of the packed reserve can vary signicantly depending on the quality
of packing, and often differs greatly from the volume of a factory-packed reserve
compressed by the harness.
• That the rescue system has not been installed in the wrong direction/arrangement
inside the reserve compartment. The instructions for the harness/container must be
strictly followed in this regard.
It must be ensured that the compatibility test is documented in the packing and inspection
record booklet!
In addition to the usual pre-ight check (see operating instructions of the paraglider, the
harness, possibly the tow release etc.), make sure that the reserve container is properly
closed and the release handle is correctly positioned before every take-off.
If the reserve connection line is unhooked after each ight (for example with a front
Compatibility test of reserve, harness & pilot
PRE-FLIGHT CHECK
Operating & packing instructions | DIAMONDcross 16

container system), the pre-ight check must additionally include the correct attachment
of the riser!
For winch towing, the instructions of the harness, paraglider/hang glider and winch
manufacturer must be followed! When using a front container, it must be ensured that the
deployment of the rescue parachute is possible at all times.
Its S-shaped canopy trim provides a high righting moment, so that the DIAMONDcross
is in a stall for a short time imediately after opening. This reliably prevents a downplane
position of the reserve. The paraglider is quickly unloaded and dives down. This prevents
the danger of a scissor position between the rescue system and the paraglider, facilitates
the recovery of the main glider and even allows the unhooking of one riser with CHARLY
Pinlock or even conventional carabiners.
The sinking of the DIAMONDcross during stall corresponds to that of a conventional cross
canopy. The then beginning forward movement in the direction of the red marked corner
further reduces the sink rate signicantly.
Since the S-shaped canopy trim additionally ensures high pendulum stability, also the
hang glider versions of the DIAMONDcross benet from its advantages.
Steerability is an optional feature of the paraglider ST versions of the DIAMONDcross. If it
is not used after deployment, e.g. due to low altitude, the landing will be the same as with
a conventional cross canopy.
If required, the paraglider Basic versions of the DIAMONDcross can be converted to be
steerable by the manufacturer at a later date.
Forward motion
Signicant forward speed only occurs after the paraglider has been pulled in or separated.
The trim of the DIAMONDcross canopy results in a ying speed of up to 15 km/h or a glide
ratio of about 1:1,5. This gives the pilot the possibility, e.g. at 500 meters above ground,
to target a landing area of about 1,7 km² for landing. At lower deployment altitudes, it is at
least still possible to avoid obstacles; at higher altitudes, it is even possible to steer from
the ridge down into the valley or towards a safe landing area.
The horizontal drift of the DIAMONDcross also helps to reduce the risk of injury, because
the deceleration path to reduce the impact speed is shortest in the case of a vertical impact
on a at surface, while lower forces act on the body in the case of an angular impact. In
addition, the human body is not equally resilient in all axes. The most sensitive axis is the
one in the direction of the spine, which has to cushion an impact on the buttocks.
Twists with steerable reserves
Since after deployment, the inner container package is thrown more or less uncontrolled
into the open airspace, and rotations of the container before the canopy unfolds cannot
be completely avoided, a steerable reserve sometimes opens twisted. Steerable rescue
systems have the characteristic that the main glider will always be turned away from the
ight direction due to the air resistance. Even if the main glider still has open surface, a
FEATURES OF THE DIAMONDCROSS CANOPY & FLIGHT CHARACTERISTICS
INFORMATION FOR WINCH TOWING
Operating & packing instructions | DIAMONDcross17

twist (at least 180°) is usually unavoidable. The pilot ies backwards. The DIAMONDcross
then behaves like a conventional cross canopy, but with increased forward movement,
higher pendulum stability and a reduced sink rate.
Twists have basically no negative inuence on the DIAMONDcross’ sink rate or pendulum
stability, and can be considered uncritical in contrast to twists of the paraglider. However,
the benets of a steerable reserve can only be fully realized if the main glider is completely
disconnected. An uncontrollable, partially open surface of the main glider always has a
disadvantageous effect on the ight characteristics of the reserve parachute. This also
applies to all non-steerable systems, which is why it is generally advisable to use separation
carabiners (e.g. CHARLY Paralock) instead of conventional carabiners.
Resolving twists
If the paraglider is disconnected, even multiple twists can be resolved quickly and
easily with the right technique. By making leg kicks in an upright position (slow in one
direction, fast in the other), the pilot turns about 90° per stroke in the desired direction.
This technique is standard in skydiver training, and should be practiced on a suspension
using the reserve attachment points at the harness.
While resolving twists, the pilot should look upwards to the reserve and check whether the
leg kicks are made in the right direction for the respective direction of rotation.If necessary,
the direction of the leg kicks and thus the direction of rotation must be changed.
Spiraling
The DIAMONDcross can be steered using the brake loops on the rear risers. This is most
effective when one side is pulled through quickly and to full deection to y a turn. After
about ve seconds, the brake can be released briey to resume full speed. Then it can be
pulled fully again for directional correction. With this method, the canopy turns into the
curve most quickly and in a dened manner.
The control forces of the DIAMONDcross are relatively high and the system reacts much
slower to direction changes than a paraglider. There is no danger of a stall - not even with
impulsive and deep control inputs at the brakes.
Flyback
By pulling the brake loops fully on both sides, the canopy can be brought into a “yback“.
The reserve will then y backwards until the brakes are released.
Side slip
By holding one brake long and far down, the DIAMONDcross can also be brought into a
“side slip”. The reserve then pushes stably over one of the two lateral corners. This ight
state is terminated by counter-braking and releasing. The side slip can be helpful to avoid
obstacles or to turn just above ground still against the wind. Pulling the brake too deep
or too hard will not cause a stall, which is very important for the pilot’s safety, especially in
stress situations.
Landing approach
The DIAMONDcross’ minimized sink rate resulting from its canopy trim gives the pilot
more time to prepare for landing and provides optimal conditions for an injury-free
landing. The ight tests have shown that the DIAMONDcross is best landed when the
Operating & packing instructions | DIAMONDcross 18

approach and landing are done completely unbraked.
1. In an air emergency situation, pull the release handle rmly so that the release pins
are pulled out of the release pin loops. Throw the inner container holding the reserve,
which is attached to the release handle, powerfully into clear air. As the suspension
lines stretch, the inner container opens and the canopy is inated by the air current.
The reserve unfolds and the inner container is lost. Perform the throwing action as
quickly and as powerfully as possible, and practice it on the ground before each
repack of the reserve. It is important to also mentally practice the procedure several
times.
2. Check: Is the canopy inated? What is the height above ground?
3. Check: Orientation - what is the direction of ight (indicated by the red corner)?
4. Adjust the direction of ight: If there is an imminent collision with an obstacle,
immediately change the ight direction by pulling the brake loop (side does not
matter). Immediately try to do this even when the reserve is twisted.
5. Pull in or separate the paraglider (optional). Separation can be done by:
• Separation carabiners
• Unhooking the risers from conventional carabiners (a separation system for the
speed system is strongly recommended)
• Using a crosscut knife and cutting the paraglider risers or the main lines in case
of emergency. Material damage is preferable to physical damage, so every pilot
should always carry a crosscut knife in ight!
6. Direction check: Correct the direction of ight again, if necessary.
7. Resolve twists
GENERAL ADVICE FOR THE USE OF A STEERABLE RESERVE
Operating & packing instructions | DIAMONDcross19

8. Heading for the landing area: In the remaining time, head for the nearest possible
area where a safe, injury-free landing appears possible. Do not attempt to y over
power lines or other obstacles in low altitude if your position is in front of the
obstacle!
9. If possible, turn the canopy against the wind: If you are above an obstacle and sinking
towards it due to increased headwind speed, try to turn off and reach a more suitable
landing site with tailwind.
10. Landing: At least 20 m above the ground, release the brakes completely and land
unbraked, without aring (even in the case of a tailwind landing). An exception is the
attempt to initiate a side slip to avoid an obstacle. In this case, one brake can also be
held fully pulled until landing.
11. Notify emergency services: It is highly recommended to contact the police or rescue
services immediately after landing via an emergency call. This applies even if there is
no personal injury, as search operations are often initiated by observers after a rescue
parachutes deployment.
A packing and inspection record booklet must be kept as proof of care and for reasons of
insurance coverage and warranty maintenance.
The following shall be noted therein:
• On the part of the manufacturer: The routine test
• On the part of the seller: the date of purchase and the compatibility test
• On the part of the service companies: packings, repairs and inspections
The reserve must be opened,ventilated and then repacked six months after commissioning
and every 12 months thereafter.
The required packing interval may be shortened in the event of extreme environmental
inuences such as humidity, sand, water and other factors. The packing procedure is
described from page 22.
In the event of a water landing, the rescue system may only be repacked after it has dried
completely in the air. For this purpose, it is best to hang it upside down in a symmetrical
position.
After contact with salt water, the reserve should be immediately rinsed several times with
fresh water and then dried.
If the reserve has been incompletely dried (canopy or lines), it may shrink
asymmetrically!
No other heat sources or machines may be used to accelerate the drying process.
MAINTENANCE
Packing & inspection record booklet
Packing & inspection intervals
Operating & packing instructions | DIAMONDcross 20
This manual suits for next models
11
Table of contents
Other CHARLY Safety Equipment manuals


Popular Safety Equipment manuals by other brands

IKAR
IKAR HAS 9 Log book and instructions for use

Sperian
Sperian MILLER Grip 497 Operation and instruction manual

MS3C
MS3C MS3C-300TSB manual

Omron
Omron F3S-AP Series manual

BUCKINGHAM MFG
BUCKINGHAM MFG BuckSqueeze 483 Series Instructions & warnings

Buckingham
Buckingham GLIDE Series Instructions & warnings


Capital Safety
Capital Safety PROTECTA AM211 Specific instructions

Guardian Fall Protection
Guardian Fall Protection 15026 instruction manual

GTS
GTS I-9201 manual

BARRON
BARRON Exitronix CH900X Series installation instructions

CMC
CMC RESCUE & PROTECH PULLEYS manual

Clevertronics
Clevertronics L10 Jumbo LJELED-40 Series Installation & maintenance instructions