Chase Bliss Audio Blooper User manual


Table of Contents
2
4
6
16
22
26
28
30
32
34
36
38
40
42
44
46
48
Overview
Looping 101
Controls
Modifiers
Layers
Normal Mode
Recording with Modifiers
Additive Mode
Ideas
Sampler Mode
Delay-Style
Ideas
Customize
Ramping
Ideas
External Control
Bye
Power req: 9V DC Center Negative ~150 mA

Overview
All of which means Blooper is a little different,
and you will find yourself in some strange
places. You will probably be surprised and
bewildered. It’s an opportunity.
Take your time and enjoy the view.
03
02
Loopers are handy little things.
They can be practice partners, or performance
builders, or idea starters. But Blooper was
designed with something a little different in mind.
Here, it can be helpful to think of looping like
gathering raw materials. Once you get some
sounds in there, you can really get started.
Blooper’s looping functions are surrounded by
machinery that lets you mold your loops into
new and unexpected shapes. You can remix and
edit your loops in real time, in a hands-on way.
You can pile up variations and navigate
between them, or let Blooper take the lead and
leave your source material behind completely.
We are here to guide you along.

Looping 101
Let’s capture our first loop.
Nice and easy.
Your first press of the
left footswitch starts
recording.
Your second press sets
the end point of the loop
and begins playback.
You’re looping.
This initial recording is important because it sets
the length of the loop. No matter what you do
from this point - however strange - that length
will remain the same. This is an important
concept we’ll return to throughout the manual.
Every recording from this point on piles sound on
top of that initial recording. This is called
overdubbing. To begin overdubbing, press the left
footswitch. You can start and stop overdubbing at
any point. The loop will simply wrap around when
it hits the end point and keep going. Press the left
footswitch again when you’re done.
That’s really all there is to it:
Record a base layer, which sets your
loop length.
Overdub sounds on top.
Looping is a simple technique, but you can go
a long way with this alone.
Of course, we’re going much further.
05
04
STABILITY
REPEATSVOLUME
NORM
FIRST PRESS SECOND PRESS
The modifier buttons will blink when the
loop reaches the end and resets, so you
can keep track.

Sets the loudness of your loop. Noon is
unity, max is boosted by 2x. If ramping is
engaged (pg. 42), the function of this knob
will change. It now controls the speed of
the movement.
VOLUME
A
VOLUME REPEATSLAYERS
Boost, navigate, fade.
BLAYERS
Navigates through the different overdubs
you’ve recorded, like 8 levels of undo /
redo. Counter-clockwise removes layers,
clockwise adds them back. A new layer is
created each time you complete an
overdub (pg. 23).
CREPEATS
Causes your recordings to gradually
fade out when overdubbing, creating
evolving, shifting loops. The farther
counter-clockwise you go, the faster
your recordings will fade. Set to max for
standard, infinite looping. (Note that your
loops will not fade while in playback.)
Controls - Shared
If you go back to an earlier layer and
press record, all subsequent layers will
be erased.
07
06
C
B
A

STABILITY
NORM ADD SAMP
SAVE / LOAD
Age, select, save.
DSTABILITY
A multi-effect that introduces an analog
and increasingly broken feel (includes wow,
flutter, noise, and filtering). In the minimum
position, STABILITY is bypassed for clean
looping. You can adjust the noise volume
using the BLIP Interface (pg. 41).
Controls - Shared (Continued)
09
08
D
E
F
ENORM, ADD, SAMP
Selects the looping mode. You can switch
between modes without erasing your
current loop.
FSAVE / LOAD
Blooper can save and recall 16 loops with
their layers preserved.
PREVIEW (toggle in left position) - Allows you to scroll
through your loops, selecting a destination to save or
load. Press the left footswitch to scroll backwards, press
the right footswitch to scroll forward. The modifier
buttons and audio previews will help you navigate.
SAVE / LOAD (toggle in right position) - Once you’ve
selected a slot, flick the toggle to the right position. Now
hold the left footswitch to save to it, or the right
footswitch to load. You’ll get a little light show to let you
know it’s working. Once it’s done, flick back to the
middle position and make music.
You can use the BLIP Interface to download your
saved loops (pg. 41).

MOD A MOD B
MOD A MOD B
1 2 3 4 5 6
Controls - Modifiers
Modify and modify more.
11
10
B
F
D
A
E
C
1, 2, 3
C
Selects the modifier for CHANNEL A.
D4, 5, 6
Selects the modifier for CHANNEL B.
MOD A MOD B
The MOD knobs control Blooper’s modifiers.
The exact function changes depending on
the modifier, but there is consistency: 12
o’clock is always the “neutral” zone, with
different behaviors on either side.
A
The arcade buttons are used to engage the
modifiers. A quick press will have a
standard latching effect, while holding will
work as a momentary engage. In this case,
the modifier will only stay on while the
button is held down.
Both channels can be used at once.
MOD A BUTTON MOD B BUTTON
E F
B

STOPPLAY/RECORD
Footswitches (NORM and ADD modes)
Tap once to begin recording and a second
time to set the end-point of the loop and
begin playback. From there, tapping this
switch toggles between overdubbing and
playback. If the loop is stopped, tapping
here resumes playback.
RECORD / PLAY
Engages overdubbing for exactly one full
pass of the loop, then automatically
returns to playback. Useful for recording
modifiers or stability in ADDITIVE mode
without having to precisely punch the
recording in and out.
ONE-SHOT OVERDUB
13
12
Press both footswitches at once to delete
your loop and start over.
DELETE
TAP
HOLD
Hold the right footswitch to enter the undo /
redo submenu. Once in the submenu, tap
the right footswitch to undo and tap the left
footswitch to redo. Hold the right footswitch
again to exit the submenu.
UNDO / REDO
Stops playback of the loop.
STOP
TAP
HOLD
TAP
RECORD
PLAY
Blinking Solid

STOP
Footswitches (SAMPLER mode)
Tap once to begin recording, and a
second time to set the end-point of the
loop and begin playback. There is no
overdubbing in SAMPLER mode - each
time you tap the left footswitch your old
loop will immediately be cleared and a
new one will begin recording.
RECORD
Recording will be engaged as long as the
footswitch is held down, and switch to
playback immediately on release. Useful
for capturing brief moments.
MOMENTARY RECORD
15
14
Press both footswitches at once to delete
your loop and start over.
DELETE
TAP
HOLD
Plays or resets your loop.
TRIGGER / RETRIGGER
TAP
Hold the right footswitch to turn off looping,
turning Blooper into a sample player.
LOOPING ON / OFF
HOLD
ON OFF
TAP
Blinking Solid

Controls the modifier.
All of Blooper's modifiers have a "neutral" zone at
noon on the knob, with different behaviors on
either side.
Modifiers
17
16
The modifiers are a collection of effects that let
you refine and reimagine your loops.
There are two channels that can be used
simultaneously, each with three controls:
MOMENTARY - The modifier buttons can be used
as a momentary effect by holding them down, or
your typical on / off with a quicker press.
Each pedal comes loaded with a standard
arrangement of modifiers, including alternate
banks selected via dip switch (pg. 20). You can
also connect to the BLIP Interface to select your
own and customize the banks (pg. 41).
A number of the modifiers have both a smooth
and stepped option. Smooth gives you finer
control and a fluid response, while Stepped
jumps between musical intervals to make things
fast and simple. The stepped version of Trimmer
makes it easy to rhythmically shrink your loop,
cutting it in half, for example.
So what have you got?
E
N
D
E
N
D
N
O
N
E
S
T
A
R
T
S
T
A
R
T
Stepped Trimmer modifier
MOD A / B
Selects the modifier.
1 2 3 / 4 5 6
Activates the modifier.
A / B

Default Modifiers
18 19
Adjusts the speed and direction of
your loop in a fluid, organic way
reminiscent of a tape machine.
Useful for slowing things to a
crawl, finding sweet spots, or
introducing dissonance.
A1. SMOOTH SPEED
Adjusts the speed and direction of
your loop in musical steps, tuned
to stay in key (the equivalent of
octaves and fifths). Has an extra
octave of range compared to
Smooth and Chromatic Speed.
B1. STEPPED SPEED
Rearranges your loop, turning it
into a pattern. Going counter-
clockwise will be random, while
going clockwise will create a
repeating sequence. Lower levels
will produce the occasional jump,
while higher levels will chop
everything up.
B2. SCRAMBLER
Simple multi-mode filter; a
High-pass filter for removing low
frequencies, and a Low-pass filter
for mellowing out the highs. Note
that using the filter can cause
oscillation in ADD mode.
B3. FILTER
Channel A Channel B
Causes playback errors – brief
moments of silence. These drops
will sometimes be smooth and
subtle, other times abrupt and
deep. Going counter-clockwise
produces a random stream of
drops, while clockwise will create
a consistent pattern. At maximum
you will get granular crumbling.
A2. DROPPER
Allows you to shorten the length
of your loop, either by trimming
off part of the end or part of the
beginning. Each landing spot is a
subdivision of the loop length, so
it's easy to cut a loop in half, for
example, and all of your changes
will fit nicely into rhythm.
A3. STEPPED TRIMMER

Both Stretcher and Pitcher use a lot of processing
power, so you won’t be able to use both at the
same time. You also won’t be able to use the
Speed modifiers, except to go into reverse.
The alt banks for Channels A and B can be turned on
independently, using Blooper’s dip switches (pg. 40).
Channel A
Channel B
Alt Banks
21
20
Pitch shifts your loop without
affecting the speed. You have a
three-octave range up or down.
A2. PITCHER
Creates a loop within your loop,
repeating the current moment.
Counter-clockwise of noon will loop
whatever just happened, while
clockwise will loop what’s coming
up next. Useful as a performance
effect or zooming in on a certain
moment of a longer loop.
A3. STUTTER
Adjusts the speed of your loop
without affecting the pitch.
Explore the microscopic world
hiding within each loop or
condense it into a blur.
B1. STRETCHER
Introduces two alternate ways to
stop your loop – a volume fade or
a tape stop. Each of these effects
only applies to the play head, so
you can record them in ADD mode.
The loop will remain stopped until
Stopper is disengaged.
B2. STOPPER
An interactive modifier that offers
three different ways to silence
your loop. With the knob at noon
the loop will instantly be muted
when overdubbing is engaged,
while the two halves of the knob
sweep offer different kinds of
envelope-controlled muting. This
can be useful for replacing parts of
your loop in ADD mode.
B3. SWAPPER
Adjusts the speed and direction of
your loop in precise steps, tuned to
follow the chromatic scale. Useful
for transposing your bloops.
A1. CHROMATIC SPEED

Blooper’s LAYERS function is a
unique take on undo / redo.
In total, Blooper allows you to
record 16 layers. The first 7 are
stored independently, while
layers 8-16 are lumped
together into one mega layer.
The LAYERS knob lets you
navigate through these
layers: Rotating it counter-
clockwise removes them
one-by-one, and rotating it
clockwise adds them back.
You can think of the layers like a tower. They are
not isolated, but instead stack on top of each
other. If you go back to layer 3, for example, you
will be hearing layers 1-3. If you press record at
this point, all subsequent layers will be cleared
out and a new 4th layer will be added on top.
So what constitutes a layer?
A layer is created when you complete an overdub.
The number of times the loop resets is of no
consequence – you can go around and around
and record an infinite amount of audio on a
single layer. The layer is only created when you
decide you’re done and press the record or stop
footswitches. This means one layer can be
subtle, while another can contain a whole heap
of sound. You can also use the REPEATS knob to
do some interesting things here (pg. 36).
A final note on the LAYERS knob is that it “goes to
sleep” when you aren’t using it, so that you don’t
have to worry about where it’s set at all times.
Layers
23
22
Loops 1-7
Loops 8-16
Scrolls back to layer 3
Records new 4th layer
All of this could
be contained in
a single layer.

SMOOTH SPEED DROPPER
STEPPED SPEED SCRAMBLER
CHROMATIC SPEED FILTER
SWAPPER STUTTER
STRETCHER STOPPER
STEPPED TRIMMER PITCHER
SAY HELLO TO THE BLOOP TROOP

Normal Mode
Normal mode is probably
the best place to start on
your blooping journey.
The difference between NORM and ADD is how
the modifiers and stability are treated.
In NORMAL mode you can think of them like
external effects – you can set up the sound just
the way you like it and that character will apply
to all of your overdubs. At any time you can turn
the modifiers off and your clean audio will be
waiting underneath.
Try this:
Record a loop, then set it to half-speed.
Now go ahead and record some overdubs.
Now turn off half-speed and enjoy the nice,
normal loop waiting below.
Well, mostly normal.
27
26
NORM ADD SAMP
STEPPED SPEED MODIFIER
Notice how all
those overdubs
play back at half
speed too; a nice
way to build
loops that grow
and change,
but stay in the
background.

Recording with modifiers is the most rewarding
and challenging part of Blooper.
Here’s what you need to know:
Blooper uses two different “heads” to achieve
its effect:
One to record audio
One to play it back
The thing is, certain modifiers split those two
heads up. So you might be hearing one part of
the loop and recording to another.
The important rule:
the record head is always steady.
It always moves forward at real-time speed. It is
dependable. Nothing you do will change its
behavior; all you can do is tell it to record or not.
If you care to go further, we have an in-depth
breakdown of all of this on our website called
Recording with Modifiers.
Recording with Modifiers
What does this mean for you? Simply, if you’re
overdubbing with modifiers that manipulate time,
you will get unexpected results. You will record to
a different part of the loop than you expect.
It’s a bit odd, but also a great way to surprise
yourself and create some unorthodox loops.
Try turning on Trimmer and recording a few
overdubs in NORM mode, then turn Trimmer off
and see what you get.
To keep things predictable, simply leave these
modifiers off while overdubbing:
29
28
RECORD HEAD PLAY HEAD

Additive Mode
In ADD mode, modifiers and stability will be
recorded into your overdubs. The simplest way
to think of it: Whatever you hear, that’s what
Blooper will record.
Let’s look at one use of ADD mode:
Remixing your loops in real-time.
Record a loop.
Now leave Blooper overdubbing and turn some
modifiers on and off. Move the MODIFY knobs as
you go. All those moments will be stored exactly as
you performed them, including your movements.
This can be an interesting way to create breaks
or B-sides – when you’re done getting weird,
simply use the LAYERS knob to go back.
31
30
One-shot overdub (pg. 13) is very handy in ADD
mode for neatly “printing” modifiers into your
loop. Turn on Filter, for example, and hold the left
footswitch until the LED starts blinking red.
Blooper will overdub for exactly one pass of the
loop and turn off the modifier when it’s done.
Now that modifier is baked neatly into the loop.
But remember: No matter what you do, you will
not change the length of the loop (pg. 4).
This means that if you record a half-speed
effect, you will lose half of your loop. It can’t fit.
ADD mode adjusts for this and plays modifiers exactly
how they will sound once recorded, so you don’t have
to guess. This means going to half-speed will only
play half your loop in ADD mode. You can turn this
off if you wish using the BLIP Interface (pg. 41).
It can all take a bit of getting used to, but it’s a
heckuva ride.
The next page has some ideas to get you going.
FILTER SWAPPER
SWAPPER &STRETCHER
SCRAMBLER
STEPPED SPEED EFFECT
FULL LOOP HALF THE LOOP

Additive Mode Ideas
33
32
ACCUMULATOR
This approach involves leaving a
(generally mild) modifier on while
you overdub, causing your loop to
gradually evolve over time.
STABILITY is a good starting point
– older layers will start to wobble,
lose frequencies and get noisier,
while newer layers will sound
fresh and pop out. Try Scrambler
for something more adventurous.
NOISE GENERATOR
This approach turns Blooper into a
strange instrument, no input
signal required. Record a layer of
silence, then turn up the STABILITY
knob and record an overdub.
Blooper will record the noise from
stability into the loop. Now you can
go wild modifying that noise – slow
it down, filter it, make yourself a
nice white noise soundtrack.
PUNCH-IN
This technique is a great way to
get precise, impactful results in
ADD mode. Start overdubbing
first, then turn on a modifier for
just a brief moment. Now when
the loop plays back only that
moment will be altered. This
approach is a great way to add
intrigue to a loop or emphasize a
certain bit.
STABILITY
STABILITY
ANY MODIFIER
wOaHh!

ONE SHOT PLAYBACK
By default, SAMPLER is set to loop so you can
move freely between modes without accidentally
stopping your loop. Hold the right footswitch to
shut looping off and turn Blooper into a manual
sample player.
Sampler Mode
SAMPLER is a performance-oriented mode with
its own workflow.
Instead of overdubbing, each time you press
record your loop is cleared and a new one begins
recording. This can be great for momentary
glitches or snagging passing moments.
CARRYOVER - While you can’t record overdubs in SAMPLER
mode, you can first record a loop in NORM or ADD mode and
then switch over to SAMPLER. This allows you to use complex,
multi-layer loops as samples.
SAMPLED LOOP
INPUT AUDIO
HOLD TAP TAP TAP
Like the other modes, samples will go through
the modifiers and stability.
Tap the right
footswitch to trigger
your “sample”– once it
reaches the end it will
stop automatically.
You can also interrupt
and retrigger it while
playing (this works
while looping in
SAMPLER mode as well).
LED A will
turn solid
green

Thanks to the
REPEATS knob,
Blooper is also
a delay.
With some tricks.
First, clear out your loop and start fresh. Now
instead of recording a new loop, think of the
record footswitch like tap tempo. Tap once, then
quickly tap again. The amount of time between
the first and second tap sets your delay time.
Now press a third time – Blooper will need to be
in the overdubbing state to work as a delay. Play
a note, and enjoy some echoes.
You can think of the REPEATS knob just like the
feedback knob on a classic delay. The higher it’s
turned up, the more echoes you will get.
Delay-Style
37
36
TRICK 1: LATCH - Going into playback (by pressing
the record footswitch) will infinitely loop the
current echo. Simply press the footswitch again to
resume echoing. A nice bonus: Every time you do
this, that latched phrase becomes a layer you can
revisit later (pg. 39).
TRICK 2: DELOOPING - You don’t have to choose
between delay or looping, but can instead flow
back and forth between the two. All you need to
do is adjust the REPEATS knob – max it out for
looping, lower it for delay. This can be a great
way to get a nice, lazy loop going. Simply use
Blooper as a delay until you find an interesting
spot, then turn up the REPEATS and start building
your loop from there. If you’re ready to move
somewhere new, just turn down REPEATS again
and you will gradually transition. Rinse, repeat.
More ideas on the next page.
LAYERS
STABILITY
REPEATS
MOD B
VOLUME
MOD A
NORM
Other manuals for Blooper
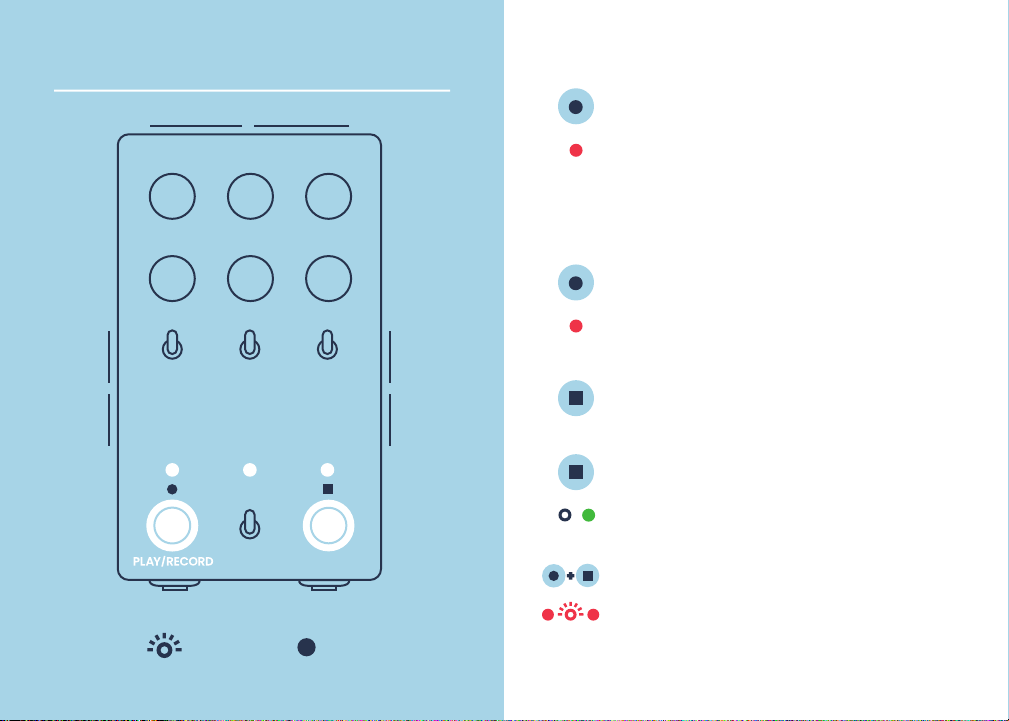
1
Table of contents
Other Chase Bliss Audio Music Pedal manuals

Chase Bliss Audio
Chase Bliss Audio Reverse Mode C User manual

Chase Bliss Audio
Chase Bliss Audio Lossy User manual

Chase Bliss Audio
Chase Bliss Audio Thermae User manual

Chase Bliss Audio
Chase Bliss Audio MOOD MKII User manual

Chase Bliss Audio
Chase Bliss Audio Blooper User manual

Chase Bliss Audio
Chase Bliss Audio Generation Loss MKII User manual

Chase Bliss Audio
Chase Bliss Audio Brothers User manual

Chase Bliss Audio
Chase Bliss Audio MOOD MKII User manual

Chase Bliss Audio
Chase Bliss Audio Thermae User manual

Chase Bliss Audio
Chase Bliss Audio Cooper FX Generation Loss User manual