Chase Bliss Audio Thermae User manual

THERMAE
INSTRUCTIONS
OVERVIEW
Public bathing never felt so good. Thermae™ represents a radically
new approach to analog delay and harmonization. The pedal
digitally manipulates the analog signal path created by 4 re-issued
versions of the legendary MN3005 bucket-brigade delay chips.
This creates the ability to change delay time in musically interesting
intervals, which allows for innumerable options for harmonizing and
other sonic madness. These intervals can be sequenced through
automatically or triggered manually for ultimate usability in a musical
context. Thermae™ can also be used as a more standard analog
delay with unprecedented analog modulation options. Every knob
and switch is connected to a little digital brain while your guitar
signal stays 100% analog and never gets digitally processed.
enough time for the pitch bend to complete its journey, so it’ll
sound like a bendy soup. Like an old man wandering around, never
quite reaching his original intended destination because he is
pointed in a new direction.
INT 1 (SPEED)
If Modulation dip is not engaged, this knob sets the rst delay time
interval change in sequence or in step mode. If Modulation dip
is engaged, this knob sets the speed of the LFO (low frequency
oscillator) for the pitch modulation on the repeats. Clockwise for
fast modulation, counter-clockwise for slow modulation.
INT 2 (DEPTH)
If Modulation dip is not engaged, this knob sets the second delay
time interval change in sequence or in step mode. If you are in step
mode and only want to step between two intervals, turn this knob
to “off.” If Modulation dip is engaged, this knob sets the intensity
of the pitch modulation on the repeats.
THOSE THREE NOTE TOGGLES
Ok, rst things rst. If you are using this as a normal delay (that
is, you have both interval knobs set to “off” so there’s no pitch
shifting) the left toggle is a simple tap tempo note division switch;
quarter note, dotted eighth, and eighth. If you have INT 1 and/or
INT 2 set to something, that’s when things get interesting. Let’s say
you tap in a tempo for one second (1000ms) delays, and all three
toggles are set for quarter notes. That’s the base time from which
everything else derives from. Now let’s say INT1 is set for +1 octave
and INT2 is set for +1 octave. For the rst 1000ms (rst quarter
note), the delay time will be 1000ms. For the second 1000ms
(second quarter note), the delay time will jump up an octave to
500ms and you’ll hear two repeats (and pitch shifting) during that
interval. For the third 1000ms (third quarter note), the delay time
will jump an octave to 250ms and you’ll hear 4 repeats (and pitch
shifting) during that interval. Then we go back to our original
1000ms delay time and start the sequence over. If this is difcult
to understand you are not alone; it’s best to check out the KNOBS
MIX (RAMP)
Simply put, this is a magical knob. When you don’t have
any dip switches assigned for ramping, this knob functions
as mix control between the dry, unaffected signal and the
delay’s repeats. Completely clockwise is 100% wet, full delay
path, and in this scenario the signal will be boosted slightly.
Completely counter-clockwise is 100% dry. In regards to the
ramping functionality, the digital control of this pedal allows
you to set this knob to control any of the ve parameters
individually or simultaneously (mix, rate, time, regen, depth),
and have it either modulate or ramp-and-hold (rise or fall) via
dip switches in the back of the pedal. Essentially, this
knob controls the ramp time in which this takes place.
LPF
This controls a slightly resonant low pass lter (LPF) on the
repeats (wet signal). Set it all the way clockwise for brighter,
noisy repeats. Turn it counterclockwise to lter out high
frequencies and get a resonant boost or hump in frequencies
immediately preceding that drop-off. Due to the resonance on
this control, it’s highly interactive with the Regen control and
can make the pedal self-oscillate or increase repeat numbers,
even if the Regen knob is set relatively low.
REGEN
This controls the amount of repeats on the delay. If set
carefully, it can regenerate seemingly forever, and can also
regenerate into self-oscillating madness. The longer that a
delay is regenerated, the sooner it will eventually devolve into
a beautiful, smeary, tape-saturated blur.
GLIDE
This controls the pitch transition time from one
interval to another. Completely counterclockwise has
nearly instantaneous pitch shifting. As the control is moved
clockwise, more and more transition time is gradually
introduced. When completely clockwise, there may not be
This device complies with part 15 of the FCC rules.
Operation is subject to the following two conditions:
(1) This device may not cause harmful interference, and
(2) this device must accept any interference received,
including interference that may cause undesired operation.
demo on YouTube for a video explanation. It’s much easier to
understand if you are able to see it rather than read it. TLDR;
this whole manual is pointless, watch the knobs video.
SLOWDOWN MODE
While the pedal is sequencing like described above, you have
the option to slow the speed of the sequence down 2x. Hold
both stomps for 3 seconds and you’ll notice the tempo LED is
green now. This can be saved as well.
MODULATION TOGGLES
If the Modulation dip is engaged, you can use these two
toggles for 9 types of modulation. The right toggle controls
the shape of the wave for the pitch modulation on the repeats.
Left for triangle, middle for sine, and right for square…
nothing terribly unusual there. The middle toggle controls how
smooth and/or random/glitchy the modulation is. Put in the
left position for modulation that is completely representative
of the right toggle (i.e. sine, triangle, and square). Things get
interesting in the middle and right positons. They implement
varying levels of randomness and glitch in half of the wave
shape cycle. That is, half of the wave shape is smooth and
half is glitchy and random. The depth knob controls this
randomness in the modulation. Best to just try these out, they
are fun.
BYPASS STOMP
This Activates or bypasses the effect. This can be changed to a
momentary bypass via a dip switch in the back of the pedal, if
it is desired. This pedal allows for “True Bypass” via a relay, or
buffered bypass with “trails” selectable via a dip switch in the
back of the pedal.
TAP / HOLD STOMP
Sets tap tempo, always honors the last two stomps. If you hold
down this stomp switch, the pedal will go into self-oscillating
regeneration “runaway” mode. This is the same effect as if
the regeneration knob is set completely clockwise. If the step
dip is engaged, the next interval in the sequence is triggered
when this stomp is pressed. If you are in step mode and you
want to change the base tempo, hold both stomps for 3
seconds and you’ll notice the tempo LED is green now. Now
you can tap in a new tempo. Do the same process again to get
back to typical step mode.
LOWER TOGGLE
This switch recalls presets. The right position recalls preset
#1, the left position recalls preset #2. The middle position will
always reect wherever the knob positions, toggle positions,
and dip switch positions are currently at. In order to save to
the right preset slot, you hold down the right stomp (bypass)
for 3 seconds, and then hold down both stomp switches
simultaneously for another 3 seconds. The LED blinks and
your setting is saved. For the left slot, you do the same thing,
but hold the left stomp rst. If you recall a preset, and move a
knob, you will notice that the LED above the toggle goes dim.
This is to signify that something has changed on the preset.
If you want to save this change in the preset, you will have to
save it again.
IN / OUT
¼” mono input jack.
EXP / CV
¼” TRS jack for expression pedal (parameter selectable via dip
switch in the back of the pedal. Tip goes to wiper. Can also be used
for 0-5V Control Voltage (CV) on tip – the ring should be left
oating in this case. There are many expression pedals that work
with Chase Bliss Audio products, contact us if you have questions.
MIDI
¼” TRS jack for expression pedal (parameter selectable via dip
switch in the back of the pedal. Tip goes to wiper. Can also be
used for 0-5V Control Voltage (CV) on tip – the ring should be left
oating in this case. There are many expression pedals that work
with Chase Bliss Audio products, contact us if you have questions.
POWER & OTHER INFO
This pedal consumes ~180mA and should be operated with a
standard 2.1mm 9V DC center negative adapter with current supply
capabilities of 200mA or more. If you use a “standard” outlet of
100mA, the pedal will not function properly. Input impedance of
this device is 1M, and output impedance is less than 1k.
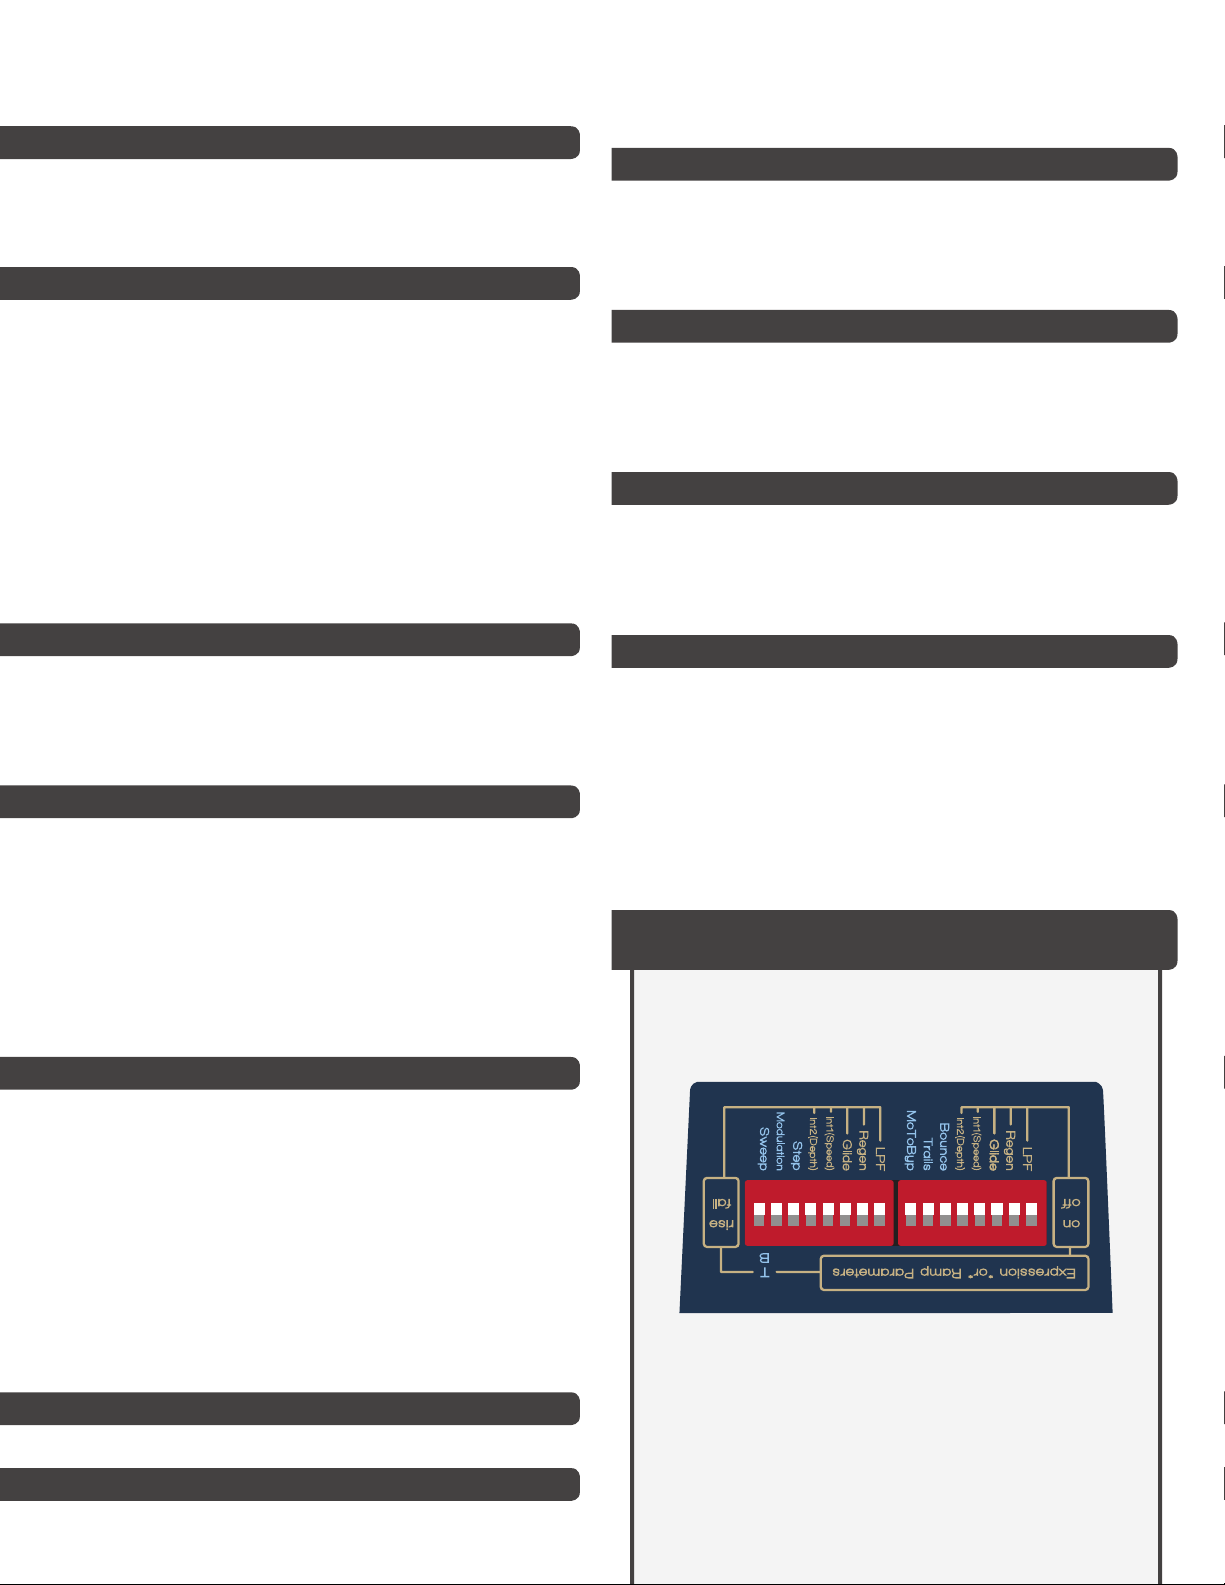
EXP / CV CONTROL & DIP SWITCHES
The LPF, Regen, Glide, Int 1 (Rate), Int 2 (Depth) dip switches in
the left bank allow you to control parameters via ramping or an
Expression Pedal / CV. Whenever you plug a ¼” in to the EXP /
CV jack, the pedal automatically knows that you will be controlling
parameters via expression or CV, not ramping.
SETTING EXPRESSION / CV RANGE
The range of the expression / CV is controlled by the parameter
knob position and the “sweep” dip switch. For example, if you
wanted an expression pedal to control the volume parameter from
zero volume to unity gain, you would make sure the “sweep” dip
switch is in the bottom position and set the volume knob at unity
gain. If you need more volume, you simply turn the volume knob
up slightly. This will increase the maximum range of the expression
pedal. This allows you to control multiple parameters with an
expression pedal, but you can ne tune the range that you want for
each parameter.
The LPF, Regen, Glide, Int 1 (Speed), and Int 2 (Depth) dip
switches on the left side simply turn that parameter on or off
expression / CV capability.
The LPF, Regen, Glide, Int 1 (Speed), and Int 2 (Depth)
dip switches on the right side control whether or not the
parameters will rise (go clockwise with expression) or fall (go
counter-clockwise with expression).
UNDERSTANDING THE DIP SWITCHES
When you save a preset, all of this information gets saved.
The parameters in Ta n below correspond to an expression
pedal (if one is plugged in).
Continued on next page

Bounce: When on (and no expression pedal), parameters will
go back and forth (i.e. modulate), if it’s off, parameters will
ramp and hold.
Trails: This switch allows you to select bypass type. With trails
“off” the bypass is normal, true bypass. With trails in the
“on” position, you have a buffered bypass where the delay
trails spillover into your dry tone. It is important to remember
that with trails mode engaged, and if you have the pedal set
in a conguration that is causing self-oscillation, this will not
stop simply because you are in bypass.
MoToByp: Momentary-to-bypass. If on, the pedal is only
activated when the bypass stomp is pressed in.
Step: When on, the pedal will not sequence through intervals
by itself. It will only do so if the tap stomp is pressed. If you
set the Int 2 knob to “off”, it will only step through the Int 1
interval and whatever base time delay you have tapped in.
Modulation: When on, the Int 1 and Int 2 knobs become
speed and depth knobs for the modulation, respectively. In
addition, the toggles below those knobs allow you to choose
what kind of modulation style you want.
Sweep: This controls where ramp sweeps. In “T” (top),
the expression control will occur between the current
knob position and the max position (fully clockwise). In
“B” (bottom) the expression control will occur between
the current knob position and the minimum position (fully
counterclockwise).
Example presets continued on next page
Some of these concepts are much easier to explain
and demonstrate on video, and I have many tutorials
available on my youtube channel at
www.youtube.com/ChaseBlissAudio.
We also love to hear from customers and answer
questions so feel free to write us anytime at
chaseblissaudio.com/contact.
Thank you so much for purchasing this product
and ENJOY!
All presets created by Knobs.
This is the modulation setting he used on all
of them, which can be set by engaging the
“modulation” dip switch: using the right-most
random setting, triangle & depth about 11:00
and speed about 10:00.
Hear them at soundcloud.com/chaseblissaudio.com
HALF TO HALF DISINTEGRATING LOOP

Example presets continued on next page
BENT SEQUENCE GLIDE VIBRATO
MODULATED REVERB MELTING / UNMELTING
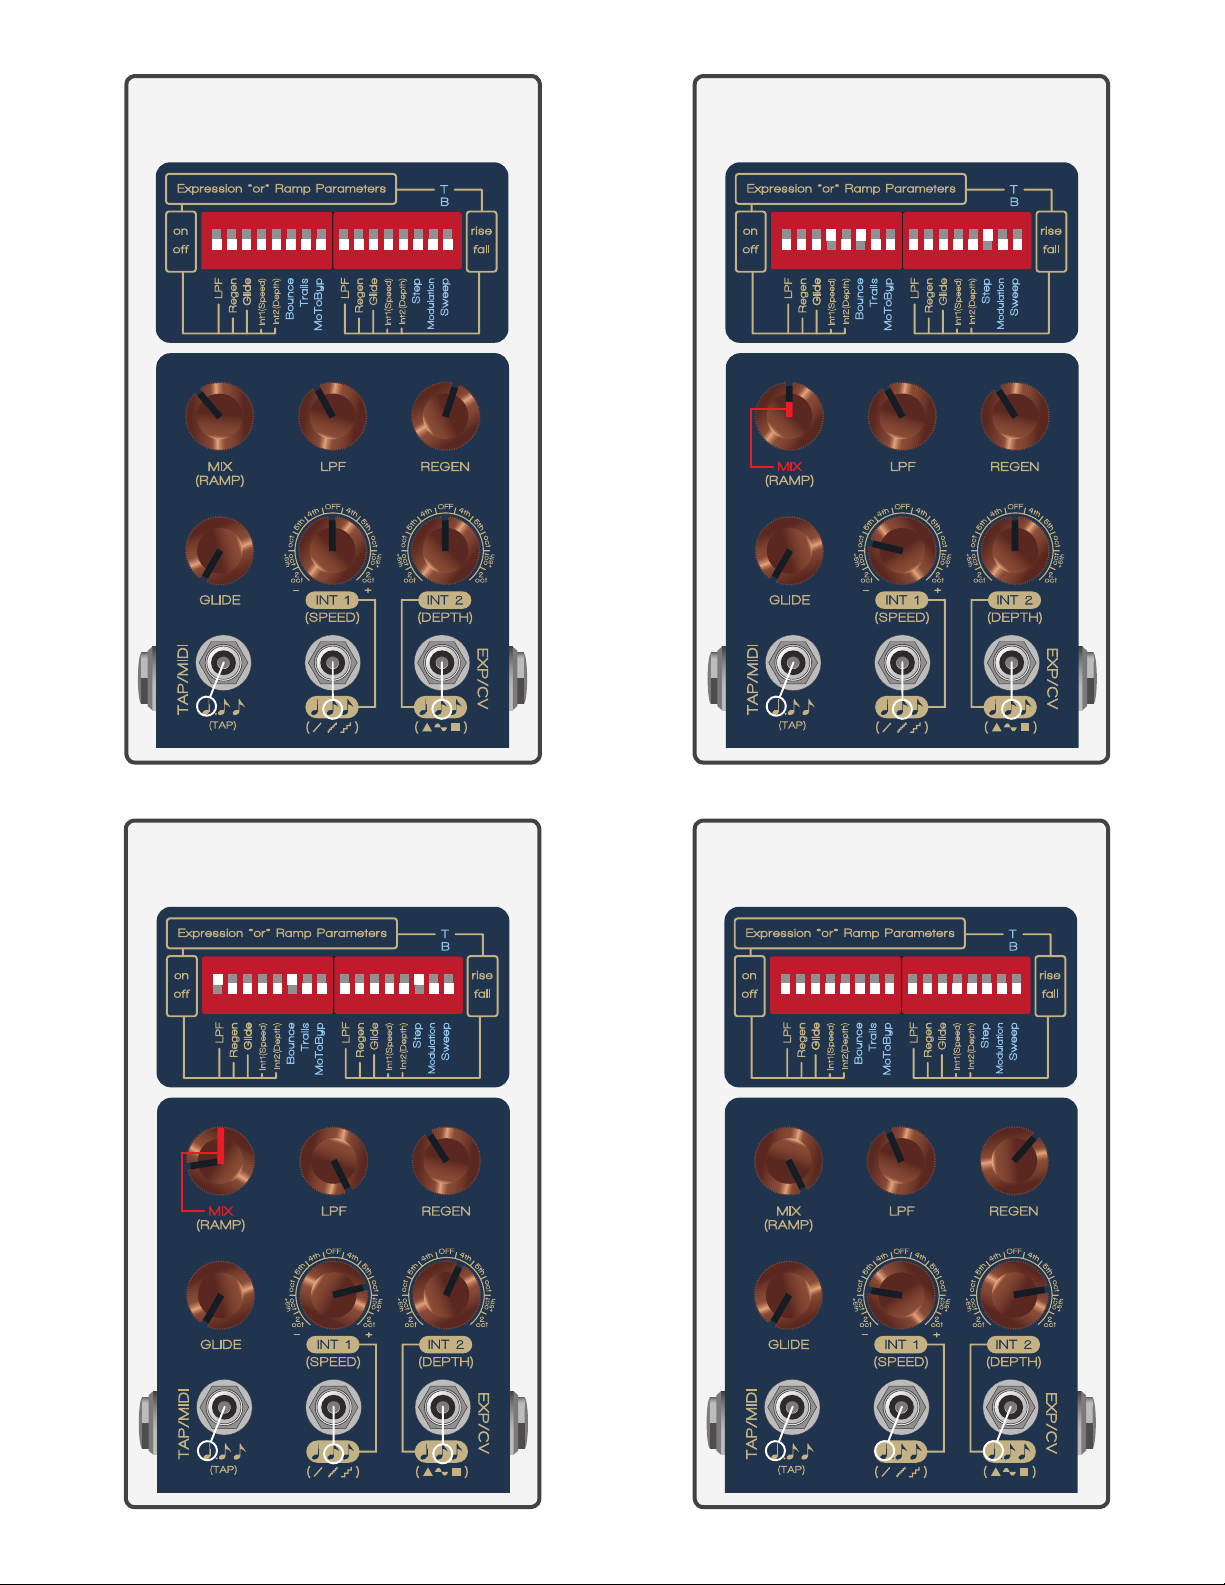
NORMAL DELAY INTERVAL RAMPING
LFO RAMPING BIRD ARP
Other manuals for Thermae
1
Table of contents
Other Chase Bliss Audio Music Pedal manuals

Chase Bliss Audio
Chase Bliss Audio Lossy User manual

Chase Bliss Audio
Chase Bliss Audio Mood User manual

Chase Bliss Audio
Chase Bliss Audio Brothers User manual

Chase Bliss Audio
Chase Bliss Audio MOOD MKII User manual

Chase Bliss Audio
Chase Bliss Audio Cooper FX Generation Loss User manual

Chase Bliss Audio
Chase Bliss Audio Thermae User manual

Chase Bliss Audio
Chase Bliss Audio Blooper User manual

Chase Bliss Audio
Chase Bliss Audio Generation Loss MKII User manual

Chase Bliss Audio
Chase Bliss Audio MOOD MKII User manual

Chase Bliss Audio
Chase Bliss Audio Reverse Mode C User manual


