Chase Bliss Audio MOOD MKII User manual


Table of Contents
2
4
6
8
14
18
22
28
36
40
42
44
46
48
50
Overview
Setup
Getting Started
Controls
Hidden Controls
Clock
Wet Channel
Micro-Looper Channel
Spread
Routing
Classic Mode
Customize
Ramping
External Control
Bye
Power req: 9V DC Center Negative ~270 mA

Overview
03
02
Hi. Welcome back.
If you’re familiar with the world of MOOD, good.
MOOD MKII picks up right where you left off –
same controls, same spirit, but with a bunch of
ways to go further and tune the experience to
your music.
If you aren’t, even better.
MOOD was designed for messing around. You
don’t have to understand it, and it might be
better if you don’t. Turn it on and be surprised,
find some new sounds.
But we’re going to explain it here because that’s
the job.
MOOD is a two-channel multi-effect. One half
samples and loops brief moments, the other is a
suite of real-time spatial effects.
What makes it a little different is that the two
channels are aware of each other and work
together. You can process the micro-loops with
the spatial effects, or record those effects into
the loops. This free-flowing exchange makes it
possible to pass audio back and forth between
the two channels for endless, spontaneous
discovery.
It’s a musical chemistry set.
Let’s see about it.
In this manual we will refer to
MOOD MKII simply as MOOD.
Because it’s easier.
Setup
If you have a mono input and want to split it to
stereo output, turn on the MISO dip switch.
And if you want unique stereo processing, turn
on the SPREAD dip switch (pg. 36).
OPTIONS
MOOD has lots of ways to customize and
fine-tune your experience. If you’d like to get
right into all that, check out:
Hidden Options (pg. 14)
Customize (pg. 44)
Ramping (pg. 46)
External Control (pg. 48)
If you don’t want to get into all that, it’s probably
best to start with all dip switches in the off position.
Okay let’s get started.
05
04
Let’s get MOOD settled into your environment. If
you’re experienced with pedals, you can probably
ignore this bit and dive right in.
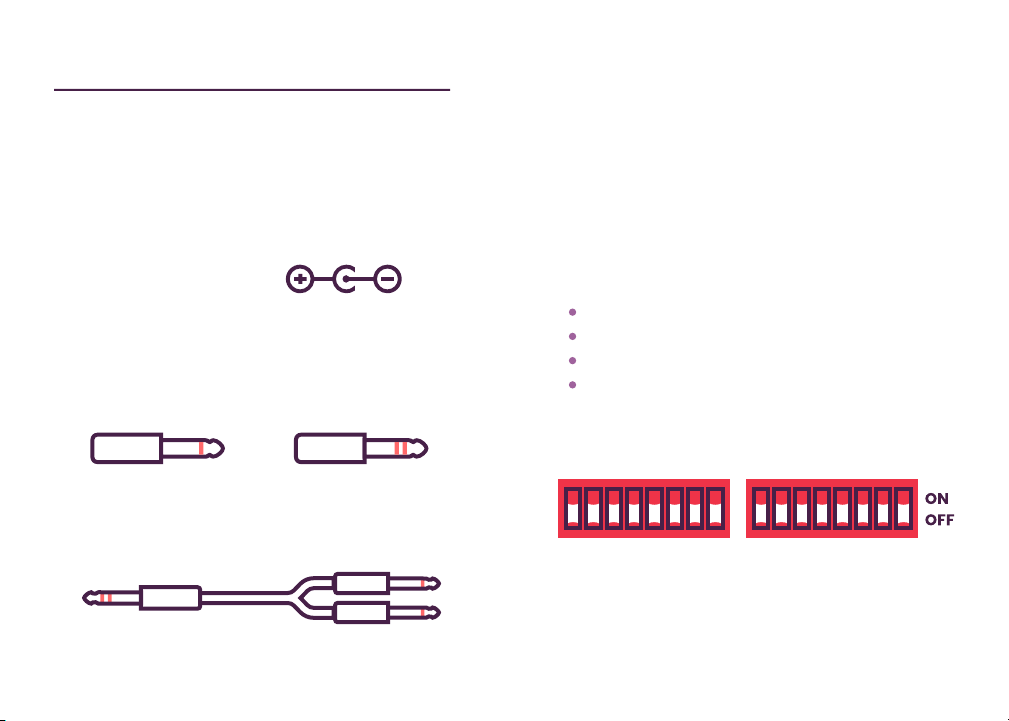
POWER
MOOD requires a 9V DC center negative power
supply with at least 270 mA of current.
You’ll see this symbol
on your power supply:
I / O
MOOD can be used in mono, stereo, or mono to
stereo. The default setting will automatically
work for either mono or stereo:
Mono in, mono out Stereo in, stereo out
TS CABLE TRS CABLE
Many stereo devices use dual mono jacks, so
you may need a TRS to dual TS-style cable.
Getting Started
If you're looking for a good
default setting to do your
own thing, try this.
07
06
Let’s use MOOD to turn a few simple notes into
a textural symphony.
Start with both channels bypassed.
Play a few notes, then
turn on the Micro-Looper.
Start to roll back the CLOCK,
get some texture in there.
Move around each of the
MODIFY knobs.
CLOCK
MODIFY
TIME / LENGTH
Then work your way up to the
TIME and LENGTH knobs.
You should be a texture now.
This is where things get interesting:
Now, let’s smear it with
the Wet Channel.

Sets the balance between your input
signal and MOOD (controls both channels
simultaneously). If ramping is engaged
(pg. 46), the function of this knob will
change. It now controls the speed of the
movement instead.
MIX
A
MIX
CLOCK
ROUTING
PRESETS
Blend, degrade, recall.
BCLOCK
Sets MOOD’s sample rate. This controls
the length and resolution of the
Micro-Looper Channel, as well as the
quality and time of the Wet Channel.
CROUTING
Controls what gets processed by the
Wet Channel. This toggle only has an
effect when both channels are on.
DPRESETS
The left and right positions each store a
preset, while the middle position is live
(current settings). To save to the right
slot, hold the right foot switch for 3
seconds, then add the left footswitch for
another 3 seconds. Do the same for the
left slot, but start by holding down the
left footswitch. The middle LED will blink
to indicate success.
Shared Controls
09
08
A
B
C
D

MODIFY
BYPASS
TIME
Wet Channel Controls
Engage, adjust, select.
The function of this knob changes
depending on the mode.
Reverb - Decay / size
Delay - Delay time
Slip - Refresh rate
TIME
A
BMODIFY
The function of this knob changes
depending on the mode.
Reverb - Smear
Delay - Feedback
Slip - Playback speed and direction
CMODE
Selects between Reverb, Delay,
and Slip modes.
DBYPASS
Activates the Wet Channel.
FREEZE
Freezes and infinitely repeats the
current sound.
TAP
D
HOLD
11
10
A
B
C
D

The function of this knob changes
depending on the mode.
Env - Slice size
Tape - Loop length
Stretch - Slice size
LENGTH
A
BMODIFY
The function of this knob changes
depending on the mode.
Env - Sensitivity
Tape - Playback speed and direction
Stretch - Stretch amount and direction
CMODE
Selects between Env, Tape,
and Stretch modes.
LENGTH
MODIFY
BYPASS
Micro-Looper Channel Controls
Engage, adjust, select.
13
12
A
B
C
DDBYPASS
Alternates between recording and
playback of a micro-loop.
OVERDUBBING
Engages overdubbing, recording
additional audio onto the micro-loop.
TAP
D
HOLD
Recording Playback

Hidden Options
15
14
Hold both footswitches down to
access MOOD’s hidden options.
STEREO WIDTH
Sets the panning of the Wet Channel
when SPREAD is engaged.
TIME
W
I
D
E
R
X3 To reset all the hidden options to their default setting,
flip the preset toggle to the left position and back to
center three times. Once you see the blinking lights,
press both footswitches simultaneously to confirm.
DIRECT MICRO-LOOP
Allows you to blend in some of the
clean micro-loop when it’s routed
through the Wet Channel.
N
O
N
E
U
N
I
T
Y
MODIFY
TONE
A simple hi-cut filter for mellowing
the Wet algorithms, helpful for
sitting back in the mix or matching
the sound of the original MOOD.
MODIFY
D
A
R
K
E
R
FADE
Turning this down will cause your
loops to gradually fade while
overdubbing for slowly evolving
loops or the ability to treat the
Micro-Looper Channel like a delay.
FADE has no effect when the NO DUB dip switch is on.
LENGTH
TONE
FADE
LOOP
LENGTH
SPREAD
SOLO
SYNC
STEREO
WIDTH
DIRECT
MICRO-LOOP
LEVEL
BALANCE
RAMPING
WAVEFORM
(The settings above are the default for all Hidden Options)
Hidden Options Continued
17
16
CLOCK
EVEN
LEVEL BALANCE
Sets the relative loudness of the
two channels. UNSYNCED SYNC
Allows you to sync one channel to the
other.
In the left position, the Micro-Looper
is synced to the Wet Channel. The
length of the micro-loop is now set by
the TIME knob. It’s a great way to
capture more rhythmic ideas – if
your playing is in time with the Wet
Channel effects, your loops will
neatly capture that timing.
In the right position, the Wet Channel
is synced to the Micro-Looper. The
TIME knob now moves in steps that
are rhythmically related to the
micro-loop length.
SPREAD SOLO
Lets you engage SPREAD (pg. 36) on
one channel but not the other. This
might be helpful if you want to keep
your micro-loop mono, but have it
pass through a ping-pong delay.
ROUTING
BOTH
MODE
TRUE BYPASS
MOOD uses buffered bypass. The
bypassed signal is completely
analog, but if you prefer true bypass
we’ve built in a way to do that:
Simply tap both footswitches three
times. All three LEDs will blink red
when you’re in this state. Tap either
footswitch to exit. (Note that the
always-listening looper will not
work until you exit true bypass).
LOOP LENGTH
You can use this toggle to cut the
loop length in half and match the
response of the original MOOD (loop
length is relative to the CLOCK
setting, see pg. 18).
HALF FULL
MODE
RAMPING WAVEFORM
Selects the shape of the ramping
movement (pg. 46). The shapes
smoothly warp from one to the next:
Triangle, Square, Sine, Random,
Smooth Random.
MIX

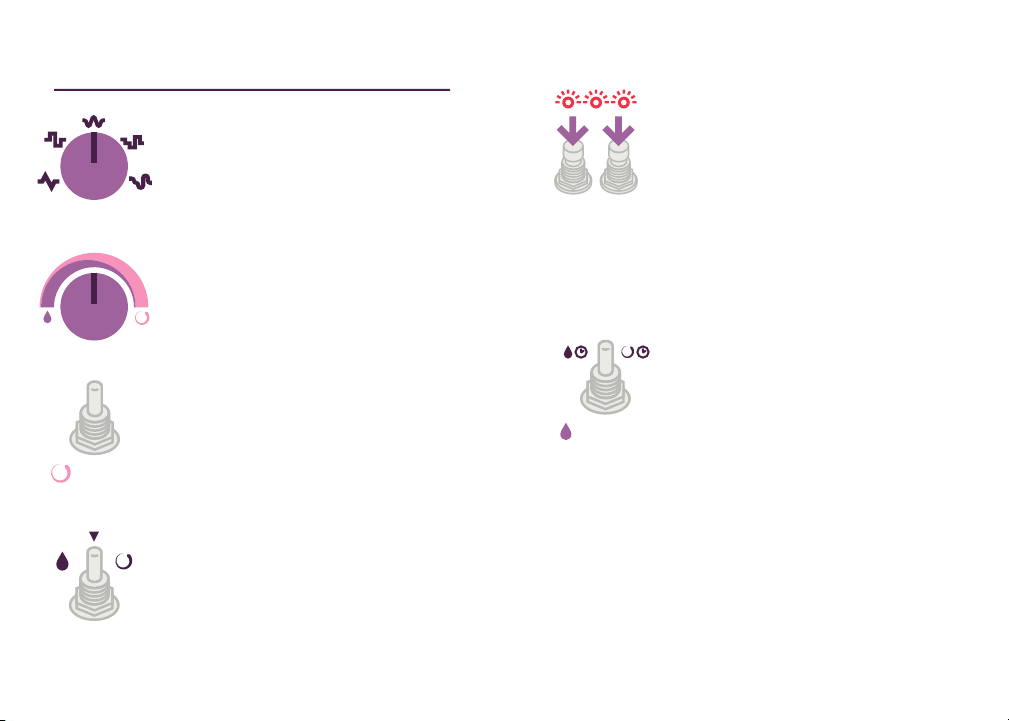
Clock
The CLOCK knob controls everything.
Specifically, it sets MOOD’s sample rate.
The sample rate is responsible for:
WET CHANNEL
The quality and time of the effects.
MICRO-LOOPER CHANNEL
The length and resolution of the loops.
Getting down into the lower settings will introduce
some heavy aliasing and downsampling of your
signal. Computer noises.
What makes it interesting is that it moves in
musical, harmonized steps. For example,
lowering the sample rate from 64k to 32k will
half-speed your micro-loop as well as your
Wet Channel effect.
Try this:
Play a single note,
and while the reverb
decays, turn down
the CLOCK.
Now play another note. Notice how much the
character has changed.
Continue to rotate counter-clockwise from
there and things will get real textural.
19
18
REVERB
TIME
CLOCK
CLOCK
SYNC
Allows you to sync one channel to the
other.
In the left position, the Micro-Looper
is synced to the Wet Channel. The
length of the micro-loop is now set by
the TIME knob. It’s a great way to
capture more rhythmic ideas – if
your playing is in time with the Wet
Channel effects, your loops will
neatly capture that timing.
In the right position, the Wet Channel
is synced to the Micro-Looper. The
TIME knob now moves in steps that
are rhythmically related to the
micro-loop length.

CLOCK is tone, length, and quality, all in one.
Want something ambient and gritty?
Lower the CLOCK.
Need something more pure and hi-fi?
Turn it up.
Introduce aliasing, set the length of your
micro-loops, extend delay time. Etc.
It’s your partner in .
SMOOTH CLOCK
New for MKII is the ability to smooth out the
sweep of the CLOCK knob. Simply turn on the
SMOOTH dip switch to enjoy fluid motion,
useful for fine-tuning, gradual changes, or
atonal harmonies.
21
20

Each one has its own use, and will of course vary
based on the knob settings. The next page has a
few starter ideas.
Wet Channel
23
22
The Wet Channel is
a twist on the familiar
ambient palette.
It’s a collection of
real-time effects
that can process
your micro-loops,
input signal, or both.
Holding the bypass switch will freeze the current
sound, causing it to repeat infinitely. How this will
sound is different in each mode:
Reverb - Ambient pad
Delay - Looping echo
Slip - Repeating tone
TIME
MODIFY
REVERB
DELAY
SLIP
REVERB PATTERN
With MODIFY turned down, your
frozen reverb will sound like a
percussive pattern. You can turn up
MODIFY once frozen to smudge the
pattern, but note that you won’t be
able to go back.
REVERB TIME MODIFY
DOUBLE TIME
You can use a frozen delay as a
secondary micro-loop. Capture a
micro-loop, then play some notes
into the Delay and freeze it. Try
experimenting with different delay
lengths, as well as syncing (pg. 17).
DELAY TIME
SLIP SOLO
Slip mode can become a glitchy
synth when frozen. Manipulate the
MODIFY knob to generate bizarre
chromatic melodies and arcade-
style sound effects.
SLIP TIME
Freeze Ideas

Multi-tap ambience.
MOOD’s reverb is a dense cluster of
echoes that can be smudged and
softened into a beautiful haze. You
can use it for clean echo clusters,
washed-out reverb, or unique
semisolid hybrids.
Clean, looping delay.
This is MOOD’s simplest mode, but
it has some unexpected abilities.
It’s the key to passing sound back
and forth between MOOD’s two
different channels.
Reverb Mode Delay Mode
25
24
TIME
Sets both the decay and size at once. You
can get some wild modulation by moving
this knob.
MODIFY
Sets the amount of smearing. Leave at min
for multi-tap delay, crank to max for reverb,
or explore the areas in between.
TIME
Sets the delay time. Adjusting this cleanly
transitions between delay times without
creating pitch-bends in existing echoes.
MODIFY
Sets the feedback. At max, repeats are
stable and will pile up like a looper.
BETWEEN STATES
Try ramping (pg. 46) or using an expression
pedal with the MODIFY knob to warp back and
forth between multi-tap and reverb.
LOOP TRICKS - These are some of the things you
can do by maxing out the feedback and using
Delay like a looper:
SELF-STRETCH - Once you have some audio repeating, try
slowly rotating the TIME knob clockwise. You will notice a
stretching effect is now recorded into your loop.
MICRO-LOOP TRANSFER - Route your micro-loops to the Wet
Channel and crank the feedback to create a copy. Then switch
to the IN routing to hear both loops, and start exploring.
MODIFY
BOUNCE, MODIFY
LOOPER REMIXER
Slip mode can be a fun way to manipulate your
micro-loops within a performance. Try punching
Slip in and out while a micro-loop is routed through
it, moving the MODIFY knob as you go. You can
produce a rainbow of steppy glitches with this
approach, or even chromatic key changes.
Auto-sampler.
Slip is an oddity. It samples your
input continuously and spits it back
out at a speed and direction of your
choosing, generating whimsical
harmonies and pitch-shifting.
Slip Mode
TIME
Sets the sampling size. Lower settings will
produce more instant results and function
like a pitch-shifter, while higher settings will
create harmonized phrases that follow
behind you.
MODIFY
Sets the playback speed
and direction. Moves
in semi-tone steps.
2
x
2
x
NEUTRAL
R
E
V
E
R
S
E
F
O
R
W
A
R
D
27
26

To get started, simply play a few notes and turn
the Micro-Looper on. It will keep whatever was
played most recently and loop it. Now you can
start modifying that sound or overdubbing on it.
It’s important to note that the Micro-Looper has
no stop command and is never really off.
It has three states:
The LED will blink while recording to show you the
current loop length.
If the Wet Channel is on while the Micro-Looper is
in its recording state, its effects will be recorded
into your micro-loops.
TRAIL CATCHER - Try running a micro-loop
through the Reverb, then briefly turning the
Micro-Looper off and back on again. It will
resample the reverb trails into the loop!
FREE PLAY - Once a micro-loop is recorded you
can switch freely between the looping modes
without it being erased.
Micro-Looper Channel
29
28
LENGTH
MODIFY
STRETCH
TAPE
ENV
MOOD’s Micro-Looper
is a little different. It’s
an always-listening
looper, which is a bit
like fishing for music:
It continuously records
when bypassed, and
then you turn it on and
see what you get.
Instead of manually
setting the length like a
typical looper, it’s set
by the CLOCK position.
Here’s how it breaks down:
Recording Playing Overdubbing

In practice this doesn’t matter much because
the loop will already be doing wild stuff, just toss
some notes in there and see what happens. But
for more traditional, predictable overdubbing,
use these settings:
USE THE CLOCK! - The CLOCK knob is an exception
to the rule above. You can freely move the CLOCK
knob while overdubbing and your notes will remain
right where you played them. A great way to build
harmonies that play at different speeds.
Overdubbing
31
30
Once you’ve snagged a loop, you can start to pile
sounds on top.
Simply hold the footswitch to start overdubbing.
There are a couple things to note:
WET OVERDUBS
While you will hear the Wet Channel’s effects as
you overdub, they will not be recorded into your
micro-loops. This would create a loud, scary
feedback loop. No thanks. Only your clean input
signal will be overdubbed.
You will record the Wet Channel’s effects
when the Micro-Looper is in its bypassed,
always-listening state (pg. 41).
MISPLACED OVERDUBS
Each of the Micro-Looper modes give you different
ways to mess with the playback of your loop:
shortening, stretching, slowing, interrupting. If
any of these effects are happening while
overdubbing, the recorded audio may end up in
a different place than you expect.
LENGTH MODIFY
ENV
LENGTH MODIFY
TAPE
LENGTH MODIFY
STRETCH
REPLACE
You can treat the bypass setting of the
Micro-Looper Channel like a replace function. As
soon as the channel is bypassed it starts to erase
the existing loop and record the input audio in its
place. This can be an interesting way to clear out
some space or add glitches to your loops.

MANUAL STRETCHING
By cranking the sensitivity, you can interrupt the
loop without making any audible noise. Try gently
tapping on your guitar strings (or sending a quiet
signal of any kind) and notice how the loop slows
to a crawl. It’s like time-stretching by touch.
Env Mode Tape Mode
LENGTH
Sets the size of the slices. Lower settings will
zoom in on microscopic grains, higher
settings will repeat short phrases.
MODIFY
Sets the sensitivity of the audio detector. The
lower the knob is set, the less sensitive.
BALANCE BEAM - One interesting technique is to
use the MODIFY knob to offset CLOCK adjustments.
You can lower the CLOCK knob to introduce some
grit and character, then use MODIFY to speed the
loop back up. Same speed as you recorded it, but
more vibe.
LENGTH
Lets you shrink your recorded micro-loops
and make them even micro-er. The further
counter-clockwise you rotate the knob, the
shorter the loop will become.
MODIFY
33
32
Tape-style looper.
Tape mode is a straightforward
way to capture loops. It allows you
to adjust the speed & direction of
your loops in harmonized steps
(octaves), as well as shorten up the
loop length.
Audio-controlled looper.
Env mode lets you interrupt a loop
with your playing to create dynamic
stutters and frozen notes. It chops
your loop into slices, and whenever
sound is detected at the input it will
repeat the current slice until the
sound disappears.
4
x
2
x
1
x
.
5
x
.
5
x
1
x
2
x
4
x
R
E
V
E
R
S
E
F
O
R
W
A
R
D
Sets the speed / direction of
playback. Go down to half-
speed or up to 4x faster,
either forward or reversed.
MODIFYLENGTH
STRETCHING 101
Here’s a good way to get to know Stretch mode:
Set both MODIFY and LENGTH to max, then slowly
rotate MODIFY towards noon. Once things are
moving nice and slow, gradually rotate the
LENGTH knob down to its minimum position.
Good ol’ stretching.
LENGTH
Sets the size of the slices. Higher settings
will have more clarity and feature repeating
phrases, while lower settings will be more
blurry and grainy. Counter-clockwise of
noon is where you will find classic
time-stretching sounds.
MODIFY
Stretch Mode
35
34
Time-stretching looper.
Stretch mode lets you zoom in and
explore the details of your loop,
spreading short phrases into
sprawling epics. It does this by
chopping your loop up into slices
and moving through them at a
speed of your choosing.
R
E
V
E
R
S
E
F
O
R
W
A
R
D
MOST
STRETCHED
NONE NONE
Sets the playback direction,
as well as the amount of
stretching. The closer you
get to noon the slower you’ll
progress. If the MODIFY
knob is set to its maximum
position you will not hear
any effect, regardless of the
LENGTH setting.
FROZEN
With MODIFY set to noon, your loop will stop
progressing and infinitely repeat the current
slice. You can still adjust LENGTH in this setting
to shrink and expand the repeating moment.

Spread
The SPREAD dip switch turns each of MOOD’s
modes into a stereo effect.
SPREAD does not enable stereo, MOOD is stereo
by default. What it does is use the pedal’s various
modes to create or change a stereo image.
DELAY mode is good for illustrating the difference:
With SPREAD off, the stereo image going into the
pedal will be preserved. If you have a sound
panned 30% to the right, for example, that’s
where you will hear the echo. This is great if you
don’t want any extra stereo movement and just
want to loop a stereo instrument.
With SPREAD on, your incoming stereo image will
be altered and exaggerated. In this case, a sound
panned 30% to the right will alternate back and
forth between 30% to the right and 30% to the left
with each echo: a ping-pong delay that mirrors
your panning depth. This is great if you want to
turn a mono signal into a stereo signal (pg. 44),
or use MOOD to create a more dramatic stereo
effect that’s different from your input signal.
Each mode has its own unique way of creating a
stereo image.
37
36
You can use the Hidden Options to apply SPREAD
to one channel of MOOD but not the other (pg. 16).
100%
LEFT 100%
RIGHT
SPREAD = OFF
SPREAD = ON
Other manuals for MOOD MKII
1
Table of contents
Other Chase Bliss Audio Music Pedal manuals

Chase Bliss Audio
Chase Bliss Audio Mood User manual

Chase Bliss Audio
Chase Bliss Audio Brothers User manual

Chase Bliss Audio
Chase Bliss Audio Reverse Mode C User manual

Chase Bliss Audio
Chase Bliss Audio Cooper FX Generation Loss User manual

Chase Bliss Audio
Chase Bliss Audio Thermae User manual

Chase Bliss Audio
Chase Bliss Audio Lossy User manual

Chase Bliss Audio
Chase Bliss Audio Blooper User manual

Chase Bliss Audio
Chase Bliss Audio Generation Loss MKII User manual

Chase Bliss Audio
Chase Bliss Audio Blooper User manual

Chase Bliss Audio
Chase Bliss Audio Thermae User manual


