Chase Bliss Audio Mood User manual

INSTRUCTIONS
OVERVIEW
Whimsical AF. M O O D AF. M O O D™is a two channel granular micro-
looper / delay. Designed to be playful and immediate, it is a study of
interaction. M O O D™is internally collaborative, allowing audio to freely
pass back and forth between its two sides, evolving and transforming
over time. Drolo FX is behind , a collection of always-listening micro-
loopers, and Old Blood Noise Endeavors offer us , a suite of live spatial
effects. We have three different options for how the channels are
internally routed. Run a time-stretched loop through a cloud of delay
taps, re-record it and carry on. Overdub, freeze, dissolve, smear. The
device’s heart is the clock control, which slows or accelerates both sides
simultaneously in harmonized steps. Instantly turn a loop into rolling
chirps, or divide a reverb down into atmospheric noise. And naturally,
we have full MIDI, dip-switch, and preset implementation. M O O D™is a
compact, colorful dip into the surreal.
CHANNEL TOGGLE
The channel is an always-listening micro looper. In the
bypassed state, it is continuously recording. Engage the
channel and your last phrase will play back as a loop.
These algorithms are controlled by the LENGTH and
MODIFY knobs.
ENV
Env mode allows you to dynamically interrupt your loop,
creating momentary stutters, time-stretching, and frozen
notes. When you stop playing, the loop resumes as normal.
It works by breaking your loop into slices. Whatever slice is
playing at the moment of interruption will loop within itself.
LENGTH sets the size of these slices, from short phrases
to microscopic grains. Lower length settings (CCW) will
zoom in on single moments, higher settings (CW) will repeat
short phrases. MODIFY sets the sensitivity of the envelope
detector, CW for more sensitive.
TAPE
Tape allows you to adjust the speed & direction of your loop,
in quantized steps. LENGTH slices the loop up into grains;
moving the control CCW reduces the grain size to make
your loop porous, swelling in and out or dissolving into bits.
MODIFY sets the speed / direction of the loop. From CCW
to CW your options are rev 4x ; rev 2x ; rev 1x ; rev 0.5x ;
fwd 0.5x ; fwd 1x ; fwd 2x ; fwd 4x.
STRETCH
Stretch mode time-stretches the loop, allowing you to zoom
in and smear little moments. LENGTH sets the amount of
loop that will ultimately get stretched. CW for a size closer
to your full loop, CCW for smaller bits. MODIFY controls the
amount of stretching, increasing as it’s turned CW.
CHANNEL TOGGLE
The channel is a collection of live spatial effects. They
can process the channel, your input, or both. These
algorithms are controlled by the TIME and MODIFY
knobs.
REVERB
Reverb mode is a cluster of smearable delay taps. It
produces an array of atmospheric effects, from reverb to
multi-tap delay to comb filtering. The TIME knob adjusts
the time of all delay taps. Turning the MODIFY knob CW
increases the amount of smearing (from clean repeats to
washed out reverb).
DELAY
Delay mode is a looping delay. This mode was specifically
designed to play with the clock knob, experiment with
creating harmonies by recording different loop layers at
different clock settings. TIME sets your delay time. When
changing the time, you’ll hear a discontinuity at certain
spots on the dial. This is by design, as it allows for smooth
action between those spots and creates an interesting
sound when ramped. MODIFY controls the feedback of
the looping delay. With feedback in the full CW position,
repeats are stable and will pile up like a looper.
SLIP
Slip mode is a buffer with an adjustable playback head,
able to go from half to double speed either forwards or
backwards. TIME sets the length of the buffer. Smaller
samples will produce more instant, granular effects,
while longer samples will capture and alter whole phrases
like a delay. MODIFY sets the buffer playback speed
and direction.
This device complies with part 15 of the FCC rules.
Operation is subject to the following two conditions:
(1) This device may not cause harmful interference, and
(2) this device must accept any interference received,
including interference that may cause undesired operation.
MIX (RAMP)
When you don’t have any dip switches assigned for
ramping, this is a mix control. All the way CCW is 100%
dry signal and wet volume increases as you turn this knob
CW. In maximum CW position, there will be no dry signal.
Additionally, if you feel you want more (or less) maximum
dry or wet signal you can set this to taste with internal
trimmers. If a dip switch is engaged for ramping, you
can set this knob to control any of the five parameters
individually or simultaneously (Time, Length, Modify ,
Clock, Modify ), and have it either modulate (Bounce) or
ramp-and-hold (rise or fall) via dip switches in the back of
the pedal. In this case, this knob controls the ramp time in
which this takes place.
CLOCK
This single knob is a global control for the clock that
controls the recording and playback for each channel.
Sample rate is half the value of the clock. In addition, this
knob controls the recorded loop time on the 0 channel.
64k = .5s, 48k = .75s, 32k = 1s, 24k = 1.5s, 16k = 2s, 12k =
3s, 8k = 4s, 6k = 6s, 4k= 8s, 3k = 12s, 2k = 16s. The red LED
blinks off in time with this to give a visual indication of
recorded loop length.
IN | IN + | TOGGLE
This toggle is used only when both channels are active,
and allows the user to select what gets processed by
the channel.
& BYPASS STOMPS
Activates or bypasses each channel. These can be
changed to a momentary bypass or momentary active
via a dip switch in the back of the pedal if it is desired.
In addition, on the channel, if that channel is in playback
(green LED), you can do momentary records by holding
down the stomp and it will re-enter playback on release.
LOWER TOGGLE
This switch recalls presets. The right position recalls preset
#1, the left position recalls preset #2. The middle position
will always reflect wherever the knob positions, toggle
positions, and dip switch positions are currently at. In order
to save to the right preset slot, you hold down the right
stomp (bypass) for 3 seconds, and then hold down both
stomp switches simultaneously for another 3 seconds.
The LED blinks and your setting is saved. For the left slot,
you do the same thing, but hold the left stomp first. If
you recall a preset, and move a knob, you will notice that
the LED above the toggle goes dim. This is to signify that
something has changed on the preset. If you want to save
this change in the preset, you will have to save it again.
IN / OUT
¼” mono jack.
EXP / CV
¼” TRS jack for expression pedal (parameter selectable
via dip switch in the back of the pedal). Tip goes to wiper.
Can also be used for 0-5V Control Voltage (CV) on tip
– the ring should be left floating in this case. There are
many expression pedals that work with Chase Bliss Audio
products, contact us for more info.
MIDI
¼” TRS jack. This can be used to interface the pedal with
a Chase Bliss Midibox. There is much more information on
this in the MIDI manual. In addition, this can be used as a
secondary switch to activate / bypass channel with a
momentary normally open (NO) switch.
POWER & OTHER INFO
This pedal consumes ~150mA and should be operated with
a standard 2.1mm 9V DC center negative adapter with
current supply capabilities of 200mA or more. If you use
a “standard” outlet of 100mA, the pedal will not function
properly. Input impedance of this device is 1M, and output
impedance is less than 1k.
EXPRESSION / CV CONTROL
& DIP SWITCHES
The Time, Length, Modify , Clock, Modify dip switches
in the left bank allow you to control parameters via
Expression Pedal / CV. If you have something plugged
into the EXP / CV jack but do not have any parameters
selected via dip switch, you can control the Mix knob via
expression or CV. It behaves like it has “rise” and “bottom”
sweep dip switches engaged.
SETTING EXPRESSION /
CV RANGE
The range of the expression / CV is controlled by the
parameter knob position and the “Sweep” dip switch. For
example, if you wanted an expression pedal to control the
clock parameter from 2kHz to 16kHz (noon), you would
make sure the “Sweep” dip switch is in the bottom position
and set the volume knob around noon. If you want to
increase the range to a higher clock rate, you simply turn
the clock knob CW. This will increase the maximum range
of the expression pedal. This allows you to control multiple
parameters with an expression pedal, but you can fine
tune the range that you want for each parameter.
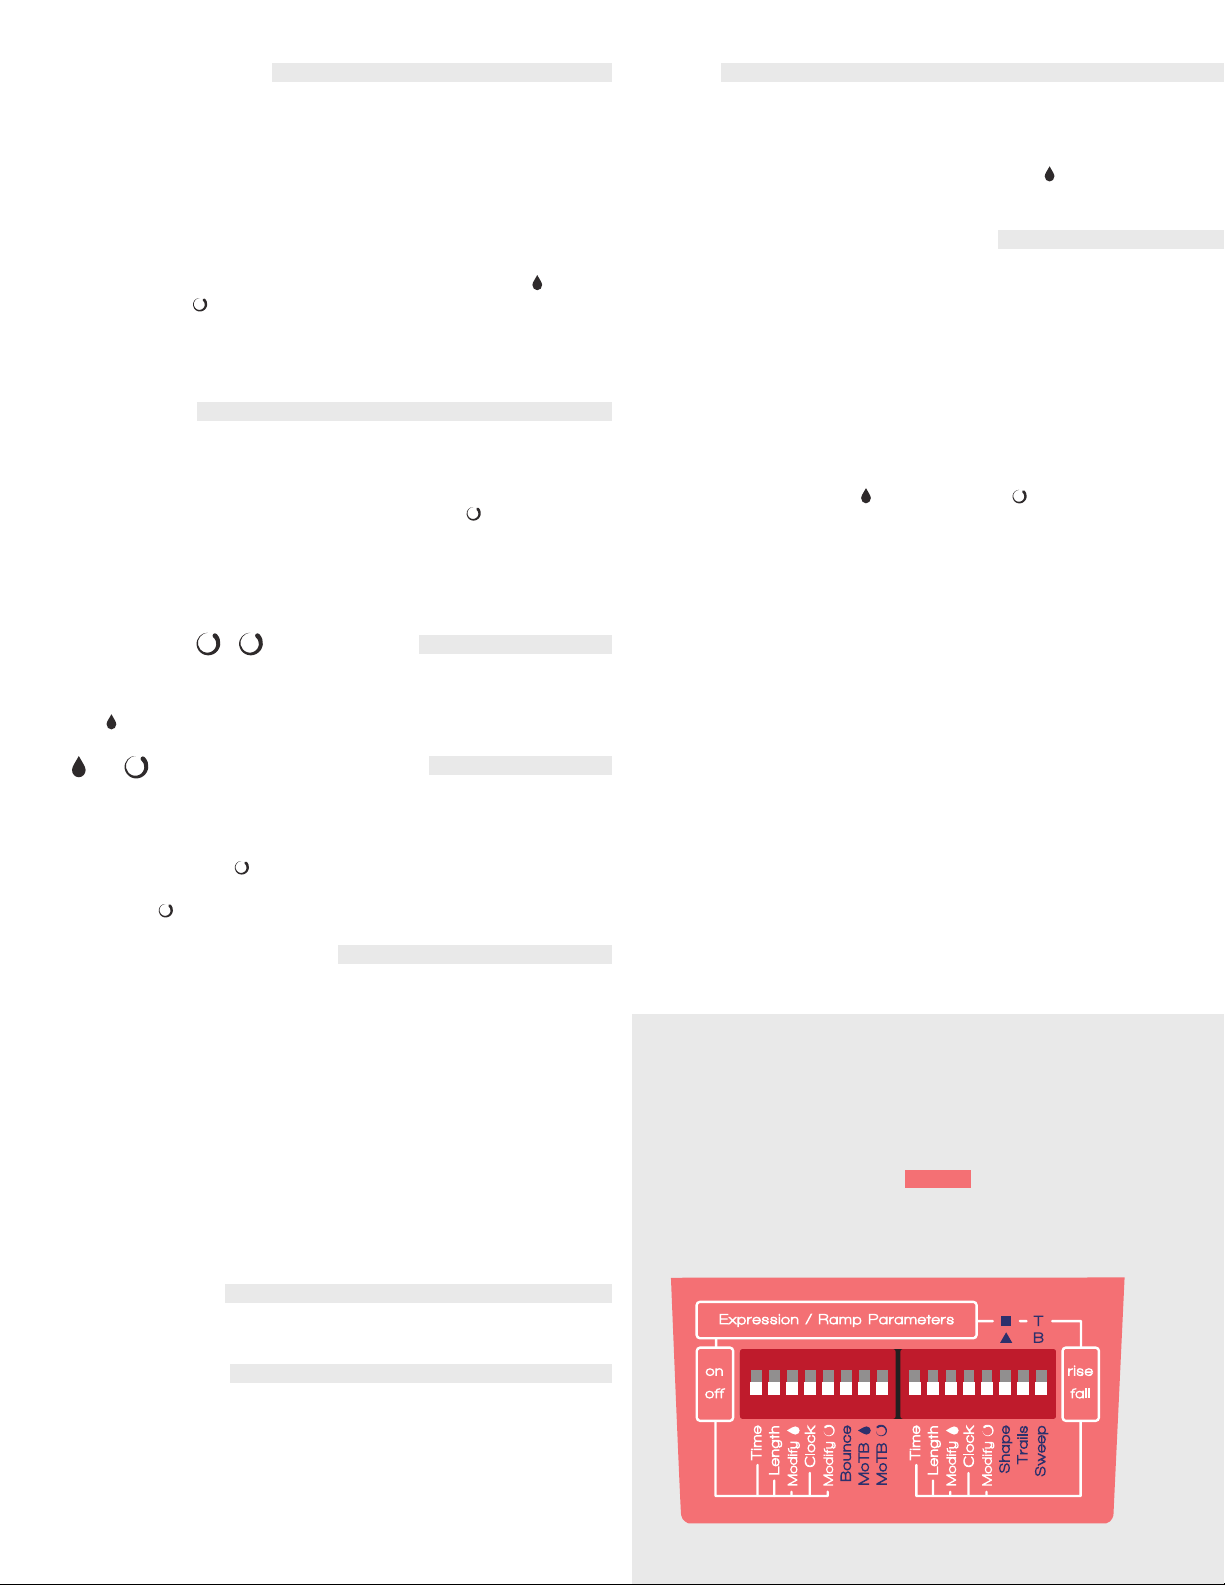
UNDERSTANDING THE
DIP SWITCHES
When you save a preset, all of this information gets
saved. The parameters in White below correspond
to the ramp function or an expression pedal (if one
is plugged in).

Example presets continued on next page
A very important thing to remember is that ramping
always gets reset when bypassing. The parameters’
current knob position control where the parameters
ultimately will either start or stop ramping.
The Time, Length, Modify , Clock, and Modify :
dip switches on the left side simply turn that
parameter on or off for ramping or expression /
CV capability.
The Time, Length, Modify , Clock, and Modify :
dip switches on the right side control whether or
not the parameters will rise (go CW in ramp mode)
or fall (go CCW in ramp mode). It also controls how
the parameters will behave with an expression
pedal plugged in.
Bounce: When on (and no expression pedal),
parameters will go back and forth (i.e. modulate),
if it’s off, parameters will ramp and hold.
MoTB : Momentary engage or bypass for
channel .
MoTB : Momentary engage or bypass for
channel .
Ramp Shape: Engaging this dip switch gives you
the option for square wave ramping. Default is
triangle wave ramping.
Trails: This enables optional buffered bypass
with “trails.” Trails mean that the existing wet
signal continues to bleed into the dry signal even
while bypassed.
Sweep: This controls where ramp sweeps.
In “T” (top), the expression control will occur
between the current knob position and the max
position (fully CW). In “B” (bottom) the expression
control will occur between the current knob position
and the minimum position (fully CCW).
NOTE: It may seem overwhelming and difficult for users to take
all this in at first. Our suggestion is always to forget about the
dip switches for a while when you get the pedal. Get to know
the basic functionality of it, and then if/when you want to
experiment with ramping or expression, it will likely be easier.
Some of these concepts are much easier to explain
and demonstrate on video, and we have many tutorials
available on our youtube channel at
www.youtube.com/ChaseBlissAudio.
We also love to hear from customers and answer
questions so feel free to write us anytime at
chaseblissaudio.com/contact.
Thank you so much for purchasing this
product and ENJOY!
All presets created by Andy Othling
Hear them at soundcloud.com/chaseblissaudio
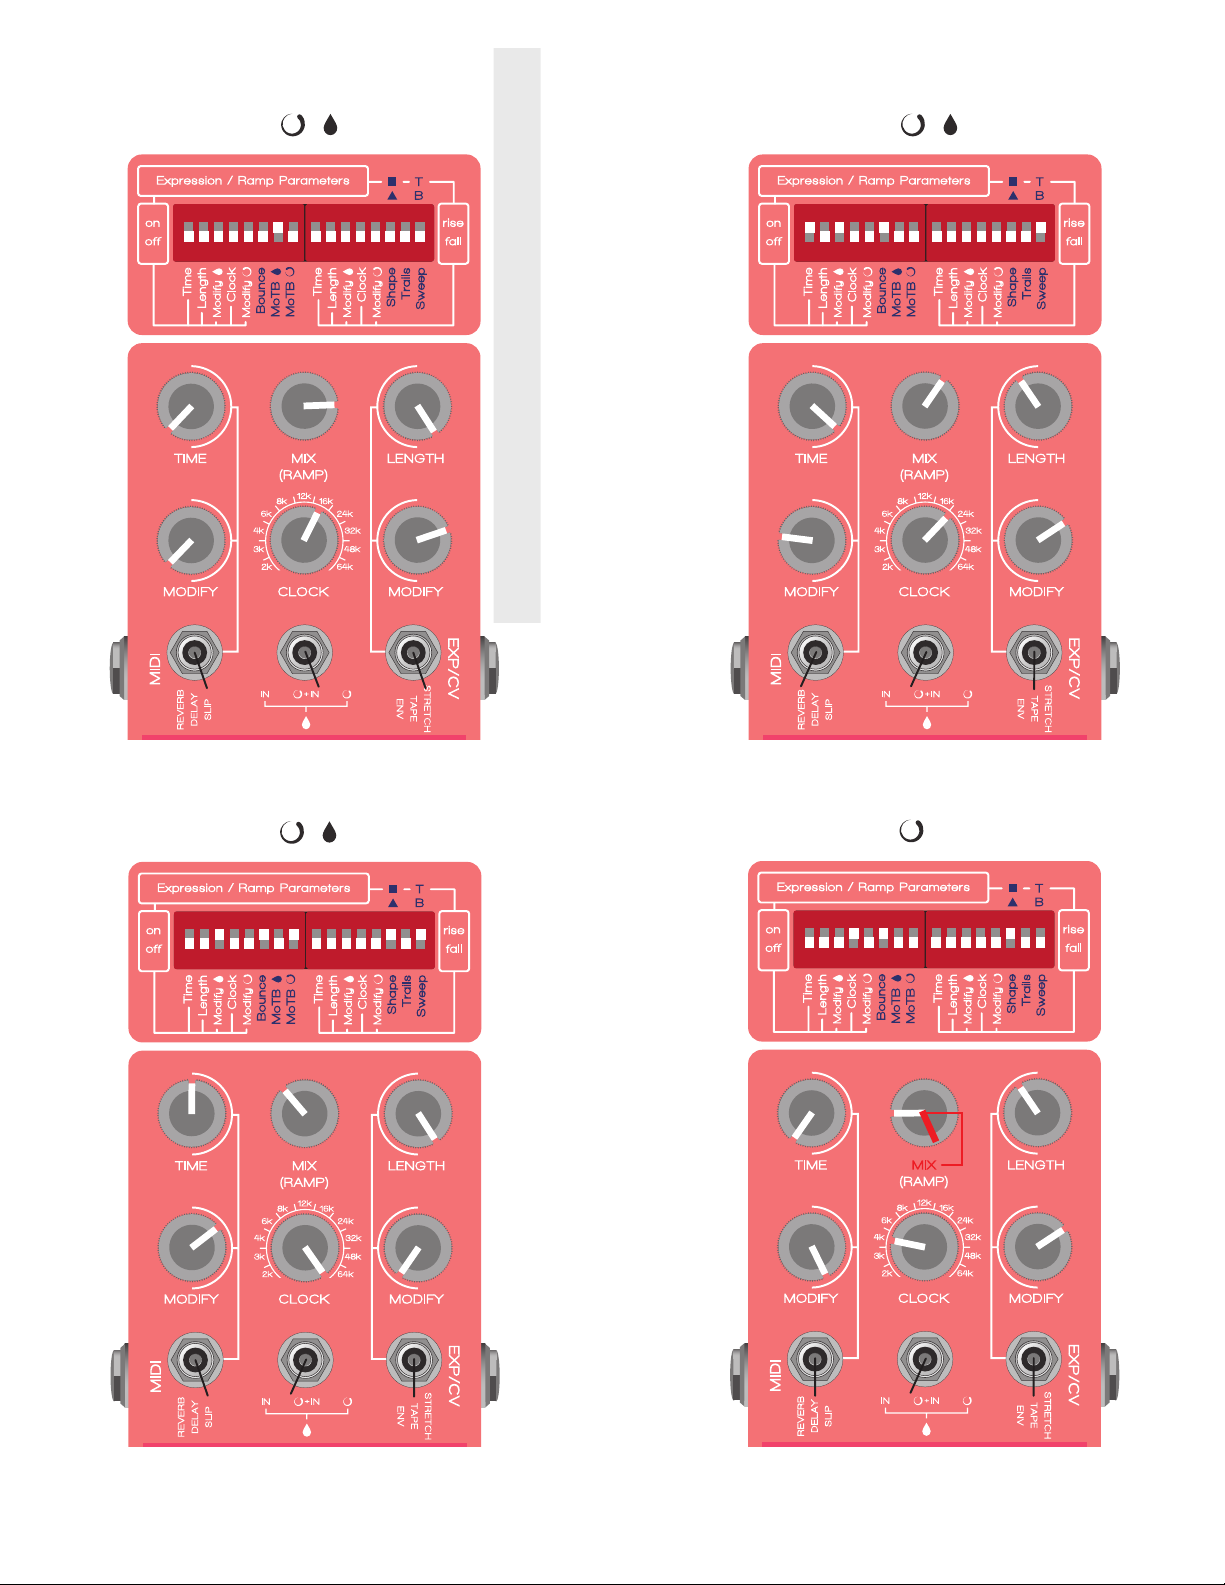
SWEET BERRY WINE
Active Channels
CELERY MAN
Active Channels
Example presets continued on next page
UNCLE MUSCLES
Active Channels
Note: The Clock parameter is being manually ramped on this setting.
ALL THE FOOD IS POISON
Active Channels
GLOW BONES
Active Channels
Active Channels
NUDE TAYNE

Active Channels
TITTLEMAN’S CREST
KRUNKLE KICK
Active Channels
Note: The Clock parameter is being manually ramped on this setting.
WHERE’S MY CHIPPY?
Active Channels
Note: The Clock parameter is being manually ramped on this setting.
BUSINESS HUGS
Active Channels
Other Chase Bliss Audio Music Pedal manuals

Chase Bliss Audio
Chase Bliss Audio Blooper User manual

Chase Bliss Audio
Chase Bliss Audio Cooper FX Generation Loss User manual

Chase Bliss Audio
Chase Bliss Audio MOOD MKII User manual

Chase Bliss Audio
Chase Bliss Audio Thermae User manual

Chase Bliss Audio
Chase Bliss Audio Reverse Mode C User manual

Chase Bliss Audio
Chase Bliss Audio Lossy User manual

Chase Bliss Audio
Chase Bliss Audio Blooper User manual

Chase Bliss Audio
Chase Bliss Audio Generation Loss MKII User manual

Chase Bliss Audio
Chase Bliss Audio MOOD MKII User manual

Chase Bliss Audio
Chase Bliss Audio Thermae User manual


