Chauvin Arnoux RayCAm C.A 1886 User manual

C.A 1886
C.A 1888
ENGLISH User’s manual
I.R. thermography camera

English
2 C.A1886 –C.A1888
Thank you for buying a RayCAm I.R. thermography camera.
For best results from your device:
read this user manual attentively,
observe the precautions for its use
MEANING OF THE SYMBOLS USED
Selective sorting of wastes for the recycling of electrical
and electronic equipment within the European Union.
In conformity with directive DEEE 2002/96/EC: this
equipment must not be treated as household waste.
Risk of danger. See explanations in this user manual
Problems that may affect the operation of the I.R.
camera.
Notes completing the essential operating procedures.
Laser radiation, do not look directly into the LASER
beam.
This marking certifies compliance with the European
"Low Voltage" and "Electromagnetic Compatibility"
directives (2006/95/CE and 2004/108/CE).

English
C.A1886 – C.A1888 3
Characteristics of the laser: Class 2, < 1 mW, wavelength 635nm
WARNING
LASER RADIATION
DO NOT LOOK DIRECTLY INTO THE
BEAM
CLASS 2 LASER DEVICE

English
4 C.A1886 –C.A1888
CONTENTS
1. PRECAUTIONS OF USE.............................................................................................6
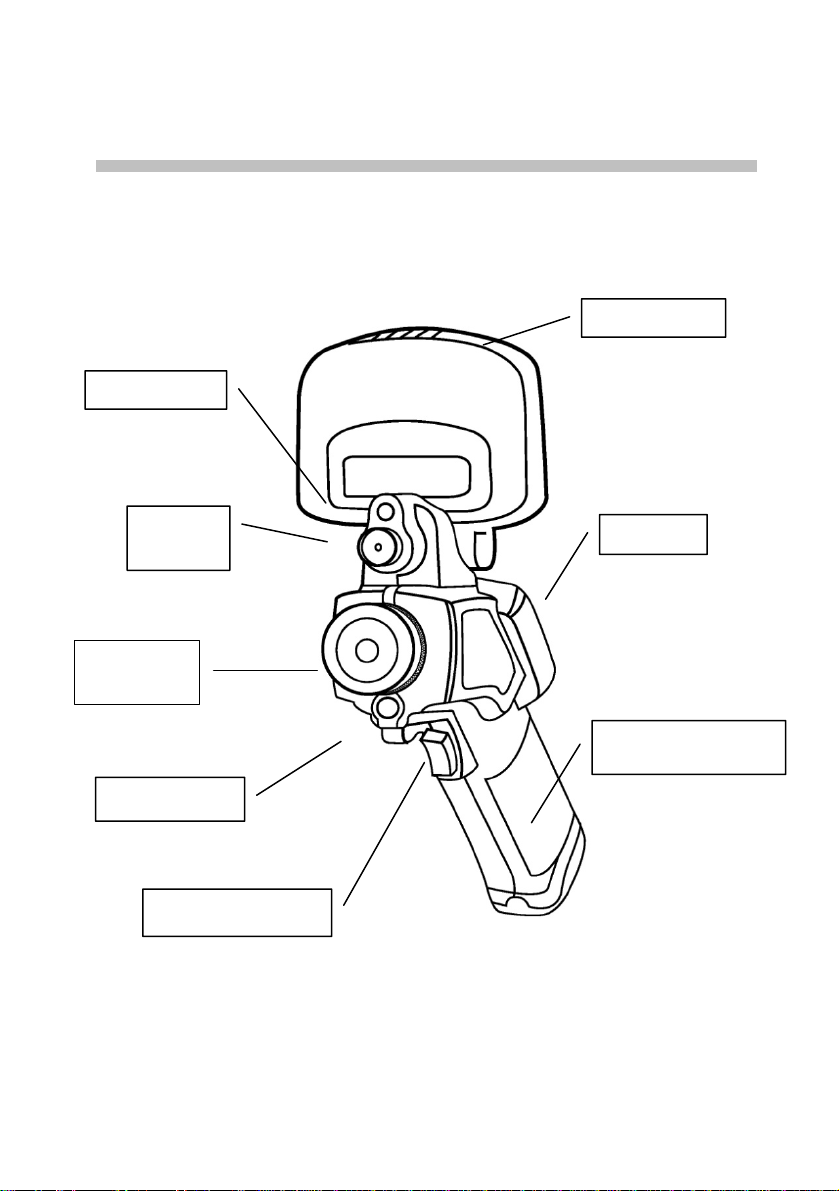
2. DESCRIPTION .............................................................................................................7
2.1 FRONT PANEL..............................................................................................................7
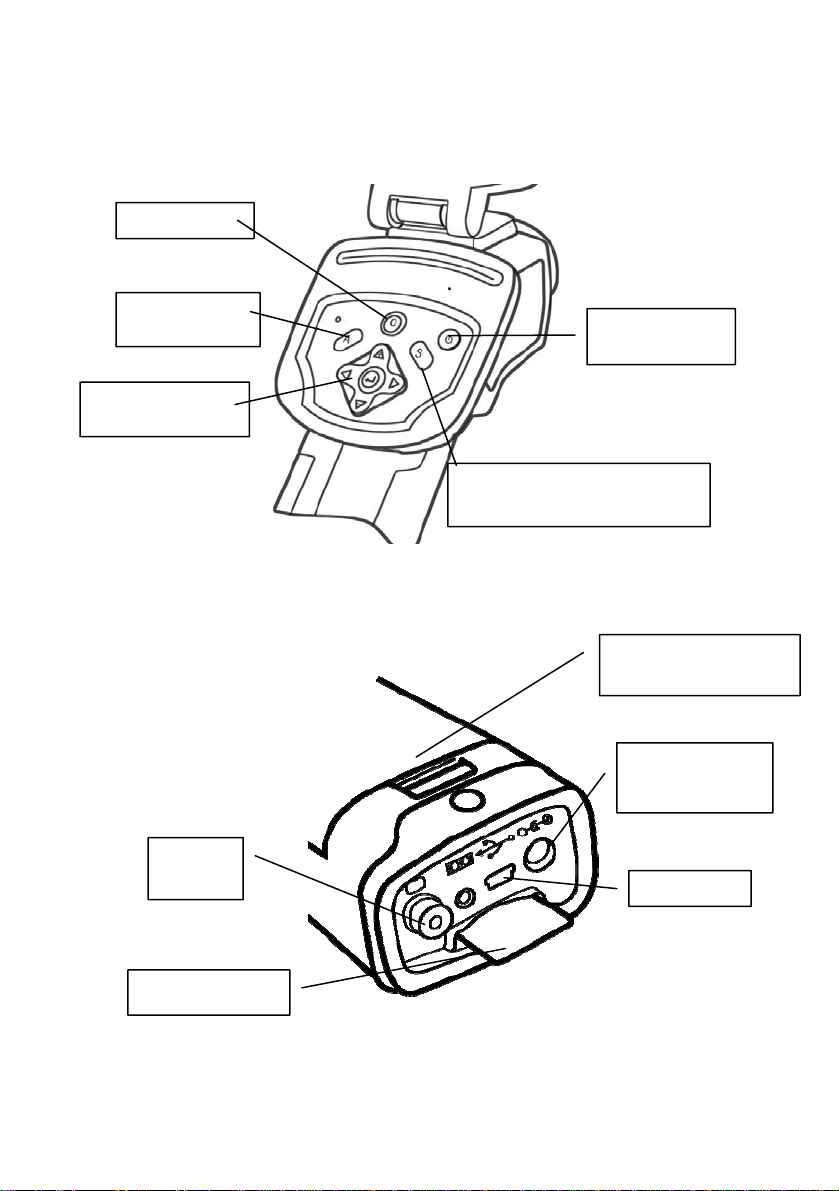
2.2 KEYPAD......................................................................................................................8
2.3 VIEW OF BACK AND BOTTOM .......................................................................................8
3. STARTING UP..............................................................................................................9
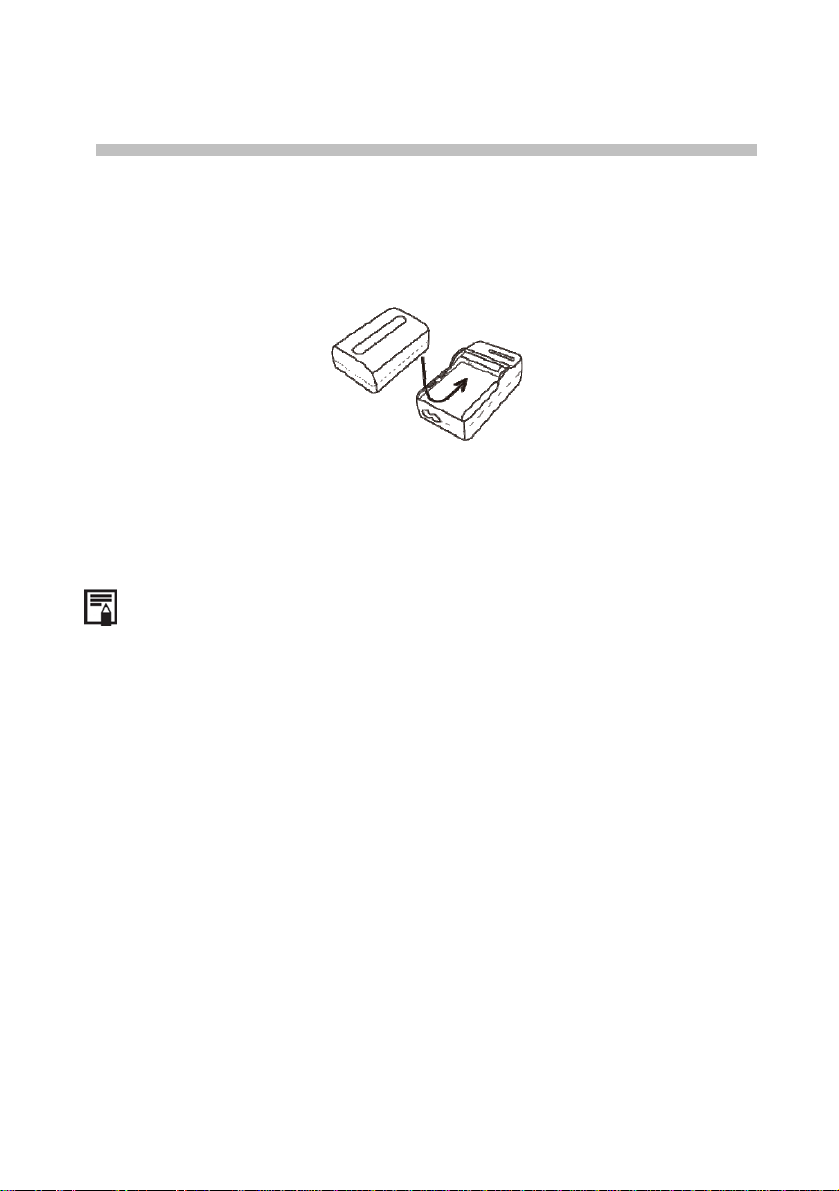
3.1 CHARGING THE BATTERY.............................................................................................9
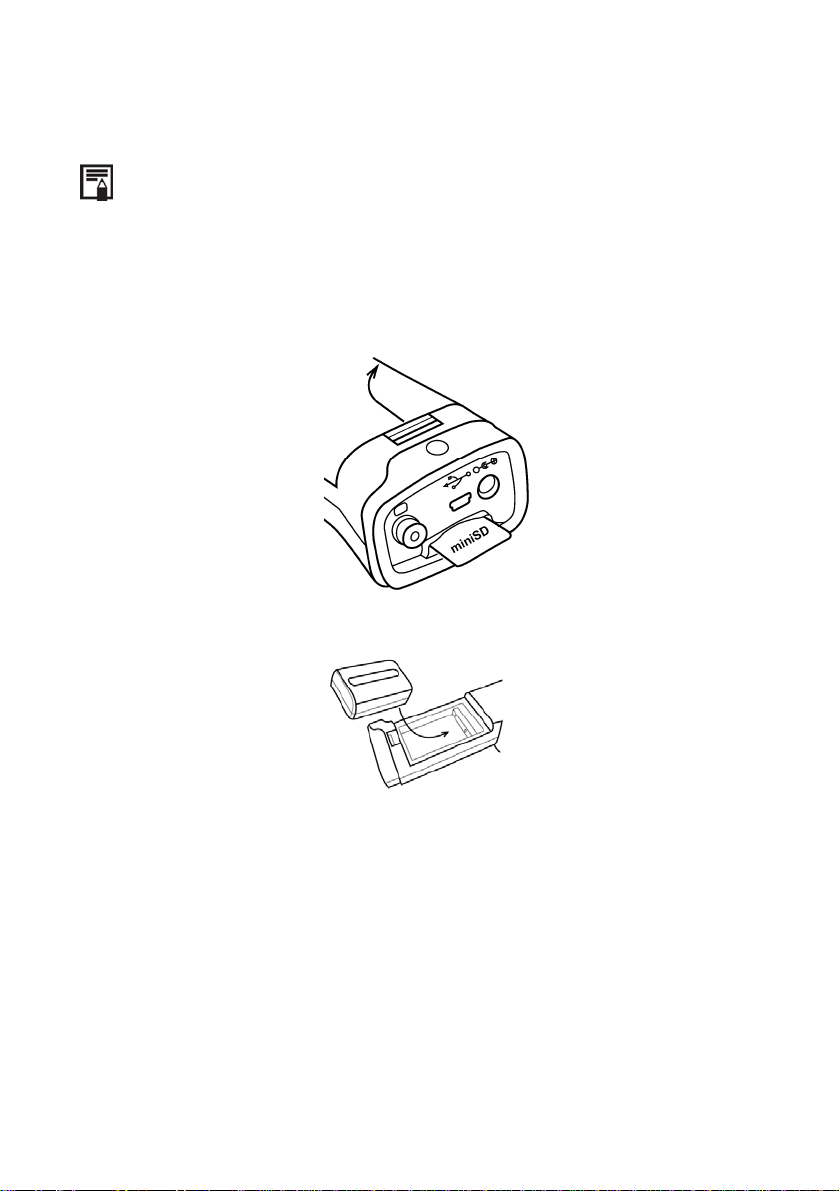
3.2 INSTALLING THE BATTERY.........................................................................................10
3.3 SWITCHING ON AND OFF ............................................................................................11
3.4 CHECKING THE INFORMATION ON THE LCD SCREEN...................................................12
3.5 SETTING THE DATE AND TIME ....................................................................................13
3.6 LOCAL SETTINGS .......................................................................................................13
4. BASIC FUNCTIONS...................................................................................................15
4.1 USING THE LCD SCREEN ...........................................................................................15
4.2 SELECTION OF MENUS AND PARAMETERS ...................................................................15
4.3 RESTORING THE DEFAULT SETTINGS...........................................................................16
5. TAKING SHOTS.........................................................................................................16
5.1 ADJUSTING THE CAMERA...........................................................................................16
5.1.1 Manual focusing ........................................................................................16
5.1.2 I.R., Real, and Real + Mix Display............................................................16
5.2 PARALLAX ADJUSTMENT ...........................................................................................17
5.3 ADJUSTING THE IMAGE ..............................................................................................18
5.3.1 Automatic adjustment.................................................................................18
5.3.2 Manual adjustment ....................................................................................18
5.3.3 Adjusting the image ...................................................................................19
5.4 MEASUREMENT RANGE..............................................................................................21
5.5 FREEZE/ACTIVATE AN IMAGE ....................................................................................21
6. ANALYSIS FUNCTION.............................................................................................22
6.1 ADJUSTMENT OF THE ANALYSIS PARAMETERS............................................................22
6.2 ADJUSTMENT OF THE ANALYSIS PARAMETERS............................................................24
6.3 PARAMETERIZING THE ANALYSIS TOOLS ....................................................................26
6.3.1 Analysis by point........................................................................................26
6.3.2 Isothermal analysis....................................................................................26
6.3.3 Profile analysis..........................................................................................27
6.3.4 Area analysis .............................................................................................27

English
C.A1886 – C.A1888 5
6.4 DESACTIVATING THE ANALYSIS TOOLS ......................................................................29
6.4.1 Deactivation of the analysis tools..............................................................29
6.5 RECORDING THE IMAGE .............................................................................................29
6.6 ASSOCIATING VOICE REMARKS WITH THE IMAGES (OPTION)........................................30
6.6.1 Voice recording..........................................................................................30
6.7 ADJ STMENT OF THE TRIGGER...................................................................................30U
6.7.1 Adjustment of the release...........................................................................30
7. READING AND ERASING........................................................................................32
7.1 OPENING THE IMAGES................................................................................................32
7.2 PLAYING THE REMARKS (OPTION)..............................................................................33
7.3 ERASING THE IMAGES................................................................................................34
8. TRANSFERRING IMAGES......................................................................................35
8.1 TRANSFER BY MINI SD CARD ....................................................................................35
9. CONNECTIONS AND DOWNLOADING ...............................................................36
9.1 CONNECTION TO A MONITOR......................................................................................36
9.2 USING THE BLUETOOTH HEADSET (OPTION)...............................................................36
10. TROUBLESHOOTING............................................................................................38
11. MAINTENANCE.......................................................................................................39
11.1 CLEANING AND MAINTAINING THE CAMERA .............................................................39
Housing of the device.................................................................................................39
Lens ...........................................................................................................................39
LCD screen................................................................................................................39
11.2 METROLOGICAL CHECK...........................................................................................39
11.3 REPAIR.................................................................................................................39
12. WARRANTY.............................................................................................................40
13. APPENDIX ................................................................................................................41
13.1 TABLE OF EMISSIVITIES ...........................................................................................41
14. TECHNICAL CHARACTERISTICS......................................................................43
15. DELIVERY CONDITION........................................................................................45

English
6 C.A1886 –C.A1888
1. PRECAUTIONS OF USE
Before using the camera, make sure that you have read and understood the
safety precautions described below. Make sure that the camera is used correctly.
Please refer to this manual each time you encounter a hazard symbol. To avoid
exposure to laser radiation, injury, or damage to the device, and be sure that you
use the camera in a risk-free way, observe the safety recommendations given
below:
Do not look directly into the laser beam. Do not point the laser beam at
people.
Do not use the instrument other than for its intended purpose; keep it out
of reach of children and make sure that it is never treated as a toy.
Do not aim the device towards the sun or other source of intense heat.
Use only the recommended batteries and accessories. Do not leave the
device connected to mains when not necessary.
Avoid problems due to condensation.
Moving the I.R. camera rapidly from a cold to a warm place can cause
condensation (droplets of water) to form on its outside and inside surfaces.
You can avoid this problem by placing the camera in the plastic case and letting it
warm slowly to the ambient temperature before withdrawing it from the case.
When you switch on the camera, wait 10 to 15 minutes before recording
your first thermograms, to be certain that the camera's temperature has
stabilized and that your measurements are correct.
Focus the objective correctly according to the distance to the target to be
inspected.
Device that may, but only under special conditions, be sensitive to
electrostatic discharges (ESD).

English
C.A1886 – C.A1888 7
2. DESCRIPTION
2.1 FRONT PANEL
LCD screen
Torch
Visual
objective Keypad
IR objective
Battery
com
p
artment cove
r
Laser pointer
Configurable trigger

English
8 C.A1886 –C.A1888
2.2 KEYPAD
Automatic
ad
j
ustment On/Off button
Freeze/Activate image
Record image
Menu/Validation
ke
y
Cancellation
2.3 VIEW OF BACK AND BOTTOM
External power
supply
Video
output
Battery compartment
cover clip
Mini USB
Mini SD card

English
C.A1886 – C.A1888 9
3. STARTING UP
3.1 CHARGING THE BATTERY
1. Align the edge of the charger on the line marked on the battery and
push the battery in until it locks.
2. Connect the power cord to the charger and plug into a power outlet.
The charging indicator lights red during recharging and green when
charging is over.
After recharging, disconnect the charger and withdraw the battery
It is a lithium ion battery. It does not have to be fully discharged before
recharging (no memory effect). The number of complete
charging/discharging cycles is approximately 500; beyond this number,
the battery loses its capacity and has to be recharged more often.
The charging time varies with the ambient temperature and the initial
charge condition.

English
10 C.A1886 –C.A1888
3.2 INSTALLING THE BATTERY
The battery must be fully charged before it is used for the first time (the
battery reaches its full capacity only after 5 complete
charging/discharging cycles).
1. Switch off the camera. Push the clip of the battery compartment cover
toward the front, then lift the cover.
2. Install the battery in its compartment, then push it in until it locks.
3. Close the battery compartment cover.
Withdraw the battery when you expect to leave the camera unused for an
extended period (in order to avoid discharging too deeply): even when the camera
is off, there is some consumption (C.A 1886: 8 mA; C.A 1888: 6,6 mA).
The Mini SD card must be formatted to FAT16 or FAT32, since otherwise the
camera may fail to recognize it.

English
C.A1886 – C.A1888 11
Symbols representing the battery charge condition
Battery adequately charged
Battery low
Battery needs to be replaced or recharged
3.3 SWITCHING ON AND OFF
The power check light remains on for as long as the camera is on.
4. Place your thumb above the keypad and your index finger in front of the
configurable trigger.
Thumb
Index
5. Press the On/Off button and hold it down for three seconds.
The power check light lights green.
On/Off button
6. After a few seconds, the start-up screen is displayed.
7. Power down
Press the On/Off button for three seconds.
The power supply indicator goes off.

English
12 C.A1886 –C.A1888
3.4 CHECKING THE INFORMATION ON THE LCD SCREEN
The LCD screen provides a field of view corresponding to 100% of the actual shot
Status of the
camera
Battery condition
Time
Colour scale
Lower limit of colour
scale
Dynamic /
Frozen
mode Emissivity in
progress
Upper limit of colour
scale
About the status of the camera
Menu The device is in Menu mode
Null The device is not in Menu mode and no analysis tool has
been selected.
1 … 3 The analysis tool selected is cursor 1, 2, or 3.
Cap The analysis tool selected is the auto Max/Min detection
cursor.
Isot. The analysis tool selected is isothermal analysis
PRO. The analysis tool selected is the profile of temperature
AR1…5 The analysis tool selected is area 1 or area 2… or area 5.
Status
of the
camera
E Emissivity in progress.
A Mini SD card has been inserted
The Bluetooth headset has been installed

English
C.A1886 – C.A1888 13
3.5 SETTING THE DATE AND TIME
You must set the date and time when you switch the camera on for the first time.
1. Check that the camera is in Null mode.
2. Press the MENU key and select the [System Setup] menu.
Analysis ►
File ►
IR / Visible
Manual Adj.
Object Param.
System Setup►
Analysis setup
Local setup
Date & Time
Camera setup
System info
3. Select the [Date & Time] sub-menu.
4. Set the date and time
Press the UP or DOWN arrow to select the field to be modified.
Press the LEFT or RIGHT arrow to define the values.
5. After completing the parameterizing, press the MENU/VALIDATION key
to close the window and save the modifications, or the C key to exit
without saving.
3.6 LOCAL SETTINGS
This menu is used to display the local parameters of your geographical zone.
1. Check that the camera is in Null mode.
2. Press the MENU/VALIDATION key, then the UP or DOWN arrow to select
the [System Setup] menu.
Analysis ►
File ►
IR / Visible
Manual Adj.
Object Param.
System Setup►
Analysis setup
Local setup
Date & Time
Camera setup
System info

English
14 C.A1886 –C.A1888
3. Press the UP or DOWN arrow to select [Local setup], then press the
MENU/VALIDATION key.
Language : French
Video output : PAL
Temp. unit : °C
Dist. unit : Meter
4. Local
parameters
Press the UP or DOWN arrow to select the field to be modified.
Press the LEFT or RIGHT arrow to define the values.
5. After completing the settings, press the Menu/Validation key to close
the window and save the modifications, or the C key to exit without
saving.
About the local settings
Language Selects the language of the menus and messages.
Temp unit Selects the temperature format of the camera: °C or °F.
Distance unit Selects the unit of distance of the camera: Metres or Feet.
Video output Selects the video output format of the camera: PAL or NTSC.

English
C.A1886 – C.A1888 15
4. BASIC FUNCTIONS
4.1 USING THE LCD SCREEN
1. Open the LCD screen in the direction
2. Aim the I.R. camera at the target.
For a better temperature measurement, frame the subject in the centre of
the LCD screen.
The screen is switched to standby when you close it.
4.2 SELECTION OF MENUS AND PARAMETERS
1. Press the MENU/VALIDATION key to view the menus.
2. Select the desired menu using the UP and DOWN arrows.
Analysis ►
File ►
IR / Visible
Manual Adj.
Object Param.
System Setup►
3. Enter the menu by pressing the MENU/VALIDATION key.
4. Modify the desired values/modes using the up, down, right,
and left arrows.
5. Validate the modifications using the MENU/VALIDATION key or
exit without saving by pressing the C key.

English
16 C.A1886 –C.A1888
4.3 RESTORING THE DEFAULT SETTINGS
1. Switch the I.R. camera off.
2. Press the On/Off and C buttons simultaneously.
Hold them down a few seconds.
The camera reboots with the default parameters.
The stored data are not deleted when you reset the camera.
5. TAKING SHOTS
5.1 ADJUSTING THE CAMERA
5.1.1 Manual focusing
1. Check that the camera is in Null mode.
2. Aim the I.R. camera towards the target
3. Turn the focusing ring to focus on the target.
4. Continue turning until the image is sharp
5.1.2 I.R., Real, and Real + Mix Display.
This I.R. camera records visual images with its built-in digital device. This lets you
record a real image and compare it to the thermal image.

English
C.A1886 – C.A1888 17
1. Press the "Menu/Validation" key to display the menu, then select
"I.R./Visible".
Analysis ►
File ►
IR / Visible
Manual Adj.
Object Param.
System Setup►
2. Press the "left" or "right" arrow to select the percentage of infrared
(possible only in "MixVision”).
This percentage is the percentage of thermal image in the display (100%
means pure I.R. image, 0% means real image only).
The various modes available:
I.R.
In this mode, only the I.R. image is displayed on screen.
All of the analysis tools are available in this mode.
6 sorts of palettes can be selected.
Vision
In this mode, only the visual image is displayed on screen.
The analysis tools are not all available in this mode.
MixVision
In this mode, the visual image appears in the background and the central window
is the fusion zone. You can apply all of the analysis tools to this zone. You can
also set the proportions of visual and thermal image using the "Percentage I.R."
option.
5.2 PARALLAX ADJUSTMENT
Since the infrared and visual objectives are offset, the two images may be
misaligned in the "MixVision" mode.

English
18 C.A1886 –C.A1888
To align the two images:
1. Make sure that you are in NULL mode
2. Hold the C key down and press; the left arrow to shift the image to the
left; the right arrow to shift the image to the right; the up arrow to shift
the image upward; the down arrow to shift the image downward.
5.3 ADJUSTING THE IMAGE
You can set the brightness (Level) and contrast (Span) of the image captured by
the I.R. camera manually or automatically.
5.3.1 Automatic adjustment
The I.R. camera adjusts the brightness and/or the contrast automatically when
you press the A key.
5.3.2 Manual adjustment
You can adjust the image brightness and contrast in the menu or by pressing the
arrows in NULL mode: press the UP or DOWN arrow to modify the contrast, the
LEFT or RIGHT arrow to modify the brightness.
Manual adjustment in the menu:
1. Press the MENU/VALIDATION key
2. Press the UP or DOWN arrow to select the [Manual Adj.] menu. Validate
by pressing the MENU/VALIDATION key.
Analysis ►
File ►
IR / Visible
Manual Adj.
Object Param.
System Setup►
3. Adjusting the brightness and contrast
Press the LEFT or RIGHT arrow to select the field to be modified.
Press the UP or DOWN arrow to define the values.

English
C.A1886 – C.A1888 19
4. After this operation, press the MENU/VALIDATION key to save the
modifications or the C key to close the menu window without saving.
To activate manual adjustment, make sure that continuous adjustment
(Menu => Camera setup) is desactivated.
5.3.3 Adjusting the image
1. Press the MENU/VALIDATION key.
2. Press the UP or DOWN arrow to select the [System Setup] menu, then
press the MENU/VALIDATION key.
Analysis ►
File ►
IR / Visible
Manual Adj.
Object Param.
System Setup►
Analysis setup
Local setup
Date & Time
Camera setup
System info
3. Press the UP or DOWN arrow to select [Camera setup], then press the
MENU/VALIDATION key.
Shut down : Never
Trigger button : Laser on
Laser adjust. : Off
Menu style : Normal
Palette : Metal
Auto. Adjust : Level and span
Continuous adj. : Level and span
Shutter period : Never
4. Define the adjustments of the image.
Press the UP or DOWN arrow to select the field to be modified.
Press the LEFT or RIGHT arrow to define the values.
5. After this operation, press the MENU/VALIDATION key to save the
modifications or the C key to close the menu window without saving.

English
20 C.A1886 –C.A1888
About the adjustments of the image
Palette Assigns the pseudo-colours of the thermal image. 6
palettes are provided: Metal, Reversed metal, Rainbow,
Natural, Grey, and Reversed grey.
Auto Adjust.
Assigns the function of the A key. You may choose
among three options: Level and contrast, level, or
contrast.
Level and
span
The device automatically
adjusts the brightness and
contrast of the image to their
optimum levels.
Level The device automatically
adjusts the brightness of the
image.
Span The device automatically
adjusts the contrast of the
image.
Continuous
Adjust.
Determines whether the brightness and contrast of the
image displayed on screen are adjusted automatically
or not, continuously with no press.
Level and
span Automatic adjustment of the
brightness and contrast.
Level Automatic adjustment of the
brightness.
None No automatic adjustment of the
brightness or contrast.
Shutter period Sets the period of auto-adjusting.
Shut Down Set the period of shutting down the camera.
Trigger button Set the control switch of the trigger button
Laser Adjust Adjusts the Laser point in the LCD displayer.
Menu Style Sets the menu style.
Other manuals for RayCAm C.A 1886
1
This manual suits for next models
5
Table of contents
Other Chauvin Arnoux Thermal Camera manuals

Chauvin Arnoux
Chauvin Arnoux DiaCAm 2 CA 1900 User manual

Chauvin Arnoux
Chauvin Arnoux DiaCAm 2 CA 1900 User manual

Chauvin Arnoux
Chauvin Arnoux C.A 1954 DiaCAm 2 User manual

Chauvin Arnoux
Chauvin Arnoux C.A 1879 User manual

Chauvin Arnoux
Chauvin Arnoux DIACAM 2 C.A 1950 User manual

Chauvin Arnoux
Chauvin Arnoux C.A 1954 DiaCAm2 User manual