CHD MP-KBD User manual

7
Model 8-433
ver. 1.0
INSTALLATION MANUAL
© 2008 CHD Elektroservis
MP-KBD
MIDI Interface for Mono / Poly Keyboard
Model 8-433 ver. 1.0
Copyright © 2008 CHD Elektroservis
All rights reserved. No part of this publication may be reproduced in any form without the written permission of CHD Elektroservis.
2
Table of contents
1. Introduction . . . . . . . . . . . . . . . . . . . . . . . . . . . . . . . . . . . . . . . 3
1.1. MIDI interface kit parts . . . . . . . . . . . . . . . . . . . . . . . . . . . . . . . . . . 3
1.2. General information . . . . . . . . . . . . . . . . . . . . . . . . . . . . . . . . . . . 3
2. Installation of MIDI interface . . . . . . . . . . . . . . . . . . . . . . . . . . . . . . . 3
2.1. Releasing of the instrument cover . . . . . . . . . . . . . . . . . . . . . . . . . . . . 4
2.2. MIDI-IN connector installation . . . . . . . . . . . . . . . . . . . . . . . . . . . . . . 4
2.3. Cable montage . . . . . . . . . . . . . . . . . .. . . . . . . . . . . . . . . . . . . . 6
2.4. Interface board installation . . . . . . . . . . . . . . . . . . . . . . . . . . . . . . . . 7
2.5. Instrument re-assembly . . . . . . . . . . . . . . . . . . . . . . . . . . . . . . . . . 8
Manufacturer :
CHD Elektroservis
Nad kundratkou 27, 19000 Praha 9
Czech Republic
info@chd-el.cz
www.chd-el.cz
MP-KBD
MIDI Interface for Mono / Poly Keyboard
Model 8-433 ver. 1.0
Copyright © 2008 CHD Elektroservis
All rights reserved. No part of this publication may be reproduced in any form without the written permission of CHD Elektroservis.
3
1. INTRODUCTION
Korg Mono/Poly Keyboard MIDI Interface enables the integration of your Mono/Poly to the
MIDI system. The instrument’s keyboard and arpeggiator speed can be controlled with this MIDI
interface.
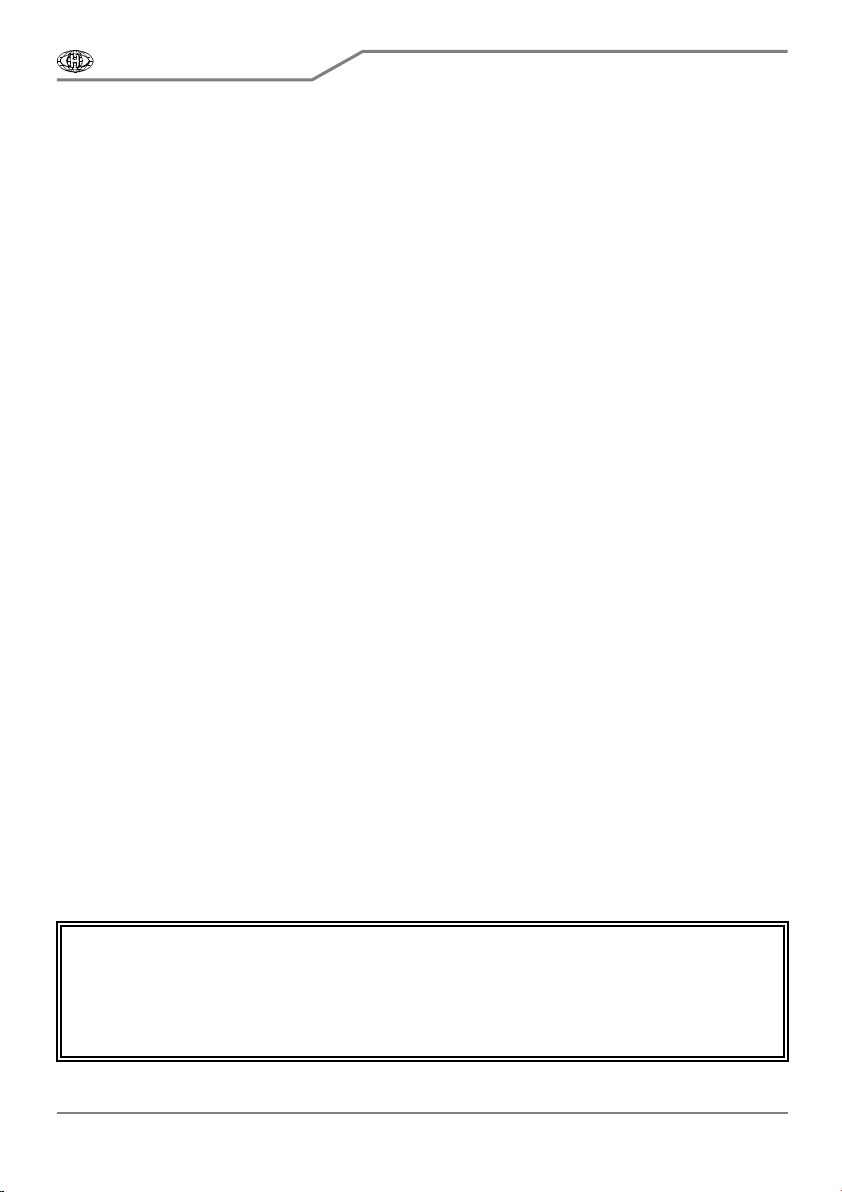
1.1. MIDI INTERFACE KIT PARTS
The supplied MIDI
interface kit contains all
necessary parts and
material for the installation
and detailed installation
instructions. The kit delivery
contents:
1. MP-KBD MIDI Interface
board
2. Bunch of the cables
with connectors
(including screws, nuts,
washers and isolation
material)
3. CD-ROM with the user and installation manuals and support software
1.2. GENERAL INFORMATION
The installation of all interface components is very easy. If you follow the instruction from this
manual there will be no major problems during the installation procedure. The cover of the instrument
is not damaged during the installation markedly. The physical appearance of the vintage instrument
remains nearly same as before the installation. If necessary the interface can be removed and the
instrument restored back to original appearance. All original features of the Korg Mono/Poly are kept.
The instrument can be used the same way as before the retrofitting thus.
The following tools are necessary for the installation: Phillips screwdriver, driller, drills 3,5 and
16 mm, smaller rasp, pliers, pincers, soldering iron (soft melting iron and soldering paste).
Attention ! Disconnect the instrument form the mains prior the installation. The risk of the
electric shock !
The producer is not responsible for any eventual mechanical or electrical damage of the Korg
Mono/Poly instrument caused by the infringement of the described installation procedure or by
uncareful manipulation during the installation of the MIDI interface !
2. INSTALLATION OF MIDI INTERFACE
The interface is connected to the keyboard switch matrix of the instrument in parallel manner.
It is also inserted into the arpeggiator synchronization impulses way. The following diagram explains
the electrical connection of the interface in the instrument:

MP-KBD
MIDI Interface for Mono / Poly Keyboard
Model 8-433 ver. 1.0
Copyright © 2008 CHD Elektroservis
All rights reserved. No part of this publication may be reproduced in any form without the written permission of CHD Elektroservis.
4
Electrical connection of interface in the instrument
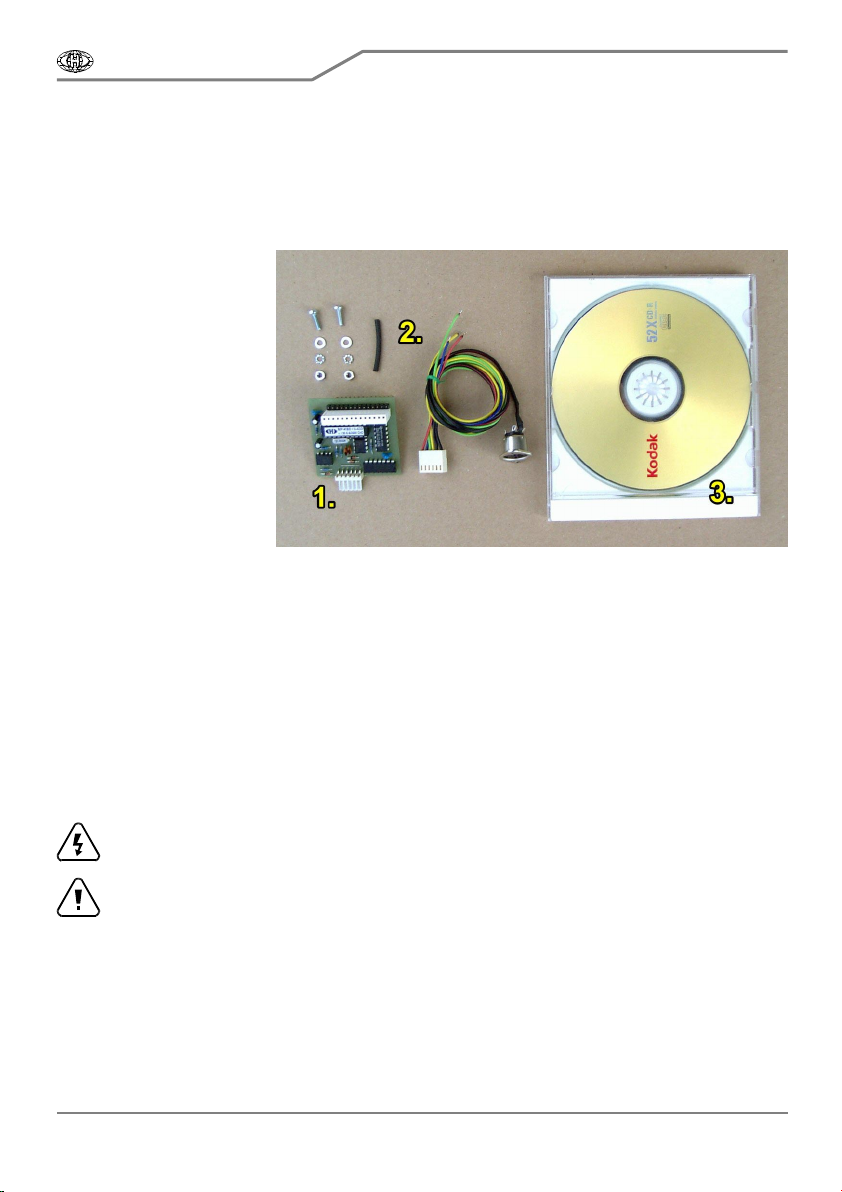
2.1. RELEASING OF THE INSTRUMENT COVER
a) Unscrew the three screws from the bottom of the instrument (pic. 1-1) and four screws on the
front panel (pic. 1-2). Keep the screws. They will be used again after the MIDI kit installation.
b) Lift off carefully the instrument front panel (pic. 1-3).
Pic. 1-1 Pic. 1-2
Pic. 1-3
2.2. MIDI-IN CONNECTOR INSTALLATION
There are three ways of the MIDI-In connector installation possible.
If you do not like to mechanically damage the front cover of the instrument, take out the MIDI cable
through the slot near the left side for example (see pic. 2-1).

MP-KBD
MIDI Interface for Mono / Poly Keyboard
Model 8-433 ver. 1.0
Copyright © 2008 CHD Elektroservis
All rights reserved. No part of this publication may be reproduced in any form without the written permission of CHD Elektroservis.
5
If you do not want to damage the instrument, it is possible to mount the MIDI-In connector instead
the serial number plate on the power cord sub-panel (see pic. 2-2). This solution is recommended
since you can change the instrument in the original appearance at any time. The MIDI-In connector
installation procedure is as follows:
Pic. 2-1 Pic. 2-2
a) Turn over the front cover of the instrument back to sit on the sides of the instrument.
b) Unscrew the serial number plate from the power cord sub-panel (pic. 2-3). Please safe the
serial number plate and screws.
c) Drill three holes in the sub-panel (see pic. 2-4). Please work carefully to not drill in the
instrument parts inside the instrument (pic. 2-5).
Pic. 2-3 Pic. 2-4 Pic. 2-5
d) Clean the edge of the holes with small rasp (pic. 2-6). Clen the holes also from inside after the
turn over the front cover. The visible silver edge should be colored with dark blue or black cover (you
can use permanent marker for example) (pic. 2-7).
Obr. 2-6
e) Clean all iron sawdust and raspings from the inside of
the instruments, they can cause short circuits or serious electrical
damage of the instrument. Please clean the instrument carefully!
f) Insert the MIDI-In (DIN plug) in the back cover and fix it with
screws and female screws. Insert the flat supports under the heads
of the screws and fan type supports under the female screws (pic.
2-8). Hold the female screws during the fixing. All material is a part
of the kit.
g) It is suitable to mark the connector („MIDI IN“) use e.g.
self-adhesive foil (pic. 2-9).

MP-KBD
MIDI Interface for Mono / Poly Keyboard
Model 8-433 ver. 1.0
Copyright © 2008 CHD Elektroservis
All rights reserved. No part of this publication may be reproduced in any form without the written permission of CHD Elektroservis.
6
Pic. 2-7 Pic. 2-8 Pic. 2-9
2.3. CABLE MONTAGE
Bunch of the cables (part of the kit) is finished with six-pin connector (pic. 3-1). There are four
terminals (except two wires to MIDI-IN connector). Two of them (5, 6) must be soldered on the
instrument’s KLM-356 Keyboard Assigner board and two of them (3, 4) to the ARPEGGIO-TRIG-IN
Jack connector (pics 3-1, 3-2).
Pic. 3-1
Pic. 3-2

MP-KBD
MIDI Interface for Mono / Poly Keyboard
Model 8-433 ver. 1.0
Copyright © 2008 CHD Elektroservis
All rights reserved. No part of this publication may be reproduced in any form without the written permission of CHD Elektroservis.
7
a) Solder the blue cable (GROUND - pin Nr. 5) to the ground of the KLM-356 board. The most
suitable place is the J50 wire (pic. 3-3). Be careful here, as the cables must not be connected with
other components on the circuit board.
b) Solder the red cable (Vcc +5V - pin Nr. 6) to the power distribution +5V on the KLM-356 board.
The most suitable place is the J71 wire (pic. 3-3).
c) Unsolder the orange cable from the ARPEGGIO-TRIG-IN Jack connector on rear panel of the
instrument (pic. 3-4). Place the shrinking isolation tube on the cable and solder the cable to green
cable from the interface cable bunch (ARPG CLK OUT - pin Nr. 4). Isolate the connection with the
isolation tube and heat it up until it shrinks to the cables fast. The tube can be heated up with hot-flue
pistol for example (pic. 3-5).
d) Solder yellow cable from the interface cable bunch (ARPG CLK IN - pin Nr. 3) to released lead
of the ARPEGGIO-TRIG-IN Jack connector (pic. 3-6).
Pic. 3-3 Pic. 3-4
Pic. 3-5 Pic. 3-6
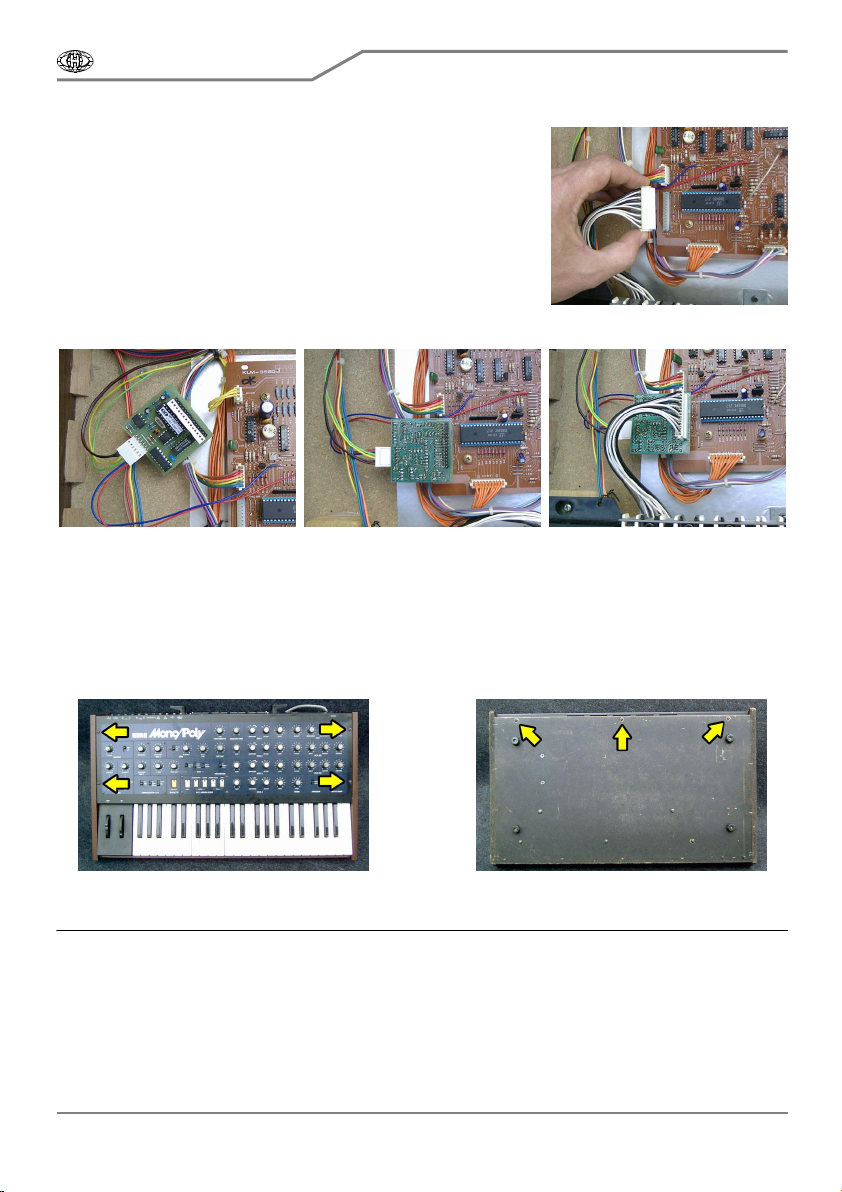
2.4. INTERFACE BOARD INSTALLATION
a) Detach the 14-pin CN22 connector on the KLM-356 board of the cable bunch from the
instrument’s keyboard (pic. 4-1).
MP-KBD
MIDI Interface for Mono / Poly Keyboard
Model 8-433 ver. 1.0
Copyright © 2008 CHD Elektroservis
All rights reserved. No part of this publication may be reproduced in any form without the written permission of CHD Elektroservis.
8
Obr. 4-1
b) Plug the flat 6-pin connector of newly installed cable bunch
to the interface board (pic. 4-2). The connector can not be
connected wrong way, there are locks on it.
c) Plug the interface board onto the CN22 connector on
instrument’s KLM-356 board, the flat connector of the interface
leading left (pic. 4-3). Component side of the interface board is
orientated down.
d) Plug the connector of the cable bunch from the
instrument’s keyboard in the plug on the interface board (pic. 4-4).
Be careful, the lock of the connector must lead right.
Pic. 4-2 Pic . 4-3 Pic. 4-4
2.5. INSTRUMENT RE-ASSEMBLY
a) Turn over the front panel of the instrument.
b) Screw the panel with four screws to the sides of the instrument (pic. 5-1) and three screws to
the bottom of the cover (pic. 5-2). Reversed procedure as described in the chapter 2.1.
Pic. 5-1 Pic. 5-2
The installation of the MIDI kit is now finished, the instrument is ready for use with MIDI.
Please read the user’s guide carefully before the MIDI interface use.
Table of contents
Other CHD Media Converter manuals


Popular Media Converter manuals by other brands


Phrontier Technologies
Phrontier Technologies PHANTA-S1F4 user manual

Vicon
Vicon VN-DECODER-2V8 installation guide

Datalogic
Datalogic AMT58*-PN Series instruction manual

PCB Piezotronics
PCB Piezotronics 422E05 Installation and operating manual

Hanwha Techwin
Hanwha Techwin Wisenet SPD-152 quick guide

Luxlink
Luxlink IRGM-7004 operating instructions