manuals.online logo
Brands
  1. Home
  2. •
  3. Brands
  4. •
  5. Chef's Choice
  6. •
  7. Accessories
  8. •
  9. Chef's Choice Pronto Diamond Hone 463 User manual

Chef's Choice Pronto Diamond Hone 463 User manual

USING PRONTO®
Note: Always clean your knife before sharpening
in the Pronto®!You will find that the Pronto®can
create and maintain an exceedingly sharp and
effective edge on all your conventional fine edge
and serrated cutlery. The primary edge facets are
each formed in Stage 1 at a nominal 15 degrees
which results in a total primary edge of 30 degrees
(15° on each side). Stage 2 creates a second bevel
at a slightly larger angle leaving a strong double
beveled edge structure that will stay sharp longer.
Always use the sharpener with the stage numbers
1 and 2, facing you.
Safety:Keepyour fingersclearofthe bladeedgeat
all times. Hold the handle with your left hand making
certain that all your fingers and thumb remain safely
behind the partition wall where the handle attaches
to the sharpening stage.
FINE EDGE KNIVES STAGE 1
Tosharpen,holdthe sharpener onthe table withyour
left hand. Insert the knife blade into the slot of Stage
1. Hold the blade level with the table, press down
to bring the knife edge into firm sustained contact
with both of the two internal diamond coated disks
and slide the blade back and forth in a sawing-like
motion. For optimum results center the blade left to
right in the slot and avoid rubbing against the walls
of the slot. Apply a downward force of about 4-5*
pounds as you move the blade. Listen carefully to
the disks to insure both disks are rotating when you
move the blade. Sharpening will not be as effective
if you press too lightly while sharpening.
If your knife, before sharpening, is not very dull
you may find that only about 10 or less back and
forth stroke pairs in Stage 1 (with recommended
downward pressure) will be sufficient to put a keen
edge on the blade. However, if the knife starts out
very dull you may find that 20 or more back and
forth paired strokes will be needed the first time
as you reshape and sharpen the old edge. Before
się, że Pronto® może stworzyć i utrzymywać
wyjątkowo ostre i skuteczne krawędzie na wszystkich
konwencjonalnych, gładkich i ząbkowanych nożach.
Podstawowe płaszczyzny ostrza są utworzone w
etapie 1 przy nominalnym kącie 15 stopni, co daje 30
stopni całkowitej płaszczyzny (15 ° po każdej stronie).
Etap 2 tworzy druga płaszczyznę pod nieco większym
kątem, dzięki czemu otrzymujemy wytrzymałą dwu
płaszczyznowa, która pozostanie ostra dłużej. Zawsze
używaj ostrzałki tak, aby numery etapów 1 i 2 były
skierowane do ciebie.
Bezpieczeństwo: Trzymaj palce z dala od
krawędzi ostrza przez cały czas. Trzymaj rękojeść
lewą ręką, upewniając się, że wszystkie palce i kciuk
pozostają bezpiecznie za przegrodą, oddzielającą
uchwyt od modułu ostrzącego.
OSTRZENIE NOŻY GŁADKICH ETAP 1
Aby naostrzyć nóż, przytrzymaj ostrzałkę na stole
lewą ręką. Wsuń ostrze noża do szczeliny w Etapie
1. Trzymaj ostrze równolegle do stołu, dociśnij w
dół, aby krawędź noża utrzymywała stały kontakt z
obydwoma wewnętrznymi diamentowymi tarczami i
przeciągaj ostrze do przodu i do tyłu tak jak podczas
piłowania. Aby uzyskać optymalne rezultaty, należy
wypośrodkować ostrze i unikać ocierania się ostrza
o ścianki szczeliny.
Podczas przeciągania ostrza należy je dociskać
do dołu z siłą około 2 kg nasłuchując czy oba dyski
obracają się podczas przeciągania ostrza.
Ostrzenie nie będzie skuteczne, jeżeli będziesz
zbyt lekko naciskał na ostrze.
Jeśli twój nóż, przed ostrzeniem, nie jest
bardzo stępiony wystarczy tylko około 10 lub mniej
przeciągnięć do przodu i do tyłu w Etapie 1 (przy
zalecanym nacisku w dół), aby przywrócić ostrość
krawędzi ostrza. Jeśli jednak nóż jest bardzo stępiony,
potrzebnych będzie 20 lub więcej przeciągnięć do
przodu i tyłu razy, aby naostrzyć krawędź. Przed
zakończeniem etapu 1 należy sprawdzić ostrość
krawędzi tnącej przez przekrojenie kawałka
leaving Stage 1 check the edge for sharpness by
slicing a piece of paper.It should cut paper readily
with only a slight roughness to the cutting action.
* 4 to 5 pounds is about the weight of a 2 inch thick
telephone book
STAGE 2
Ifthe knife iscorrectly sharpened in Stage 1only 2-5
back and forth stroke pairs in Stage 2 will complete
the small second bevel and the edge will be very
sharp and effective. It should cut paper smoothly
allowing you to make straight or curved cuts easily.
For optimum results center the blade (left and
right) within the slot and keep the length of the
blade aligned with the center line of the slot as you
sharpen.Apply about 3-4 pounds downward pres-
sure on the blade in Stage 2. Hold the blade level,
make smooth consistent strokes while maintain-
ing recommended downward pressure and make
certain the disks are turning.
RESHARPENING THE KNIFE EDGE
Follow the procedure for Stage 2 described above
for “Using Pronto®”, making two to three (2-3)
pairs of strokes while maintaining recommended
downwardpressure.Generally you shouldbe able to
resharpen several times using only Stage 2. Listen
to confirm the sharpening disks are turning. Test
edge for sharpness and if necessary make four (4)
back and forth pairs of repeated strokes in Stage
1 followed by two to three (2-3) pairs in Stage 2.
SERRATED BLADES
Serratedblades can besharpened in Stage 2.Center
the blade in the slot of Stage 2 and make five (5)
forwardandback stroke pairs.Examinetheedge and
if necessary make another 5 full strokes. Examine
blade. If the blade to be sharpened is very dull, first
make two full strokes (forward and back pairs) in
Stage 1 and then make five (5) paired strokes in
Stage 2. Because of its nature, a serrated knife
papieru. Ostrze powinno z łatwością ciąć papier tylko
nieznacznie go strzępiąc podczas cięcia.
* 4 do 5 funtów to mniej więcej waga książki telefonicznej o grubości 2cm
Jeśli nóż został poprawnie naostrzony w etapie
1, wystarczy tylko od 2 do pięciu par przeciągnięć
w Etapie 2, aby powstała druga mała powierzchnia
tnąca i uzyskać bardzo ostrą i skuteczną krawędź,
która powinna z łatwością przecinać papier i pozwoli
ci na wykonywanie cięć prostych i zakrzywionych.
W celu uzyskania optymalnych rezultatów
wypośrodkuj ostrze w szczelinie i upewnij się, że
pozostanie wypośrodkowane podczas ostrzenia.
Dociśnij ostrze do dołu używając siły około 3-4 kg
nacisku na ostrze w etapie 2. Trzymając ostrze prosto
wykonuj płynne, ciągłe pociągnięcia, utrzymując
zalecaną siłę nacisku w dół i upewnij się, że tarcze
się obracają.
PODOSTRZANIE KRAWĘDZI TNĄCEJ NOŻA
Postępuj zgodnie z procedurą opisaną powyżej
dla etapu 2. Wykonaj od dwóch do trzech (2-3) par
przeciągnięć przy zachowaniu zalecanego nacisku
w dół. Ogólnie rzecz biorąc, powinieneś być w stanie
wielokrotnie podostrzyć nóż, używając tylko etapu 2.
Upewnij się, że tarcze ostrzące się obracają. Sprawdź
czy krawędź jest wystarczająco ostra i, w razie
konieczności, wykonaj cztery (4) pary przeciągnięć
w Etapie 1, a następnie dwie trzy pary Etapie 2.
OSTRZA ZĄBKOWANE
Ostrza ząbkowane mogą być ostrzone w Etapie 2.
Ustaw ostrze po środku szczeliny Etapu 2 i wykonaj
pięć (5) par przeciągnięć do przodu i do tyłu. Sprawdź
krawędź, a jeśli to konieczne, wykonaj kolejnych 5
przeciągnięć. Sprawdź ostrze. Jeśli ostrze jest jeszcze
tępe, najpierw wykonaj dwa pełne przeciągnięcia (do
przodu i do tyłu) w Etapie 1, a następnie wykonaj
pięć (5) par przeciągnięć w Etapie 2. Ze względu na
swój charakter, nóż ząbkowany nigdy nie będzie tak
ostry i nie będzie ciąć tak dobrze, jak ostrze gładkie.
Uwaga: Nie wykonuj wielu przeciągnięć w Etapie 1,
will never appear as sharp or cut as smoothly as a
straight edged blade. Caution: Do not make many
strokes in Stage 1, which can quickly remove metal
from a serrated edge.
ASIAN BLADES
The Pronto®which sharpens at a primary angle of
15 degrees, can sharpen all double faceted Asian
blades such as the Santoku which is traditionally
sharpened at 15º.
Do not sharpen in the Pronto any single sided,
single faceted Asian Kataba knives, such as the
traditional sashimi styled blade that is commonly
used to prepare ultra thin sashimi. The Pronto®
sharpens simultaneously both sides of the cutting
edge while the sashimi knives are designed to
be sharpened only on one side of the blade. The
versatile Chef’sChoice®Electric Model 15XV and
Model 1520 are designed to also sharpen all single
faceted Asian style knives.
CERAMIC KNIVES
ThePronto®isnot recommended forceramic knives.
SCISSORS
Do not attempt to use the Pronto®to sharpen
scissors. EdgeCraft does manufacture both electric
and manual scissor sharpeners.
BRANDS OF KNIVES
The Pronto®will put an excellent edge on all double
bevel15degreeAsian knives including Santoku style
knives regardless of brands, including Henckels,
Wüsthof, Sabatier, Lamson and Goodnow, Global,
Forshner, Russell Harrington, Forshner, Mundial,
Messermeisser, Cuisinart, Kitchen Aid, Shun and
many, many more.
TEST FOR SHARPNESS
To test for sharpness and cutting ability of your
knife, hold a sheet of paper vertically by its upper
edge and carefully cut down through the sheet a
small (but safe) distance from your fingers.A sharp
edge (on a straight edge blade) will cut smoothly
without tearing the paper.
Alternativelytry cutting atomato.Theknifeshould
penetrate the skin of the tomato and cut through it
on the first pull without applying significant force
to the knife.
MAINTENANCE:
• The exterior can be cleaned with a damp
soft cloth
• Periodically shake out and dispose of the metal
sharpening dust by inverting the sharpener and
lightly tapping it onto a newspaper, paper towel,
or other paper sheet.
• No oils or other lubricating liquids are
necessary with this sharpener.
Limited Warranty: Used with normal care, this EdgeCraft
product is guaranteed against defective material and
workmanship for a period of one (1) year from date of
original purchase (“Warranty Period”). We will replace or
repair,at our option, any product or part that is defective in
material or workmanship without charge if the product is
returned to us postage paid with dated proof of purchase
within the Warranty Period.This warranty does not apply
to commercial use or any product abuse. ALL IMPLIED
WARRANTIES, INCLUDING IMPLIED WARRANTIES OF
MERCHANTABILITY AND FITNESS FOR A PARTICULAR
PURPOSE, ARE LIMITED TO THE WARRANTY PERIOD.
EDGECRAFT CORPORATION SHALL NOT BE LIABLE FOR
ANY INCIDENTAL OR CONSEQUENTIAL DAMAGES. Some
states do not allow limitations on how long an implied
warranty lasts and some states do not allow exclusions or
limitations of incidental or consequential damages, so the
above limitations or exclusions may not apply to you. This
limited warranty gives you specific legal rights, and you
may also have other rights which vary from state to state.
Congratulations!!
The Pronto®Model 463 designed to sharpen Asian
style blades is manufactured by Chef’sChoice®,
the world’s leader in cutting edge technology. It
is an exceedingly fast manual sharpener that will
create an exceptionally effective cutting edge on
your Asian style cutlery. The cutting edge is finely
honed to extreme sharpness but retains strong
microscopic teeth that gives it a highly effective
bite for all your food prep needs and especially for
fibrous materials. The edge is surprisingly durable
yetcanbe resharpened quicklywhenevernecessary.
You will be pleased to see how easy the Pronto®
is to use and how well your Asian knives will
perform. Read and follow the instructions carefully.
Keep the sharpener close at hand so that you can
enjoy the pleasure of sharp knives every day.
DESCRIPTION OF THE PRONTO®
You will appreciate that the soft touch ergonomical
handle of the Pronto®is extremely comfortable
providing a secure grip.There are two slots, the first
(#1)uses fine diamondabrasives to create and hone
a sharp primary edge and a second slot (#2) where
that edge is ultrahoned at a slightly larger angle
with micron size diamonds to its final sharpness.
In each, the first and second stage, both sides
of the edge are sharpened simultaneously by two
precision diamond coated conical honing disks.
The orientation of the disks is such that by sharp-
ening in both stages the entire length of the edge
is sharpened.
Small rubber feet secure the Pronto®to any dry
cleansurface.The softtouch handle further reduces
the opportunity for slippage while sharpening.
Gratulacje!!
Ostrzałka Pronto Model 463 przeznaczona do
ostrzenia noży azjatyckich produkowana jest przez
rmę Chef’sChoice®, światowego lidera w zastoso-
waniu najnowszych technologii wykorzystywanych
do ostrzenia. Jest to niezwykle szybka, ręczna
ostrzałka, który stworzy wyjątkowo skuteczną krawędź
tnącą na twoich azjatyckich nożach. Płaszczyzna
tnąca jest szlifowana aż do uzyskania ekstremalnie
ostrej krawędzi, Mikroskopijne ząbki zachowane
na krawędzi pozwalają jeszcze lepiej i skuteczniej
kroić wszystkie produkty żywnościowe, a zwłaszcza
produkty włókniste. Krawędź tnąca jest nadspodzie-
wanie trwała, a w razie potrzeby może być szybko
podostrzona.
Będziesz zadowolony widząc, z jaką łatwością
używa się ostrzałkę Pronto® i jak dobrze będą
sprawowały się twoje noże azjatyckie. Przeczytaj
uważnie poniższe instrukcje i postępuj zgodnie z
nimi. Trzymaj ostrzałkę pod ręką, aby codziennie
cieszyć się ostrymi nożami.
OPIS OSTRZAŁKI PRONTO®
Delikatna w dotyku ergonomiczna rękojeść Pronto®
jest wyjątkowo wygodna, zapewniająca pewny
uchwyt. Ostrzałka wyposażona jest w dwie szczeliny,
pierwsza (# 1) wykorzystuje diamentowe materiały
ścierne do stworzenia i wygładzenia ostrej pierwszej
krawędzi tnącej i drugiej szczeliny (# 2), gdzie ta
krawędź jest polerowana pod nieco większym kątem
przy użyciu diamentów o rozmiarach mikrona, aby
uzyskać ostateczną ostrość.
Zarówno w pierwszym jak i drugim etapie, obie
strony krawędzi są ostrzone równocześnie przez dwa
precyzyjne diamentowe dyski. Ustawienie dysków
zapewnia, że przez ostrzenie na obu stopniach cała
krawędź tnąca zostanie naostrzona.
Małe gumowe nóżki mocują Pronto® do suchej,
czystej powierzchni. Miękki w dotyku uchwyt dodat-
kowo zmniejsza możliwość uślizgu podczas ostrzenia.
KORZYSTANIE Z OSTRZAŁKI PRONTO®
Uwaga: Przed rozpoczęciem ostrzenia ostrzałką
Pronto® zawsze należy wyczyścić nóż! Przekonasz
GB PLPL D
Pronto®Diamond Hone®
Knife Sharpener for
Asian Knives Model 463
Chef’sChoice® Pronto®
Diamond Hone® ostrzałka do
noży azjatyckich Model 463
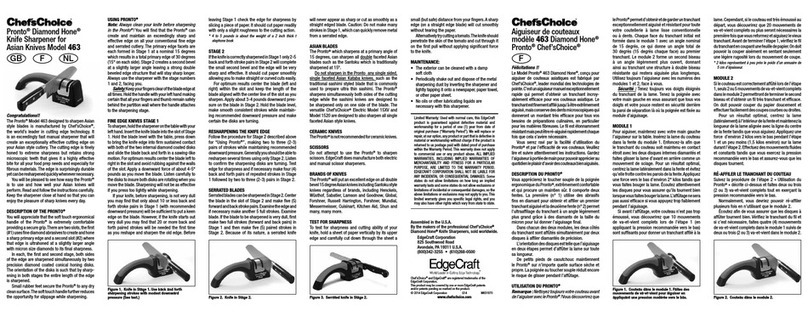
Figure 1. Knife in Stage 1. Use back and forth
sharpening strokes with modest downward
pressure (See text.) Rysunek 1. Nóż w Etapie 1. Przeciągaj nóż używając
umiarkowanego nacisku (patrz tekst).
Figure 2. Knife in Stage 2. Rysunek 2. Nóż w Etapie 2.
Figure 3. Serrated knife in Stage 2.
Assembled in the U.S.A.
By the makers of the professional Chef’sChoice®
Diamond Hone®Knife Sharpeners, sold worldwide.
EdgeCraft Corporation
825 Southwood Road
Avondale, PA 19311 U.S.A.
(800)342-3255 • (610)268-0500
Chef’sChoice®and EdgeCraft®are registered trademarks of the
EdgeCraft Corporation.
This product may be covered by one or more EdgeCraft patents
and/or patents pending as marked on the product.
© 2017 EdgeCraft Corporation E17 M631980
www.chefschoice.com
gdyż może to doprowadzić do szybkiego usunięcia
metalu z ząbkowanej krawędzi.
OSTRZA AZJATYCKIE
Ostrzałka Pronto®, która ostrzy głównie pod kątem
15 stopni, może naostrzyć wszystkie obustronnie
ostrzone ostrza azjatyckie, takie jak Santoku, który
są tradycyjnie ostrzone pod kątem 15º.
Ostrzałką Pronto nie należy ostrzyć żadnych jed-
nostronnie ostrzonych noży azjatyckich Kataba, takich
jak tradycyjne ostrza sashimi, które są powszechnie
stosowane do przygotowywania bardzo cienkich
sashimi. Ostrzałka Pronto® wyostrza równocześnie
obie strony krawędzi tnącej, podczas gdy noże sashimi
są przeznaczone do ostrzenia tylko jednej stronie os-
trza. Uniwersalny model Chef’sChoice® Electric Model
15XV i model 1520 służą do wyostrzania wszystkich
jednostronnie ostrzonych noży azjatyckich.
NOŻE CERAMICZNE
Ostrzałka Pronto® nie jest zalecana do ostrzenia
noży ceramicznych.
NOŻYCZKI
Niewolno używać ostrzałki Pronto® do ostrzenia
nożyczek. Firma EdgeCraft produkuje zarówno
elektryczne, jak i ręczne ostrzałki do nożyczek.
MARKI NOŻY
Ostrzałka Pronto® nada doskonałą krawędź wszystkim
nożom azjatyckim obustronnie ostrzonym pod kątem
15 stopni, w tym nożom Santoku, niezależnie od
marek, w tym Henckels, Wpustów, Sabatier, Lamson
i Goodnow, Global, Forshner, Russell Harrington,
Forshner, Messermeisser, Mundial, Cuisinart, Kitchen
Aid, Shun i wiele innych.
TEST NA OSTROŚĆ
Aby przetestować ostrość noża, przytrzymaj kartkę
papieru pionowo za górną krawędź i ostrożnie
przecinaj w niewielkiej, (ale bezpieczną) odległości
od palców. Ostra krawędź tnąca z łatwością przetnie
papier bez jego strzępienia.
Alternatywnie można spróbować pokroić
pomidora. Nóż powinien zagłębić się i przeciąć
skórkę pomidora za pierwszym pociągnięciem
wykonanym bez użycia nadmiernej siły.
KONSERWACJA:
• Obudowę można czyścić wilgotną miękką szmatką
• okresowo należy pozbyć się metalowych opiłków
poprzez odwrócenie ostrzałki i delikatne uderzanie
w nią nad gazetą, papierowym ręcznikiem lub
kartką papieru.
• ostrzałka nie wymaga stosowania oleju lub innych
płynów smarujących.
Ograniczona gwarancja:, Jeżeli ten Produkt rmy EdgeCraft
jest używany zgodnie ze swoim przeznaczeniem to producent
zapewnia, że produkt pozostanie wolny od wad materiałowych
i produkcyjnych przez okres jednego roku od daty pierwotnego
zakupu (“Okres gwarancji”). W przypadku stwierdzenia wad
materiałowych lub produkcyjnych produktu lub jego części produkt
lub część zostanie nieodpłatnie naprawiona lub wymieniona na
nową, według uznania producenta, jeśli produkt zostanie odesłany
do producenta z zapłaconą opłatą pocztową i potwierdzoną datą
zakupu w Okresie Gwarancyjnym. Niniejsza gwarancja nie dotyczy
używania produktu w celach komercyjnych ani niezgodnie z jego
przeznaczeniem. WSZYSTKIE DOMNIEMANE GWARANCJE,
W TYM DOMNIEMANE GWARANCJE PRZYDATNOŚCI HAN-
DLOWEJ I PRZYDATNOŚCI DO OKREŚLONEGO CELU SĄ
OGRANICZONE DO POWYŻSZEGO OKRESU GWARANCJI.
FIRMA EDGECRAFT CORPORATION NIE BĘDZIE
ODPOWIEDZIALNA ZA JAKIEKOLWIEK PRZYPADKOWE
LUB WYNIKOWE SZKODY. Niektóre państwa nie zezwalają
na ograniczenie czasu trwania dorozumianej gwarancji, a
niektóre państwa nie zezwalają na wykluczenia lub ograniczenia
przypadkowych lub wynikowych szkód, więc powyższe
ograniczenia lub wykluczenia mogą nie mieć zastosowania w
twoim przypadku do Ciebie.
Rysunek 3. Nóż ząbkowany w Etapie 2.
Wyprodukowano w USA
Wyprodukowane przez producenta profesjonalnych
ostrzałek do noży Chef’sChoice® Diamond Hone®,
sprzedawanych na całym świecie,
EdgeCraft Corporation
825 Southwood Road
Avondale, PA 19311, USA
(800)-342-3255; (610)-268-0500
Chef’sChoice® i EdgeCraft® są zastrzeżonymi znakami
towarowymi EdgeCraft Corporation. Zgłoszony do opatentowania.
© 2017 EdgeCraft Corporation E17 M631980
www.chefschoice.com
Der Soft-Haltegriff verringert des Weiteren die
Gefahr, beim Schleifen abzurutschen.
GEBRAUCH DES PRONTO®
Hinweis: Reinigen Sie das Messer grundsätzlich
vor dem Schleifen mit dem Pronto®!Sie werden
feststellen, dass der Pronto®überaus scharfe,
leistungsstarkeund haltbare Schneidenbei all Ihren
üblichen Schneidwaren mit Glatt- und Sägeschliff
erzeugt. Die ersten Arbeitsschritte werden jeweils
in Stufe 1 mit einem Nominalwinkel von 15 Grad
gebildet, wodurch eine erste Schneide mit einem
Gesamtwinkel von 30 Grad entsteht (15° auf jeder
Seite). Die 2.Stufe erzeugt eine zweite Zuschärfung
in einem etwas größeren Winkel und bildet somit
einestarke,beidseitigzugeschärfteSchneidstruktur,
deren Schärfe länger hält. Verwenden Sie das
Schleifgerät immer so, dass die Zahlen der Stufen
1 und 2 zu Ihnen hin zeigen.
Sicherheit: Halten Sie die Finger immer von der
Klinge fern. Halten Sie den Griff mit der linken Hand
und achten Sie darauf, dass sich alle Finger und der
Daumen hinter der Schutzabtrennung befinden, die
Griff und Schleifstufe voneinander trennt.
MESSER MIT GLATTSCHLIFF PHASE 1
Zum Schleifen halten Sie das Schleifgerät mit der
linken Hand auf dem Tisch fest. Führen Sie die
Klinge in den Schlitz der ersten Stufe ein. Halten
Sie das Messer waagerecht zum Tisch, drücken
Sie die Schneide nach unten, bis sie die beiden
internen diamantbeschichteten Scheiben berührt,
und bewegen Sie die Klinge in einer sägeähnlichen
Bewegung vor und zurück. Für ein optimales
Ergebnis zentrieren Sie die Klinge in der Mitte des
Schlitzesund vermeiden Sie ein Scheuern der Klinge
an den Seitenwände des Schlitzes. Drücken Sie die
Klinge mit der Kraft eines Gewichts von ca. 2 bis 2
1/2* Kilogramm nach unten. Achten Sie sorgfältig
darauf, dass sich beide Scheiben beim Bewegen
der Klinge drehen. Der Schleifvorgang ist nur dann
effektiv, wenn Sie beim Schleifen ausreichenden
Druck ausüben.
Wenn das Messer vor dem Schleifen nicht sehr
stumpfist,genügeninStufe 1 möglicherweiseschon
10 oder weniger Vor- und Zurückbewegungen (mit
dem empfohlenen Druck nach unten), um für eine
scharfe Schneide der Klinge zu sorgen. Wenn die
Klingezu Beginn jedochsehr stumpf ist,müssen Sie
sie möglicherweise mehr als 20 Mal vor und zurück
bewegen, um die alte Schneide neu zu formen und
zu schleifen. Bevor Sie Stufe 1 abschließen,prüfen
Sie die Schärfe der Schneide, indem Sie ein Blatt
Papier durchschneiden. Die Schneide sollte das
Papier problemlos schneiden können und nur eine
leicht raue Schnittkante hinterlassen.
* 2 bis 2 1/2 Kilogramm entsprechen in etwas dem Gewicht
eines 5 cm dicken Telefonbuchs.
STUFE 2
Wenn das Messer in Stufe 1 richtig geschliffen
wurde, sind in Stufe 2 nur 2-5 Vor- und
Zurückbewegungen nötig, um die kleine zweite
Zuschärfung zu vervollständigen, damit die
Schneide äußerst scharf und leistungsfähig ist. Es
sollte Papier glatt durchschneiden und problemlos
gerade oder bogenförmige Schnitte ermöglichen.
Für ein optimales Ergebnis richten Sie die Klinge
(links und rechts) mittig in dem Schlitz aus und
achten Sie darauf, dass die gesamte Länge der
Klinge während des Schleifens im Schlitz zentriert
bleibt. Üben Sie in Stufe 2 ca.1 1/2 bis 2 Kilogramm
Druck nach unten auf die Klinge aus. Halten Sie
das Messer waagerecht, führen Sie gleichmäßige
Bewegungen mit dem empfohlenen Druck aus und
achten Sie darauf, dass die Scheiben sich drehen.
NACHSCHLEIFEN DER MESSERSCHNEIDE
Gehen Sie gemäß dem Verfahren für Stufe 2,
wie oben im Abschnitt „Gebrauch des Pronto®”
beschrieben, vor und führen Sie zwei bis drei (2-3)
Vor- und Zurückbewegungen mit dem empfohle-
nen Druck nach unten aus. Im Allgemeinen sollte
ein mehrmaliges Nachschleifen nur mit Stufe 2
möglich sein. Vergewissern Sie sich, dass sich die
Schleifscheiben drehen. Prüfen Sie die Schärfe
der Schneide und führen Sie nötigenfalls jeweils
vier (4) Vor- und Zurückbewegungen in Stufe 1
und anschließend zwei bis drei (2-3) Vor- und
Zurückbewegungen in Stufe 2 aus.
KLINGEN MIT SÄGESCHLIFF
Klingenmit Sägeschliff könnenin Stufe 2geschliffen
werden. Setzen Sie die Klinge mittig in den Schlitz
der Stufe 2 ein und führen Sie jeweils fünf (5)
Vor- und Zurückbewegungen aus. Prüfen Sie die
Schneide und führen Sie nötigenfalls 5 weitere
Vor- und Zurückbewegungen aus. Prüfen Sie die
Klinge.Wenn die Klinge,die geschliffen werden soll,
sehrstumpfist,führenSiezuerst 2 volle Bewegungen
(jeweils 2 Vor- und Zurückbewegungen) in Stufe 1
aus und anschließend fünf (5) volle Bewegungen
in Stufe 2. Aufgrund ihrer Beschaffenheit wirkt die
Schneide eines Messers mit Sägeschliff nie so
scharf oder schneidet nie so sanft wie eine Klinge
mit Glattschliff. Vorsicht: Führen Sie in Stufe 1 nur
wenigeBewegungen aus, da sonstder Metallabrieb
von Messern mit Sägeschliff beschleunigt wird.
ASIATISCHE KLINGEN
Der Pronto®, der mit einem primären Winkel von
15 Grad schärft, kann ebenfalls doppelschneidige
asiatische Klingen schleifen, wie beispielsweise
Santoku-Messer, die üblicherweise mit 15 Grad
geschliffen werden.
Verwenden Sie den Pronto nicht zum Schleifen
von einseitigen, einschneidigen asiatischen
Kataba-Messern, wie z.B. dem traditionellen
Sashimi-Messer,dassimAllgemeinenzumSchneiden
von ultradünnem Sashimi verwendet wird. Der
Pronto®schleift gleichzeitig beide Seiten der
Schneide;Sashimi-Messersind jedoch sokonzipiert,
dass nur eine Seite der Klinge geschliffen wird. Das
vielseitig einsetzbare elektrische Chef’sChoice®
Modell 15XV und das Model 1520 dienen zum
Begrenzte Garantie: Bei normaler Benutzung dieses
Produkts gewährt EdgeCraft eine Garantie auf fehlerhaftes
Material und Montagefehler für einen Zeitraum von einem
(1) Jahr ab dem Kaufdatum („Garantiezeitraum“). Produkte
bzw.TeilemitMaterial-oderFertigungsfehlernwerdennach
unserem Ermessen kostenlos ersetzt oder repariert, wenn
das Produkt mit datiertem Kaufnachweis innerhalb der
Garantiezeit mit bezahlten Portokosten an uns zurück-
gesandt wird. Diese Garantie trifft nicht für gewerbliche
Nutzung oder jeder Art von Missbrauch des Produktes
zu. ALLE GARANTIELEISTUNGEN, EINSCHLIESSLICH
MARKTFÄHIGKEITODER EIGNUNG FÜR EINEN BESTIMMTEN
ZWECK, SIND AUF DEN GEWÄHRLEISTUNGSZEITRAUM
BEGRENZT. DAS UNTERNEHMEN EDGECRAFT HAFTET
NICHT FÜR NEBEN- ODER FOLGESCHÄDEN. In einigen
Staaten sind Einschränkungen der gesetzlichen Garanti-
efrist und in anderen Ausschlüsse oder Einschränkungen
von beiläufig entstandenen oder Folgeschäden nicht
zulässig. Die oben angeführten Einschränkungen bzw.
AusschlüssegeltenfürSie daher möglicherweise nicht.Diese
Garantieerklärung sichert Ihnen bestimmte Rechte zu, die
durchweitereRechteergänztwerdenkönnen,die von Staat
zu Staat unterschiedlich sind.
Wir gratulieren!!
DasPronto®Model 463,konzipiert für die Schärfung
von asiatischen Messern, wird von Chef’sChoice®,
dem weltweit führenden Unternehmen auf dem
Gebiet der Schneidkantentechnologie, hergestellt.
Eshandelt sich umein überaus schnellesmanuelles
Messerschleifgerät für eine beispiellos leistungs-
fähigeSchneidebei Ihren asiatischenSchneidwaren.
DieSchneideist aufextreme Schärfefeingeschliffen,
behält jedoch starke mikroskopisch kleine
Zähne bei, die sie bei allen Anforderungen in der
Speisenvorbereitung und insbesondere bei
Produkten mit Faserstruktur mühelos durch
das Material gleiten lassen. Die Schneide ist
überraschend haltbar, kann jedoch bei Bedarf
schnell nachgeschliffen werden.
Sie werden von der einfachen Handhabung des
Pronto®und der guten Leistung Ihrer asiatischen
Messer angenehm überrascht sein. Bitte lesen
Sie die
Anweisungen sorgfältig durch, und befolgen
Sie sie entsprechend. Bewahren Sie das Messer-
schleifgerät immer griffbereit auf, damit Sie nie auf
das Vergnügen verzichten müssen, jeden Tag mit
scharfen Messern zu arbeiten.
BESCHREIBUNG DES PRONTO®
Der ergonomische Soft-Haltegriff des Pronto®
ist äußerst bequem und liegt sicher in der Hand.
Das Gerät weist zwei Schlitze auf: Im ersten (#1)
werden feine Diamantschleifmittel verwendet,
um eine scharfe erste Schneide zu erzeugen
und abzuziehen. Im zweiten Schlitz (#2) wird die
Schneide mit mikroskopisch kleinen Diamanten in
einem etwas größeren Winkel zu ihrer endgültigen
Schärfe feingeschliffen.
InbeidenStufenwerdenbeideSeitenderSchneide
gleichzeitig von zwei diamantbeschichteten
konischen Präzisionsschleifscheiben geschliffen.
Die Scheiben sind so ausgerichtet, dass in beiden
Stufen die Schneide über ihre gesamte Länge
geschliffen wird.
Kleine Gummifüße bieten dem Pronto®sicheren
Halt auf jeder trockenen und sauberen Oberfläche.
D
Pronto®Diamond Hone®
Messerschleifgerät für
asiatisches Messer Modell
463
Abbildung 1. Messer in Stufe 1. Zum Schleifen mit
mäßigem Druck nach unten vor- und zurückbewegen
(siehe Text). Abbildung 2. Messer in Stufe 2. Abbildung 3. Messer mit Sägeschliff in Stufe 2.
Hergestellt in den USA
Von den Herstellern der professionellen, weltweit im
Handel erhältlichen Chef’sChoice®Diamond Hone®
Messerschleifgeräte.
EdgeCraft Corporation
825 Southwood Road
Avondale, PA 19311, USA
(800)-342-3255; (610)-268-0500
Chef’s Choice®und EdgeCraft®sind eingetragene Warenzeichen der
EdgeCraft Corporation. Patente angemeldet.
© 2017 EdgeCraft Corporation E17 M631980
www.chefschoice.com
Schärfen von jeglichen einschneidigen asiatischen
Messern.
KERAMIKMESSER
DerPronto®wirdnichtfür Keramikmesser empfohlen.
SCHEREN
VersuchenSienicht,den Pronto®zum Schleifenvon
Scherenzuverwenden.EdgeCraftproduziert sowohl
elektrischealsauch manuelle Scherenschleifgeräte.
MESSERMARKEN
Mit dem Pronto®erzielen Sie bei allen beidseitig
zugeschärften asiatischen 15-Grad-Messern,
wie z. B. Santoku-Messern, eine ausgezeichnete
Schneide, ungeachtet der Marke, einschließlich
Henckels,Wüsthof,Sabatier,Lamson undGoodnow,
Global,Forshner,Russell Harrington,Messermeisser,
Mundial, Cuisinart, Kitchen Aid, Shun und viele
viele mehr.
SCHÄRFETEST
Zum Prüfen der Schärfe und Schneidfähigkeit
des Messers halten Sie ein Blatt Papier vertikal
am oberen Rand fest und schneiden Sie das Blatt
in geringer (aber sicherer) Entfernung von den
Fingern ein. Eine scharfe Schneide (bei Klingen
mit Glattschliff) schneidet sanft durch das Papier
ohne es einzureißen.
Alternativ können Sie auch versuchen, eine
Tomate zu schneiden. Das Messer sollte die Haut
der Tomate durchdringen und sie auf Anhieb ohne
großen Druckaufwand durchschneiden.
PFLEGE:
• Die Außenseite kann mit einem feuchten,
weichen Tuch gereinigt werden.
• Entfernen Sie regelmäßig den beim Schleifen
entstehenden Metallstaub; drehen Sie das
Messerschleifgerät dazu um und klopfen es
leicht auf eine Zeitung, ein Papiertuch oder ein
Blatt Papier aus.
• Für dieses Messerschleifgerät sind weder Öle
noch andere Schmiermittel erforderlich.

Other manuals for Pronto Diamond Hone 463

6

Other Chef's Choice Accessories manuals

Chef's Choice Pronto Diamond Hone 463 User manual

Chef's Choice

Chef's Choice Pronto Diamond Hone 463 User manual

Chef's Choice Trizor XV User manual

Chef's Choice

Chef's Choice Trizor XV User manual

Chef's Choice Angle Select 1520 User manual

Chef's Choice

Chef's Choice Angle Select 1520 User manual

Chef's Choice Angle Select 1520 User manual

Chef's Choice

Chef's Choice Angle Select 1520 User manual

Chef's Choice Angle Select 1520 User manual

Chef's Choice

Chef's Choice Angle Select 1520 User manual

Chef's Choice 700 User manual

Chef's Choice

Chef's Choice 700 User manual

Chef's Choice EdgeSelect 120 User manual

Chef's Choice

Chef's Choice EdgeSelect 120 User manual

Chef's Choice Pronto Diamond Hone 464 User manual

Chef's Choice

Chef's Choice Pronto Diamond Hone 464 User manual

Chef's Choice Pronto Diamond Hone 463 User manual

Chef's Choice

Chef's Choice Pronto Diamond Hone 463 User manual

Chef's Choice 315XV User manual

Chef's Choice

Chef's Choice 315XV User manual

Chef's Choice EdgeCraft DC 220 User manual

Chef's Choice

Chef's Choice EdgeCraft DC 220 User manual

Chef's Choice 310 User manual

Chef's Choice

Chef's Choice 310 User manual

Chef's Choice Diamond UltraHone 312 User manual

Chef's Choice

Chef's Choice Diamond UltraHone 312 User manual

Chef's Choice Pronto Diamond Hone 464 User manual

Chef's Choice

Chef's Choice Pronto Diamond Hone 464 User manual

Chef's Choice 315S User manual

Chef's Choice

Chef's Choice 315S User manual

Chef's Choice Trizor XV User manual

Chef's Choice

Chef's Choice Trizor XV User manual

Chef's Choice Sportsman Diamond Hone 4635 User manual

Chef's Choice

Chef's Choice Sportsman Diamond Hone 4635 User manual

Chef's Choice Diamond Hone 2000 User manual

Chef's Choice

Chef's Choice Diamond Hone 2000 User manual

Chef's Choice Hybrid Diamond Hone 220 User manual

Chef's Choice

Chef's Choice Hybrid Diamond Hone 220 User manual

Chef's Choice Pronto Diamond Hone 463 User manual

Chef's Choice

Chef's Choice Pronto Diamond Hone 463 User manual

Chef's Choice 320 User manual

Chef's Choice

Chef's Choice 320 User manual

Chef's Choice 442 User manual

Chef's Choice

Chef's Choice 442 User manual

Chef's Choice Hybrid 270 User manual

Chef's Choice

Chef's Choice Hybrid 270 User manual

Chef's Choice Diamond Hone 478 User manual

Chef's Choice

Chef's Choice Diamond Hone 478 User manual

Popular Accessories manuals by other brands

Pepperl+Fuchs UC2000-L2-E5-V15 manual

Pepperl+Fuchs

Pepperl+Fuchs UC2000-L2-E5-V15 manual

Honeywell 5 series Installation and operation guide

Honeywell

Honeywell 5 series Installation and operation guide

Maxim Integrated MAX32664A quick start guide

Maxim Integrated

Maxim Integrated MAX32664A quick start guide

FUTABA SBS-01G instruction manual

FUTABA

FUTABA SBS-01G instruction manual

Ritron RQX 6 Series Modification

Ritron

Ritron RQX 6 Series Modification

Outdoor Revolution MoveAirLite Classic Annexe Instructions & care manual

Outdoor Revolution

Outdoor Revolution MoveAirLite Classic Annexe Instructions & care manual

ELRO DB200 manual

ELRO

ELRO DB200 manual

Dixon Bayco installation instructions

Dixon

Dixon Bayco installation instructions

Grixx GROEXTBP15B01 user guide

Grixx

Grixx GROEXTBP15B01 user guide

BEA COLIBRI ONE DRO quick start guide

BEA

BEA COLIBRI ONE DRO quick start guide

Pil Sensoren P41-40-I-CM12 manual

Pil Sensoren

Pil Sensoren P41-40-I-CM12 manual

Anjou AJ-ADA019 user manual

Anjou

Anjou AJ-ADA019 user manual

Xiaomi Mi Power Bank 2 user manual

Xiaomi

Xiaomi Mi Power Bank 2 user manual

SENSIRION LD20 Series Overview and Engineering Guidelines

SENSIRION

SENSIRION LD20 Series Overview and Engineering Guidelines

Airam AUTOPICNIC manual

Airam

Airam AUTOPICNIC manual

Dometic CK40D Hybrid operating manual

Dometic

Dometic CK40D Hybrid operating manual

Apogee Apogee Duet user guide

Apogee

Apogee Apogee Duet user guide

Di-soric LAT52-500IU-B5 quick start guide

Di-soric

Di-soric LAT52-500IU-B5 quick start guide

manuals.online logo
manuals.online logoBrands
  • About & Mission
  • Contact us
  • Privacy Policy
  • Terms and Conditions

Copyright 2025 Manuals.Online. All Rights Reserved.