manuals.online logo
Brands
  1. Home
  2. •
  3. Brands
  4. •
  5. Chefman
  6. •
  7. Electric Pressure Cooker
  8. •
  9. Chefman RJ40-25-CH User manual

Chefman RJ40-25-CH User manual

Other Chefman Electric Pressure Cooker manuals

Chefman RJ25-C User manual

Chefman

Chefman RJ25-C User manual

Chefman RJ40-6-CH User manual

Chefman

Chefman RJ40-6-CH User manual

Chefman RJ40-8-O User manual

Chefman

Chefman RJ40-8-O User manual

Popular Electric Pressure Cooker manuals by other brands

Presto 6-Quart Stainless Steel instructions

Presto

Presto 6-Quart Stainless Steel instructions

Orbegozo HPL 70 Series instruction manual

Orbegozo

Orbegozo HPL 70 Series instruction manual

Prestige 47286 quick start guide

Prestige

Prestige 47286 quick start guide

Maestro MR790 owner's manual

Maestro

Maestro MR790 owner's manual

Rosewill RHPC-15001 user manual

Rosewill

Rosewill RHPC-15001 user manual

Magefesa mageplus instruction manual

Magefesa

Magefesa mageplus instruction manual

Big boss STAINLESS STEELPRESSURE COOKER instruction manual

Big boss

Big boss STAINLESS STEELPRESSURE COOKER instruction manual

Klarstein 10028679 manual

Klarstein

Klarstein 10028679 manual

Ninja Foodi OP101BRN Assembly Hints and Tips

Ninja

Ninja Foodi OP101BRN Assembly Hints and Tips

Presto 1282 Instructions and recipes

Presto

Presto 1282 Instructions and recipes

AmazonBasics B079LNTDQV Welcome guide

AmazonBasics

AmazonBasics B079LNTDQV Welcome guide

MONIX CLASSICA Instructions for use

MONIX

MONIX CLASSICA Instructions for use

Cuckoo CRP-M10 Fuzzy Series operating instructions

Cuckoo

Cuckoo CRP-M10 Fuzzy Series operating instructions

Moulinex CE400031 manual

Moulinex

Moulinex CE400031 manual

Fagor M16301272 user manual

Fagor

Fagor M16301272 user manual

West Bend ELECTRIC PRESSURE COOKER instruction manual

West Bend

West Bend ELECTRIC PRESSURE COOKER instruction manual

Midea MY-SS5051P user manual

Midea

Midea MY-SS5051P user manual

Morgan MPC-800 user manual

Morgan

Morgan MPC-800 user manual

manuals.online logo
manuals.online logoBrands
  • About & Mission
  • Contact us
  • Privacy Policy
  • Terms and Conditions

Copyright 2025 Manuals.Online. All Rights Reserved.

2.5 QT Electric
PRESSURE COOKER
CUSTOMER SERVICE: 888.315.6553 | customerservice@chefman.com
RJ40-25-CH
2
MODEL: RJ40-25-CH
READ ALL INSTRUCTIONS BEFORE USE
For your safety and continued enjoyment of this product, always read the instruction manual before using.
Congratulations!
You have made an excellent choice purchasing this Chefman product. Rest assured that
your purchase is manufactured to the highest standards of performance and safety. We
are confident that you will be satisfied with your purchase and will think of Chefman as
the go to company for appliances that are: dependable, affordable, built with intuitive
features and the panache that will enhance your kitchen experience.
Customer satisfaction is a key element of our company’s philosophy. Each product is
backed by a comprehensive manufacturer’s 1-year warranty as well as outstanding
after-sales service support through our dedicated helpline team. We are confident that
you will enjoy your purchase for years to come.
In the unlikely event, that your product does not operate as described in the manual
please feel free to call or email our helpline for assistance. Products can malfunction and
we understand that they sometimes will. If you feel that your appliance is not operating
as it should; know that each appliance is backed by a 1-year warranty period. Warranty
claims can be made within one year from the date of purchase only when accompanied
by a dated receipt. This guarantee is in addition to your statutory rights. Your statutory
rights are not affected. This limited warranty does not apply in cases of damage caused
by accident improper use, abuse and force majeure.
This warranty gives you specific legal rights. Rights may vary depending on your state
or province of residence. Some locations do not allow limitations on implied warranties
or special incidental, or consequential damages, so the limitations may not apply to you.
This limited warranty will be invalidated if the appliance is tampered with in any way
whatsoever.
Our telephone helpline (888)-315-6553 is available for questions or technical assistance:
Monday-Friday 9am to 5 pm EST. Customers can also receive support via email:
customerservic[email protected].
1 Safety Instructions
3 Features
5 Operating Instructions
12 Cleaning, Maintenance and Troubleshooting
13 Troubleshooting
14 Notes
15 Terms and Conditions
16 Warranty Card
Contents
1
MODEL: RJ40-25-CH
THIS APPLIANCE IS FOR HOUSEHOLD USE ONLY.
WARNING: When using electrical appliances especially when children are present, basic
safety precautions should always be followed to reduce the risk of fire, electric shock,
and/or injury to persons, including the following:
1. This appliance is intended for indoor home use only.
2. Never use any accessories or parts from other manufactures. Your warranty will
become invalid if such accessories or parts have been used.
3. Check that your home power supply corresponds with this appliance’s intended
voltage.
4. Place this appliance on a stable, heat resistant surface. Make sure not to place near
or on a heat source such as gas or electric burner or oven.
5. Short power cords are attached to this item to prevent entanglement and tripping
hazards. Extension cords with corresponding voltage, electrical rating and
grounding wires can be used. Care should be taken so that any exposed cord is not
hanging down from a counter or table where it can be pulled on or tripped over by
any child or adult.
6. Before using this appliance inspect the plug and cord line for cuts and/or abrasion
marks if they are found. Do not use this appliance and contact our authorized
customer service representative.
7. Insert the plug by grasping it firmly and guiding it into your home’s grounded
electric outlet. Disconnect by grasping the plug and removing it from your home’s
grounded electric outlet. Never wrap the cord tightly around the appliance during
use or storage as this can cause the wire to fray and break.
8. During initial use, you may notice some smoke and or a slight odor. This is normal
and should quickly dissipate. It should not reoccur after the appliance has been used
a few more times.
9. This appliance should be used only by persons who are capable of understanding
the user manual or are supervised by those who have adequate understanding of
the appliances’ features, their use and the operating instructions. Children must be
supervised and should not be left alone with appliances during their operation.
10. During use appliances should not be left unattended.
11. Care should be taken not to move appliances that are in use.
12. Do not move appliances that are full of food or liquid whether hot or cold.
13. Never operate this appliance without food and liquid in the removable cooking bowl.
14. Do not exceed the ‘MAX’ fill level. When cooking foods that expand (such as dried
vegetables, beans, grains, rice, etc.) Do not fill past the ‘MAX’ rice fill level.
IMPORTANT SAFEGUARDS
SAFETY INSTRUCTIONS
2
MODEL: RJ40-25-CH
SAFETY INSTRUCTIONS
15. Appliances can emit heat or steam when in use therefore care should be taken
not to block inlets or outlets.
16. Always check the pressure release valve and safety locking pin for clogging or
obstruction and clean if necessary.
17. Appliance exteriors are designed to be cool to the touch. Portions do get HOT
during use. Burns can result from touching heating elements, air vents and
removable baskets or containers and - if any part is designed to be handled,
do so with care.
18. Do not use this appliance near an open flame or flammable materials.
19. Examine the silicone seal gasket to make sure it is without tears or damages.
Only use the gasket designed for this particular appliance. Should you notice
that the silicone sealing gasket has any damage please contact customer service.
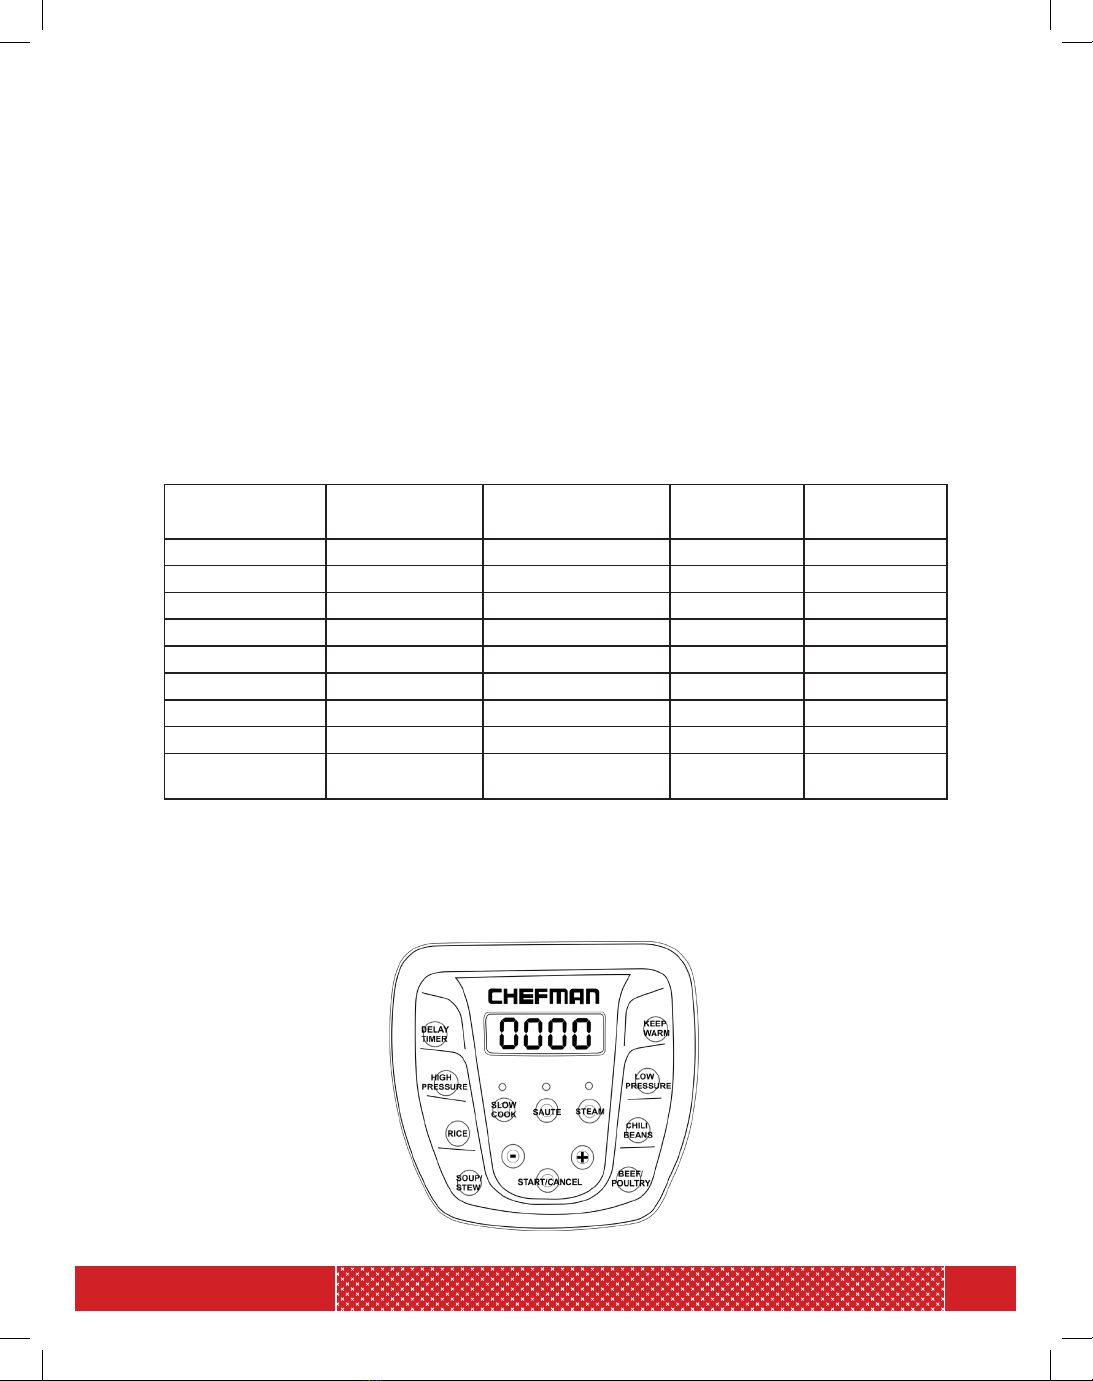
20. Before using this appliance please read the caution sticker attached to the lid
of the pressure cooker. Review how to lock and unlock the lid as well as always
checking the setting of the float pressure release valve to make sure it is in the
right position (Airtight or Exhaust) for the function you have selected.
21. It is necessary to lock the lid of this appliance for safe cooking. Once the lid
is locked and the cooking process has begun do not attempt to open the lid.
Do not force the lid open once locked. Should you need to open the pot cancel
the function with the cancel button. If this is a function that requires the steam
to be released follow the instruction to turn the knob to exhaust and release the
steam. The pot will go to the keep warm setting and can then safely be opened.
22. Never place your hands, arms or face over the pressure release valve once this
appliance has started to function.
23. Do not use the appliance for frying. Oil can be used within the saute mode (this
is a quick, light fry mode) and as an ingredient in a frying cooking process.
24. Do not warm for more than ten hours.
25. Do not leave uncooked ingredients in this pot for more than a short period of
time. Raw meat, poultry, fish, fruits or vegetables can spoil.
26. Unplug unit when you have finished cooking.
27. Before cleaning, make sure that the pot is turned off, unplugged, cooled to
room temperature and all pressure has been released.
28. Do not clean the appliance until the unit is cool.
29. Do not immerse complete appliance in water or a dishwasher for cleaning.
30. Clean with a non-abrasive cleaner, soft pad or cloth.
31. Store unit in a cool, dry location.
32. In case of any electric emergency such as a fire call 911.
Take a minute to unwrap your appliance. Remove any packaging or labels that
may interfere with the use of your appliance. Locate your instruction manual. For
your safety and the continued enjoyment of this product, read all the directions
carefully and store this manual in a safe place for future reference.
3
MODEL: RJ40-25-CH
Features
1. LID HANDLE
2. PRESSURE EXHAUST VALVE
3. SPOON
4. MEASURING CUP
5. RUBBER GASKET
6. 3-PRONG POWER CORD
7. INNER POT
8. CONTROL PANEL
9. CARRYING HANDLES
10. CONDENSATION CUP
11. POWER CORD PLUG
12. STEAM RACK
1
4
7
8
5
6
12
9
10
11
2
3
4
MODEL: RJ40-25-CH
The Chefman pressure cooker can also function as a slow cooker. It can enable you to cook
a fast, fresh homemade meal on the pressure setting or a programmed slow cooked meal
that you have ready when you arrive home. Additionally, you can select cooking presets
that meet your personal cooking preferences including: saute, steam, chili/beans and beef/
poultry. We know you will enjoy your Chefman cooking experience. This is a multi-function
appliance so please take the time to look over the features of this device with its many
settings. There are safety and operating instructions that are unique to this appliance so
pay careful attention to these instructions this will insure that you maximize the benefits
of this purchase and that it functions safely and efficiently.
When the pressure cooker has been set up and plugged into an electrical outlet the user
interface will appear as pictured. An alert will sound notifying the user that it is powered
on. Four blue zeros will light up on the display. All the user functions can be accessed by
selecting them as pictured below.
PRESSURE COOKER PANEL
Features
Menu
Function
Default
Cooking Time
Adjustable
Cooking TIme
Cooking
Pressure
Adjustable
Cooking TIme
Rice 12 minutes 1 to 30 minutes 7-10 psi 230-237 ˚F
Soup/Stew 16 minutes 1 to 50 minutes 7-10 psi 230-237 ˚F
Beans/Chili 20 minutes 1 to 50 minutes 7-10 psi 230-237 ˚F
Beef/Poultry 25 minutes 1 to 99 minutes 7-10 psi 230-237 ˚F
High Pressure 1 minute 1 to 99 minutes 7-10 psi 230-237 ˚F
Low Pressure 1 minute 1 to 99 minutes 4-6 psi 223-226 ˚F
Steam 1 minute 1 to 99 minutes No Pressure 212 ˚F
Saute 10 minute 1 to 50 minutes No Pressure 329-356 ˚F
Slow Cooker 1 hour 1 to 9 hours
(.5 increments)
No Pressure 194-203 ˚F
5
MODEL: RJ40-25-CH
Operating Instructions
1. Delay Timer: This feature allows the user to set a timed cooking experience. You can set
the timer within the time frame one half-hour to twenty-four hours. The timer is set in
thirty minute increases or decreases.
2. High Pressure: This setting can only be started while cooking within the pressure cooker
mode. The high pressure setting is used for quick cooking. In the high pressure setting the
amount of pressure in the pot is raised to its maximum intensity.
Low Pressure: This setting can only be started while cooking with the pressure cooker
mode. The low pressure setting is used for with the pots pressure set for lower intensity.
3. Rice: This setting adjust the time and cooking features of the pressure cooker to optimize
pressure cooking rice. Rice will be cooked allowing the grains to be both separated
and tender. A measuring cup is provided for measuring the rice. This setting is suitable
for all types of rice such as long grain rice, jasmine, basmati and brown rice. Weigh dry
rice accurately and wash well with cold water until water runs clear. Drain well and place
into the removable cooking bowl. Add corresponding water amount. Water to rice ratio is
based on the table provided. Keep in mind that different grains of rice require different
time adjustments. Rice will foam and double in size after cooking. When you put in the
dry rice use the interior bowl markings and do not fill the bowl beyond the 1/2 marking for
your rice and water combination.
4. Soup/Stew: This setting is suitable to cook a variety of soups from light broths to hearty.
It can also be used to cook a variety of vegetable, meat or poultry stews.
5. Slow Cook: This setting has adjusted for long cook times at low temperatures. It is ideal
for breaking down tough cuts of meat or vegetables that would be accomplished with long
and slow cooking times. It is used paired with the timer and/or delay start mode. The user
determine the cooking time based on what is being prepared. A reference guide is
included in the user guide. The delay timer can be used to allow the cook to set the slow
cooking function to automatically for a period from a half hour to twenty- four hours.
6. Sauté: This setting is designed for softening and caramelizing garlic, onions and smaller
pieces of food prior to pressure or slow cooking. It can also be used to pre-heat the pot so
that other functions will begin more rapidly.
7. Steam: This setting is ideal for steaming vegetables, fish fillets, dumplings and reheating.
Grain (1 Cup) Water Required
Basmati 1 ½ cups (350mL)
Brown 1 ½ cups (350mL)
White 1 ¼ cups (330mL)
Wild 3 cups (700mL)
6
MODEL: RJ40-25-CH
Operating Instructions
8. Increase (+): This setting allows the user to increase the time for the functions of this
appliance. Slow increases are completed by tapping the button gently. Faster increases
are completed by holding down the button.
9. Decrease (-): This setting allows the user to decrease the time for the functions of this
appliance. Slow decreases are completed by tapping the button gently. Faster decreases
are completed by holding down the button.
10. Start/Cancel: This setting starts or cancels each appliance function. When a function is
started the initial display will show a moving LED image to show that the pot has started
the warming function this may take several minutes. The cancel function will stop a process.
If you then decide to start again you will have to restart all of the functions you require.
11. LED Display: This display allows the user to see if the appliance is turned on, whether a
function is in progress or whether the function has completed. When the unit is first
plugged in an alert will sound and the display will show four blue zeros.
12. Keep Warm: This setting is engaged when one of the menu functions such as pressure
cooking, slow cooking or steaming comes to an end. It can also be turned on its own to
keep food warm for up to six hours.
13. Low Pressure: This setting can only be started while cooking within the pressure cooker
mode. When set to low pressure the cooking time is increased because the level of
pressure in the pot is raised to its minimum intensity.
14. Chili/Beans: This setting is used for chili recipes that often will have beans as a key
ingredient. The setting assumes that you are cooking dried beans. To shorten the cook
time, soak beans in cold water overnight. Discard soaking water and cook with fresh cold
water for half the pre-set cooking time. Make sure to use a water ratio of 1 part beans to 3
parts water. Beans swell and double in size after cooking. For best results, do not overfill
the cooking bowl. The total volume of uncooked beans and water should not exceed the
marking inside the removable cooking bowl.
15. Beef/Poultry: This setting is used for cooking meat and poultry.
16. Pressure Valve: This valve has two settings exhaust and airtight. Airtight: Set when the
pressure cooker is in use. Exhaust: Set when the pressure cooking is complete to allow
steam to escape. Also set when the pot is set to steam to allow steam to escape. Care
must be taken not to put your hand, arm or face near the valve when steam is escaping.
Use a utensil (a long handled item such as a spatula, tong etc.) to turn the valve
distancing the user from the escaping steam. You can also use a dry or wet towel to
cover the vent as the steam is escaping.
7
MODEL: RJ40-25-CH
Operating Instructions
CLEAN THE APPLIANCE PARTS BEFORE USE
Remove the silicone gasket and the interior pot. Wash with water and a non-abrasive sponge
and cleaner. Dry the items. Reinstall the gasket and pot. Make sure the gasket is in tightly
installed in the interior of the lid (both behind and under the metal ring within the lid).
Look at the features diagram to guide you. Reattach the lid if it has been removed.
OPEN/CLOSE POSITION OF THE LID
B. You will know the lid is in the open position when the icons on the left side of
the lid line up next to the word open.
To lock the lid- insert your hand under the molded plastic handle and turning
it to the right. On the top right side of the lid you will see the icons line up
next to the word close (diagram of the triangle and gum drop). For the lid
to be in the open position the open triangle and the lid need to line up. For
the lid to be in the closed position the close triangle and the lid icon have to
line up. Knob counter clockwise and lifting lid up and off the appliance. Open
the lid by turning the lid knob handle counter clockwise and lifting lid up and
off the appliance.
OPENED LID CLOSED LID
UNLOCK UNLOCKLOCK LOCK