manuals.online logo
Brands
  1. Home
  2. •
  3. Brands
  4. •
  5. Chiayo
  6. •
  7. Amplifier
  8. •
  9. Chiayo MMA-3000 User manual

Chiayo MMA-3000 User manual

MMA-3000
2.1-Channel Multimedia Mixer Amplifier
ISO 9001
ISO 14001
OHSAS 18001
GREEN PRODUCT
Operation manual
IS O
14001
REG IS TER ED
O H S A S
18001
REG IS TER ED
-1-
Thank you for your purchase of this CHIAYO product. To ensure a trouble-free operation,
please read this manual thoroughly to fully understand its controls and functions.
Basic content
1. MMA-3000 multimedia mixer amplifier
2. 100-240V AC switching power supply
3. Operation manual
MMA-3000 is a Multimedia Mixer Amplifier. It can accept multiple audio inputs from the
following sources:
1.Wired and / or wireless microphone.
2.Digital player with USB / SD card MP3
3.Bluetooth receiver
4.Conference system
5.Digital video player audio input
6.Smartphone / iPOD / computer
Parts and functions of MMA-3000
Front panel
1.Slot for receiver/MP3/Bluetooth module (optional)
2.MUSIC-WR switch
3.LINE / Microphone volume control
4.SPEECH / MUSIC mode switch
5.VOICE PRIORITY on/off
6.AUX IN ○
1volume control
7.AUX IN ○
2volume control
8.Stereo Balance control
9.Bass control
10. Treble control
11. Stereo speaker volume control
12. Subwoofer volume control
13. Power on/off
Rear panel
14. Antenna A socket (TNC)
15. DC input (20V)
16. DC output (12V)
13
2
4 5 6 7 8 9 10 11 12 13
14 15 16 17 18 19 20 21 22 23 24 25
26
27 28 29 30 31
32
ISO 9001|ISO 14001|OHSAS 18001
-2-
17. USB 2.0 charging port (for 5V device)
18. SUBWOOFER Phase switch
19. SUBWOOFER (crossover) tone control
20. SUBWOOFER output (Ø 6.3mm)
21. SUBWOOFER output (R/L)
22. SPEAKER output (R, Ø 6.3mm)
23. SPEAKER output (R/L)
24. SPEAKER output (L, Ø 6.3mm)
25. ALD (assistive listening device) output (Ø 3.5mm)
26. ALD (assistive listening device) volume control
27. AUX output (RCA R/L)
28. AUX input (Ø 3.5mm)
29. AUX input (RCA R/L)
30. LINE microphone input (Ø 6.3mm)
31. Wired microphone input (balanced, XLR)
32. Antenna B socket (TNC)
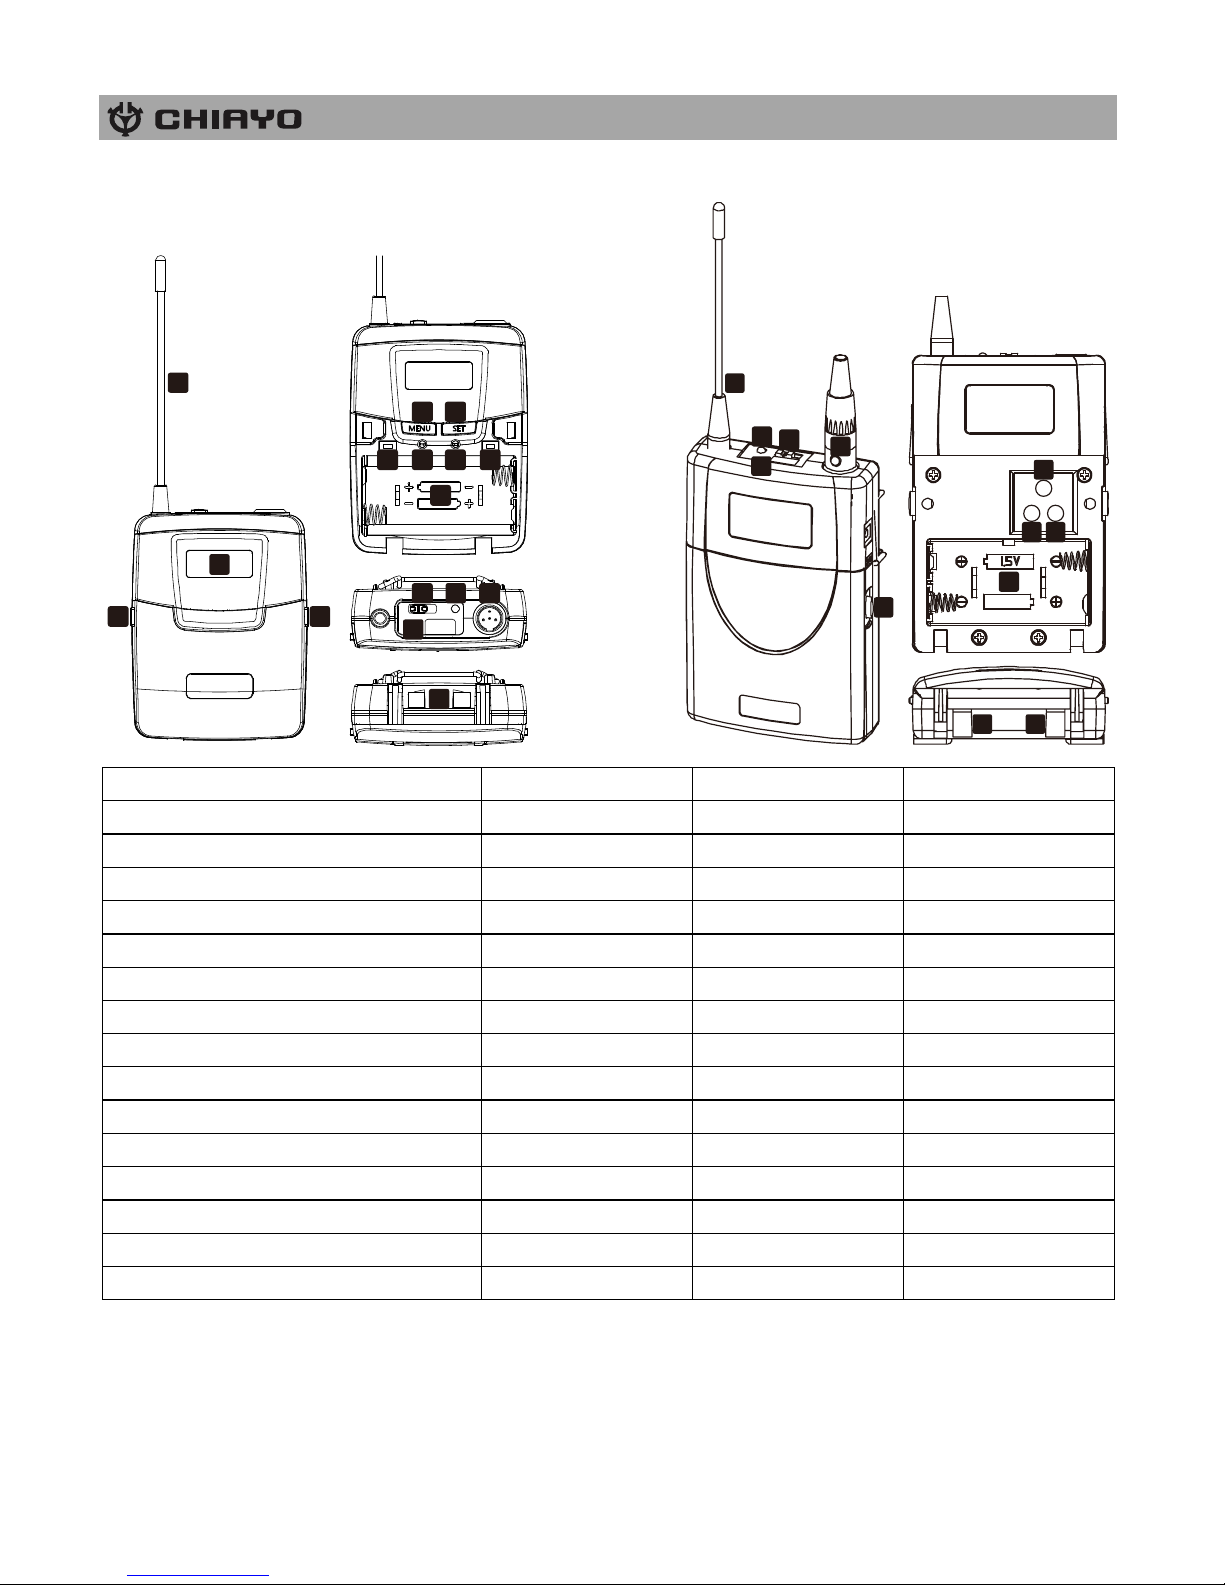
As there is only one open slot ○
1 available for module, so only one of the following CHIAYO
modules can be used at any one time:
1.wireless receiver module
2.digital recorder player module
3.Bluetooth receiver module
When a wireless receiver module is plugged in slot ○
1 , two receiving antennas must be
installed at antenna sockets ○
14 and ○
32.for a drop-out-free reception.
MMA-3000 is a 2.1 channel multimedia mixer amplifier, its digital class-D amplifier can drive a
stereo L / R speakers plus a subwoofer!
Operating the WIRED MICROPHONE
1. Connect the wired microphone to the MIC IN jack (XLR ○
31) on the rear panel.
2. Set the LINE / microphone’s volume level ○
3 to minimum before turning on the amplifier.
3. After the unit is ON, adjust the microphone’s volume ○
3 to a desired level.
Connecting to EXTERNAL AUDIO INPUTS
This amplifier’s compatible unbalanced audio inputs include a Ø3.5mm phone jack ○
28 , an
RCA R/L jacks ○
29 and a Ø 6.3mm phone jack ○
30. Their volume controls are ○
6 , ○
7 and ○
3 .
SUBWOOFER OUTPUTS ○
20 ○
21
This amplifier’s compatible subwoofer outputs include a Ø 6.3mm phone jack ○
20 and a phoenix
connector ○
21 . The volume control for subwoofer is ○
12 .
-3-
The output could deliver 100W power to a 2Ω Subwoofer speaker.
The Subwoofer Crossover tone control ○
19 has an adjustable range from 60Hz to 200Hz.
When a phase swift difference is detected, please use the phase switch ○
18 to correct it.
L / R SPEAKER OUTPUTS ○
22 ○
23 ○
24
This amplifier’s compatible speaker outputs include a Ø 6.3mm phone jack (R/L) ○
22 ○
24 and a
Phoenix connector ○
23 . The volume control for L/R speakers is ○
11 .while ○
8 ○
9 ○
10 are the
balance, bass and treble controls.
DC OUTPUT ○
16
This amplifier can provide 12V power supply to an external device.
USB charging ○
17
This amplifier can provide a 5V power supply to power or charge an external device such as
Smartphone and Tablet computer.
Operating the VOICE PRIORITY ○
5
Besides wired microphone, the device can also detect the audio signal from the plug-in module.
When using the wireless microphone, position the MUSIC-WR ○
2switch to WR (Wireless
Receiver). When using other module like MP3 or Bluetooth, position the switch to MUSIC to
prevent VOICE PRIORITY from mistaking the music as microphone audio.
When the VOICE PRIORITY switch ○
5 is ON, the ducking function will be activated. While the
music is playing, a voice input from either a Wired or Wireless Microphone will temporarily
override and lower the volume of the background music and voice could be heard more clearly.
When no microphone signal is detected, the music volume will automatically return to its
previous level.
ALD (Assistive Listening Device) OUTPUT ○
25
For the benefit of hearing impaired audiences, MMA-3000 has an additional Ø 3.5mm ALD
output ○
25 which can be connected to an ALD amplifier or transmitter to send the mixed audio
signal to whoever is wearing an ALD headphone.
An ALD output volume control ○
26 is for the setting of the ALD volume to an appropriate level
to be transmitted.
ISO 9001|ISO 14001|OHSAS 18001
-4-
SDR-5200M IrDA/SDR-5100M IrDA/SDR-5116M receiver modules
1.Channel indicator
2.Diversity A/B indicator
3.Audio signal indicator
4.IR sensor area (SDR-5200M IrDA/SDR-5100M IrDA)
5.Channel Selector
6.IRDA synchronizing button (SDR-5200M IrDA/SDR-5100M IrDA)
7.Squelch control
8.Power switch/volume control
First turn on the Power of the main unit. Then turn on the individual power of the receiver
module. Select a channel that corresponds to the transmitter. When transmitter is turned on,
either A or B diversity indicator will flash to indicate that signal has been received.
SQUELCH (SQ) setting
When a channel is in use and undesired interference signal is received, turn the SQ in
clockwise direction to make the receiver less sensitive and thus less susceptible to interference.
If this still does not solve the problem, it means this frequency is not applicable at current
position. Please switch over to the next channel.
Channel synchronizing of the receiver and microphone (SDR-5200M IrDA/SDR-5100M IrDA)
1.Effective range between the receiver and transmitter is within 30cm
2.Point the transmitter sensor to align with the receiver sensor.
3.To change the receiver’s channel, please press the synchronizing button of the microphone.
The microphone will transmit synchronizing signal to the receiver and change its channel.
4.To change the microphone’s channel, please press the synchronizing button of the receiver.
The receiver will transmit synchronizing signal to the microphone and change its channel.
-5-
DPR-500M MP3 recorder player module
1.LCD display
2.Press to return to previous track, press and hold to fast reverse.
3.Press to play/pause.
4.Press to go to next track, press and hold to fast forward.
5.Press to record.
6.Press to switch repeat modes.
7.Press to stop playing or recording.
8.IR sensor area
9.USB 2.0 input
10.USB/SD indicator: The LED flashes green during playing and red during recording. It lights
red if there is no track to play, lighting green when playing or recording stops.
11.SD card input
12.Power switch/volume control
Operating functions on the panel and the remote
※Extra attention to recording
1.Recordable only when USB/SD is detected.
2.Record files will be stored in the RECORD folder of USB/SD.
3.The files will be named as FILE_001, FILE_002, FILE_003…etc.
4.The name of a deleted track won’t be applied to its next one.
5.Recordable until FILE_999 appears with LCD displaying Num Full.
Operating function
On the panel
On the remote
Play/pause
Press II
Record
Press●to record and ■to stop.
Press REC to record and ■to stop.
Skip forward
Press I
PressI
Fast forward
Press and hold I
Press and hold I
Skip backward
Press I
Press I
Fast backward
Press and hold I
Press and hold I
Next folder
-
Press 
Previous folder
-
Press 
Track select (button #0-9)
-
input track number, then press II
USB/SD switch
-
Press USB/SD
Repeat mode switch
(ALL//SINGLE/FLDER)
Press MODE
Press MODE
Volume control
-
Press or
A-B section play
-
Press A-B to start, again to play
section and again to stop
Delete tracks
-
Press DEL to delete track and again
to confirm your delete
Mute
press MUTE to mute/recover
remote control▲
ISO 9001|ISO 14001|OHSAS 18001
-6-
6.LCD displays USB FULL or SD FULL when insufficient memory left.
7.LCD displays SD LOK if the SD is locked.
8.Don’t remove the USB/SD during the recording process in case the interrupted track might
be damaged.
BT-500mBluetooth receiver module
1
234
1.Power/volume control
2.LOCK LED
3.SCAN LED
4.PAIRING button
Matching instruction
1.Turn on BT-500m and both SCAN and LOCK LEDs will flash alternatively.
2.Activate Bluetooth on your device and search new external Bluetooth devices.
3.Find and connect to “Bluetooth Speaker” that appears on your option list.
4.Once connection is made, the LOCK LED will flash green.
5.Pressing PAIRING button can cut the connection.
-7-
UHF handheld microphones(SQ-6100 IrDA/SQ-2100 IrDA/SQ-1100 IrDA)
SQ-6100 IrDA
SQ-2100 IrDA
SQ-1100 IrDA
Parts and functions
SQ-6100 IrDA
SQ-2100 IrDA
SQ-1100 IrDA
Cartridge
1
1
1
Battery power LED
2
2
2
Power switch
3
3
3
LCD
4
-
-
Menu button
5
-
-
Setting button
6
-
-
IrDA synchronizing button
7
4
4
Battery compartment
8
5
5
Color cap
9
6
-
IrDA sensor area
10
7
6
Charging port
-
-
7
Battery installation & indicator
This microphone requires 2 x AA batteries to operate.
To install, remove the battery cover and slide the batteries into the battery compartment &
replace the battery cover.
Note: Batteries contain a corrosive acid that may leak and damage the microphone when
stored for a long period. Batteries should be removed from the microphone before storing
without use for more than 4 weeks.
When the microphone is switched ON a red LED (2) will blink once to indicate the batteries
installed are in good condition. If the LED remains illuminated the batteries have expired
and require replacement.
Channel synchronizing of the receiver and microphone
1. Limit the distance between the receiver and transmitter within 30cm.
2. Align both sensor areas
1 2 3 7
4 5 6
ISO 9001|ISO 14001|OHSAS 18001
-8-
3. To change the receiver’s channel, please press the synchronizing button of the microphone.
The microphone will transmit synchronizing signal to the receiver and change its channel.
4. To change the microphone’s channel, please press the synchronizing button of the receiver.
The receiver will transmit synchronizing signal to the microphone and change its channel.
Other settings(SQ-6100 IrDA)
1. Channel setting
Use MENU button to go to the CHANNEL/FREQUENCY page.︰
After pressing the SET button for 3 seconds, the cursor will flash to allow changes to be made.
Pressing SET/MENU buttons will increase/decrease the channel number. The corresponding
frequency will change accordingly. 3 seconds after selecting a channel, it will be automatically
saved.
2. Battery type setting
Use MENU button to go to the BATTERY TYPE page.︰
After pressing the SET button for 3 seconds, the cursor will flash to allow changes to be made.
Press SET button to select either NiMH (rechargeable battery) or AKLN (alkaline battery). 3
seconds after selecting a battery type, it will be automatically saved.
Remark: NiMH battery must be selected when rechargeable battery is being used. Never select
AKLN (alkaline) when microphone is intended for charging as alkaline battery isn’t
rechargeable. Wrong battery selection will result in battery sensing electronics to display wrong
and misleading status information.
-9-
UHF belt-pack transmitters(SM-7100 IrDA/SM-6100 IrDA/SM-1100 IrDA)
SM-7100 IrDA/SM-6100 IrDA SM-1100 IrDA
Parts and functions
SM-7100 IrDA
SM-6100 IrDA
SM-1100 IrDA
Antenna
1
1
1
LCD
2
2
-
Cover release button
3
3
6
Power switch
4
11
3
IrDA synchronizing button
5
5
7
Menu button
6
6
-
Setting button
7
7
-
High-impedance gain control (GT)
8
8
8
Low-impedance gain control (MT)
9
9
9
Battery compartment
10
10
10
Audio mute switch
11
-
-
Battery power LED
12
12
2
IrDA sensor area
13
13
4
Mini XLR connector
14
14
5
Charging contacts
15
15
11
Battery installation & indicator
This belt-pack requires 2 x AA batteries to operate.
To install, open the battery cover using the cover release buttons and insert the batteries into
the battery compartment.
1
2
3 3
9
7
84 5
6
10
11 12
13
14
15
1
23
45
6
7
8
10
11 11
9
ISO 9001|ISO 14001|OHSAS 18001
-10-
Note: Batteries contain a corrosive acid that may leak and damage the belt-pack when stored
for a long period. Batteries should be removed from the belt-pack before storing without use for
more than 4 weeks.
When the microphone is switched ON, the battery power LED (red) will blink once to indicate
the batteries installed are in good condition. If the LED remains illuminated the batteries
have expired and require replacement.
Channel synchronizing of the receiver and transmitter
1. Limit the distance between the receiver and transmitter within 30cm.
2. Align both sensor areas
3. To change the receiver’s channel, please press the synchronizing button of the transmitter.
The transmitter will transmit synchronizing signal to the receiver and change its channel.
4. To change the transmitter’s channel, please press the synchronizing button of the receiver.
The receiver will transmit synchronizing signal to the transmitter and change its channel.
GAIN setting (GT/MT)
Gain control enables the user to set different output levels. GT is for the use of instrument with
high impedance, such as guitar while MT is for the use of low impedance such as lapel or
headset microphones.
Other settings(SM-7100 IrDA/SM-6100 IrDA)
1. Channel setting
Use MENU button to go to the CHANNEL/ FREQUENCY page.︰
After pressing the SET button for 3 seconds, the cursor will flash to allow changes to be made.
Pressing SET/MENU buttons will increase/decrease the channel number. The corresponding
frequency will change accordingly. 3 seconds after selecting a channel, it will be automatically
saved.
2. Battery type setting
Use MENU button to go to the BATTERY TYPE page.︰
After pressing the SET button for 3 seconds, the cursor will flash to allow changes to be made.
Press SET button to select either NiMH (rechargeable battery) or AKLN (alkaline battery). 3
seconds after selecting a battery type, it will be automatically saved.
Remark: NiMH battery must be selected when rechargeable battery is being used. Never select
AKLN (alkaline) when transmitter is intended for charging as alkaline battery isn’t rechargeable.
Wrong battery selection will result in battery sensing electronics to display wrong and
misleading status information.
-11-
UHF handheld microphones(SQ-1016/SQ-1016V/SQ-5016)
1 2 3 5 7
4 6 8
SQ-1016/1016V (UHF 16-freq)
1 2 3 4 5 6 91011
7 8
SQ-5016 (UHF LCD 16-freq)
Microphone parts and functions
SQ-1016
SQ-1016V
SQ-5016
Cartridge
1
1
1
Battery weak/power LED
2
2
2
Power switch
3
3
3
Channel switch
4
4
-
LCD
-
-
4
Battery compartment
5
5
5
Bottom cap
6
6
6
Locking button
-
-
7
Audio mute switch
-
-
-
Setting button
-
-
8
Up button
-
-
9
Down button
-
-
11
Charging port
7
7
10
Volume control
-
8
-
Battery installation & indicator
This microphone requires 2 x AA batteries to operate.
To install, remove the battery cover and slide the batteries into the battery compartment &
replace the battery cover.
Note: Batteries contain a corrosive acid that may leak and damage the microphone when
stored for a long period. Batteries should be removed from the microphone before storing
without use for more than 4 weeks.
When the microphone is switched ON a red LED (2) will blink once to indicate the batteries
installed are in good condition. If the LED remains illuminated the batteries have expired
and require replacement.
Channel setting (SQ-1016/1016V)
Please use the attached small screw driver to set the channel.
Volume adjusting (SQ-1016V)
Please slide the wheel to adjust the volume.
ISO 9001|ISO 14001|OHSAS 18001
-12-
Other settings (SQ-5016)
1. Channel setting
Use UP or DOWN button to go to the CHANNEL/ FREQUENCY page.
The cursor will flash to allow changes to be made. Pressing UP or DOWN button will increase
or decrease the channel number. The corresponding frequency will change accordingly. When
a desired channel is selected, it will be automatically saved and stored in the memory.
2. Making changes to Battery selection
Use UP or DOWN button to go to the Battery selection page.
Press UP or DOWN button to move the cursor to either NiMH (rechargeable battery) or AKLN
(Alkaline battery) position.
When the desired battery has been selected, it will be automatically saved and stored in the
memory.
Remark: NiMH battery must be selected when rechargeable battery is being used. Never select
AKLN (Alkaline) when microphone is intended for charging as Alkaline battery can’t be charged.
Wrong selection of battery will result in battery sensing electronics to display wrong and
misleading status information.
3. Making changes to Sensitivity Level
Use UP or DOWN button to go to the SENS SET page.
Press UP or DOWN button to increase or decrease the Sensitivity Level of the microphone.
The MAX level is 4 and the MIN level is 1.When a desired sensitivity level has been selected
for your application, it will be automatically saved and stored in the Memory.
Remark: When selecting Sensitivity level, please bear in mind that Level 1 is for close proximity
singing purposes whereas Level 4 is for use of microphone on tripod mount for speech
purposes. When Level 4 setting is used for close proximity singing, high SPL input will result in
undesirable distortion in the output.
After performing setting changes, you could turn the protective cover 180°in either direction to
block the buttons from being accidentally adjusted.
-13-
UHF belt-pack transmitters(SM-1016/SM-5016)
Parts and functions
1
234
6
5
7
8
12
911
10
13
14
15 15
Transmitter parts and functions
SM-1016
SM-5016
Antenna
1
1
Battery weak/audio mute indicator
2
2
Power switch
3
8
(Lavalier microphone) Mini XLR connector
4
4
Audio mute switch
-
3
LCD
-
5
Charging port
-
6
Cover release button
7
7
Charging contacts
15
15
Setting button
-
11
Up button
-
12
Down button
-
13
Channel switch
11
-
Gain control (GT, high impedance)
12
9
Gain control (MT, low impedance)
13
10
ISO 9001|ISO 14001|OHSAS 18001
-14-
Battery installation & indicator
This belt-pack requires 2 x AA batteries to operate.
To install, open the battery cover using the cover release buttons and insert the batteries into
the battery compartment.
Note: Batteries contain a corrosive acid that may leak and damage the belt-pack when stored
for a long period. Batteries should be removed from the belt-pack before storing without use for
more than 4 weeks.
When the transmitter is switched ON, the battery power LED (red) will blink once to indicate the
batteries installed are in good condition. If the LED remains illuminated the batteries have
expired and require replacement.
CHANNEL and GAIN setting (SM-1016)
Please use the attached small screw driver to set the channel.
Gain control is an adjustable design that enables user to set different output levels. GT is for
the use of instrument with high impedance, such as guitar while MT is for the use of low
impedance such as lavalier or headset microphone.
Other settings (SM-5016)
1. Channel setting
Use UP or DOWN button to go to the CHANNEL/ FREQUENCY page.
The cursor will flash to allow changes to be made. Pressing UP or DOWN button will increase
or decrease the channel number. The corresponding frequency will change accordingly. When
a desired channel is selected, it will be automatically saved and stored in the memory.
2. Making changes to Battery selection
Use UP or DOWN button to go to the Battery selection page.
Press UP or DOWN button to move the cursor to either NiMH (rechargeable battery) or AKLN
(Alkaline battery) position.
When the desired battery has been selected, it will be automatically saved and stored in the
memory.
Remark: NiMH battery must be selected when rechargeable battery is being used. Never select
AKLN (Alkaline) when microphone is intended for charging as Alkaline battery can’t be charged.
Wrong selection of battery will result in battery sensing electronics to display wrong and
misleading status information.
CHIAYO ELECTRONICS CO.,LTD.
Http://www.chiayo.com.tw Email: sales@chiayo.com.tw
Office: 30, Lane 27, Section 4, Jen-Ai Road, Taipei 10685, Taiwan / Tel: 886-2-27415741 / Fax: 886-2-27525242
Factory: 88, Chung-Hsiao Street 2, Chiayi 60080, Taiwan / Tel: 886-5-2711000 / Fax: 886-5-5767611
12I1305

Other Chiayo Amplifier manuals

Chiayo Coach 400 Series User manual

Chiayo

Chiayo Coach 400 Series User manual

Chiayo IRX2 User manual

Chiayo

Chiayo IRX2 User manual

Chiayo Stage pro User manual

Chiayo

Chiayo Stage pro User manual

Chiayo EZtalk User manual

Chiayo

Chiayo EZtalk User manual

Chiayo MMA-3000N User manual

Chiayo

Chiayo MMA-3000N User manual

Chiayo EZtalK User manual

Chiayo

Chiayo EZtalK User manual

Chiayo Coach 400 Series User manual

Chiayo

Chiayo Coach 400 Series User manual

Chiayo IWM-202 User manual

Chiayo

Chiayo IWM-202 User manual

Chiayo Focus 500 series User manual

Chiayo

Chiayo Focus 500 series User manual

Chiayo SMART 300-U Series User manual

Chiayo

Chiayo SMART 300-U Series User manual

Chiayo Focus 505 series User manual

Chiayo

Chiayo Focus 505 series User manual

Chiayo EZ-TALK User manual

Chiayo

Chiayo EZ-TALK User manual

Chiayo italk User manual

Chiayo

Chiayo italk User manual

Chiayo Stage Man User manual

Chiayo

Chiayo Stage Man User manual

Chiayo AMP-500 User manual

Chiayo

Chiayo AMP-500 User manual

Chiayo Challenger 1000 User manual

Chiayo

Chiayo Challenger 1000 User manual

Chiayo IWA-200 User manual

Chiayo

Chiayo IWA-200 User manual

Chiayo iTour User manual

Chiayo

Chiayo iTour User manual

Chiayo FOCUS 515 User manual

Chiayo

Chiayo FOCUS 515 User manual

Chiayo Stage pro User manual

Chiayo

Chiayo Stage pro User manual

Chiayo Challenger 1000 User manual

Chiayo

Chiayo Challenger 1000 User manual

Chiayo Coach Pro 500 User manual

Chiayo

Chiayo Coach Pro 500 User manual

Chiayo Stage Man User manual

Chiayo

Chiayo Stage Man User manual

Chiayo iTour User manual

Chiayo

Chiayo iTour User manual

Popular Amplifier manuals by other brands

Toa WA-1830M-AS instruction manual

Toa

Toa WA-1830M-AS instruction manual

Osculati 29.531.00 owner's manual

Osculati

Osculati 29.531.00 owner's manual

Lindell Audio LiN76 manual

Lindell Audio

Lindell Audio LiN76 manual

Audiophonic HP 4000 installation manual

Audiophonic

Audiophonic HP 4000 installation manual

Lyngdorf Audio MXA-8400 owner's manual

Lyngdorf Audio

Lyngdorf Audio MXA-8400 owner's manual

Roksan Audio Blak manual

Roksan Audio

Roksan Audio Blak manual

Silex technology Multicast Video Distribution System MVDS X-1 Install & user's guide

Silex technology

Silex technology Multicast Video Distribution System MVDS X-1 Install & user's guide

Sony TA-F110 Service manual

Sony

Sony TA-F110 Service manual

Converters.TV 15405 Operation manual

Converters.TV

Converters.TV 15405 Operation manual

Kenwood KAC-723 instruction manual

Kenwood

Kenwood KAC-723 instruction manual

Gefen EXT-COMPAUD-148 quick start guide

Gefen

Gefen EXT-COMPAUD-148 quick start guide

Sony XM-SD46X - Stereo Power Amplifier Specifications

Sony

Sony XM-SD46X - Stereo Power Amplifier Specifications

Outline L3000 user manual

Outline

Outline L3000 user manual

m-Dimension COMPETITION ProZ2-50 manual

m-Dimension

m-Dimension COMPETITION ProZ2-50 manual

AMC iA2X250 user manual

AMC

AMC iA2X250 user manual

Sennheiser HDV 820 instruction manual

Sennheiser

Sennheiser HDV 820 instruction manual

BIK BPA-620X owner's manual

BIK

BIK BPA-620X owner's manual

Leuze electronic LV463 Series manual

Leuze electronic

Leuze electronic LV463 Series manual

manuals.online logo
manuals.online logoBrands
  • About & Mission
  • Contact us
  • Privacy Policy
  • Terms and Conditions

Copyright 2025 Manuals.Online. All Rights Reserved.