Chicago Gaming Golden Tee Fore! Non-Coin-Operated Home... User manual

Golden Tee® Fore! –home version Version 03/06 Page 1
Non-Coin-Operated Home Edition
For technical support contact Chicago Gaming Company at (708)780-0070
Please DO NOT contact Incredible Technologies
Chicago Gaming Company, 4616 W. 19th Street, Cicero, IL 60804 (708)780-0070
www.chicago-gaming.com
©Incredible Technologies 2006

Golden Tee® Fore! –home version Version 03/06 Page 2
TABLE OF CONTENTS
LEGAL INFORMATION…………………………………………………………………………………………………………3
INITIAL SETUP..............................................................................................................................................................4
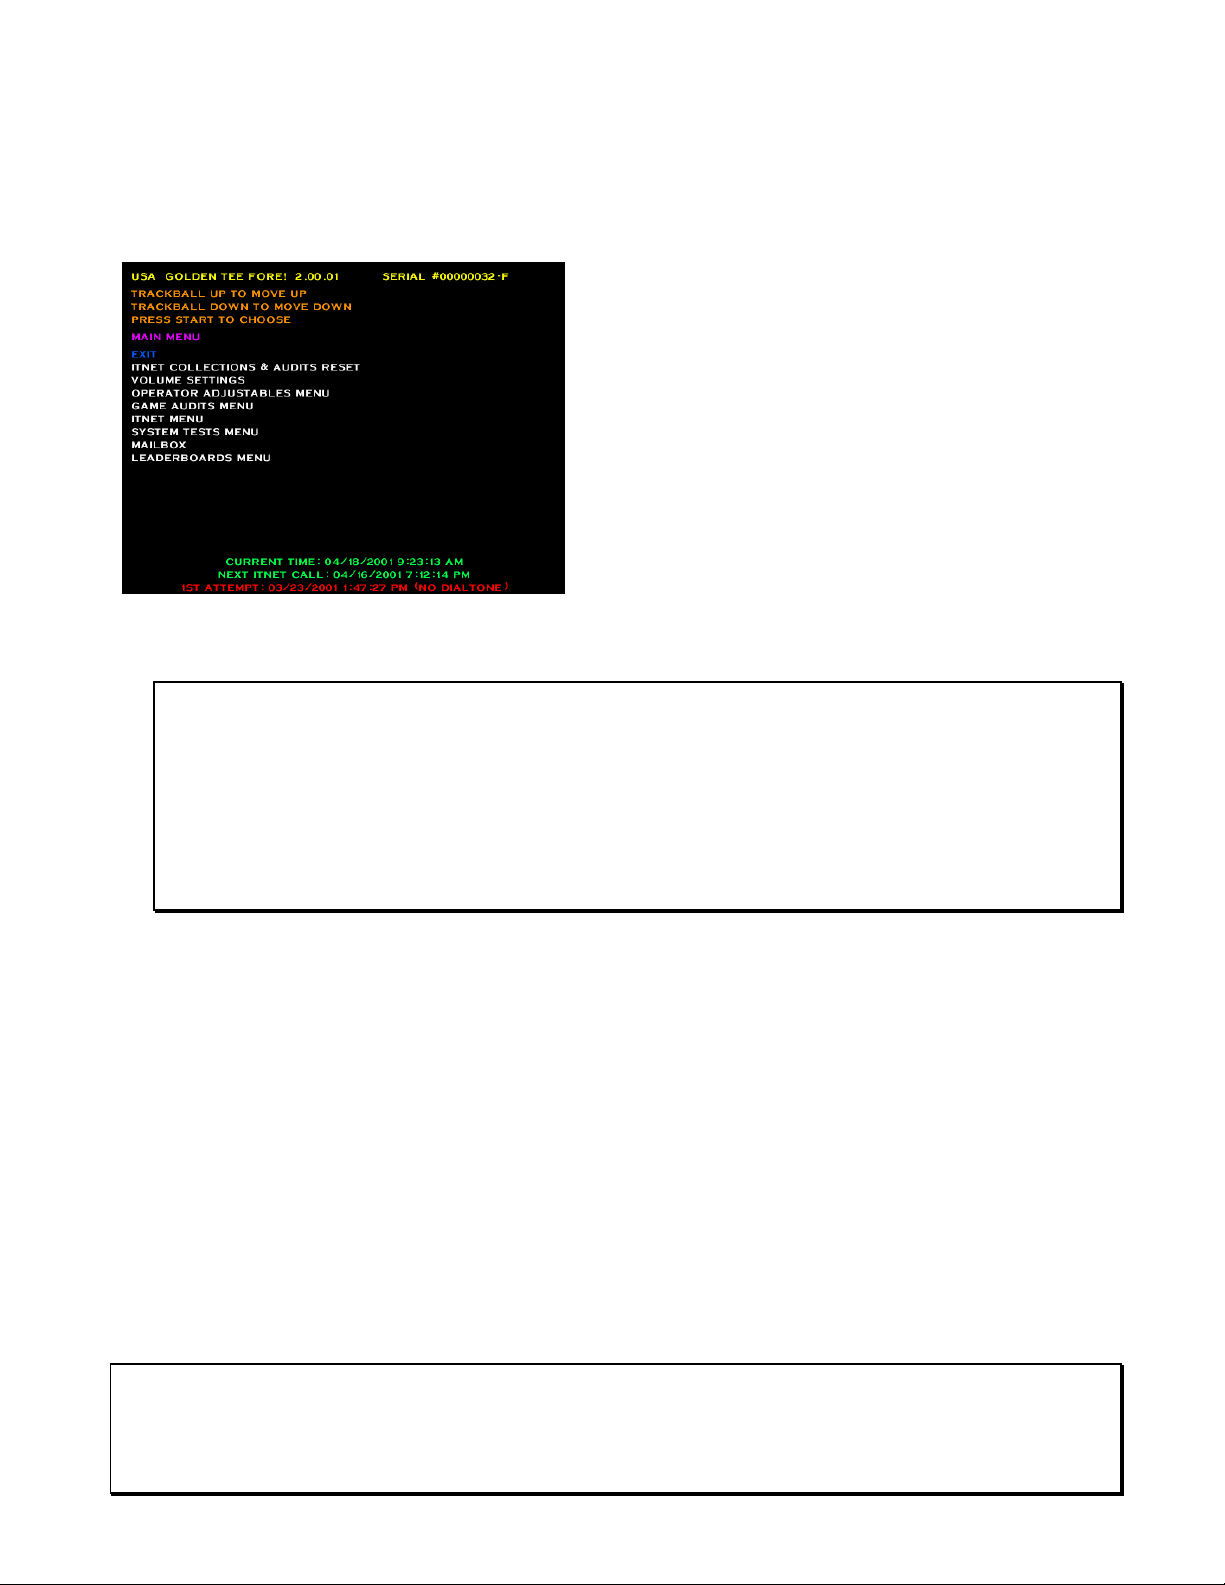
OPERATOR MODE .......................................................................................................................................................7
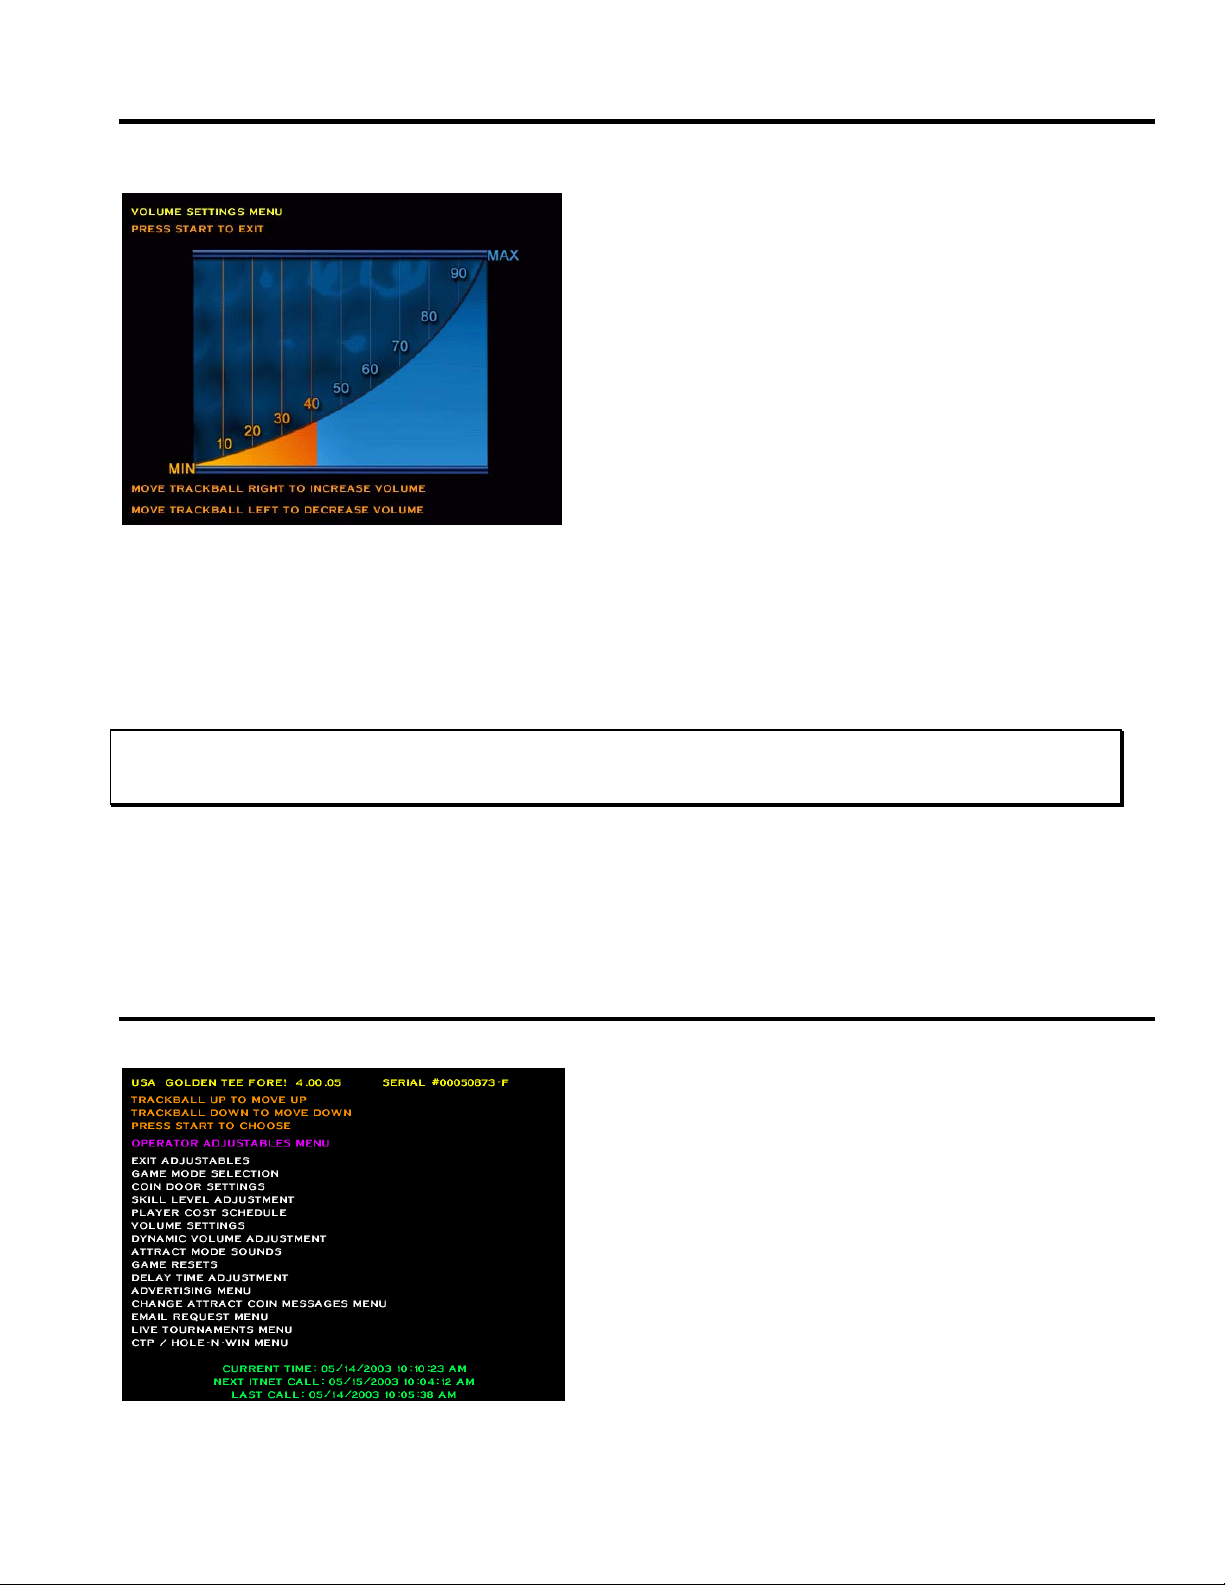
VOLUME SETTINGS .................................................................................................................................................8
VOLUME SETTINGS..............................................................................................................................................8
OPERATOR ADJUSTABLES MENU........................................................................................................................8
SKILL LEVEL ADJUSTMENT.................................................................................................................................9
ATTRACT MODE SOUNDS ...................................................................................................................................9
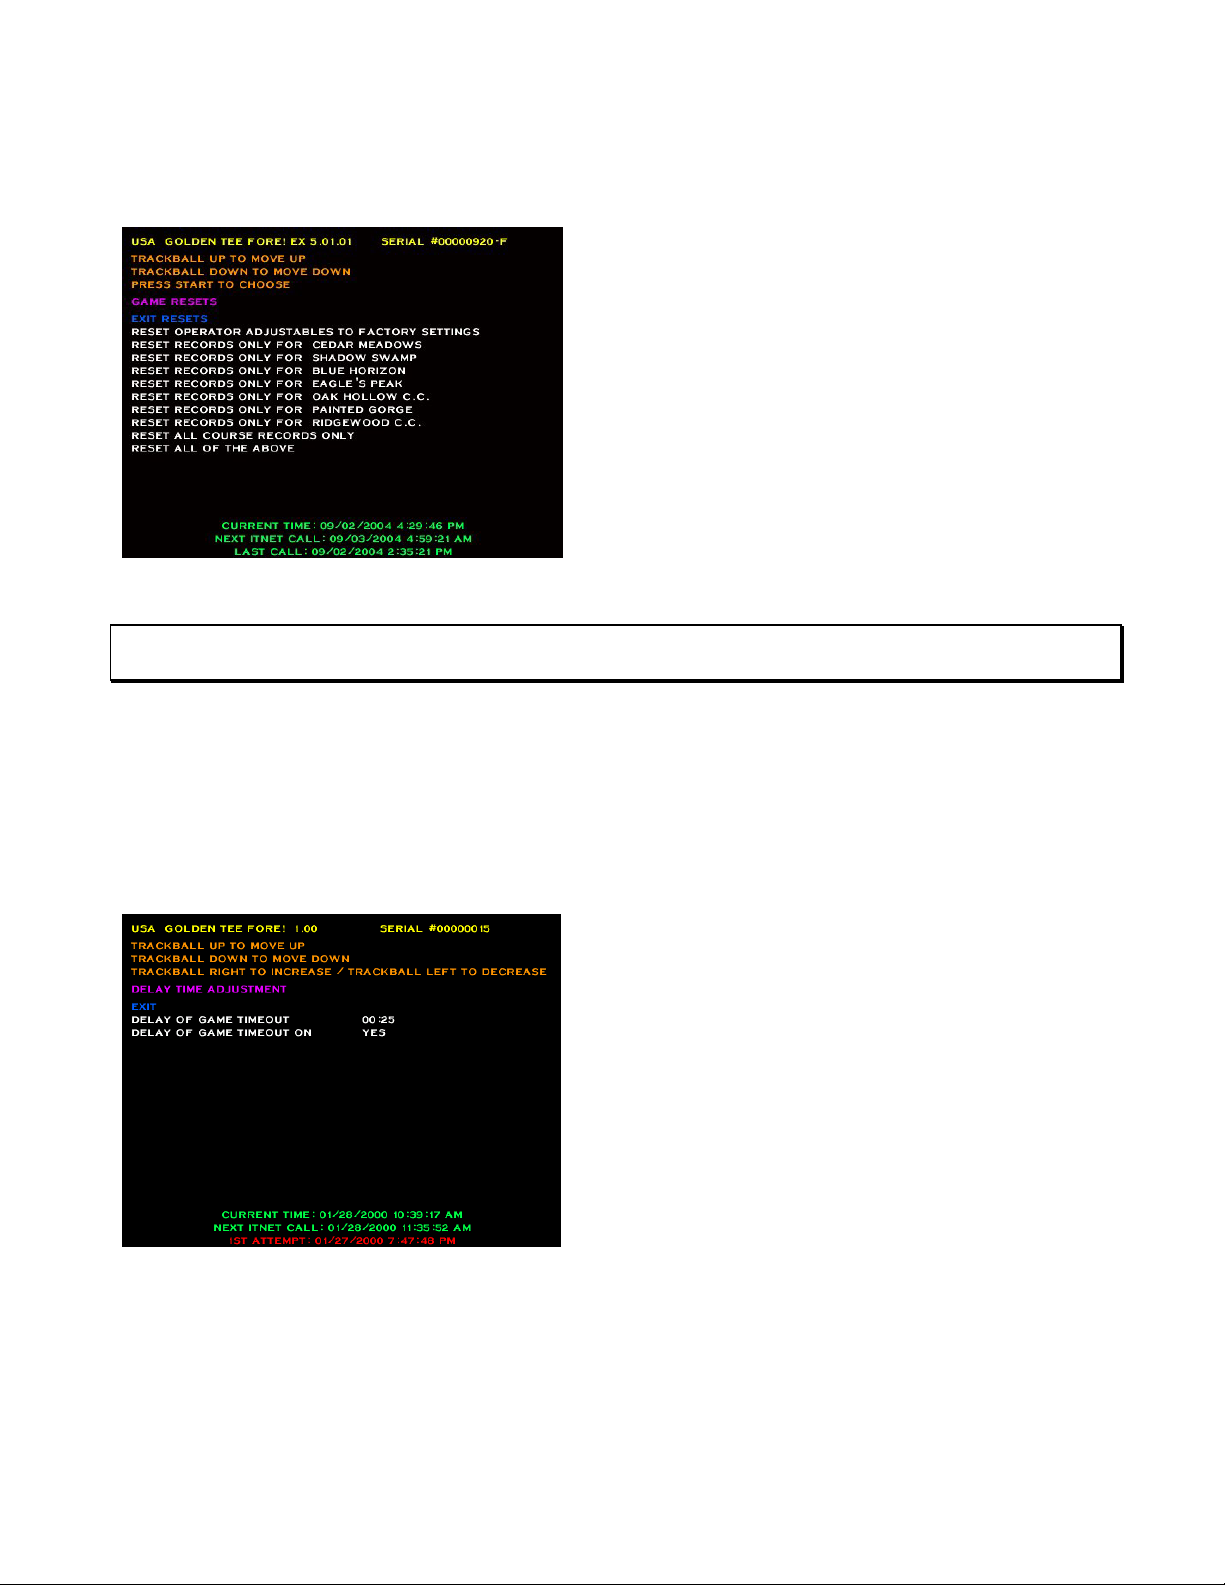
GAME RESETS ....................................................................................................................................................10
DELAY TIME ADJUSTMENT ...............................................................................................................................10
CLOSEST TO PIN MENU.....................................................................................................................................11
HOLE-N-WIN MENU.............................................................................................................................................11
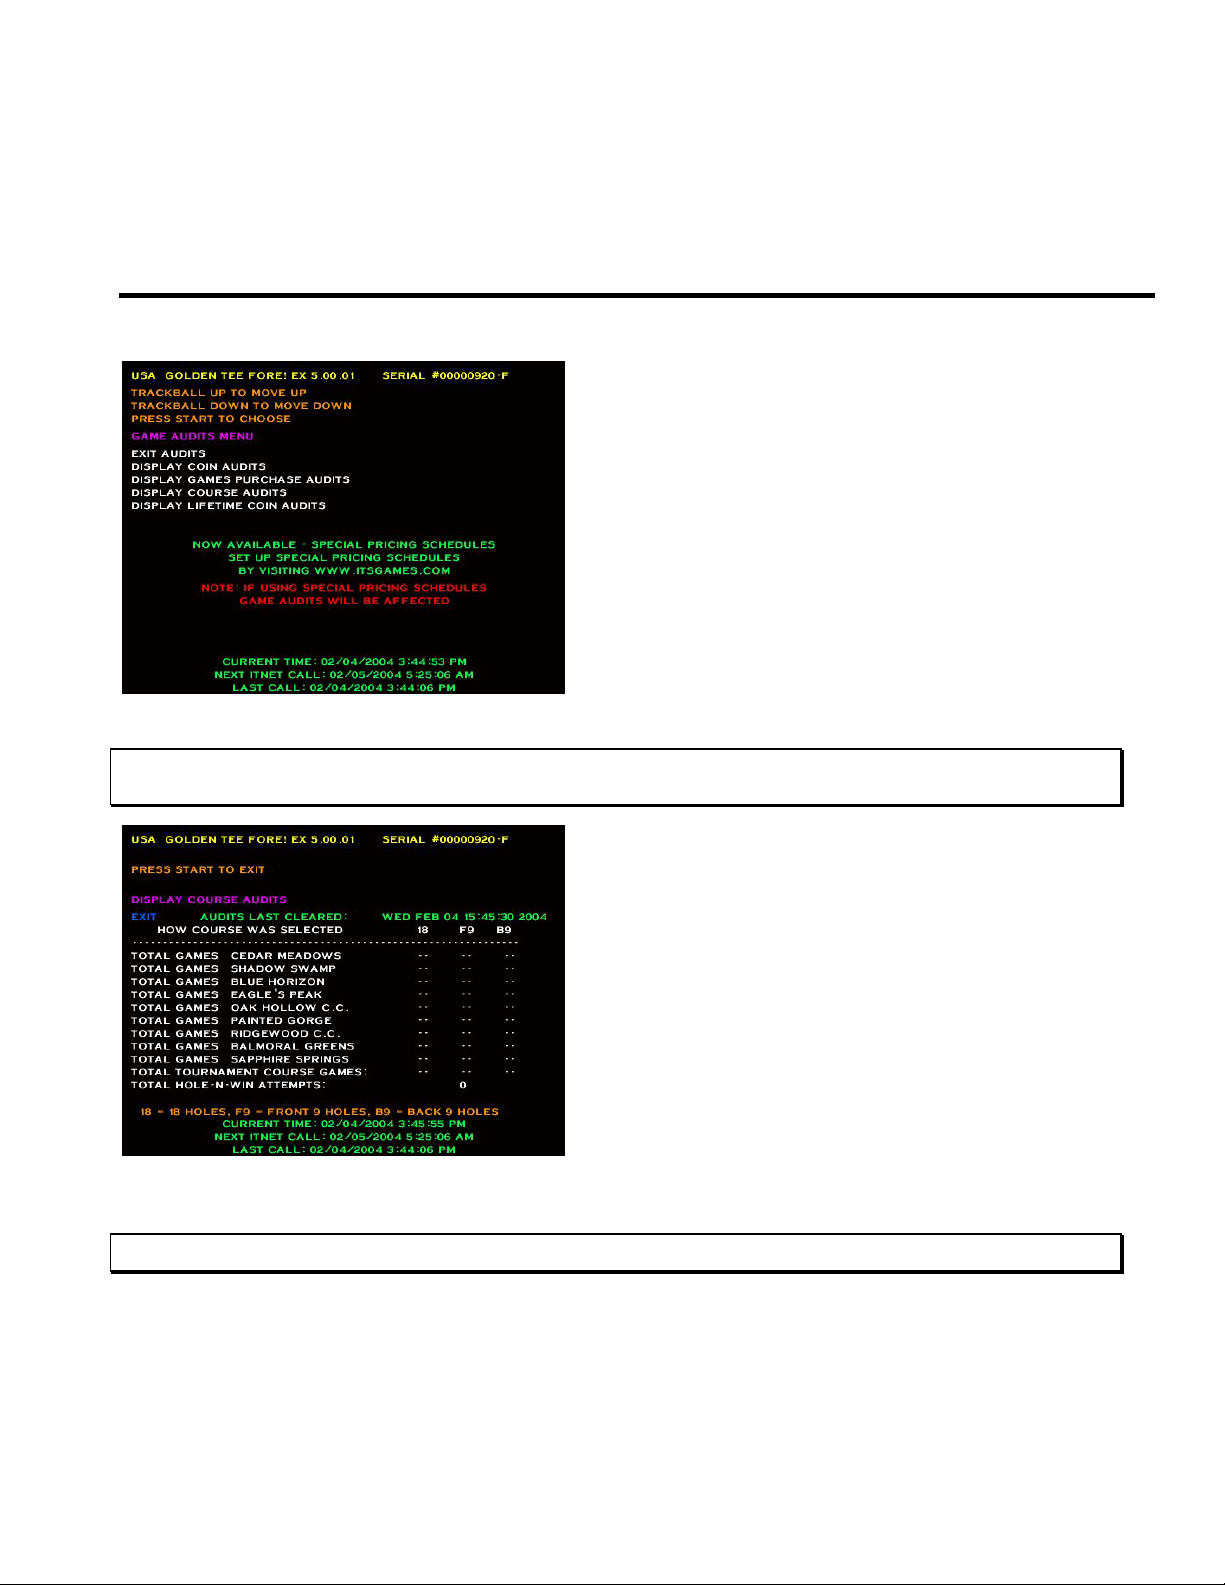
GAME AUDITS ........................................................................................................................................................12
SYSTEM TESTS MENU...........................................................................................................................................13
VIDEO SCREEN TESTS ......................................................................................................................................13
SOUND TESTS ....................................................................................................................................................14
PLAYER CONTROLS TESTS ..............................................................................................................................14
MOTHERBOARD TESTS.....................................................................................................................................15
LEADERBOARDS MENU........................................................................................................................................15
DISPLAY / CLEAR COURSE LEADERBOARDS.................................................................................................16
DISPLAY LEADERBOARD MENU.......................................................................................................................16
CLEAR/RESET LEADERBOARD MENU .............................................................................................................17
APPENDIX A (ONLY FOR TRAINED SERVICE TECHNICIANS) .............................................................................18
GENERAL TROUBLESHOOTING ....................................................................................................................................18
Video Problems.....................................................................................................................................................18
Sound Problems ...................................................................................................................................................19
Power-Up Problems..............................................................................................................................................20
GENERAL TROUBLESHOOTING (CONTINUED…) ............................................................................................................21
Miscellaneous Problems.......................................................................................................................................21
CD-ROM Upgrade Problems ................................................................................................................................21
CD-ROM DRIVES LISTING ..........................................................................................................................................22
POWER SURGE PROTECTION RECOMMENDATIONS .......................................................................................................22
APPENDIX B ...............................................................................................................................................................23
SERVICE INFORMATION ...............................................................................................................................................23
Golden Tee® Fore! PCB Connections..................................................................................................................23
Dip Switch Settings ...............................................................................................................................................23
JAMMA Harness Connection................................................................................................................................24
Trackball Harness Connection..............................................................................................................................24
Cabinet Schematic................................................................................................................................................25
APPENDIX C ...............................................................................................................................................................26
WARRANTY INFORMATION ...........................................................................................................................................26
Warranty, Repair and Return Policy .....................................................................................................................26
Return Merchandise Authorization .......................................................................................................................26
CONTACT INFORMATION .........................................................................................................................................27

Golden Tee® Fore! –home version Version 03/06 Page 3
LEGAL INFORMATION
SAFETY NOTICES
The following safety instructions apply to all game owners. We recommend that you read this page before
setting-up your Golden Tee game. Use the following safety guidelines to help protect the system from potential
damage and to ensure your personal safety.
• Use with only 115 volts/60Hz
• To help prevent electric shock, plug the system power cables into properly grounded power sources.
These cables are equipped with 3-prong plugs to help ensure proper grounding. Do not use adapter
plugs or remove the grounding prong from a cable. If you must use an extension cable, use a 3 wire
cable with properly grounded plugs.
• To help protect your system from sudden, transient increases and decreases in electrical power, use a
surge suppressor, line conditioner or uninterruptible power supply (UPS).
• Do not spill food or liquid on your system.
• Do not push any objects into the openings of the system. Doing so can cause fire or electric shock by
shorting out interior components.
• Keep your game far away from radiators and heat sources.
• Do not block cooling vents.
• Be sure to turn off power before working on the machine
• Be sure to use fuses which meet the specified rating. (5A, 220V Quick-blow). Using fuses exceeding
the specified rating can cause a fire and electrical shock.
• When working around the monitor, be extremely careful. Monitor parts are subject to high tension
voltage. Even after turning off power some portions are still subject to high tension voltage. Monitor
repair and replacement should be performed only by technical personnel who have knowledge of
electricity and technical expertise.
ENVIRONMENTAL CONDITIONS
Golden Tee Fore! Complete is intended for indoor use only. Be sure to keep dry and maintain operating
temperatures of 50-104° Fahrenheit.
HOME USAGE DISCLAIMER
This version of Golden Tee Fore! Complete is designed for non-commercial use only. The game software
contains many of the menu options from the commercial unit but certain components of the commercial
hardware are not included. The commercial options are disabled and any attempt to activate these options could
produce undesirable results. Please leave all coin and ITNet options DISABLED in their respective menus.
®

Golden Tee® Fore! –home version Version 03/06 Page 4
INITIAL SETUP
The locations of the On/Off Switch, Service Button, and Display Adjustment Panel are shown in the
illustration below. If for any reason the panels on the machine need to be removed you MUST disconnect the
unit from any power source.

Golden Tee® Fore! –home version Version 03/06 Page 5
Removing the Control Panel Assembly
For ease of movement thru narrow staircases a trained technician can remove the control panel assembly. Unplug
the machine before removing the control panel! The technician will follow these simple steps to remove the
control panel:
1. Remove only the two screws circled in the following picture.
2. Once the screws are removed simply grasp the control panel, at the side nearest the screen, and gently pull
upward. The panel is hinged at the front and will swing open. Once the panel is open, locate the latches on
both sides and release them.

Golden Tee® Fore! –home version Version 03/06 Page 6
3. After the latches are released grasp the bottom of the panel and gently pull up and out about six inches until
the panel stops are reached, then locate the video connector and separate the connection. The A/C power
connector for the power supply must also be disconnected.
4. Now that the wiring is disconnected it is safe to remove the panel. Close the control panel and grasp the
assembly from the bottom and lift about one inch to disengage the stops and pull outward until the panel is
clear of the cabinet.
To reinstall simply reverse the procedures making sure that the video and power connections are tightly
connected, and NEVER force either the connectors or the panels together.

Golden Tee® Fore! –home version Version 03/06 Page 7
OPERATOR MODE
The OPERATOR MODE can be entered by pressing the Service Button located inside the coin door,
When in OPERATOR MODE, the game’s country code, product name, and software version and the specific Game
Serial Number are displayed at the top of the screen.
NOTE:
Menu items can be highlighted in one of two ways: rolling the trackball Up and Down or by pressing the LEFT and RIGHT buttons. To
select a highlighted item, press the START button. You can tell a menu item is highlighted as it will flash.
To exit most tests or menus and return the game to its normal state, use the trackball or LEFT and RIGHT buttons to highlight the
line that says EXIT, and press the start button. Otherwise, hitting start will normally exit you out of any test you are in that does not
have that option.
At the bottom of most menu screens are displayed the current date and time, next ITNet® call date and time, and the last date and
time ITNet® was called (successful or not). If the last call was unsuccessful, a short error message is displayed on the First Attempt
line.
The MAIN MENU allows you to enter several different areas:
ITNET® COLLECTIONS & AUDITS RESET displays the current machine coin counts, for use in separation of
ITNet® fees from your collections. DO NOT change items on this menu.
VOLUME SETTINGS is used to adjust the volume of your game for your location.
OPERATOR ADJUSTABLES MENU is used for customizing the game to your location including player costs per
game, skill level settings, attract mode sounds, etc.
GAME AUDITS MENU allows you to check your game’s coin, games purchased, course, and lifetime audits.
ITNET® MENU is redesigned to take advantage of many of the ITNet® capabilities including registering your
machine with ITNET®, disabling/enabling calls to ITNET®, and forcing a call to ITNet™. DO NOT change items on
this menu.
SYSTEM TESTS MENU verifies the operation of the hardware, controls, and monitor through easy and automatic
procedures accessed through this menu.
MAILBOX is a feature that was designed with the operator in mind. However, it is currently not functional in this
version of Golden Tee Fore!
LEADERBOARDS MENU gives you quick and easy access to the Stroke Play leaderboards for each course.
COLOR KEY NOTE:
For easy identification, all test screens have been color-coded. Items displayed in PURPLE are the Menu titles. This is the name of the
menu that is currently displayed. Items appearing in ORANGE are instructions for that screen. The WHITE items are choices available on
that menu. The BLUE item is the selection that is currently highlighted and/or can be changed*. Any item shown in GREEN or YELLOW is
an unselectable or pre-set unchangeable item. Items appearing in RED mean an action should be taken or the machine is displaying a
warning. *This selection will now flash for easy recognition.

Golden Tee® Fore! –home version Version 03/06 Page 8
VOLUME SETTINGS
The VOLUME SETTINGS screen is used to adjust the volume of sounds and music that are heard during game
play.
When this screen appears, music will play. Move the trackball to the right to increase the game’s sounds and music.
Roll the trackball to the left to make the game sounds softer. When you have adjusted the sounds to the appropriate
volume, press the START button to exit back to the main menu. (This level will default at 40.)
VOLUME SETTINGS
NOTE:
This menu option is in the OPERATOR ADJUSTABLES MENU as well to allow for quick access while you are already customizing your
other game settings.
To change the volume, press the START button. When the volume settings screen appears, music will play. Move
the trackball to the right to increase the game’s sounds and music. Roll the trackball to the left to make the game
sounds softer. When you have adjusted the sounds to the appropriate volume, press the START button to exit back
to the main menu (This level will default at 40).
OPERATOR ADJUSTABLES MENU
The OPERATOR ADJUSTABLES MENU is accessed through the MAIN MENU.
You can control many customizing procedures. The following are brief descriptions of each adjustable function and
what the screen looks like when displayed. Remember to select an item from any menu, use the trackball to
highlight the item in blue and then press the START button.

Golden Tee® Fore! –home version Version 03/06 Page 9
SKILL LEVEL ADJUSTMENT
Golden Tee® Fore! lets you change the skill level needed to play the game. This setting lets you adjust some of the
playing conditions such as slope of the green, wind speed, and putting sensitivity. This is good for locations with
younger/novice players who are less skilled at the game, or expert/accomplished players who demand a greater
challenge.
To set the game to an easy skill level, highlight SKILL LEVEL 1 – EASIEST.
To set the game to a difficult skill level, highlight SKILL LEVEL 5 – HARDEST.
SKILL LEVEL 3 is the default skill level and approximately the skill required for the average player. Sometimes it is
best if the skill level is adjusted gradually over a period of time.
NOTE:
The skill level adjustment will only affect regular play. The ITNET menu options appear but should remain disabled for predictable machine
operation.
ATTRACT MODE SOUNDS
This menu is used to adjust the sounds that are heard while no one is playing the game.
ATTRACT MODE SOUNDS - ON ALWAYS will play sounds during every attract cycle.
ATTRACT MODE SOUNDS - ON OCCASIONALLY plays sounds about every ten to twelve times the attract mode
is repeated. This is the default.
ATTRACT MODE SOUNDS - OFF will not allow any sounds to be played during the attract mode.

Golden Tee® Fore! –home version Version 03/06 Page 10
GAME RESETS
The GAME RESETS menu will cancel or zero out any custom features or bookkeeping figures that are no longer
wanted.
RESET OPERATOR ADJUSTABLES TO FACTORY SETTINGS will return the game’s adjustable settings (volume,
skill level, etc.) to factory defaults.
RESET RECORDS ONLY FOR <COURSE NAME> is used to reset the statistics and information like “Longest Drive” for each of the 7
stroke-playable courses (5 if you don't have EXtra) individually..
RESET ALL COURSE RECORDS ONLY is used when you want to clear the records for all courses on Golden
Tee® Fore!
RESET ALL OF THE ABOVE is used when you want to do a broad reset and bring the game completely back to its
original “out-of-the-box” settings for all operator adjustables and course records.
DELAY TIME ADJUSTMENT
This allows for changing the delay of game time. A player’s game will terminate if no activity is detected for a set
amount of time. Use this setting to adjust this time delay.
DELAY OF GAME TIMEOUT - The game will give the player a penalty stroke if they have not taken any action after
this amount of time. This function can be set from as little as 25 seconds to as high as 2 minutes. The default is set
to 00:25 (25 seconds). Note: The first hole will give the player a longer 2-minute timeout.
DELAY OF GAME TIMEOUT ON - The TIMEOUT can be disabled by selecting NO. We recommend leaving this
YES so the game will return to the attract mode if a player walks away from a game in progress. The default is set
to YES.

Golden Tee® Fore! –home version Version 03/06 Page 11
CLOSEST TO PIN MENU
OPERATOR CTP OFF OR (ON - # OF MINUTES) lets the operator turn on CTTP mode on his game for a varying
set of minutes. By keeping this at OFF instead of a time frame it will keep the game in regular mode. If they choose
a set of minutes and exit all the way off then it will prompt the operator with a message saying they are entering
CTTP mode and then reset the game. Once the time is up that the operator has selected they can choose to have it
run for another 15 minutes or let it time out and reset the game putting it back into regular play mode.
ACTIVATE CTP SPONSOR ON/OFF lets the operator enable or disable the ability for selected sponsors to swipe a
special card that lets them "rent" the machine from the operator. It puts the game into the special CTTP mode but
not until they've paid for a selected amount of time. Once their time is up they can let the machine reset back to
normal or put more money in to rent the machine for a longer period of time.
HOLE-N-WIN MENU
DO NOT tamper with or make changes to this menu.
Version 4.00.00 and higher offers operators the ability to earn additional revenue with the ITNet® online feature
Hole-n-win! Players pay an additional amount of money for an opportunity to win money. Part of the player-
supported funds is given back to operators on their monthly ITNet® billing statement.
HOLE-N-WIN OFF disables the Hole-n-win! feature. All screens in the attract mode are hidden and the player is
never offered a Hole-n-win! opportunity. Use this if you find out your location is ineligible to run Hole-n-win!
HOLE-N-WIN ON (DEFAULT) enables the Hole-n-win! feature on your machine. This is the default all games are
set to and has all screens in the attract mode visible to all players. This then gives players, in the game, an
opportunity to win money.

Golden Tee® Fore! –home version Version 03/06 Page 12
The Hole-n-win! Status shows the last date that someone won a Hole-n-win! on that specific machine. It will then
show you the date that Hole-n-win! becomes re-available on that machine or if it is currently available already what
courses qualify for Hole-n-win!
GAME AUDITS
The GAME AUDITS MENU will supply you with a detailed accounting of helpful and informative bookkeeping and
statistics.
DISPLAY GAME PURCHASE AUDITS is designed to help in bookkeeping purposes. This screen has a similar format to the Player Cost
Schedule, displaying the game types that were selected by players.
DISPLAY COURSE AUDITS is a breakdown of how many games were played on each course. Note that 18 hole,
Front 9 and Back 9 games are displayed with code version 2.01.06 and higher.
For version 4.00.00 and higher, Total Hole-n-win! Attempts are included on this screen.

Golden Tee® Fore! –home version Version 03/06 Page 13
SYSTEM TESTS MENU
Golden Tee® Fore! has been inspected and tested at the factory and should arrive to you in perfect working order. If
you are experiencing any problems with the game, the SYSTEM TESTS MENU is a good place to start when
tracking down the problem.
VIDEO SCREEN TESTS
You can test your monitor and adjust colors or sizes by choosing VIDEO SCREEN TESTS and pressing the START
button on the desired test.
These tests can be exited at any time by pressing the START button. From there move the trackball up and down
or press the LEFT and RIGHT buttons to get to the next test you want to do. The screens are a grid of colored
rectangles, a set of squares to test sizes, and then red, green, blue and white to test the condition of the monitor’s
components. Use these colors and grids to adjust your monitor so they look as good as possible.

Golden Tee® Fore! –home version Version 03/06 Page 14
SOUND TESTS
Choose SOUND TEST from the SYSTEMS TESTS MENU to test the sounds and speakers in the game. The
section also tests the coin meter and microphone.
Test sounds include the STORED SOUND (BREAKING GLASS) as well as the STREAMING SOUND (MUSIC).
These will help test that your sound is working properly.
To test the coin meter, select MECHANICAL METER TEST from this menu. If everything is working properly, the
meter should increment each time the START button is pressed while this line is highlighted.
The MICROPHONE TEST will determine the dynamic volume of the area around the cabinet. In order to get the
correct reading for all other sound tests, the MICROPHONE TEST should be run first.
PLAYER CONTROLS TESTS
When PLAYER CONTROLS TESTS is selected, the screen will display a diagram of the Golden Tee® Fore! control
panel. The controls are highlighted on the diagram when the controls are active. Test all of the controls, including
test and service switches. Press the LEFT, RIGHT, and START buttons together to exit this test.

Golden Tee® Fore! –home version Version 03/06 Page 15
MOTHERBOARD TESTS
This menu is to help test some of the basic hardware located in the Golden Tee® Fore! machine.
BOOT ROM tests the memory your game boots from. To activate this test press the START button. You will get one
of two messages: “BOOT ROM CHECKSUM IS CORRECT” or “BOOT ROM CHECKSUM IS INCORRECT”. If you
get the failure message please contact your local distributor or the Chicago Gaming Service Department.
VOLTAGE ADJUSTMENT tests the voltage levels of the game’s power supply. This test reveals one of four
messages the instant the menu selection is highlighted. “VOLTAGE IS WITHIN ACCEPTABLE RANGE” means that
everything is working properly. “VOLTAGE IS HIGH” or “VOLTAGE IS LOW” means you have to adjust the voltage
until you get the ACCEPTABLE RANGE message. “VOLTAGE DETECTION FAILURE” means there is a hardware
failure with the voltage detect circuitry and you should contact your local distributor or the Chicago Gaming Service
Department.
REALTIME CLOCK is used to display the board’s clock in current local time. Pressing the START button will
display the current local time and date. If the time is incorrect it can be adjusted by making a call to ITNet.
NVRAM tests the non-volatile RAM, or memory, on the game’s board. Pressing the START button will activate this
test. You will get one of two messages: NVRAM CHECKSUM SUCCEEDED or NVRAM CHECKSUM FAILED. As
with all other tests if you get the failure message contact your local distributor or the Chicago Gaming Service
Department.
LEADERBOARDS MENU
This new feature lets operators display and reset the stroke leaderboards for each course.
Select which course leaderboard you wish to work with and then hit the start button to go to the next menu.
Note: The courses are labeled by course name corresponding to the way they view on the course selection screen
from left to right (top to bottom if you have Extra).
EXIT takes you back to the MAIN MENU.
COURSE LEADERBOARD <COURSE NAME> MENU lets you select for which course you want to view the
leaderboard.

Golden Tee® Fore! –home version Version 03/06 Page 16
DISPLAY / CLEAR COURSE LEADERBOARDS
EXIT takes you back to the main LEADERBOARDS MENU.
DISPLAY LEADERBOARD lets you display the top 20 scores for that specific course including Name (initials),
score, longest drive, and great shot points.
CLEAR/RESET LEADERBOARDS lets you clear the leaderboard for that specific course. The leaderboard will then
be cleared in both the attract mode and in the game for stroke play. A message will flash saying the leaderboard has
been cleared for that course
NOTE: This feature clears the leaderboards for courses available in Stroke Play only. The courses available in League Play ONLY do not have
these leaderboards.
DISPLAY LEADERBOARD MENU
This menu lets you select which leaderboard you wish to see based on the 18 hole, front 9, and back 9 versions of
that course.
Here is what the leaderboard looks like:

Golden Tee® Fore! –home version Version 03/06 Page 17
CLEAR/RESET LEADERBOARD MENU
This menu lets you select which leaderboard you wish to clear based on the 18 hole, front 9, and back 9 versions of
that course.

Golden Tee® Fore! –home version Version 03/06 Page 18
THE TROUBLESHOOTING SECTION HAS BEEN INCLUDED FOR USE BY
TRAINED SERVICE TECHNICIANS
APPENDIX A
GENERAL TROUBLESHOOTING
Video Problems
Symptom Probable Cause Solution
No picture Check Dip Switches. Check monitor resolution chart on page
10 for correct SW-5.
Bad connection. Make sure there are good connections
from the board's video outputs (see
JAMMA connections - Page 51) to the
monitor's video inputs. Make sure the
video card cable is connected to the
main PCB.
Monitor. Make sure the monitor is operating
correctly. (Check it with another
compatible logic board).
Voltage too low. Check all power supply voltages.
JAMMA Harness connected improperly. Identify Pin 1 on the JAMMA connector
and on the PCB. If installed incorrectly,
damage to the PCB may have occurred.
Scrambled Picture Missing sync connection or misadjusted
monitor.
Check the sync connection - Adjust
monitor.
Dip SW-5 set in the wrong resolution. Check monitor resolution chart on page
10 for correct SW-5.
Missing colors or washed out color Bad video connections. Check the video red, green, and blue
connections at video card cable and
JAMMA harness.
Bright, blurry, or rolling picture Misadjusted monitor. Adjust the monitor, not the board.
(Refer to your monitor manual).
Picture too large, too small, or off center Misadjusted monitor. Adjust the monitor, not the board.
(Refer to your monitor manual).
Video image is flipped Incorrect Monitor Wiring Reverse the monitor's convergence
wires or flip the monitor 180º. (Refer to
your monitor manual).
Diagonal white lines or snow GND problem or interference from
other equipment. Make sure you have Video Ground
connected at the monitor and pin 14 of
JAMMA.

Golden Tee® Fore! –home version Version 03/06 Page 19
Sound Problems
Symptom Probable Cause Solution
No sound +12 vdc power supply is bad Try another +12 vdc connection from
the power supply.
Bad connection to the board. Check for +12 vdc power on the board.
Check for +5 vdc power on the board.
Sound adjustment in Operator
Adjustables
Check the volume setting in the
OPERATORS ADJUSTABLE section of
the Operator Mode.
All of the attract mode sounds are
“OFF”.
JAMMA Harness connected improperly Check the speaker connection.
Miscellaneous Identify Pin 1 on the JAMMA connector
and on the PCB. If installed incorrectly,
damage to the PCB may have occurred.
Buttons do not work or are partly
inoperable. Or the selections keep
scrolling on Operator Mode menus.
Switches not properly connected. Make sure that the common post of the
switch is connected to ground.
Make sure each individual switch is
working by doing the Control Panel Test
found in the SYSTEM TESTS section.
Make sure that the signal wire for that
particular switch is connected to the
normally open post of the switch.
JAMMA Harness connected improperly. Identify Pin 1 on the JAMMA connector
and on the PCB. If installed incorrectly,
damage to the PCB may have occurred.
Make sure pins 27 and 28 of JAMMA
are properly grounded.
Coin counter not working Miscellaneous. Make sure that the signal wire has a
connection from the switch to the board.
Make sure proper voltage is hooked up
to the counter.
The signal wire is not connected to coin
counter. (Check continuity).

Golden Tee® Fore! –home version Version 03/06 Page 20
Control Problems
Symptom Probable Cause Solution
Trackball does not work No +5 voltage. Bad inductor (L51) or bad connection to
trackball.
Check for +5V on J51 Pin 1.
Bad trackball or trackball cable. Change with known, good trackball
and/or trackball cable.
Power-Up Problems
Symptom Probable Cause Solution
No reaction when game is turned ON Voltage not good. Check all power supply voltages.
Short between power and ground.
Check for foreign material.
Turn power off. Disconnect the harness
and measure the resistance between
power and ground. It should read
around 600 ohms. (0 ohms is a dead
short).
Make sure the harness is not shorting to
anything, such as bare or frayed wires
shorting out each other or hitting bare
metal.
No power from the power supply. Replace power supply.
Short on the board. Check for loose or foreign material on
the board.
Hard drive connected improperly. Make sure hard drive ribbon cable is
connected correctly. The red wire on
ribbon cable connects to pin 1 on board.
JAMMA Harness connected improperly. Identify Pin 1 on the JAMMA connector
and on the PCB. If installed incorrectly,
damage to the PCB may have occurred.
Open on socketed IC’s Check for bent pins on socketed parts.
Make sure that all IC's are seated in
their sockets properly.
Table of contents
Other Chicago Gaming Arcade Game Machine manuals
Popular Arcade Game Machine manuals by other brands

Jennison Entertainment Technologies
Jennison Entertainment Technologies Hollywood Reels Operator's manual

Ice
Ice TAITO PANIC MUSEUM DELUXE Assembly manual

Hasbro Gaming
Hasbro Gaming BULLS-EYE ALL quick start guide

Panda Vending
Panda Vending Cut ur Prize manual

Sting
Sting KC Cobra Operation & instruction manual

Konami
Konami KGP-1 Operator's manual

Coastal Amusements
Coastal Amusements Pop-A-Tac-Toe owner's manual

Universal Space
Universal Space FRUIT MANIA Extreme Operation manual

Kriss Sport
Kriss Sport Boxer user manual

MADEFORARCADE
MADEFORARCADE MANUAL COINPUSHER manual

NAMCO
NAMCO PAC-MAN BATTLE ROYALE DELUXE Operation manual

LAI Games
LAI Games Mini Little Masterpiece Operator's manual