CHICOLOGY FAUX WOOD BLINDS User manual

Mounting Bracket x 2
STEP 1: DETERMINE INSIDE
OR OUTSIDE MOUNT
a. Inside/Ceiling or Inside/Wall Mount
(A minimum 1 3/4 in. depth is required or 3 3/4 in. depth
for flush mounts.)
Place the mounting brackets on each end of the blind’s
headrail.
Mark the position of the mounting brackets with a pencil
Align with pencil marks with the brackets then drill into
the window frame using the screws provided. Use a 1/8
inch drill bit to make a hole.
Check Components
Prepare necessary tools
CORDLESS 2 INCH
FAUX WOOD BLINDS
b. Wall or Outside Mount
(A minimum 1 3/4 in. flat wall space is necessary)
Place the mounting brackets on each end of the blind’s
headrail against the wall(on the window frame or above
the window frame).
Mark the position of the mounting brackets with a pencil.
Align with pencil marks with the brackets then drill into
the window frame using the screws provided. Use a 1/8
inch drill bit to make a hole.
1)
2)
3)
1)
2)
3)
Note:
If your product includes a center bracket: Installing at the
center of the blinds will provide additional support to
blinds. Center support bracket are included for blinds
ranging from 37” - 84”
STEP 2: ATTACH VALANCE CLIPS
STEP 3: ATTACH WAND
Insert the wand hook gently into the tilter as shown below.
or
STEP 4: MOUNT THE HEADRAIL
Mount your blind by inserting the headrail into the open
mounting brackets. Snap the bracket until you hear a “click”
Components
Faux Wood Blinds
Valance
x 2 x 3 x 4 x 5Valance Clips
Wand
Hold Down Bracket
x 4 x 6 x 8 x 10Screws
12-36 37-48 49-72 73-84
Blinds Width ( inches )
x 0 x 1 x 2 x 3
Center Support Bracket
Inside/Ceiling Outside/ Wall
Insert the valance
clips.
Side Returns (2 choices)
Side Returns Clip
1/8” drill bit
x 2
x 2
x 2
x 2
x 1
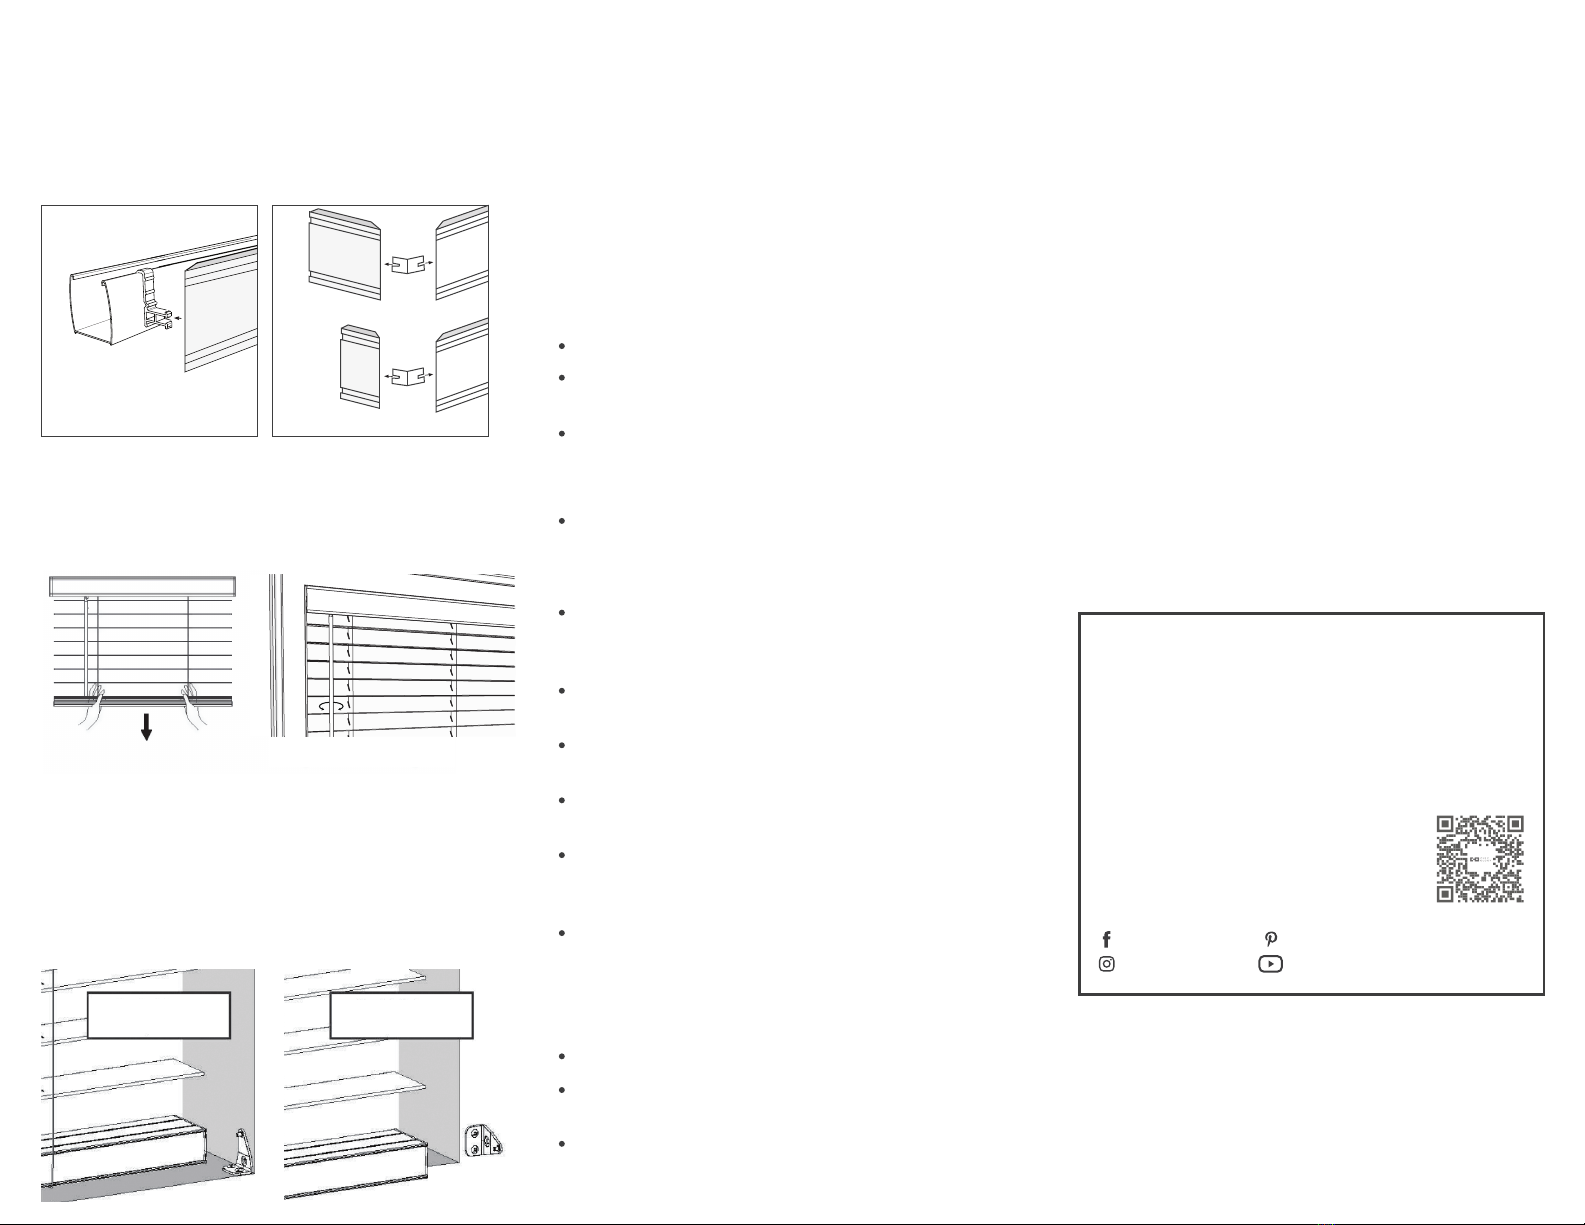
Use both hands to Lift the bottom rail up
Turn the wand to adjust the slats for desired privacy
a)
b)
To Report Shipping Damages:
If damage occurred during shipping, we are required to
collect photo documentation of damaged packaging and
merchandise for all claims. Please email and call us
immediately and report within 14 calendar days or else
you may be denied for your damaged product.
To Obligations to the consumer:
The obligations of Chicology are limited to the repair or
replacements of parts or products found to be defective.
Chicology will determine if the product is defective or not
and may replace the product. Any defective customized
products can be exchanged but are non-refundable if still
under warranty. Chicology is not responsible for shipping
or labor costs( such as measuring, installing, reinstalling,
and taking down the above stated products ).
Chicology shall have no liability whatsoever for incidental
or consequential damages:
Some states do not allow the exclusion or limitation of
incidental or consequential damages, so this limitation or
exclusion may not apply to you.
Need Further Assistance?
We stand by our products and we’re here to help.
Call or email us, and expect a reply within
1 business day.
Visit our website for how-to videos and FAQS.
Website : www.chicology.com/help
Email: support@chicology.com
Phone: 1 (866) 999-6188
Hours: Mon-Fri 8AM to 5PM (PST)
STEP 5: ATTACH VALANCE
Inside/Ceiling: attach the valance.
Outside/Wall: attach the valance, choose Full or Partial
side returns and attach it to the front piece of the valance
using the side return clips.
STEP 6: HOW TO OPERATE YOUR BLINDS
STEP 8: INSTALL THE HOLD DOWN BRACKETS
Optional: ‘Hold down brackets’ are used to keep your blinds
steady. Install the hold down brackets next to the blinds
aligning the bottom rail.
Chicology Custom-Made Blinds Warranty
Limited Three Year Warranty from the Date of
Purchase
Defective Product:
If you believe your shade has a manufacturing defect,
please email and call us.
What is Covered:
All shades and blinds are warranted against manufacturer
defects in materials or workmanship, provided:
You are the original purchaser of the products.
The product was properly installed according to
instructions.
The product was made or assembled exclusively from
Chicology’s materials and components.
Components and brackets:
Repair and/or replacements will be made with similar or
like parts.
What is Not Covered:
Chicology does not cover consumer damages caused by
accidents, alterations, misuse, and abuse of the
products, or damages from pets or insects.
Damages resulted from removal and reinstallation in the
same or any other window applications.
Damages caused during measurement, installation,
cleaning, and/or maintenance of your blinds and shades.
Any yellowing or cracking of plastic parts due to normal
wear and tear.
All fabrics can lose their original intensity due to
prolonged exposure to these elements: direct sunlight,
wind, water/moisture, salt air, high humidity.
Some natural fabrics have variations in color, grain and
texture. These variations should in no way be
considered flaws or defects, as they are part of the
natural beauty of the f abric. Fraying is considered
normal wear and tear, is not covered by the warranty.
High humidity may cause wood slats to warp.
Colors may vary from lot to lot and replacements may
not mat ch exactly to previous shades.
All cords will eventually wear out.
Inside/ Ceiling
OR
If your blind hangs unevenly, put your blind all the way down,
ensuring you are lifting or lowering from two sides evenly.
Note:
Outside / Wall
Inside/ Ceiling
Chicology Home
Chicology Home
Chicology Home
Chicology Home
Outside / Wall
PARTIAL
FULL
Other CHICOLOGY Window Blind manuals


Popular Window Blind manuals by other brands


weinor
weinor VertiTex ZipR Maintenance Instructions and Directions for use for the end user

Roto
Roto ZAR M R4/R7 Mounting instructions

Benthin
Benthin P1614 quick start guide

MDT
MDT KNX Smart 55 BE-JTA5504.01 Technical manual

Victoria M
Victoria M SYSTEM VS 1 Original instructions

SOMFY
SOMFY Movelite WT Series instructions