LH01793:05/00
4
S
TEP
4 - D
IAGRAM
4: INSTALLATION OF DROPSIDE.
PREPARATION FOR INSTALLATION OF DROPSIDE:
Loosen the four Slotted/Phillips Screws Awhich attach
the Stabilizing Bar Tto the Headboard Yand Footboard
Xto prepare for Dropside VV
VV
Vinstallation. Back out these
(4) Screws a full (8) revolutions each, but do not remove
the screws.The Stablizing Bar Twill now be loose.
Install Dropside Vby following substeps Ithrough IV
listed below. Refer to Diagram. (It would be helpful to
have a friend assist you with this procedure.) Note: the
outside location of Dropside VV
VV
Vas shown in Dia-
gram.
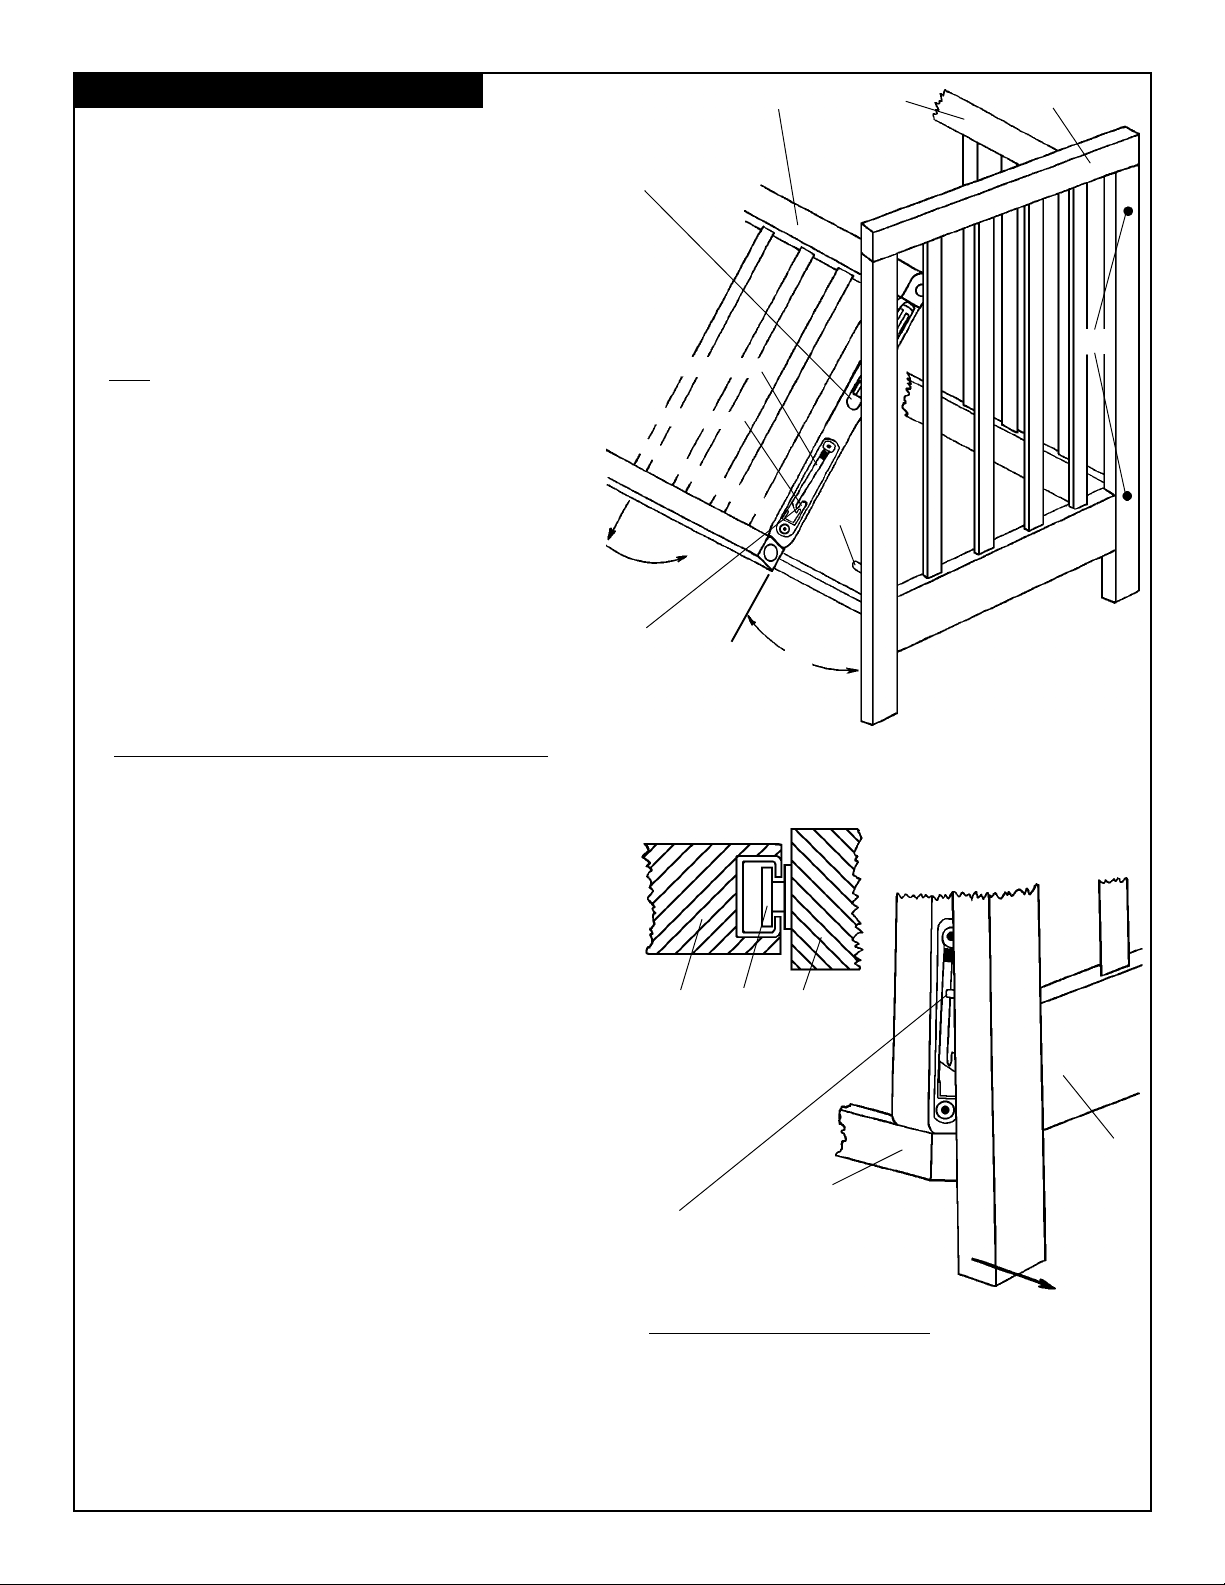
I. Note: During the Dropside
V
installation procedure
use extreme caution when Top Tracks and Lower Tracks
make contact with Upper Guide Bushings
CC
CC
C
and Lower
Guide Pins
DD
DD
D
so as not to damage the finish of this crib.
II. Insert the Upper Guide Bushings CC
CC
C(mounted to
Footboard
X
and Headboard
Y
in STEP 2)into the
Upper Tracks
(metal) which were factory mounted to
Dropside.Hold the Dropside Vat approximately 30
degrees from vertical as shown in Diagram.
III. Once both ends are engaged, then carefully allow
Dropside Vto slide downward. Then rotate the bottom
end of the Dropside Vuntil it is nearly vertical. (Note:
Rotation will be stopped when the dropside
V
touches
the Lower Guide pins
DD
DD
D
.Carefully let the Dropside V
slide down until it is as low as it can go.
IV. READ THIS STEP COMPLETELY BEFORE PROCEEDING. Next, lift
Dropside VV
VV
Vapproximately two inches (2") vertically. This will put Dropside
Vin the proper vertical alignment with the Lower Guide Pin DD
DD
Dwhich will
be inserted into the Lower Tracks (Right & Left).
Flex the bottom end of the corner post on the Dropside side of Footboard X
away from the Dropside V. The purpose of this process is to create a gap
for the Lower Guide Pins Dto pass through so that the Lower Guide Pins
can be inserted into the long groove of the plastic Lower Tracks. As you
prepare to accomplish this please note the following:
If the Stabilizing Bar Assembly T was not loosened enough (as described
in PREPARATION FOR INSTALLATION OF DROPSIDE in the beginning
of this Step) there will not be enough slack to create the necessary gap
required for the Lower Guide Pin Dto pass through. Prematurely forcing the
pin through a gap with inadequate clearance could damage the finish on the
DropsideV. If your crib has too small of a gap, then lower Dropside Vto its
lowest position and check to verify that preparation at beginning of Step 4
was performed correctly.
If it was performed correctly, but the gap is still too small, it may be because
the Stabilizing Bar Tassembly needs to be pulled away from the bottom rails
of the Footboard Xor Headboard Y. Check to verify that the End Plates M
& Nhave been pulled away from the bottom rails until they touch the
underside of the heads of loosened Slotted/Phillips Machine Screws AA
AA
A.
After the Lower Guide Pin DD
DD
Dhas been installed into the long groove on
Footboard X, then repeat this process on Headboard Y. After both Lower
Guide Pins Dare installed, very carefully and slowly raise the DropsideV
up until it locks into its raised position. Be very careful to watch to ensure that
the Lower Guide Pins Dlocated in the grooves do not slip out during the
process of raising Dropside V.
Refer to Diagram 2. Tighten the (4) Slotted/Phillips Machine Screws AA
AA
Awhich
were installed in Step 2 to attach Stabilizing Bar Tto Headboard Yand
Footboard Xbut were loosened in Step 4. Be sure the (4) Slotted/Phillips
Machine Screws AA
AA
Aare tightened securely. Check these screws periodically
and tighten if needed.
Check the function of Dropside V. To lower the Dropside, lift
up on the Dropside top rail with your hand near the middle and
then press in with your knee on the center of the Dropside
bottom rail. The Dropside will then lower. To lock the Dropside
in the raised position, just lift it up until it locks into place.
Always verify that both ends of the Dropside are locked in the
raised position whenever child is placed in crib. Only lower
the Dropside when attending to child. Lower crib DropsideVV
VV
V
prior to proceeding with Step 5.
IIII
IIII
II.
Engagement
of Metal Top
Track and
Upper Guide
Bushing CC
CC
Cwill
start at bottom
of Metal Top
Track (see
enlarged
section view
below).
III.Lower Track
( Plastic)
NOTE: Place short groove
toward inside of crib.
long groove
short groove
Outside of Dropside VV
VV
V
30°
Corner post of Footboard
ZZ
ZZ
Z
II. ENLARGED SECTION VIEW
Engagement of Metal Top
Track and Upper
Guide Bushing CC
CC
C
IVIV
IVIV
IV.ENLARGED VIEW
IV. Then insert Lower Guide Pin DD
DD
D into
long groove in Lower Track (plastic).
Corner post to receive Dropside
VV
VV
V
FLEX
X
XCV
V
VX
W
D
R