Chima SVP2000 User manual
SVP2000 Business IP Phone User Manual
STEPHEN TECHNOLOGIES CO.,LIMITED
/ 5/F, Building NO.1, TongXin Industry Zone, HengGang, LongGang, S enz en, G.D, C ina, 518115
Tel: +86 755 89352606 /Fax:+86 755 89352612 / Email: Support@step en-tele.com / Url: www.step en-tele.com
-
1
-
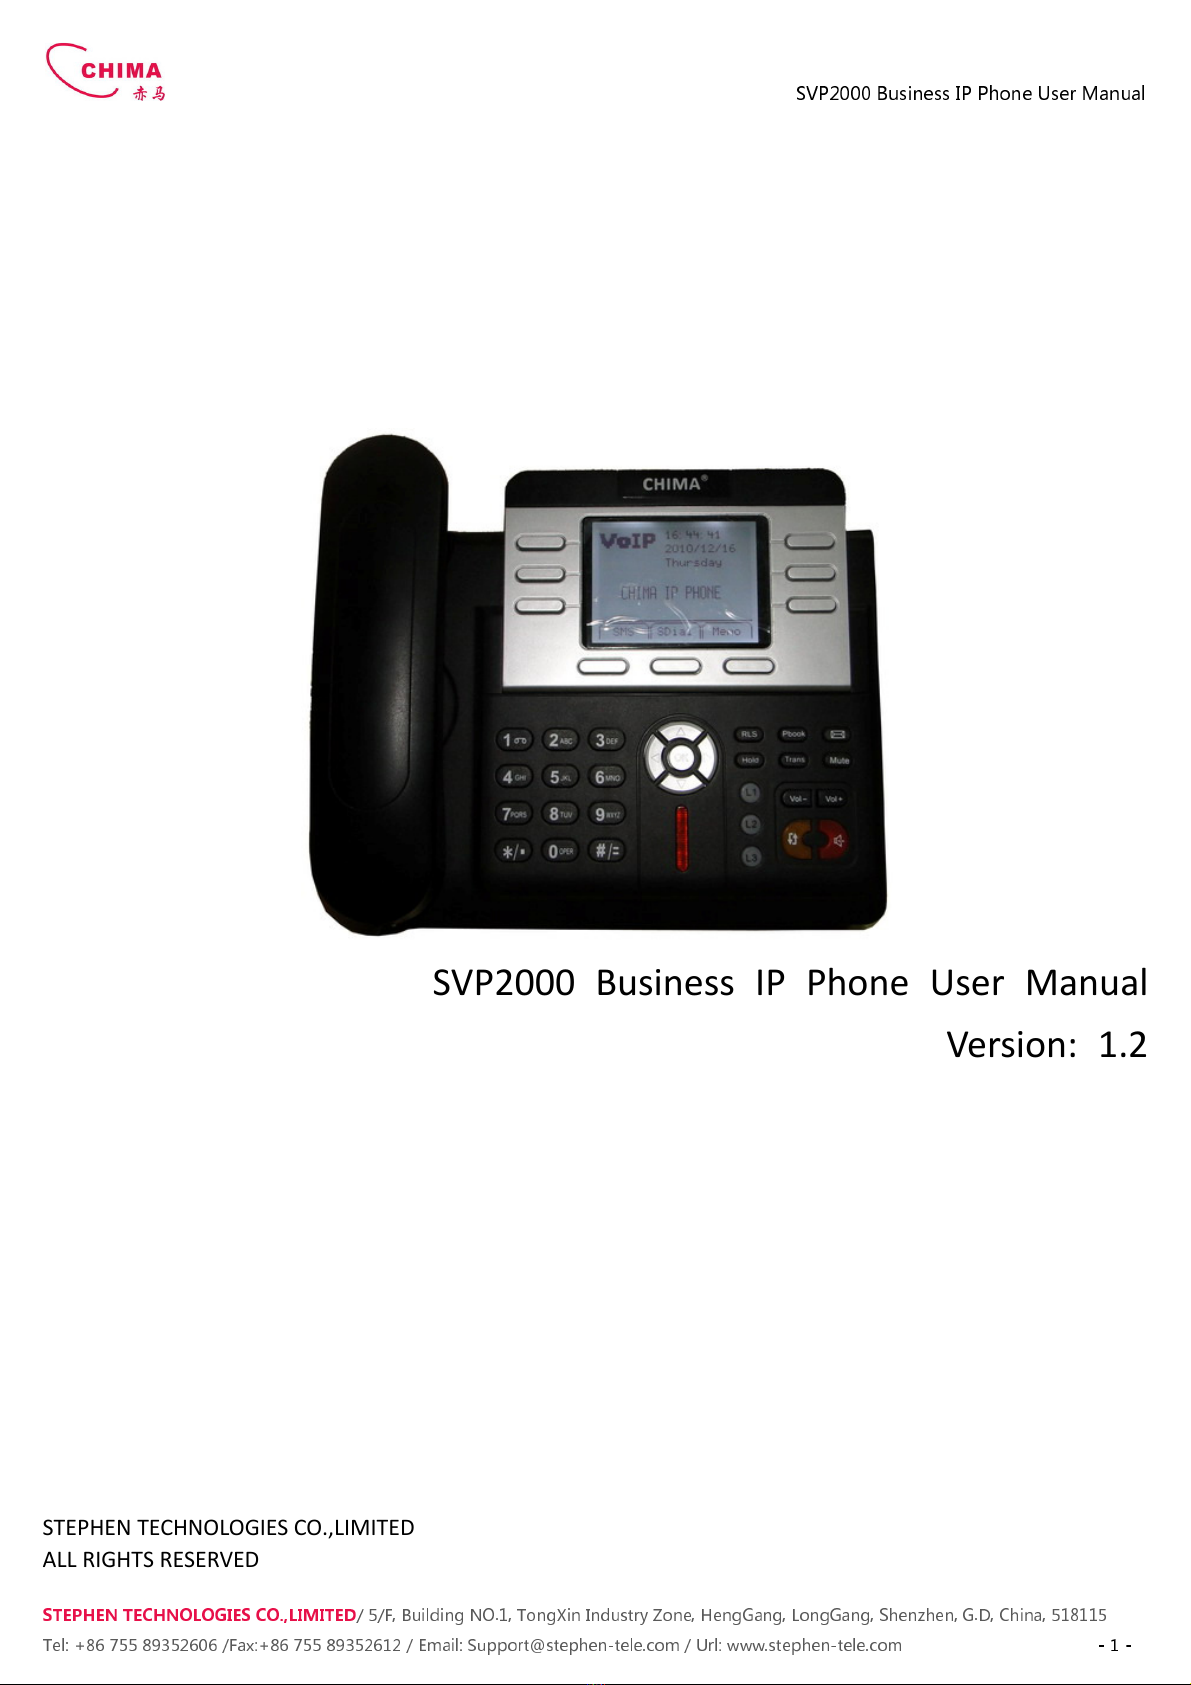
SVP2000 Business IP Phone User Manual
Version: 1.2
STEPHEN TECHNOLOGIES CO. LIMITED
ALL RIGHTS RESERVED

STEPHEN TECHNOLOGIES CO.,LIMITED
/ 5/F, Building NO.1, TongXin Industry Zone, HengGang, LongGang, S enz en, G.D, C ina, 518115
Tel: +86 755 89352606
/Fax:+86 755 89352612 / Email:
Safety Notices
Please read the following safety
notices before installing or using this phone. They are crucial for the safe and reliable
operation of the device.
Please use the external power supply that is included in the package. Other power supplies may cause damage to the
phone affect the behavi
or or induce noise.
Before using the external power supply in the package please check with home power voltage. Inaccurate power
voltage may cause fire and damage.
Please do not damage the power cord. If power cord or plug is impaired do not use it i
shock.
The plug-
socket combination must be accessible at all times because it serves as the main disconnecting device.
Do not drop knock or shake it. Rough handling can break internal circuit boards.
Do not install the devi
ce in places where there is direct sunlight. Also do not put the device on carpets or cushions. It
may cause fire or breakdown.
Avoid exposure the phone to high temperature below 0
Do not attempt to open it. Non-
expert handling of the device could damage it. Consult your authorized dealer for help
or else it may cause fire electric shock and breakdown.
Do not use harsh chemicals cleaning solvents or strong detergents to clean it. Wipe it wit
slightly dampened in a mild soap and water solution.
When lightning do not touch power plug or phone line it may cause an electric shock.
Do not install this phone in an ill-
ventilated place.
You are in a situation that
could cause bodily injury. Before you work on any equipment be aware of the hazards
involved with electrical circuitry and be familiar with standard practices for preventing accidents.
SV
P2000 Business IP Phone User Manual
/ 5/F, Building NO.1, TongXin Industry Zone, HengGang, LongGang, S enz en, G.D, C ina, 518115
/Fax:+86 755 89352612 / Email:
Support@step en-tele.com / Url: www.step en-
tele.com
notices before installing or using this phone. They are crucial for the safe and reliable
Please use the external power supply that is included in the package. Other power supplies may cause damage to the
or or induce noise.
Before using the external power supply in the package please check with home power voltage. Inaccurate power
Please do not damage the power cord. If power cord or plug is impaired do not use it i
socket combination must be accessible at all times because it serves as the main disconnecting device.
Do not drop knock or shake it. Rough handling can break internal circuit boards.
ce in places where there is direct sunlight. Also do not put the device on carpets or cushions. It
Avoid exposure the phone to high temperature below 0
℃
or high humidity. Avoid wetting the unit with any liquid.
expert handling of the device could damage it. Consult your authorized dealer for help
or else it may cause fire electric shock and breakdown.
Do not use harsh chemicals cleaning solvents or strong detergents to clean it. Wipe it wit
slightly dampened in a mild soap and water solution.
When lightning do not touch power plug or phone line it may cause an electric shock.
ventilated place.
could cause bodily injury. Before you work on any equipment be aware of the hazards
involved with electrical circuitry and be familiar with standard practices for preventing accidents.
P2000 Business IP Phone User Manual
/ 5/F, Building NO.1, TongXin Industry Zone, HengGang, LongGang, S enz en, G.D, C ina, 518115
tele.com
- 2 -
notices before installing or using this phone. They are crucial for the safe and reliable
Please use the external power supply that is included in the package. Other power supplies may cause damage to the
Before using the external power supply in the package please check with home power voltage. Inaccurate power
Please do not damage the power cord. If power cord or plug is impaired do not use it i
t may cause fire or electric
socket combination must be accessible at all times because it serves as the main disconnecting device.
ce in places where there is direct sunlight. Also do not put the device on carpets or cushions. It
or high humidity. Avoid wetting the unit with any liquid.
expert handling of the device could damage it. Consult your authorized dealer for help
Do not use harsh chemicals cleaning solvents or strong detergents to clean it. Wipe it wit
h a soft cloth that has been
could cause bodily injury. Before you work on any equipment be aware of the hazards
involved with electrical circuitry and be familiar with standard practices for preventing accidents.

SVP2000 Business IP Phone User Manual
STEPHEN TECHNOLOGIES CO.,LIMITED
/ 5/F, Building NO.1, TongXin Industry Zone, HengGang, LongGang, S enz en, G.D, C ina, 518115
Tel: +86 755 89352606 /Fax:+86 755 89352612 / Email: Support@step en-tele.com / Url: www.step en-tele.com
- 3 -
Table of Content
1.INTRODUCING SVP2000 VOIP PHONE ............................................................................
1.1.
T
HANK YOU FOR YOUR PURCHASING
SVP2000 ........................................................................ 5
1.2.
D
ELIVERY
C
ONTENT
.............................................................................................................. 5
1.3.
K
EYPAD
.............................................................................................................................. 5
1.4.
P
ORT FOR CONNECTING
........................................................................................................ 6
2. INITIAL CONNECTING AND SETTING .............................................................................. 7
2.1.
CONNECT THE PHONE
............................................................................................................ 7
2.1.1. Connect to network ................................................................................................. 7
2.1.2. Power adaptor connection ...................................................................................... 8
2.2.
B
ASIC
I
NITIALIZATION
........................................................................................................... 8
2.2.1. Network settings ...................................................................................................... 8
3. SVP2000’S BASIC OPERATION ....................................................................................... 9
3.1.
A
NSWER CALLS
.................................................................................................................... 9
3.2.
P
LACE CALLS
......................................................................................................................10
3.3.
E
ND CALLS
........................................................................................................................11
3.4.
C
ALL TRANSFER
..................................................................................................................11
3. .
C
ALL HOLD
........................................................................................................................12
3.6.
3-
WAY CONFERENCE CALL
...................................................................................................12
3.7.
S
WITCHBOARD
O
PERATOR FEATURE
.....................................................................................12
3.8.
C
ALL RECORDS
...................................................................................................................12
4. WEB CONFIGURATION................................................................................................ 12
4.1.
I
NTRODUCTION OF CONFIGURATION
.....................................................................................12
4.1.1. Ways to configure ..................................................................................................12
4.1.2. Password Configuration .........................................................................................13
4.2.
S
ETTING VIA WEB BROWSER
................................................................................................13
4.3.
C
ONFIGURATION VIA
WEB .................................................................................................13
4.3.1. BASIC ......................................................................................................................13
4.3.1.1. Status ...............................................................................................................13
4.3.1.2. Wizard .............................................................................................................14
4.3.1.3. Call Log.............................................................................................................16
4.3.1.4. MMI SET ..........................................................................................................16
4.3.2. Network ..................................................................................................................17
4.3.2.1. WAN Config .....................................................................................................17
4.3.2.2. LAN Config .......................................................................................................18
4.3.2.3. Qos Config .......................................................................................................19
4.3.2.4. Service Port .....................................................................................................21
4.3.2. . DHCP SERVER ..................................................................................................21
4.3.2.6. SNTP .................................................................................................................23
4.3.3. VOIP ........................................................................................................................24
4.3.3.1. SIP Config .........................................................................................................24
4.3.3.2. IAX2 Config ......................................................................................................26

SVP2000 Business IP Phone User Manual
STEPHEN TECHNOLOGIES CO.,LIMITED
/ 5/F, Building NO.1, TongXin Industry Zone, HengGang, LongGang, S enz en, G.D, C ina, 518115
Tel: +86 755 89352606 /Fax:+86 755 89352612 / Email: Support@step en-tele.com / Url: www.step en-tele.com
- 4 -
4.3.3.3. Stun Config ......................................................................................................27
4.3.3.4. DIAL PEER setting ............................................................................................28
4.3.4. Phone ......................................................................................................................32
4.3.4.1. DSP Config .......................................................................................................32
4.3.4.2. Call Service ......................................................................................................33
4.3.4.3. Digital Map Configuration ..............................................................................34
4.3.4.4. Phone Book .....................................................................................................35
4.3.4. . Function Key ....................................................................................................36
4.3. . Maintenance ..........................................................................................................38
4.3. .1. Auto Provision .................................................................................................38
4.3. .2. Syslog Config ...................................................................................................38
4.3. .3. Config Setting ..................................................................................................39
4.3. .4. Update .............................................................................................................40
4.3. . . Account Config ................................................................................................40
4.3. .6. Reboot .............................................................................................................41
4.3.6. Security ...................................................................................................................42
4.3.6.1. MMI Filter ........................................................................................................42
4.3.6.2. Firewall ............................................................................................................42
4.3.6.3. NAT Config .......................................................................................................44
4.3.6.4. VPN Config .......................................................................................................46
4.3.7. Logout .....................................................................................................................48
.
C
ONFIGURATION VIA
K
EYPAD
......................................................................................... 48
.1. Keypad introduction .................................................................................................48
.2. Menu Tree .................................................................................................................48
6. APPENDIX .................................................................................................................. 49
6.1.
S
PECIFICATION
..................................................................................................................49
6.1.1. Hardware ................................................................................................................49
6.1.2. Voice features ........................................................................................................49
6.1.3. Network features ...................................................................................................50
6.1.4. Maintenance and management ............................................................................50
6.1. . Special features ......................................................................................................51
6.2.
D
IGIT
-
CHARACTER MAP TABLE
.............................................................................................51
7.COPYRIGHT NOTICE..................................................................................................... 0
SVP2000 Business IP Phone User Manual
STEPHEN TECHNOLOGIES CO.,LIMITED
/ 5/F, Building NO.1, TongXin Industry Zone, HengGang, LongGang, S enz en, G.D, C ina, 518115
Tel: +86 755 89352606 /Fax:+86 755 89352612 / Email: Support@step en-tele.com / Url: www.step en-tele.com
- 5 -
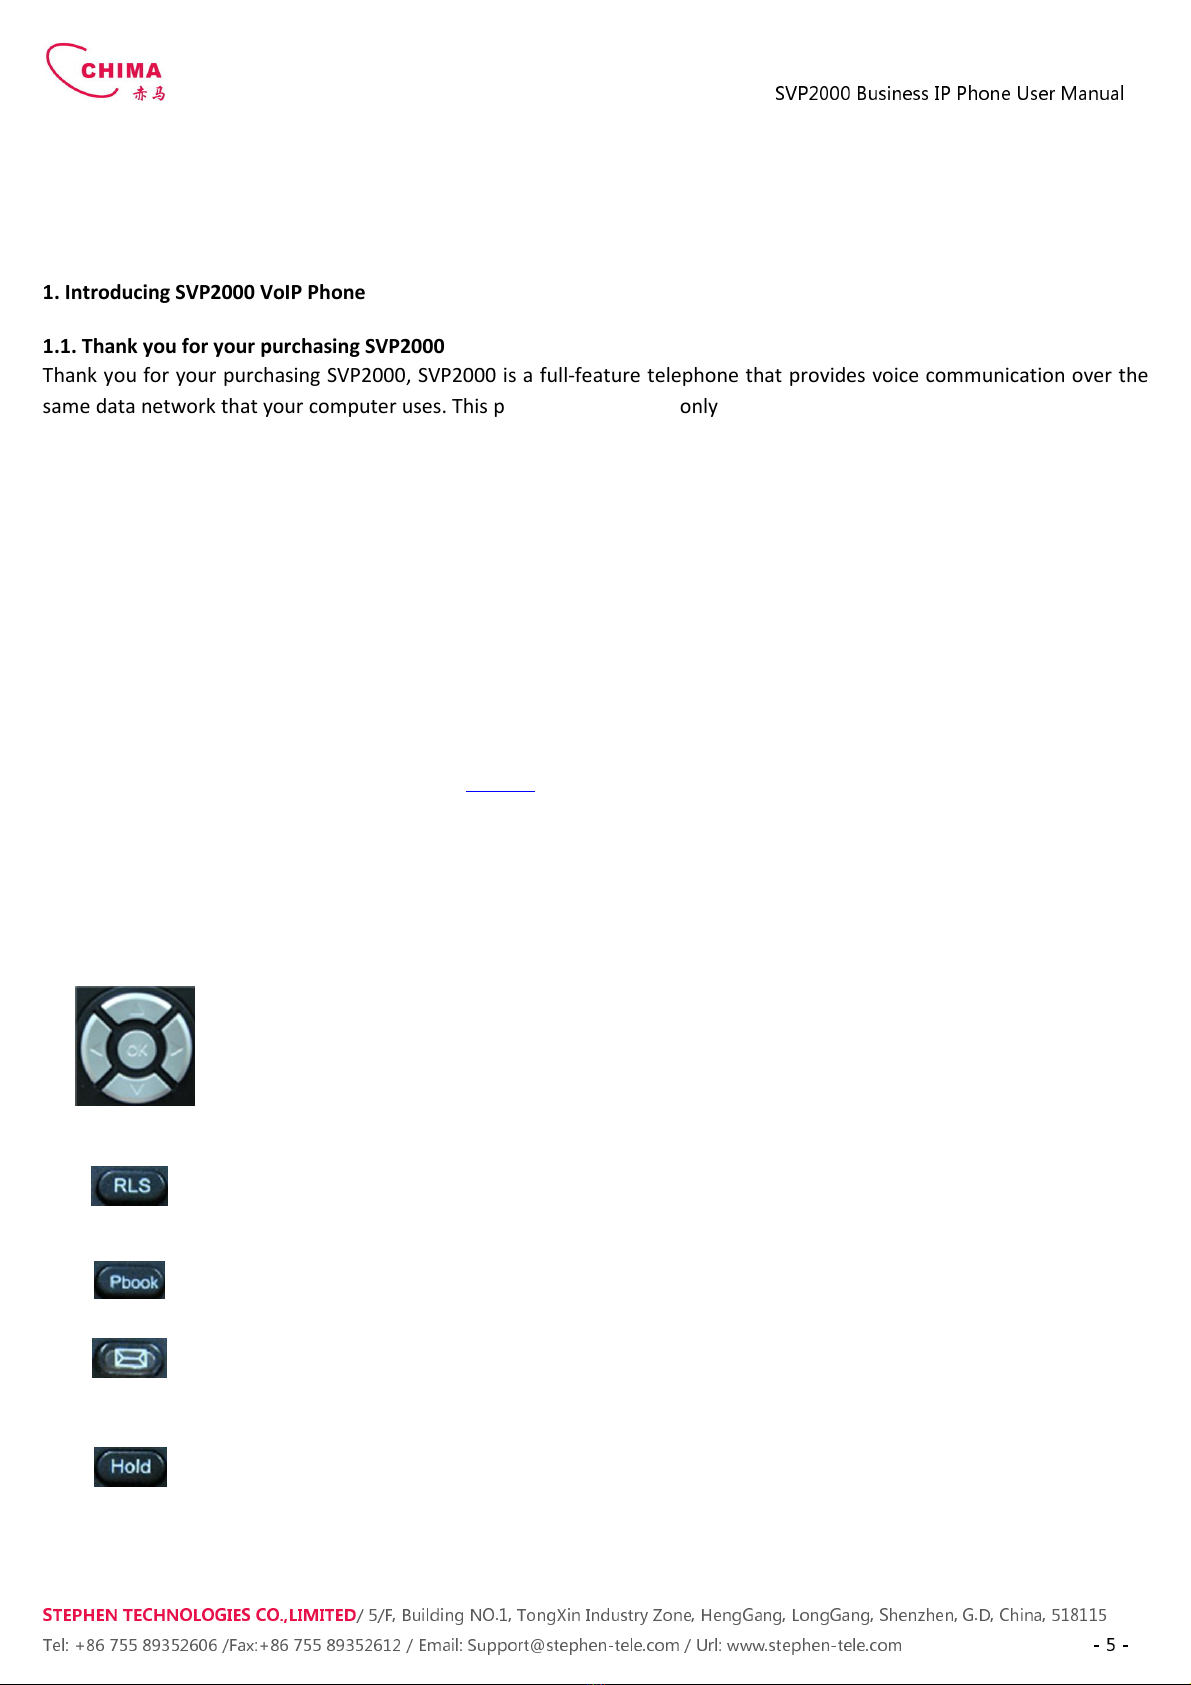
1. Introducing SVP2000 VoIP Phone
1.1. Thank you for your purchasing SVP2000
Thank you for your purchasing SVP2000 SVP2000 is a full-feature telephone that provides voice communication over the
same data network that your computer uses. This phone functions not only much like a traditional phone allowing to place
and receive calls and enjoy other features that traditional phone has but also it own many data services features which
you could not expect from a traditional telephone.
This guide will help you easily use the various features and services available on your phone.
1.2. Delivery Content
Please check whether the delivery contains the following parts:
The base unit with display and keypad
The handset
The handset cable
The power supply
The Ethernet cable
The User Manual (you may download from our website)
IP Phone are designed to look like conventional phones the following photo shows a broad overview of the IP Phone.
1.3. Keypad
Key Key name Function Description
Navigation
Navigation key assist users for operating...
In idle state they have special function
Left: Checking Incoming call
Up: Checking Missed Call
Right: Checking line status
Down: Checking IP info
OK: Enter into the phone's menu
Release key
Press RLS the phone will skip to stand-by mode.
Note: DO NOT Press RLS during the configuration process or else phone will not
save the configuration modified and return to stand-by status.
Phone Book
Access to phone book check the record list and add new records and revise the
record. When check the phone book record press this key again will return to idle
mode.
Envelope LED inside if blinks remind user have new voicemail.
Hold
Temporarily hold the active call during the talking; press the key again might
release the call. (Please refer to 3.5. - call hold for more details). In idle mode
press this key LCD will show “Do Not Disturb” and this phone is set to be No
disturbing mode. Press this key again to cancel this function.
Transfer Use the key to realize blind transfer or attended transfer please refers to 3.4.-call
transfer for more details). In the idle mode press this key LCD will show”call

STEPHEN TECHNOLOGIES CO.,LIMITED
/ 5/F, Building NO.1, TongXin Industry Zone, HengGang, LongGang, S enz en, G.D, C ina, 518115
Tel: +86 755 89352606
/Fax:+86 755 89352612 / Email:
forward”. After this indication
no. of SIP1 or SIP2. Press Soft2(ON) to enabled call forward function and set it to
always mode; Press Soft1(OFF) to close the function of forward
mute
Press this key in calling mode you can hear the oth
not hear you
Line1/2/3
Here is Three SIP lines user could select any one to make the call if it has been
registered
Volume -/+
Turn down or turn up the volume by pressing these two keys
Redial
1 In the hook off /hands
2 In stand
Hands-free
Make the phone into hands
Indicator light
If the light blinking indicate the
Memory key
(1-6)
Users could store their commonly used number in these keys and call for them as
speed dial.
Soft key 1/2/3
Keys combination include functions such as SMS / SDial /Memo /Answer /Conf
/enter /save / quit /edit
1.4. Port for connecting
Port
Port name
Power switch
WAN
LAN
SV
P2000 Business IP Phone User Manual
/ 5/F, Building NO.1, TongXin Industry Zone, HengGang, LongGang, S enz en, G.D, C ina, 518115
/Fax:+86 755 89352612 / Email:
Support@step en-tele.com / Url: www.step en-
tele.com
forward”. After this indication
disappears User can configure the forward phone
no. of SIP1 or SIP2. Press Soft2(ON) to enabled call forward function and set it to
always mode; Press Soft1(OFF) to close the function of forward
Press this key in calling mode you can hear the oth
not hear you
Here is Three SIP lines user could select any one to make the call if it has been
registered
Turn down or turn up the volume by pressing these two keys
1 In the hook off /hands
-
free mode use the key to dial the last call number;
2 In stand
-
by mode it has a function to check the OUTGOING CALL
Make the phone into hands
-free mode.
If the light blinking indicate the
phone has missed call
Users could store their commonly used number in these keys and call for them as
speed dial.
Keys combination include functions such as SMS / SDial /Memo /Answer /Conf
/enter /save / quit /edit
/redial / and so on.
Port name
description
Power switch
Input: 5V AC 1A
WAN
10/100M Connect it to Network
10/100M Connect it to PC
P2000 Business IP Phone User Manual
/ 5/F, Building NO.1, TongXin Industry Zone, HengGang, LongGang, S enz en, G.D, C ina, 518115
tele.com
- 6 -
disappears User can configure the forward phone
no. of SIP1 or SIP2. Press Soft2(ON) to enabled call forward function and set it to
always mode; Press Soft1(OFF) to close the function of forward
Press this key in calling mode you can hear the oth
er side and the other side can
Here is Three SIP lines user could select any one to make the call if it has been
Turn down or turn up the volume by pressing these two keys
free mode use the key to dial the last call number;
by mode it has a function to check the OUTGOING CALL
phone has missed call
Users could store their commonly used number in these keys and call for them as
Keys combination include functions such as SMS / SDial /Memo /Answer /Conf
description

STEPHEN TECHNOLOGIES CO.,LIMITED
/ 5/F, Building NO.1, TongXin Industry Zone, HengGang, LongGang, S enz en, G.D, C ina, 518115
Tel: +86 755 89352606
/Fax:+86 755 89352612 / Email:
Handset
Headset
Headset
SVP2000
provide two Ethernet ports and a power adaptor. Also has two headset interfaces with RJ
Please refer to safety notes of this manual carefully before power adaptor is connected.
2. Initial connecting and Setting
2.1. Connect the phone
2.1.1. Connect to network
Step 1:
Connect the IP Phone to the corporate IP telephony network. Before you connect the phone to the network please
check if your network can work normally.
You can do this in one of two ways depending on how your workspace is set up.
Direct network connection—
by this method you need at least one available Ethernet port in your workspace. Use the
Ethernet cable in the package to connect WAN port on the
Since this VoIP Phone has router functionality whether you have a broadband router or not you can make direct network
connect. The following two figures are for your reference.
Shared network connection—
Use this method if you have a single Ethernet port in your workspace with your desktop
computer already connected to it. First disconnect the Ethernet cable from the computer and attach it to the WAN port on
the back of your phone. Next use
the Ethernet cable in the package to connect LAN port on the back of your phone to your
desktop computer. Your IP Phone now shares a network connection with your computer. The following figure is for your
reference.
Step 2: Connect the handset to the h
andset port by the handset cable in the package.
Step 3:
connect the power supply plug to the AC 5V adapter port on the back of the phone. Use the power cable to
SV
P2000 Business IP Phone User Manual
/ 5/F, Building NO.1, TongXin Industry Zone, HengGang, LongGang, S enz en, G.D, C ina, 518115
/Fax:+86 755 89352612 / Email:
Support@step en-tele.com / Url: www.step en-
tele.com
Handset
Port type: RJ-9 connector
Headset
Port type: RJ-9 connector
Headset
Port type: 3.5mm jack
provide two Ethernet ports and a power adaptor. Also has two headset interfaces with RJ
Please refer to safety notes of this manual carefully before power adaptor is connected.
Connect the IP Phone to the corporate IP telephony network. Before you connect the phone to the network please
You can do this in one of two ways depending on how your workspace is set up.
by this method you need at least one available Ethernet port in your workspace. Use the
Ethernet cable in the package to connect WAN port on the
back of your phone to the Ethernet port in your workspace.
Since this VoIP Phone has router functionality whether you have a broadband router or not you can make direct network
connect. The following two figures are for your reference.
Use this method if you have a single Ethernet port in your workspace with your desktop
computer already connected to it. First disconnect the Ethernet cable from the computer and attach it to the WAN port on
the Ethernet cable in the package to connect LAN port on the back of your phone to your
desktop computer. Your IP Phone now shares a network connection with your computer. The following figure is for your
andset port by the handset cable in the package.
connect the power supply plug to the AC 5V adapter port on the back of the phone. Use the power cable to
P2000 Business IP Phone User Manual
/ 5/F, Building NO.1, TongXin Industry Zone, HengGang, LongGang, S enz en, G.D, C ina, 518115
tele.com
- 7 -
provide two Ethernet ports and a power adaptor. Also has two headset interfaces with RJ
-9 port and 3.5mm jack.
Connect the IP Phone to the corporate IP telephony network. Before you connect the phone to the network please
by this method you need at least one available Ethernet port in your workspace. Use the
back of your phone to the Ethernet port in your workspace.
Since this VoIP Phone has router functionality whether you have a broadband router or not you can make direct network
Use this method if you have a single Ethernet port in your workspace with your desktop
computer already connected to it. First disconnect the Ethernet cable from the computer and attach it to the WAN port on
the Ethernet cable in the package to connect LAN port on the back of your phone to your
desktop computer. Your IP Phone now shares a network connection with your computer. The following figure is for your
connect the power supply plug to the AC 5V adapter port on the back of the phone. Use the power cable to

STEPHEN TECHNOLOGIES CO.,LIMITED
/ 5/F, Building NO.1, TongXin Industry Zone, HengGang, LongGang, S enz en, G.D, C ina, 518115
Tel: +86 755 89352606
/Fax:+86 755 89352612 / Email:
connect the power supply to a standard power outlet in your workspace.
Step 4:
push the on/off switch on the back of the phone to the on side then the phone’s LCD screen displays “Initializing
wait logon”. Later a ready screen typically displays the date time.
If your LCD screen displays different information from the above yo
your network online mode.
If your VoIP phone registers into corporate IP telephony Server your phone is ready to use.
2.1.2. Power adaptor connection
Make sure that the power you use is comply wit
1. Plug power adaptor to power socket.
2.
Plug power adaptor’s AC output to the AC5V port of
3.
There will be displayed black line and “initializing... wait logon...” on the screen. After finishing startup p
greeting current date and time and so forth.
4.
If phone has registered to the server you can place or answer calls.
2.2. Basic Initialization
SVP2000
is provided with a plenty of functions and parameters for configuration. User needs some network and VoIP
knowledge so that user could understand the meanings of parameters. In order to make user use the phone more easily
and convenient there are basic c
onfigurations introduced which is mandatory to ensure phone calls.
2.2.1. Network settings
Make sure that network is connected already before setting network of phone.
configurations so phone could access to network as long
phone has to be changed WAN network setting to Static IP or PPPoE.
Note:
during setting network parameter in menu Please don’t press the
conf
iguration and will return to standby interface.
Setting PPPoE mode (for ADSL connection)
1. Get PPPoE account and password first.
2. Press and press
twice screen will show “
will display “WAN”.
3. Press Soft2 (Enter) then press
choose
4. Press Soft1 (Edit) the screen will display “
(Del) to delete it then input your PPPoE account and press Soft2 (Save). W
password settings
5. Press Soft2 (Edit) again then input your PPPoE password and press Soft2 (OK) With “Saved” displayed screen will
display the current password: ****** and
confirm
save the Account and password.
6. Press Soft3 (Quit) once return to “
Net Mode
the current net mode.
SV
P2000 Business IP Phone User Manual
/ 5/F, Building NO.1, TongXin Industry Zone, HengGang, LongGang, S enz en, G.D, C ina, 518115
/Fax:+86 755 89352612 / Email:
Support@step en-tele.com / Url: www.step en-
tele.com
connect the power supply to a standard power outlet in your workspace.
push the on/off switch on the back of the phone to the on side then the phone’s LCD screen displays “Initializing
wait logon”. Later a ready screen typically displays the date time.
If your LCD screen displays different information from the above yo
u need refer to the next section “Initial setting” to set
If your VoIP phone registers into corporate IP telephony Server your phone is ready to use.
Make sure that the power you use is comply wit
h the parameters of power adaptor.
Plug power adaptor’s AC output to the AC5V port of
SVP2000 to start up.
There will be displayed black line and “initializing... wait logon...” on the screen. After finishing startup p
greeting current date and time and so forth.
If phone has registered to the server you can place or answer calls.
is provided with a plenty of functions and parameters for configuration. User needs some network and VoIP
knowledge so that user could understand the meanings of parameters. In order to make user use the phone more easily
onfigurations introduced which is mandatory to ensure phone calls.
Make sure that network is connected already before setting network of phone.
SVP2000
uses DHCP to get WAN IP
configurations so phone could access to network as long
as there is DHCP server in it. If there is no DHCP server available
phone has to be changed WAN network setting to Static IP or PPPoE.
during setting network parameter in menu Please don’t press the
key or else the phone will not save the
iguration and will return to standby interface.
twice screen will show “
Network
”. Then press Soft2 (Enter) or "OK" the LCD screen
choose
PPPoE.
4. Press Soft1 (Edit) the screen will display “
Account
”. The screen will show the current account information. Press Soft1
(Del) to delete it then input your PPPoE account and press Soft2 (Save). W
ith “saved” displayed screen will jump to
5. Press Soft2 (Edit) again then input your PPPoE password and press Soft2 (OK) With “Saved” displayed screen will
confirm
: you need input the passwo
rd again after confirm press soft2 (OK) to
Net Mode
”. Press Soft2 (Save) the screen will show “Saved” and then jump to show
P2000 Business IP Phone User Manual
/ 5/F, Building NO.1, TongXin Industry Zone, HengGang, LongGang, S enz en, G.D, C ina, 518115
tele.com
- 8 -
push the on/off switch on the back of the phone to the on side then the phone’s LCD screen displays “Initializing
u need refer to the next section “Initial setting” to set
There will be displayed black line and “initializing... wait logon...” on the screen. After finishing startup p
hone will show
is provided with a plenty of functions and parameters for configuration. User needs some network and VoIP
knowledge so that user could understand the meanings of parameters. In order to make user use the phone more easily
onfigurations introduced which is mandatory to ensure phone calls.
uses DHCP to get WAN IP
as there is DHCP server in it. If there is no DHCP server available
key or else the phone will not save the
”. Then press Soft2 (Enter) or "OK" the LCD screen
”. The screen will show the current account information. Press Soft1
ith “saved” displayed screen will jump to
5. Press Soft2 (Edit) again then input your PPPoE password and press Soft2 (OK) With “Saved” displayed screen will
rd again after confirm press soft2 (OK) to
”. Press Soft2 (Save) the screen will show “Saved” and then jump to show

STEPHEN TECHNOLOGIES CO.,LIMITED
/ 5/F, Building NO.1, TongXin Industry Zone, HengGang, LongGang, S enz en, G.D, C ina, 518115
Tel: +86 755 89352606
/Fax:+86 755 89352612 / Email:
7. Press or
Soft3 (Quit) thrice return to standby at this time the phone is trying to change to PPPoE mode. Press
for checking the status. If the screen shows “
PPPoE Server; if it shows an IP addres
s then the phone has already get IP with PPPoE.
Setting Static IP mode (static ADSL/Cable, or no PPPoE / DHCP network)
1. Prepare the network’s parameters first such as IP Address Net mask Default Gateway and DNS server IP address. If you
don’t know
this information please contact the service provider or technician of network.
2. Press then press
twice chooses “
3. Press "OK" or Soft2 (Enter) then choose “
4. Press Soft1Edit) and screen will show “IP
” then press Soft1 (Del) to delete. Input your IP address and press Soft2 (Save)
to save what you input. After “Saved
” shown the screen will jump to show the
5. Press Soft1 (Del) to delete. Input
your Net mask and press Soft2 (Save). After “
show the Gateway information
6. Press Soft1 (Del) to
delete Input your gateway and press
show the DNS information.
7. Press Soft1 (
Del) to delete. Input your DNS server address and press Soft2 (Save). After “
return to show IP information.
8. Press Soft3 (Quit) once
the screen shows”
shows “Saved
” and then shows the current net mode.
9. Press
or Soft3 (Quit) thrice return to main interface and at this time the phone is trying to change to Static
mode. Press
button the screen shows
just now if the phone could display
the right time it shows that Static IP mode takes effect.
Setting DHCP mode
1. Press then press
twice
“WAN”.
2. Press "OK" or Soft2 (Enter) to show “
Net Mode
jump to show the current net mode.
3. Press or
Soft3 (Quit) thrice back to main interface and at this time phone is trying to change to DHCP mode.
Press until the phone shows “
DHCP
shows that DHCP mode takes effect.
3. SVP2000’s basic operation
3.1. Answer calls
SVP2000
will ring to indicate you when there is call incoming
Answer with hook off
Take handset you can talk directly. You can just hang up to finish talk
SV
P2000 Business IP Phone User Manual
/ 5/F, Building NO.1, TongXin Industry Zone, HengGang, LongGang, S enz en, G.D, C ina, 518115
/Fax:+86 755 89352612 / Email:
Support@step en-tele.com / Url: www.step en-
tele.com
Soft3 (Quit) thrice return to standby at this time the phone is trying to change to PPPoE mode. Press
for checking the status. If the screen shows “
Negotiating…
” it shows that the phone is trying to access to the
s then the phone has already get IP with PPPoE.
Setting Static IP mode (static ADSL/Cable, or no PPPoE / DHCP network)
1. Prepare the network’s parameters first such as IP Address Net mask Default Gateway and DNS server IP address. If you
this information please contact the service provider or technician of network.
twice chooses “
Network
”. Press "OK" or Soft2 (Enter) LCD screen will display “
3. Press "OK" or Soft2 (Enter) then choose “
Static”.
” then press Soft1 (Del) to delete. Input your IP address and press Soft2 (Save)
” shown the screen will jump to show the
Net mask
information.
your Net mask and press Soft2 (Save). After “
Saved
” shown the screen will jump to
delete Input your gateway and press
Soft2 (Save). After “Saved
” shown the screen will jump to
Del) to delete. Input your DNS server address and press Soft2 (Save). After “
Saved
the screen shows”
Net Mode”. the cursor stay at“<>Static
”; with Soft2(Sa
” and then shows the current net mode.
or Soft3 (Quit) thrice return to main interface and at this time the phone is trying to change to Static
button the screen shows
“Static” .the screen shows
the IP address and gateway which were set
the right time it shows that Static IP mode takes effect.
twice
chooses “Network”. Then press "OK" or Soft2 (
Enter) the screen will
Net Mode
”. Select “DHCP”. Press Soft2 (Save) with
“
Soft3 (Quit) thrice back to main interface and at this time phone is trying to change to DHCP mode.
DHCP
”
If the screen shows the IP address and gateway which were set just now it
will ring to indicate you when there is call incoming
below is ways to answer call
:
Take handset you can talk directly. You can just hang up to finish talk
。
P2000 Business IP Phone User Manual
/ 5/F, Building NO.1, TongXin Industry Zone, HengGang, LongGang, S enz en, G.D, C ina, 518115
tele.com
- 9 -
Soft3 (Quit) thrice return to standby at this time the phone is trying to change to PPPoE mode. Press
” it shows that the phone is trying to access to the
1. Prepare the network’s parameters first such as IP Address Net mask Default Gateway and DNS server IP address. If you
this information please contact the service provider or technician of network.
”. Press "OK" or Soft2 (Enter) LCD screen will display “
WAN”.
” then press Soft1 (Del) to delete. Input your IP address and press Soft2 (Save)
information.
” shown the screen will jump to
” shown the screen will jump to
Saved
” shown the screen will
”; with Soft2(Sa
ve) pressed the screen
or Soft3 (Quit) thrice return to main interface and at this time the phone is trying to change to Static
the IP address and gateway which were set
the right time it shows that Static IP mode takes effect.
Enter) the screen will
show
“
saved” shown screen will
Soft3 (Quit) thrice back to main interface and at this time phone is trying to change to DHCP mode.
If the screen shows the IP address and gateway which were set just now it
:

STEPHEN TECHNOLOGIES CO.,LIMITED
/ 5/F, Building NO.1, TongXin Industry Zone, HengGang, LongGang, S enz en, G.D, C ina, 518115
Tel: +86 755 89352606
/Fax:+86 755 89352612 / Email:
Answer with hands-free
Press to begin talking. Press
again to finish talk
Answer with headset
Press to answer the call if
the phone detect headset LED will turn to
change to speaker mode. You may press
Using hands-
free instead of handset during a talk
Press
and hook on the handset when you use handset to speak and want to change to use hand
Press again to finish talk.
Using handset instead of hands-
free during a talk
Hook off the h
andset when you want to use hand
talk.
3.2. Place calls
Using handset
Hook off (screen will show the current using line or you could press key L1
could begin to dial number. After finishing it press # and
hear a ring-back
tone and screen shows the callee’s number it shows that the person you called is ringing. If callee answers
the call you can begin to talk and your phone will keep showing callee’s number and counting time. Just hang up to finish
talk.
Using hands-free
Press
(
screen will show the current
using line or you could press key L1
could begin to dial number. After finishing it press # and
hear a ring
back tone and screen shows the callee’s number it shows that the person you called is ringing. If callee answers
the call you can begin to talk and your phone will keep showing callee’s number and counting time. Press
finish talk.
Using directory
Press in stand-
by mode you will access to phonebook. If there are many persons records stored in the directory
you can use &
to select number or press the first character of the name for searching the person which
you want to contact. Press
to forward
number shown on the screen.
Speed dial
SV
P2000 Business IP Phone User Manual
/ 5/F, Building NO.1, TongXin Industry Zone, HengGang, LongGang, S enz en, G.D, C ina, 518115
/Fax:+86 755 89352612 / Email:
Support@step en-tele.com / Url: www.step en-
tele.com
again to finish talk
the phone detect headset LED will turn to
green when
you press
or Soft3 (Close) to finish the call.
free instead of handset during a talk
and hook on the handset when you use handset to speak and want to change to use hand
free during a talk
andset when you want to use hand
s-
free to speak and want to change to use handset. Just hook on to finish
Hook off (screen will show the current using line or you could press key L1
-
L3 to select) after getting dialing tone you
could begin to dial number. After finishing it press # and
SVP2000
will send the number and call the number. When you
tone and screen shows the callee’s number it shows that the person you called is ringing. If callee answers
the call you can begin to talk and your phone will keep showing callee’s number and counting time. Just hang up to finish
using line or you could press key L1
-
L3 to select) after getting dialing tone you
could begin to dial number. After finishing it press # and
SVP2000
will send the number and call the number. When you
back tone and screen shows the callee’s number it shows that the person you called is ringing. If callee answers
the call you can begin to talk and your phone will keep showing callee’s number and counting time. Press
by mode you will access to phonebook. If there are many persons records stored in the directory
to select number or press the first character of the name for searching the person which
to forward
and press
to backward. Press Soft2 (Dial) to dial the current
P2000 Business IP Phone User Manual
/ 5/F, Building NO.1, TongXin Industry Zone, HengGang, LongGang, S enz en, G.D, C ina, 518115
tele.com
- 10 -
you press
again the phone
and hook on the handset when you use handset to speak and want to change to use hand
s-free to speak.
free to speak and want to change to use handset. Just hook on to finish
L3 to select) after getting dialing tone you
will send the number and call the number. When you
tone and screen shows the callee’s number it shows that the person you called is ringing. If callee answers
the call you can begin to talk and your phone will keep showing callee’s number and counting time. Just hang up to finish
L3 to select) after getting dialing tone you
will send the number and call the number. When you
back tone and screen shows the callee’s number it shows that the person you called is ringing. If callee answers
the call you can begin to talk and your phone will keep showing callee’s number and counting time. Press
again to
by mode you will access to phonebook. If there are many persons records stored in the directory
to select number or press the first character of the name for searching the person which
to backward. Press Soft2 (Dial) to dial the current

SVP2000 Business IP Phone User Manual
STEPHEN TECHNOLOGIES CO.,LIMITED
/ 5/F, Building NO.1, TongXin Industry Zone, HengGang, LongGang, S enz en, G.D, C ina, 518115
Tel: +86 755 89352606 /Fax:+86 755 89352612 / Email: Support@step en-tele.com / Url: www.step en-tele.com
- 11 -
Speed dial means user can make calls directly without hook off or using hands-free. User can dial number in stand-by mode
but first user need to add and edit SDial no. By pressing Soft2 (SDial) to edit and save the number to be a SDial number. In
this way user could make a call only press the number and Soft3 (Dial).
Multi-line calls
SVP2000 supports 3 SIP lines that is user could use 3 SIP accounts to register and make calls. System will use SIP 1 as
default line to call.
There are most two calls at the same time. Screen will display the incoming call number when user is keep talking. You can
press Soft1 (Answer) to accept it and hold the first one (if you want to use this function you need enable Call Waiting of
the phone first). Use Soft1 (Switch) to switch the two calls to talk.
3.3. End calls
Hang up with handset hook on
Hook on to finish talking.
Hang up with hands-free
Press to finish talk when phone is in hands-free status.
Note: user can not finish talk by pressing if phone is used handset to talk.
Hang up a active call with 2 calls
When there are two calls user might use Soft1(Switch)to switch to the call you want to hang up first. Then press Soft3
(Close) to finish talk and phone will switch to the other call automatically.
Note
:
it is no use to press Soft3(Close) to finish talk if there is only one current call.
3.4. Call transfer
Blind Transfer
During talk press or Soft2 (Transf) and then dial the number that you want to transfer to and finished by "#".
Phone will transfer the current call to the third party. After finishing transfer the call you talk to will be hanged up. User
can not select SIP line when phone transfers call.
Attended Transfer
During talk press or Soft2 (Transf) then input the number that you want to transfer to and press Soft2 (Send).
After that third party answers then press to complete the transfer. (You need enable call waiting and call transfer
first). If there are two calls you can just talk to one and keep hold to the other one. The one who is keep hold can not
speak to you or hear from you. In other way if user wants to invite the third party during the call they can press Soft1
(Conf) to make calls mode in conference mode. If user wants to stop conference user can press Soft1 (Split). (User must
enable call waiting and three way call first).
Note: the server that user uses must support RFC3515 or it might not be used
Alert Transfer
During the talk press or Soft2 (Transf) firstly then press Soft2 (Send) after inputting the number that you want to
transfer. You are waiting for connection now press or Soft2 (Transf) and the transfer will be done. (To use this
feature you need enable call waiting and call transfer first)

STEPHEN TECHNOLOGIES CO.,LIMITED
/ 5/F, Building NO.1, TongXin Industry Zone, HengGang, LongGang, S enz en, G.D, C ina, 518115
Tel: +86 755 89352606
/Fax:+86 755 89352612 / Email:
3. . Call hold
During talking user could press
to hold the current call. Press
active.
3.6. 3-way conference call
User can press Soft1 (Conf) to dial the line2 (press
talking with line1. After line2 connect user can press Soft2 (Conf) to enter into conference mode. To back to line1 from
conference please press Soft1 (Split); to end the call please press Soft3 (Close) or
3.7. Switchboard Operator feature
User can press Soft1 (Conf) to dial the
line2 (
talking with line1. After line2 connect user can press Soft1 (Switch) to select which line you prefer to
to input the number you want to transfer and press
3.8. Call records
SVP2000
supports 100 items of missed call 100 items of incoming call and 100 items of dialed call. If the records are full
the newes
t will replace the oldest. If phone’s power cut or reboot call records will be discarded.
Missed call
Press
and screen displays “Missed Call” with the number and time of missed call. User can also use
to browse the missed call records or press Sof
(EDial) again to change the current number. Pressing
number. If there is no missed call screen will show “List Is Empty”
Incoming call
Press
and screen displays “Incoming Call
(Option) to check the details of this record then press Soft2 (EDial) again to change the current number. Pressing Soft2
(Dial) will call this number directly if user don’t modify the number. If there is no incoming call
Empty”.
Dialed call
Press and use &
to browse the dialed call
record then press Soft2 (EDial) again to change the current number. Pressing Soft2 (Dial) will call this number direc
user don’t modify the number. If there is no dialed call screen will show “List Is Empty”.
4. Web configuration
4.1. Introduction of configuration
4.1.1. Ways to configure
SV
P2000 Business IP Phone User Manual
/ 5/F, Building NO.1, TongXin Industry Zone, HengGang, LongGang, S enz en, G.D, C ina, 518115
/Fax:+86 755 89352612 / Email:
Support@step en-tele.com / Url: www.step en-
tele.com
to hold the current call. Press
again to
return
User can press Soft1 (Conf) to dial the line2 (press
Soft1 (
Answer) to answer the call directly if this cal
talking with line1. After line2 connect user can press Soft2 (Conf) to enter into conference mode. To back to line1 from
conference please press Soft1 (Split); to end the call please press Soft3 (Close) or
press
line2 (
press Soft1 (
Answer) to answer the call directly if this call is from line2) during
talking with line1. After line2 connect user can press Soft1 (Switch) to select which line you prefer to
to input the number you want to transfer and press
again to do the transfer.
supports 100 items of missed call 100 items of incoming call and 100 items of dialed call. If the records are full
t will replace the oldest. If phone’s power cut or reboot call records will be discarded.
and screen displays “Missed Call” with the number and time of missed call. User can also use
to browse the missed call records or press Sof
t1 (Option) to check the details of this record then press Soft2
(EDial) again to change the current number. Pressing
Soft2 (
Dial) will call this number directly if user don’t modify the
number. If there is no missed call screen will show “List Is Empty”
.
and screen displays “Incoming Call
” by pressing &
to browse the
(Option) to check the details of this record then press Soft2 (EDial) again to change the current number. Pressing Soft2
(Dial) will call this number directly if user don’t modify the number. If there is no incoming call
to browse the dialed call
records; or
press Soft1 (Option) to check the details of this
record then press Soft2 (EDial) again to change the current number. Pressing Soft2 (Dial) will call this number direc
user don’t modify the number. If there is no dialed call screen will show “List Is Empty”.
P2000 Business IP Phone User Manual
/ 5/F, Building NO.1, TongXin Industry Zone, HengGang, LongGang, S enz en, G.D, C ina, 518115
tele.com
- 12 -
return
the call or switch the call
Answer) to answer the call directly if this cal
l is from line2) during
talking with line1. After line2 connect user can press Soft2 (Conf) to enter into conference mode. To back to line1 from
.
Answer) to answer the call directly if this call is from line2) during
talking with line1. After line2 connect user can press Soft1 (Switch) to select which line you prefer to
transfer then press
again to do the transfer.
supports 100 items of missed call 100 items of incoming call and 100 items of dialed call. If the records are full
t will replace the oldest. If phone’s power cut or reboot call records will be discarded.
and screen displays “Missed Call” with the number and time of missed call. User can also use
&
t1 (Option) to check the details of this record then press Soft2
Dial) will call this number directly if user don’t modify the
to browse the
records; or press Soft1
(Option) to check the details of this record then press Soft2 (EDial) again to change the current number. Pressing Soft2
(Dial) will call this number directly if user don’t modify the number. If there is no incoming call
screen will show “List Is
press Soft1 (Option) to check the details of this
record then press Soft2 (EDial) again to change the current number. Pressing Soft2 (Dial) will call this number direc
tly if

STEPHEN TECHNOLOGIES CO.,LIMITED
/ 5/F, Building NO.1, TongXin Industry Zone, HengGang, LongGang, S enz en, G.D, C ina, 518115
Tel: +86 755 89352606
/Fax:+86 755 89352612 / Email:
SVP2000
has three different ways to different users.
Use phone keypad.
Use web browser
(
recommendatory way
Use telnet with CLI command.
4.1.2. Password Configuration
There are two levels to access to phone
configuration parameters while user with general level can set all configuration parameters except SIP (1
some parameters can not be changed such as server addre
username and password.
Default user with general level
:
username
:
guest
password
:
guest
Default user with root level
:
username
:
admin
password
:
admin
The default password of phone screen menu is
4.2. Setting via web browser
When this phone and PC are connected to network enter the IP address of the wan port in this phone as the URL (e.g.
http://xxx.xxx.xxx.xxx/ or http:
//xxx.xxx.xxx.xxx
If you do not know the IP address you can l
The login page is as below picture
※
:
After you configure the ip phone you need click save button in config under Maintenance in the left catalog to save
your configuration. Otherwise the phone wil
4.3. Configuration via WEB
4.3.1. BASIC
4.3.1.1. Status
SV
P2000 Business IP Phone User Manual
/ 5/F, Building NO.1, TongXin Industry Zone, HengGang, LongGang, S enz en, G.D, C ina, 518115
/Fax:+86 755 89352612 / Email:
Support@step en-tele.com / Url: www.step en-
tele.com
has three different ways to different users.
recommendatory way
).
There are two levels to access to phone
:
root level and general level. User with root level can browse and set all
configuration parameters while user with general level can set all configuration parameters except SIP (1
some parameters can not be changed such as server addre
ss and port. User will has different access level with different
The default password of phone screen menu is
123.
When this phone and PC are connected to network enter the IP address of the wan port in this phone as the URL (e.g.
//xxx.xxx.xxx.xxx
:xxxx/).
If you do not know the IP address you can l
ook it up on the phone’s display by pressing
After you configure the ip phone you need click save button in config under Maintenance in the left catalog to save
your configuration. Otherwise the phone wil
l lose your modification after power off and on.
P2000 Business IP Phone User Manual
/ 5/F, Building NO.1, TongXin Industry Zone, HengGang, LongGang, S enz en, G.D, C ina, 518115
tele.com
- 13 -
root level and general level. User with root level can browse and set all
configuration parameters while user with general level can set all configuration parameters except SIP (1
-2) or IAX2’s that
ss and port. User will has different access level with different
When this phone and PC are connected to network enter the IP address of the wan port in this phone as the URL (e.g.
button.
After you configure the ip phone you need click save button in config under Maintenance in the left catalog to save
l lose your modification after power off and on.

STEPHEN TECHNOLOGIES CO.,LIMITED
/ 5/F, Building NO.1, TongXin Industry Zone, HengGang, LongGang, S enz en, G.D, C ina, 518115
Tel: +86 755 89352606
/Fax:+86 755 89352612 / Email:
Field name
Network
Shows the configuration information on WAN and LAN port including the connect
mode of WAN port (Static
LAN port ON or OFF of DHCP mode of LAN port.
Phone Number
Shows the phone numbers provided by the SIP LINE 1
The last line shows the version number and issued date.
4.3.1.2. Wizard
Field Name
Please select the proper network mode according to the network condition.
settings:
Static:
If your ISP server provides you the static IP address please select this mode then finish Static Mode setting. If
you don’t know about parameters of Static Mode setting please ask your ISP for them.
DHCP:
In this mode you will get the information fro
information artificially.
SV
P2000 Business IP Phone User Manual
/ 5/F, Building NO.1, TongXin Industry Zone, HengGang, LongGang, S enz en, G.D, C ina, 518115
/Fax:+86 755 89352612 / Email:
Support@step en-tele.com / Url: www.step en-
tele.com
Status
Explanation
Shows the configuration information on WAN and LAN port including the connect
mode of WAN port (Static
DHCP PPPoE) MAC address the IP address of WAN port and
LAN port ON or OFF of DHCP mode of LAN port.
Shows the phone numbers provided by the SIP LINE 1
-
3 servers and IAX2.
The last line shows the version number and issued date.
Wizard
Explanation
Please select the proper network mode according to the network condition.
SVP2000
provide three different network
If your ISP server provides you the static IP address please select this mode then finish Static Mode setting. If
you don’t know about parameters of Static Mode setting please ask your ISP for them.
In this mode you will get the information fro
m the DHCP server automatically; need not to input this
P2000 Business IP Phone User Manual
/ 5/F, Building NO.1, TongXin Industry Zone, HengGang, LongGang, S enz en, G.D, C ina, 518115
tele.com
- 14 -
Shows the configuration information on WAN and LAN port including the connect
DHCP PPPoE) MAC address the IP address of WAN port and
3 servers and IAX2.
provide three different network
If your ISP server provides you the static IP address please select this mode then finish Static Mode setting. If
you don’t know about parameters of Static Mode setting please ask your ISP for them.
m the DHCP server automatically; need not to input this

SVP2000 Business IP Phone User Manual
STEPHEN TECHNOLOGIES CO.,LIMITED
/ 5/F, Building NO.1, TongXin Industry Zone, HengGang, LongGang, S enz en, G.D, C ina, 518115
Tel: +86 755 89352606 /Fax:+86 755 89352612 / Email: Support@step en-tele.com / Url: www.step en-tele.com
- 15 -
PPPoE: In this mode your must input your ADSL account and password.
You can also refer to 3.2.1 Network setting to speed setting your network.
Choose Static IP MODE click
【
【【
【
NEXT
】
】】
】
can config the network and SIP(default SIP1)simply also can browse too. Click
【
【【
【
BACK
】
】】
】
can return to the last page.
Static IP Address Input the IP address distributed to you.
Netmask Input the Netmask distributed to you.
Gateway Input the Gateway address distributed to you.
DNS Domain Set DNS domain postfix. When the domain which you input can not be parsed phone will
automatically add this domain to the end of the domain which you input before and parse
it again.
Primary DNS Input your primary DNS server address.
Alter DNS Input your standby DNS server address.
Display Name Set the display name.
Server Address Input your SIP server address.
Server Port Set your SIP server port.
User Name Input your SIP register account name.
Password Input your SIP register password.
Phone Number Input the phone number assigned by your VOIP service provider.
Enable Register Start to register or not by selecting it or not.

STEPHEN TECHNOLOGIES CO.,LIMITED
/ 5/F, Building NO.1, TongXin Industry Zone, HengGang, LongGang, S enz en, G.D, C ina, 518115
Tel: +86 755 89352606
/Fax:+86 755 89352612 / Email:
Display detailed
information that you manual config.
Choose DHCP MODE click
【
【【
【
NEXT
】
】】
】
can config SIP(default SIP1)simply also can browse too. Click
last page. Like Static IP MODE
。
Choose PPPoE MODE click
【
【【
【
NEXT
】
】】
】
can config the PPPoE account/password and SIP(default SIP1)simply also can browse
too. Click
【
【【
【
BACK
】
】】
】
can
return to the last page. Like Static IP MODE
PPPoE Server
It will be provided by ISP.
Username
Input your ADSL account.
Password
Input your ADSL password.
Notice: Click
【
【【
【
Finish
】
】】
】
button after finished your setting IP Phone will save the setting
reboot you can dial by the SIP account.
4.3.1.3. Call Log
You can query all the outgoing through this page.
Field name
Start Time
Display the start time of the outgoing record.
Last Time Display the
conversation time of the outgoing record.
Called Number
Display the account/protocol/line of the outgoing record.
4.3.1.4. MMI SET
Field name
Language Set
Set the language of phone English is default.
SV
P2000 Business IP Phone User Manual
/ 5/F, Building NO.1, TongXin Industry Zone, HengGang, LongGang, S enz en, G.D, C ina, 518115
/Fax:+86 755 89352612 / Email:
Support@step en-tele.com / Url: www.step en-
tele.com
information that you manual config.
can config SIP(default SIP1)simply also can browse too. Click
can config the PPPoE account/password and SIP(default SIP1)simply also can browse
return to the last page. Like Static IP MODE
。
It will be provided by ISP.
Input your ADSL account.
Input your ADSL password.
button after finished your setting IP Phone will save the setting
automatically and reboot After
You can query all the outgoing through this page.
Call Log
explanation
Display the start time of the outgoing record.
conversation time of the outgoing record.
Display the account/protocol/line of the outgoing record.
MMI SET
explanation
Set the language of phone English is default.
P2000 Business IP Phone User Manual
/ 5/F, Building NO.1, TongXin Industry Zone, HengGang, LongGang, S enz en, G.D, C ina, 518115
tele.com
- 16 -
can config SIP(default SIP1)simply also can browse too. Click
【
【【
【
BACK
】
】】
】
can return to the
can config the PPPoE account/password and SIP(default SIP1)simply also can browse
automatically and reboot After
SVP2000 Business IP Phone User Manual
STEPHEN TECHNOLOGIES CO.,LIMITED
/ 5/F, Building NO.1, TongXin Industry Zone, HengGang, LongGang, S enz en, G.D, C ina, 518115
Tel: +86 755 89352606 /Fax:+86 755 89352612 / Email: Support@step en-tele.com / Url: www.step en-tele.com
- 17 -
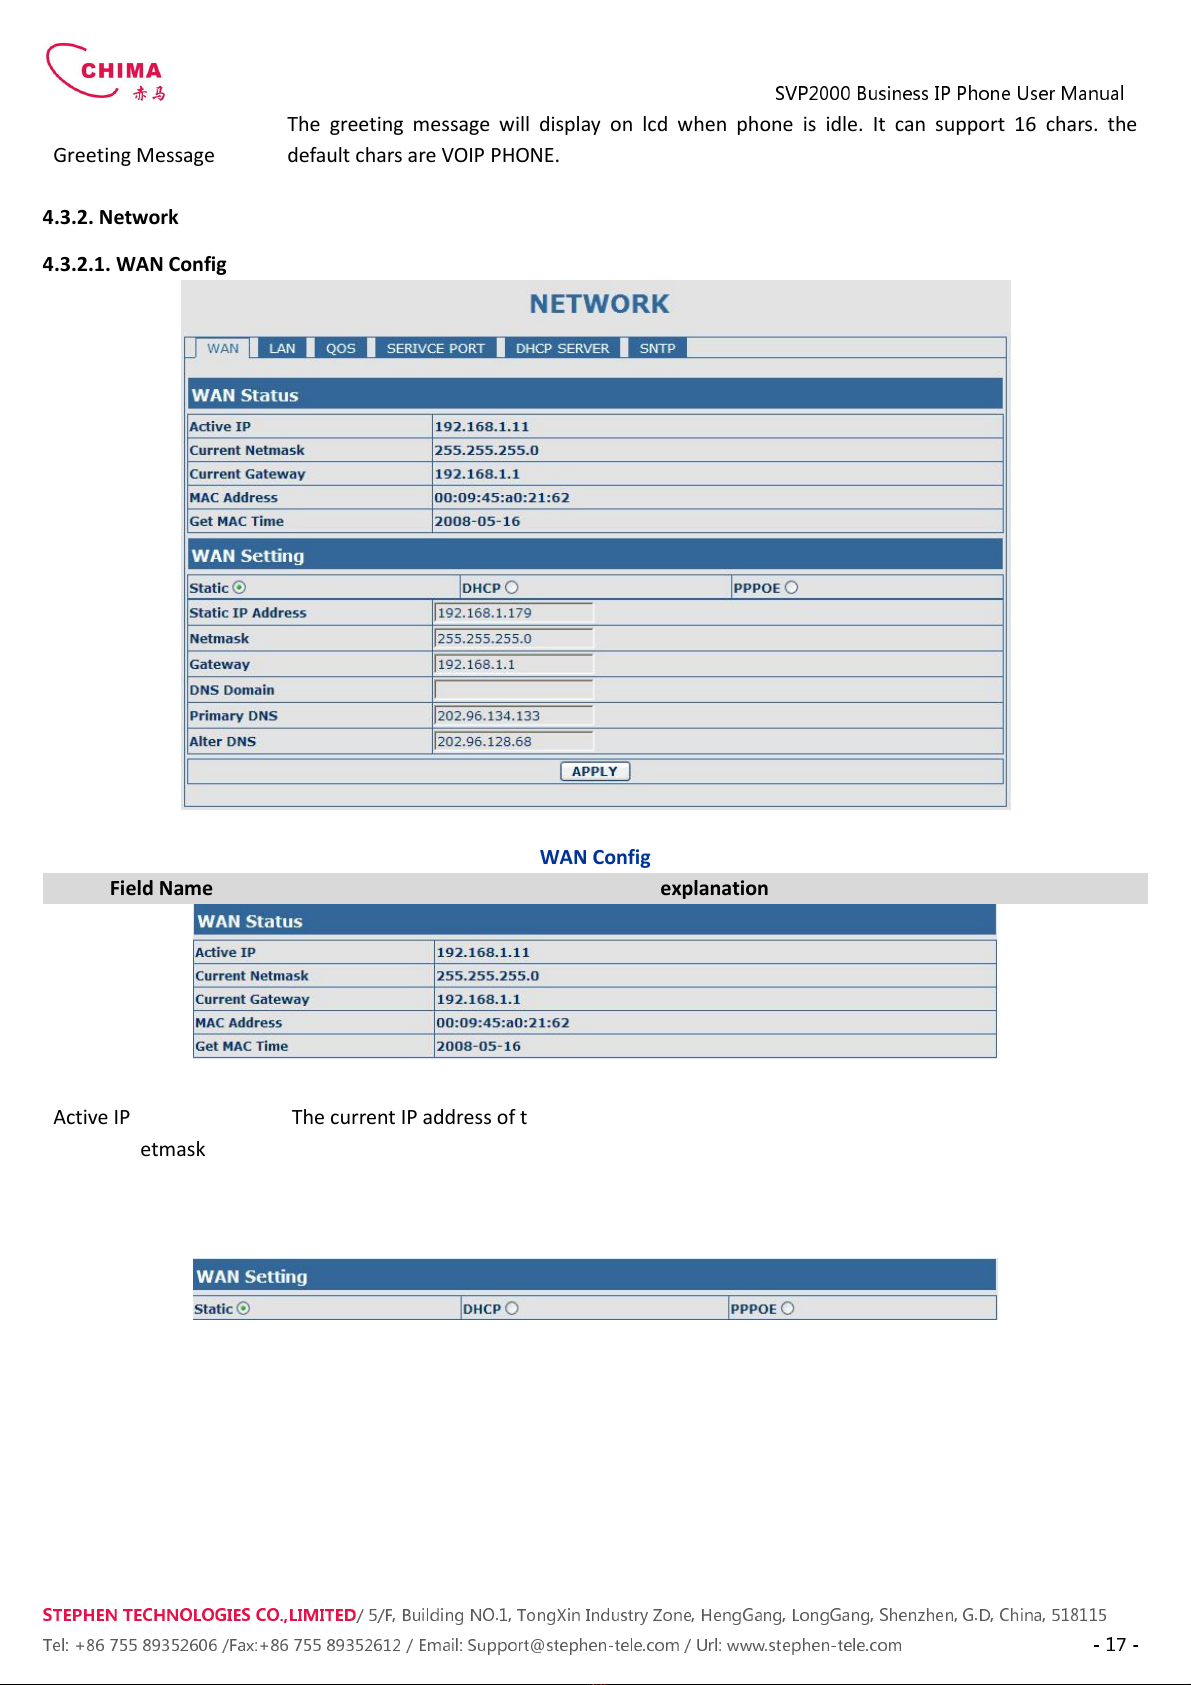
Greeting Message
The greeting message will display on lcd when phone is idle. It can support 16 chars. the
default chars are VOIP PHONE.
4.3.2. Network
4.3.2.1. WAN Config
WAN Config
Field Name explanation
Active IP The current IP address of the phone.
Current Netmask The current Netmask address.
MAC Address The current MAC address of the phone.
Current Gateway The current Gateway IP address.
Get MAC Time Shows the time of getting MAC address
Please select the proper network mode according to the network condition. SVP2000 provide three different network
settings:
Static: If your ISP server provides you the static IP address please select this mode then finish Static Mode setting.
If you don’t know about parameters of Static Mode setting please ask your ISP for them.
DHCP: In this mode you will get the information from the DHCP server automatically; need not to input this
information artificially.
PPPoE: In this mode your must input your ADSL account and password.
You can also refer to 3.2.1 Network setting to speed setting your network.
SVP2000 Business IP Phone User Manual
STEPHEN TECHNOLOGIES CO.,LIMITED
/ 5/F, Building NO.1, TongXin Industry Zone, HengGang, LongGang, S enz en, G.D, C ina, 518115
Tel: +86 755 89352606 /Fax:+86 755 89352612 / Email: Support@step en-tele.com / Url: www.step en-tele.com
- 18 -
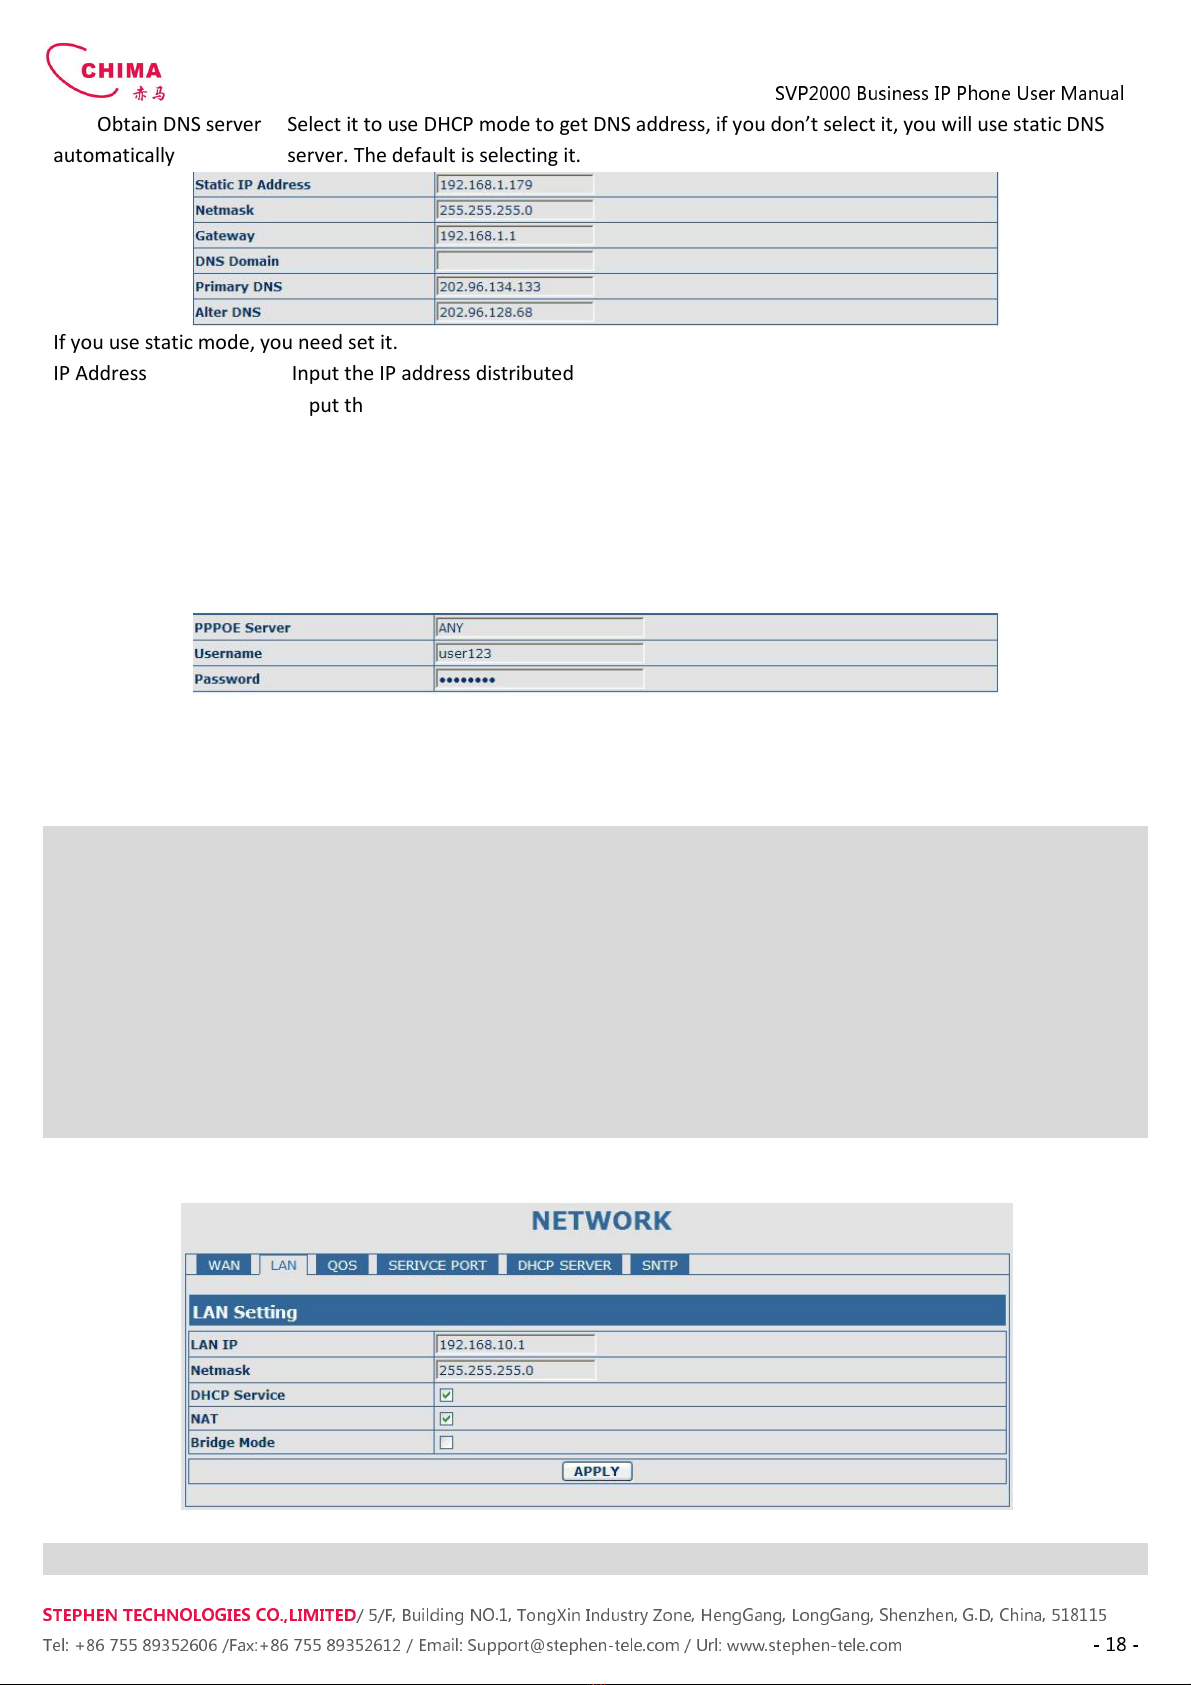
Obtain DNS server
automatically
Select it to use DHCP mode to get DNS address if you don’t select it you will use static DNS
server. The default is selecting it.
If you use static mode you need set it.
IP Address Input the IP address distributed to you.
Netmask Input the Netmask distributed to you.
Gateway Input the Gateway address distributed to you.
DNS Domain
Set DNS domain postfix. When the domain which you input can not be parsed phone will
automatically add this domain to the end of the domain which you input before and parse it
again.
Primary DNS Input your primary DNS server address.
Alter DNS Input your standby DNS server address.
If you uses PPPoE mode you need to make the above setting.
PPPoE Server It will be provided by ISP.
Username Input your ADSL account.
Password Input your ADSL password.
Notice:
1)Click “Apply” button after finished your setting IP Phone will save the setting automatically and new setting will take
effect.
2)If you modify the IP address the web will not response by the old IP address. Your need input new IP address in the
address column to logon in the phone.
3)If networks ID which is DHCP server distributed is same as network ID which is used by LAN of system system will use
the DHCP IP to set WAN and modify LAN’s networks ID(for example system will change LAN IP from 192.168.10.1 to
192.168.11.1) when system uses DHCP client to get IP in startup; if system uses DHCP client to get IP in running status
and network ID is also same as LAN’s system will refuse to accept the IP to configure WAN. So WAN’s active IP will be
0.0.0.0
4.3.2.2. LAN Config
LAN Config
Field name explanation
SVP2000 Business IP Phone User Manual
STEPHEN TECHNOLOGIES CO.,LIMITED
/ 5/F, Building NO.1, TongXin Industry Zone, HengGang, LongGang, S enz en, G.D, C ina, 518115
Tel: +86 755 89352606 /Fax:+86 755 89352612 / Email: Support@step en-tele.com / Url: www.step en-tele.com
- 19 -
LAN IP Specify LAN static IP.
Netmask Specify LAN Netmask.
DHCP Service
Select the DHCP server of LAN port or not. After you modify the LAN IP address phone will
amend and adjust the DHCP Lease Table and save the result amended automatically according
to the IP address and Netmask. You need restart the phone and the DHCP server setting will
take effect.
NAT Select NAT or not.
Bridge Mode
Select Bridge Mode or not: If you select Bridge Mode the phone will no longer set IP address
for LAN physical port LAN and WAN will join in the same network. Click “Apply” the phone will
reboot.
Notice: If you choose the bridge mode the LAN configuration will be disabled.
4.3.2.3. Qos Config
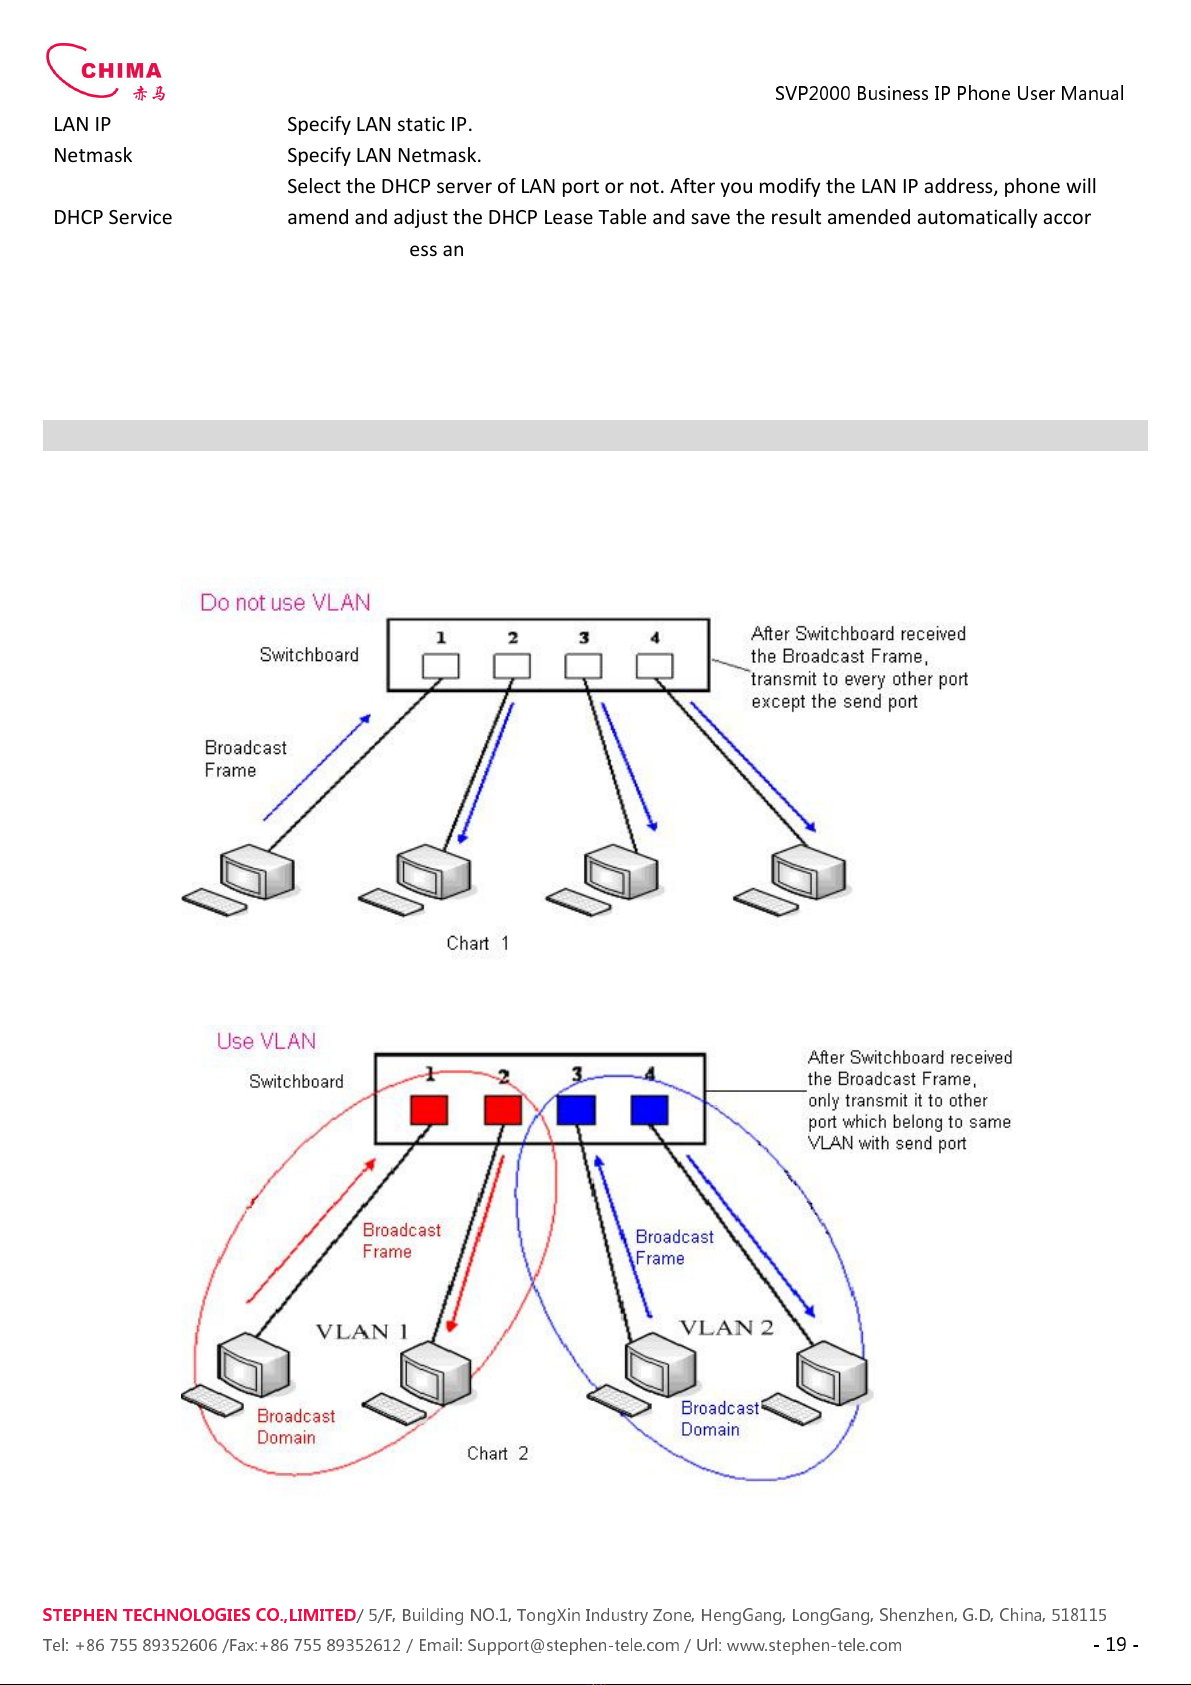
The VOIP phone support 802.1Q/P protocol and DiffServ configuration. VLAN functionality can use different VLAN IDs by
setting signal/voice VLAN and data VLAN. The VLAN application of this phone is very flexible.
In chart 1 there is a layer 2 switch without setting VLAN. Any broadcast frame will be transmitted to the other ports except

SVP2000 Business IP Phone User Manual
STEPHEN TECHNOLOGIES CO.,LIMITED
/ 5/F, Building NO.1, TongXin Industry Zone, HengGang, LongGang, S enz en, G.D, C ina, 518115
Tel: +86 755 89352606 /Fax:+86 755 89352612 / Email: Support@step en-tele.com / Url: www.step en-tele.com
- 20 -
the send port. For example a broadcast information is sent out from port 1 then transmitted to port 2 3and 4.
In chart 2 red and blue indicate two different VLANs in the switch and port 1 and port 2 belong to red VLAN port 3 and
port 4 belong to blue VLAN. If a broadcast frame is sent out from port 1 switch will transmit it to port 2 the other port in
the red VLAN and not transmit it to port3 and port 4 in blue VLAN. By this means VLAN divide the broadcast domain via
restricting the range of broadcast frame transmition.
Note: chart 2 use red and blue to identify the different VLAN but in practice VLAN uses different VLAN IDs to identify.
QoS Configuration
Field name explanation
VLAN Enable Before select it to enable VLAN you need enable Bridge mode in LAN config.
VLAN ID Check Enable
Enable VLAN ID check by selecting it. After enable VLAN ID check if VLAN ID of a data package
is not the same with the phone’s or a data package do not have VLAN ID the data package will
be discarded.
Voice/Data VLAN
differentiated
After enable VLAN system will set packets with different type of VLAN ID. Undifferentiated
means after using VLAN both VoIP packets and other data packets will use the voice VLAN ID;
tag differentiated means after using VLAN VoIP(signal and voice) packets will add voice VLAN
ID and other data packets will add data VLAN ID; data untagged means after using VLAN only
VoIP packets will add voice VLAN ID. Other data packets will not use VLAN.
DiffServ Enable Select it or not to Enable or disable DiffServ.
DiffServ Value Set DiffServ value the common value is 0x00.
Voice 802.1P Priority Specify 802.1P Priority of voice/signal data package.
Data 802.1P Priority Set 802.1p of data VLAN. Non-VoIP data (such as http telnet ping etc) will use this value to set
VLAN package.
Voice VLAN ID Set VLAN ID of voice/signal data package.
Data VLAN ID Set 802.1q of data VLAN ID. Non-VoIP data (such as http telnet ping etc) will use this value to
set VLAN package.
NOTICE
:
1)Startup VLAN if set Voice/Data VLAN differentiated as Undifferentiated all packets will use the Voice VLAN ID as the
tag.
2) Startup VLAN if set Voice/Data VLAN differentiated as tag differentiated and disables the DiffServ then system will not
distinguish the voice and data all packets will use the Voice VLAN ID as the tag.
3) Startup VLAN if set Voice/Data VLAN differentiated as tag differentiated and enables the DiffServ then system will
distinguish the voice and data and add the VLAN ID each other.
4) Startup VLAN if set Voice/Data VLAN differentiated as data untagged then the packet of the signal/voice will use the
Table of contents
Other Chima IP Phone manuals


