ChocoVision REVOLATION 1 User manual

ev lation
www.chocovision.com
REVOLATION 1
chocolate tempering system
314 MILL STREET, POUGHKEEPSIE, NY 12602
TEL (845) 473-4970 (845) 473-5453 FAX (845) 473-8004 www.chocovision.com
U S E & C A R E M A N U A L

INTRODUCTION / CONTENTS.....................................1
SAFETY TIPS........................................................2
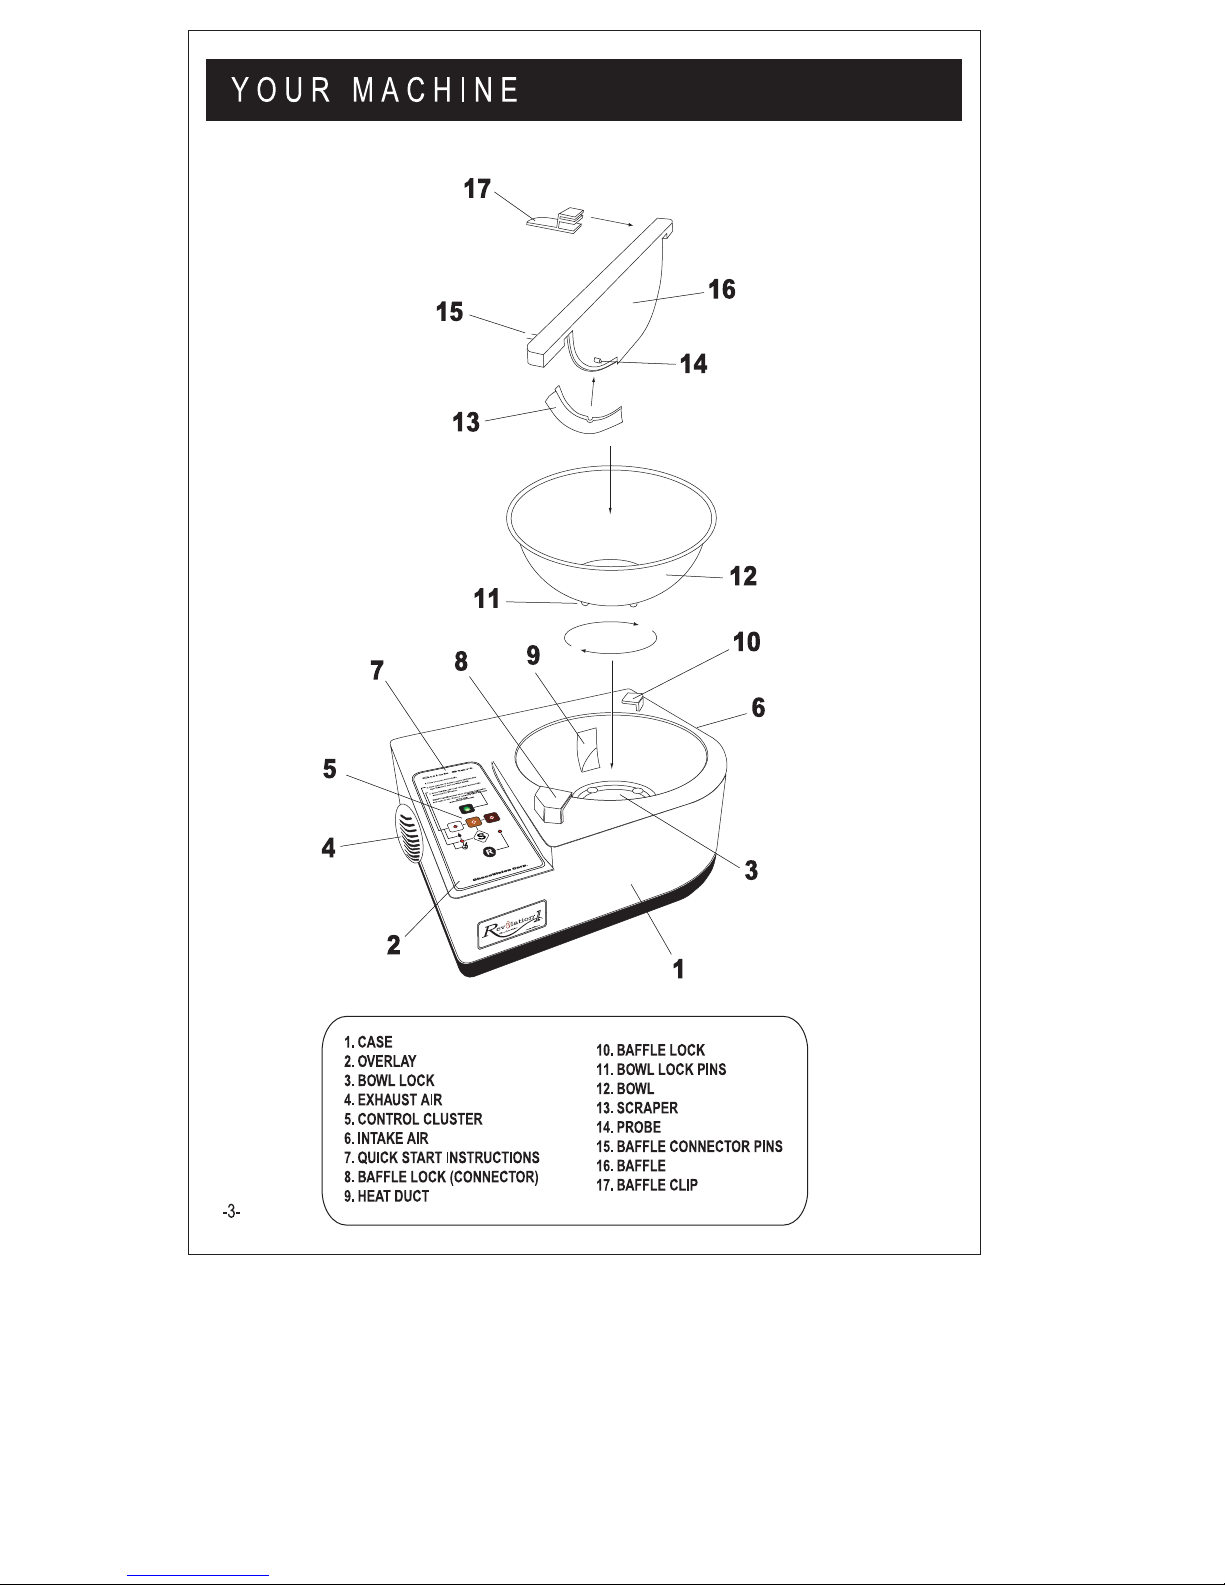
YOUR MACHINE.....................................................3
ASSEMBLY...........................................................4
THE CONTROLS.....................................................5
USING YOUR MACHINE............................................5
TIPS...................................................................
BEFORE YOU CALL SERVICE.....................................
CLEANING............................................................
QUICK START........................................................
-1-
INTRODUCTION
TABLE OF CONTENTS
The ChocoVision line of "Revolation Chocolate Makers" has been
widely accepted among the homemakers, hobbyists, restaurants,
hotels,coffee shops, bakeries, and even highly accomplished pastry
chefs.For the first time ever, the complicated process of properly
tempering chocolate can be easily peformed by anyone.
By combining the subtle nuance of precise temperature control with
sophisticated computer controlled electronics, the "Revolation" line
of Chocolate Tempering Machines has proven itself a serious
performer in this demanding environment.
We hope you will enjoy the use of your Revolation 1 Chocolate
Tempering Machine for many years to come. It has been designed
to provide the user with precision, accuracy, efficiency, and
unmatched reliability. We take great pride in providing you with the
highest quality product and superior service.
Congratulations on your purchase of the new Revolation 1
Chocolate Tempering Machine by ChocoVision
6
6
7
7

-2-
IMPORTANT SAFETY TIPS
-FOR PERSONAL SAFETY, THIS APPLIANCE MUST ALWAYS BE
PLUGGED INTO A PROPERLY GROUNDED ELECTRICAL CIRCUIT.
-DO NOT CUT OR REMOVE THE THIRD (GROUND) PRONG FROM
THE POWER PLUG, OR ATTEMPT TO USE A GROUNDING
ADAPTOR.
-NEVER IMMERSE THE MACHINE IN WATER. (SEE CLEANING
INSTRUCTIONS ON PAGE 7.)
-ALWAYS LOCATE THE MACHINE AWAY FROM ANY WATER
SOURCE. AVOID WATER SPLASHING ON TOP OR INTO THE
MACHINE, OR NEAR THE FAN AREAS.
-NEVER USE EXTENSION CORDS TO POWER THE MACHINE.
-TO AVOID SUFFOCATION, KEEP ALL PACKING MATERIAL,
(PLASTIC BAGS AND SMALL PARTS) AWAY FROM CHILDREN.
-POSITION MACHINE SUCH THAT THE INTAKE AND EXHAUST
FANS ARE NOT OBSTRUCTED, OR THAT ANY LOOSE
OBJECTS CAN NOT BLOCK AIR FLOW.
-UNPLUG MACHINE FROM POWER SOURCE WHEN NOT IN USE.
-ALWAYS UNPLUG YOUR MACHINE BEFORE CLEANING. NEVER
USE SPRAY SOLVENTS OR CLEANING FLUIDS NEAR THE
MACHINE.
-TO AVOID ELECTRICAL SHOCK, NEVER OPEN CASE.
-NEVER ALLOW MELTED CHOCOLATE TO HARDEN IN THE BOWL
WITH THE BAFFLE IN PLACE. ACCIDENTAL STARTING OF THE
MACHINE IN THIS CONDITION COULD CAUSE INTERNAL
COMPONENT DAMAGE, OR PRESENT ELECTRICAL HAZARDS.
PLEASE READ AND UNDERSTAND THE FOLLOWING
SAFETY MEASURES BEFORE USING YOUR MACHINE
* Place the BOWL in your machine and rotate the BOWL
until it drops into place.
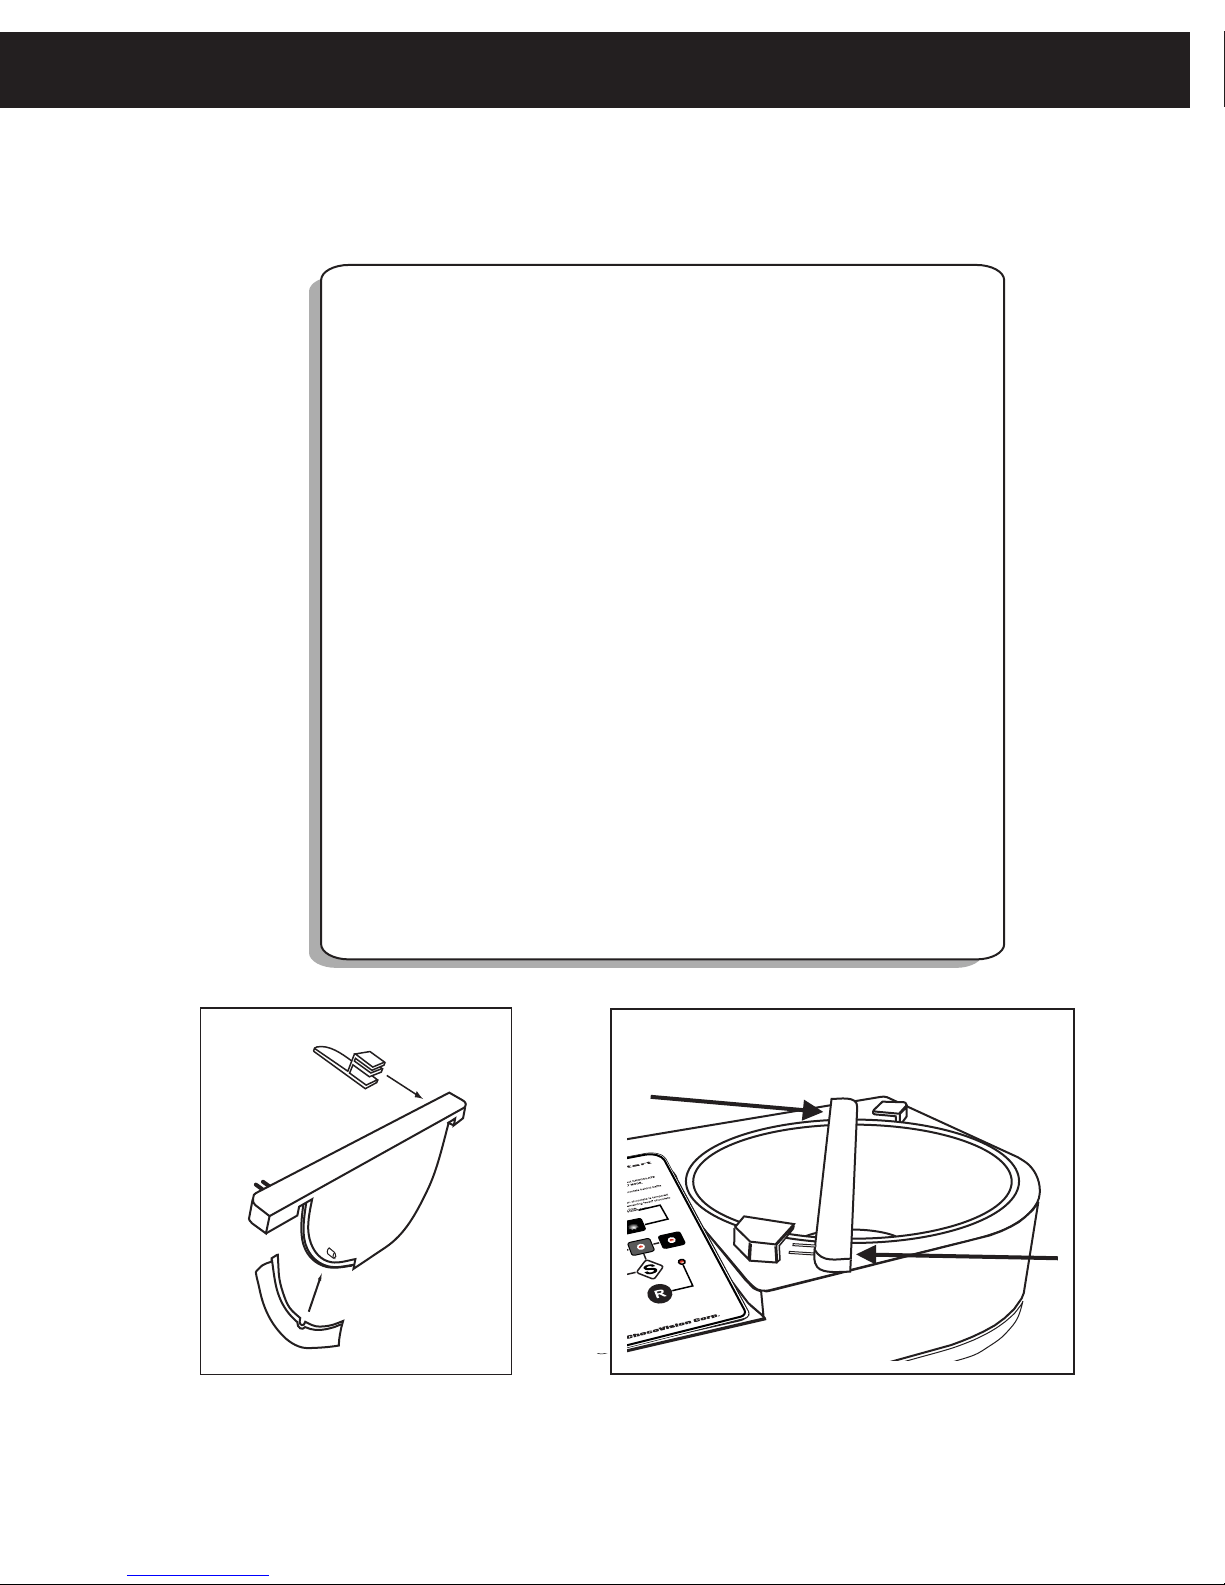
* Attach the SCRAPER to the BAFFLE (Fig. 1). When
properly installed, the SCRAPER should curve towards
the front of the machine (Fig. 1).
NOTE: To avoid damage to your scraper it is recommended
that your BOWL/SCRAPER be "primed" for the first few
uses. To do so, take a small piece of unmelted chocolate,
and simply rub it on the inside of the bowl. This will
insure a smooth initial start up.
* Fit the BAFFLE into the BOWL by rotating the BAFFLE
clockwise until the BAFFLE CONNECTOR PINS engage
into BAFFLE LOCK (CONNECTOR) (Fig. 2).
* Slide the BAFFLE CLIP on to the BAFFLE (Fig. 1). This
keeps the solid chocolate from climbing out of the bowl
as it rotates.
Fig.1
- 4 -
NOTE: BEFORE USING YOUR MACHINE, WASH ALL COMPONENTS THAT MAY COME IN
CONTACT WITH CHOCOLATE, USING A SOFT SPONGE OR CLOTH, AND MILD SOAP.
ASSEMBLY
R
YOURCHOCOLATE
WHITEMILKorDARK.
2.Loadtheselectedtypeofchocolatebehind
thebaffle.
4.Pressthe
TEMPERbuttonwhenyouhave
enoughmeltedchocolate.
5.Putthe"SEED"chocolatebehindthebaffle.
6.Whentheiconflashesandyouhearthree
beeps, removeall the"Seed"
chocolate.
7.Pressthebuttontofinishtempering.
8.WhentheREADYiconshowon
thedisplay,andyou
herethreebeeps,
thechocolateis
readytouse.
3.Pressthe
MELTbutton.
R
QUICKSTART
chocovision.com
Fig.2
1) Assemble and plug in your machine.
Load chocolate behind the baffle. (Solid
block pieces work best). You can load up
to 1.5 lbs. of chocolate at a time.
2) Hold down the 'S' button to select the
chocolate type. The LED's will scroll from
one chocolate type to another. Release to
start the MELT MODE. Melted chocolate
will collect in pool in front of the SCRAPER.
Depending on room conditions it will take
around 10-12 minutes to melt 1.5 lbs of
chocolate. Melted chocolate should
never rise above the top of the
SCRAPER.
NOTE: Make sure that the LED is illuminated
for the desired chocolate type. If not, simply
press the 'R' and start over.
4) When the machine finishes the final phase
of tempering you will hear three beeps and
READY MODE INDICATOR illuminates.
Remove remaining 'seed'
chocolate at this
time.
The chocolate is now tempered and is
ready to use.This tempering cycle should take
around 6-10 minutes.
-5-
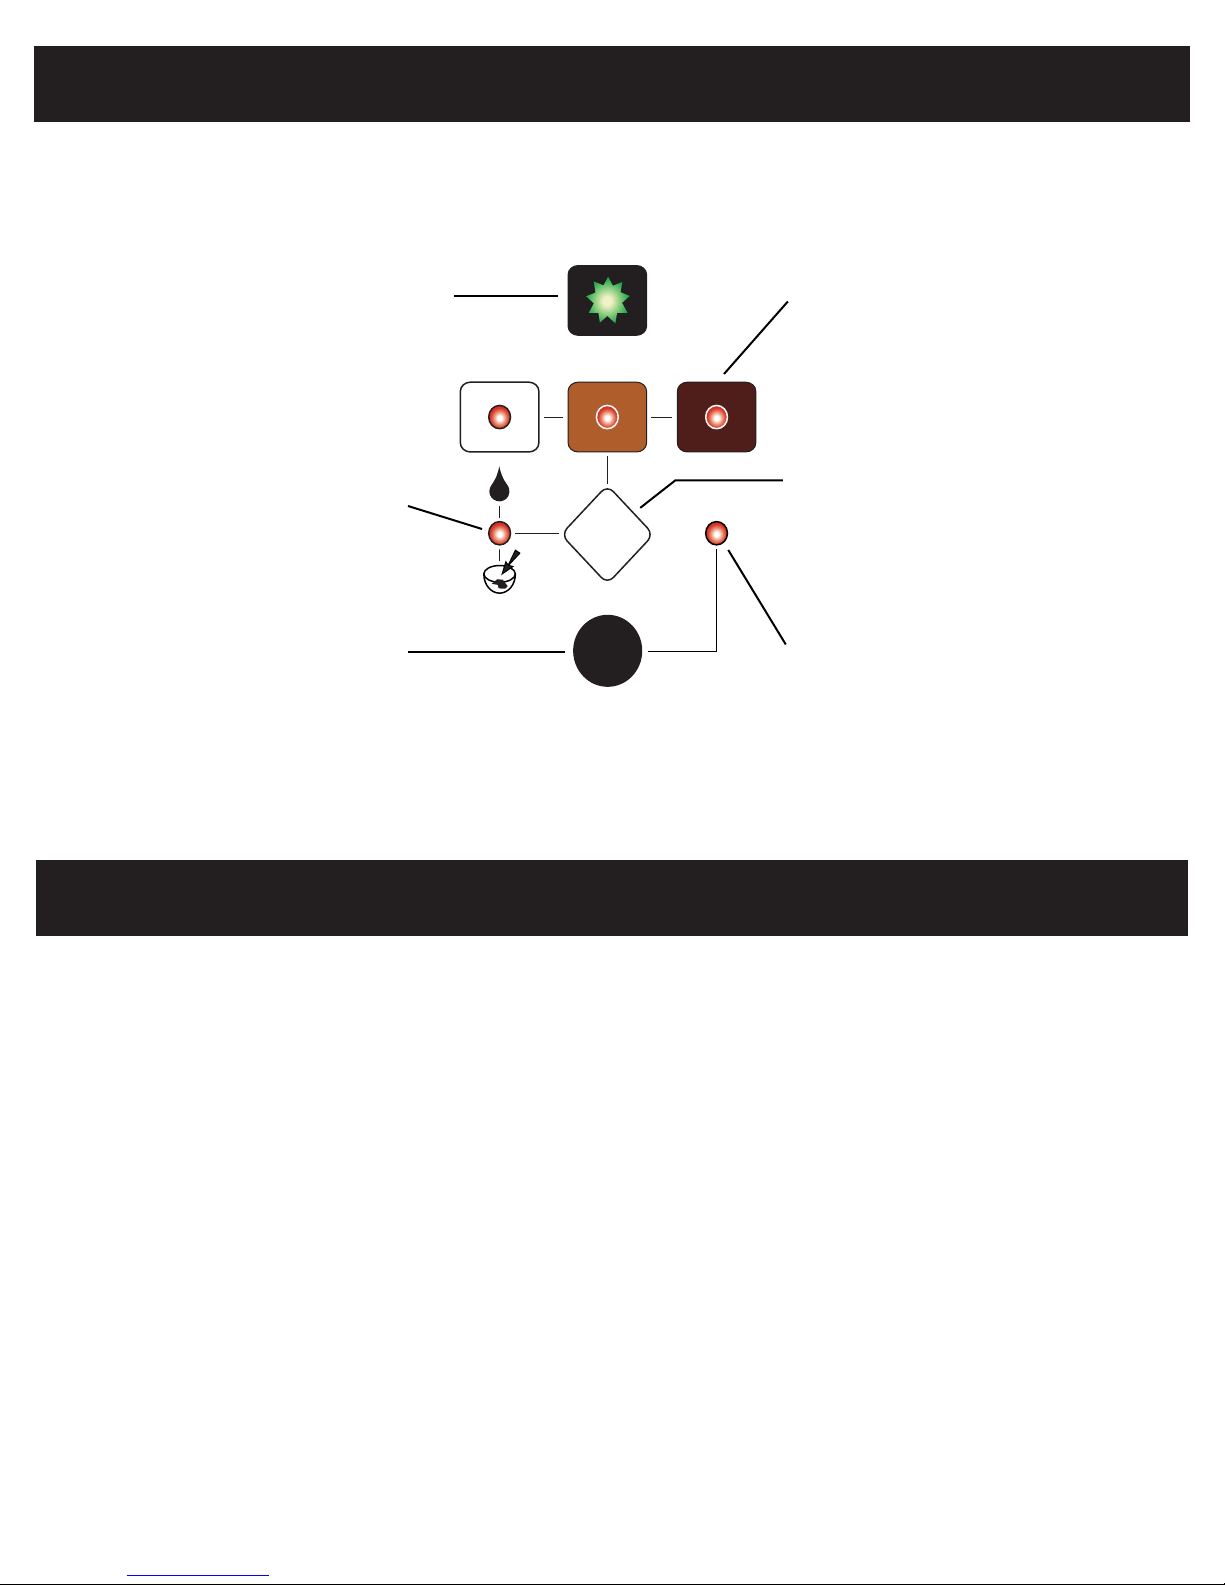
THE CONTROLS
USING YOUR MACHINE
R
S
SELECT BUTTON - Sets the machine
for the desired chocolate type when
pressed and held down. Once released,
the MELT cycle is started. Select 'S' again
to begin the TEMPER cycle (after the
SEED IN light flashes).
RESET- Stops the machine and
resets the controls.
READY MODE INDICATOR- When
illuminated the chocolate is tempered
and ready to use.
SEED IN / TEMPER- Select to start
the tempering cycle. Add 'seed'
chocolate when flashing.
CHOCOLATE TYPE- LED indicators
scroll from one chocolate type to another
during depression of the 'S' button.
FAULT LIGHT- Secure BAFFLE and
press the 'R' button.
3) When the SEED IN / TEMPER light is
flashing add at least 112 gms (4 oz) of solid,
tempered chocolate (See 'Seed' chocolate
on page 6 under TIPS & HELPFUL HINTS)
behind the baffle and press the 'S' button.

T I P S & H E L P F U L H I N T S
- 6 -
TEMPERING LARGE QUANTITIES. You can replenish the pool of chocolate by adding pre-melted batches behind
the baffle while in the TEMPER mode. We recommend that the pre- melted chocolate temperature does not exceed
34 C. (94 F). Set the machine to the MELT mode if you do not plan on using your tempered chocolate for extended
periods of time (over two hours). Re-temper when chocolate is needed again.
WORK AREA. The ideal average room temperature should be between 20-22 C. (68-72 F.), with the average
humidity not above 50 %. Air conditioned environments work best. Never allow water to mix with melted
chocolate. Never store chocolate in a refrigerated environment, as condensation (water) may form on the
chocolate surface when brought out at room temperature. Always make sure that all items being dipped into the
tempered chocolate (like fruit), are at room temperature, and COMPLETELY dry, including all utensils being used.
PRODUCT SIZE. If you are producing solid thick products, like molds, thoroughly mix the tempered chocolate
batch before you pour. With a fan, moving large volumes of air across the product helps in the cooling process.
BEFORE YOU CALL FOR SERVICE.........
'SEED' CHOCOLATE. This is solid tempered chocolate that has the proper crystalline structure. To dramatically
improve on tempering time, 'seed' chocolate is slowly added to untempered chocolate, therefore aiding in the
proper crystal structure of the liquid pool.
? MY MACHINE WON'T START. Make sure that the BAFFLE CONNECTOR PINS are
fully engaged into the BAFFLE LOCK (CONNECTOR), and are making a good connection.
These contacts should be clean and free of chocolate at all times.
? THE MELTED CHOCOLATE DOES NOT POOL IN FRONT OF THE BAFFLE. Check the
installation of the SCRAPER. The SCRAPER should be curved forward (against the BOWL,
and towards the front of the machine) when properly installed into the BAFFLE (page 4).
? THE CHOCOLATE THICKENS. The chocolate may have picked up moisture from dipping
fresh fruits, or from high room humidity (see above under TIPS & HELPFUL HINTS). The
pool of chocolate was left in the TEMPER mode too long. (see above under TIPS &
HELPFUL HINTS). The 'seed' chocolate was not removed on time, causing the tempered
pool to thicken. You can simply press the MELT button and start over. See 'SPECIAL NOTE'
above.
? THE CHOCOLATE CLIMBS OUT OF THE BOWL. Make sure that the BAFFLE CLIP is
properly installed onto the BAFFLE. Solid block chocolate works best.
? WHERE DO I SEND MY MACHINE IF IT IS IN NEED OF REPAIR. Your machine should be
sent back to the original point of purchase. Please call and get proper authorization before
shipping your machine back.
? MY SCRAPER IS DAMAGED. Make sure that you "prime" your bowl as described on
page 4 - ASSEMBLY - attaching the scraper.
SPECIAL NOTE: Any liquid chocolate that is tempered and agitated is
constantly seeding itself slowly over time. This process happens with any
tempering process therefore you will always have limited time to use your
chocolate before it thickens. Under most conditions, with about 1.5 lbs.
you'll get about 2-3 hours. Most people use up their chocolate by then and
are into another batch. If your chocolate starts to thicken don't panic,
simply press the 'R' button and start over.

C L E A N I N G
QUICK START
FIG. 1 FIG. 2
Your machine includes a special CLEANING BRUSH for areas where chocolate collects and may be
difficult to clean, such as behind the lip of the stainless steel BOWL (Fig. 1), and crevices on the BAFFLE
(Fig.2) and the BAFFLE CLIP (Fig. 3)
Never use steel wool or any other type of abrasive to clean your machine, or any components included
with your machine. Only use a sponge or a soft cloth with mild soap to wipe down the outside CASE.
Back of stainless
steel bowl
FIG. 3
14 Catharine Street, Poughkeepsie, NY 12601 (845) 473-4970 FAX (845) 473-8004 www.chocovision.com
ChocoVision Corporation
MANUFACTURED IN THE U.S.A. WITH PRIDE AND CRAFTSMANSHIP
-7-
1. Place Chocolate behind Baffle.
2. Hold down the 'S' button to select CHOCOLATE
type. Release to start the MELT MODE.
3. When flashing, add 'seed' chocolate behind baffle
and press the 'S' button.
READY light illuminates when chocolate is tempered
and ready to use. Remove remaining 'seed' chocolate
at this time.
www.chocovision.com
R
S
Other manuals for REVOLATION 1
1
Table of contents
Other ChocoVision Kitchen Appliance manuals

ChocoVision
ChocoVision revolation 2 User manual

ChocoVision
ChocoVision Revolation X3210 User manual

ChocoVision
ChocoVision revolation 2 User manual

ChocoVision
ChocoVision Revolation X3210 User manual

ChocoVision
ChocoVision Revolating Delta User manual

ChocoVision
ChocoVision REVOLATION DELTA User manual

ChocoVision
ChocoVision Revolation V User manual

ChocoVision
ChocoVision Revolation X3210 User manual

ChocoVision
ChocoVision Revolation 3Z User manual

ChocoVision
ChocoVision REVOLATION 1 User manual


