ChromTech Porvair Miniseal II User manual


Contents Page
Introduction
Specification
Health & Safety Notes
Operating Environment
Inventory / Part No’s.
Connecting Voltage Supply
Use of the Control Screen / Setting the Temperature and Sealing Time
Setting the Plate Spacers
Method of Operation and Optimisation
Cleaning the MiniSeal 2
Cleaning the Heater Block
Fault Finding
Service and Repair
Declaration of Conformity
Statement
Notes
2
2
3 - 4
5
6
7
8
9
10-11
12
12
13
13
14-15
16
17
MiniSeal 2 Issue 1

The MiniSeal 2 heat sealer has been designed to seal most types of microplates.
The MiniSeal 2 utilises various heat seal films and foils to give either permanent or peel able
seals for all common microplate material types (polypropylene, polystyrene, polyethylene).
Seal times and seal temperatures are fully adjustable on the MiniSeal 2 2 via the control screen.
The MiniSeal 2 has dual voltage capability, operating on both 110 and 220 VAC supplies without
the need for a power transformer.
Introduction
MiniSeal 2 Issue 1
Power Supply: 220 / 115 VAC 50 / 60 Hz
Power Consumption: 600 Watts Nominal
Fuse Rating: 5 Amp anti-surge (T5AH 250V)
Internal Heaters: 4 x 100 Watts (Sealing Plate)
Dimensions: 181mm Width x 270mm Depth x 285mm Height
Unit Weight: 9.2 Kg
Plate Spacers Weight: 1 Kg
Minimum Plate Height: 9mm
Maximum Plate Height: 54mm
Maximum Sealing
Temperature: 200oC
Protection: IP20
Cycle Time (approx.) :10-12 seconds (based on a 2 second seal)
Specification

It is Important that the MiniSeal 2 is installed and operated in such a way that all applicable
Heath and Safety requirements are met. It is the users responsibility to ensure that all relevant
Health and Safety Regulations are identified and complied with. Failure to do so, may result in
damage to the equipment and could cause personal injury. In particular, the user should study
the contents of this guide carefully before handling or operating this equipment.
Under no circumstances will the supplier of this equipment be liable for any incidental,
consequential or any special damages of any kind whatsoever, including but not limited to lost
profits arising from, or in anyway connected with the use of this equipment or this
instruction manual.
WARNING SYMBOLS Used In Accordance With IEC 417
RISK OF ELECTRIC SHOCK
WARNING!
Refer to Accompanying Documentation.
HOT SURFACE / HOT AREA
This Instrument is fitted with an
internal heater with a Maximum
temperature of 200oC when in use
PROTECTIVE CONDUCTOR TERMINAL
MAINS SWITCH SYMBOLS I - 0
I = ON 0 = OFF
!
Health & Safety Notes
MiniSeal 2 Issue 1

Statement:
Warning: Do not operate this instrument in an atmosphere containing explosive gases.
Statement:
Warning: Only approved, supplied mains cord set must be used with this instrument.
Statement:
Warning: If it is required to use an extension lead, the lead MUST be earthed.
Statement:
Voltage: The MiniSeal 2 is supplied for direct connection to normal 115 / 220 VAC 50 / 60Hz
supply, with a variation in supply that gives a voltage range of 108VAC to 250VAC
• The MiniSeal 2 is designed to be operated with a maximum sealing temperature of 2000C
• The MiniSeal 2 should be switched on five minutes prior to use when plugged into 230V and 6
minutes when plugged into 110V. This is to enable the set temperature to be reached and to
stabilise.
• The MiniSeal 2 should only be used in a suitably ventilated area. The use of solvents on the
unit is not recommended.
• Certain components become hot during the correct operation of the equipment.
These components are marked with the hot surface symbol . Due care should be taken to
avoid personal injury.
• Porvair Sciences accepts no responsibility for the misuse of this equipment.
The mains plug used on the MiniSeal 2 unit should be fitted with the following fuse: -
Supply Fuses Fitted in Plug Fuses Fitted in Sealer
230VAC 13 Ampere T5AH 250V
115VAC No Fuses T5AH 250V
Only refit the correct type of Fuse. Must be IEC127 approved for use in EC Countries.
Must be CSA or UL listed or recognised for use in Canada or the
United States of America.
Health & Safety Notes
MiniSeal 2 Issue 1

The MiniSeal 2 should be operated in an environment with a temperature range of 10°C to 30°C
and a non-condensing relative humidity range of 10% - 80% .
The unit should be kept out of draughts and air currents as they will have an adverse effect upon
the temperature stability of the sealing plate area. If the sealing plate area is subjected to
draughts then the time between cycles may be increased.
The unit should be placed on a secure and stable surface with a minimum of 100mm (4”)
clearance on all sides.
Operating Environment
MiniSeal 2 Issue 1

Part Description QTY
MiniSeal 2
5amp Fuse
Instruction Manual
Foil Loading Tool
UK Power Lead
EU Power Lead
US Power Lead
Shuttle Top Plate
25mm Plate Spacer
16mm Plate Spacer
Foil Loading Tool For Recessed Plates
1
2
3
4
5
6
7
8
9
10
11
1
1
1
1
1
1
1
1
1
1
1
Part No.
Inventory
35000
5050-10010
9092-10035-001
1010-29300-169
5058-10030
5058-10032
5058-10031
1010-29300-150
1010-29300-166
1010-29300-157
1010-29300-180
MiniSeal 2 Issue 1
NOTE: All of the items listed above are available as spare components from Porvair
(see the service and repair section, page 13, for contact details) .
The MiniSeal 2 utilises a standard IEC inlet, which is fused and switched.
Plug the IEC Lead in the inlet and switch the Rocker I.O. Switch to the on position (-).
The display screen should illuminate.
Note: - The system is self regulated to sense voltage differences between 100 and 250 VAC.
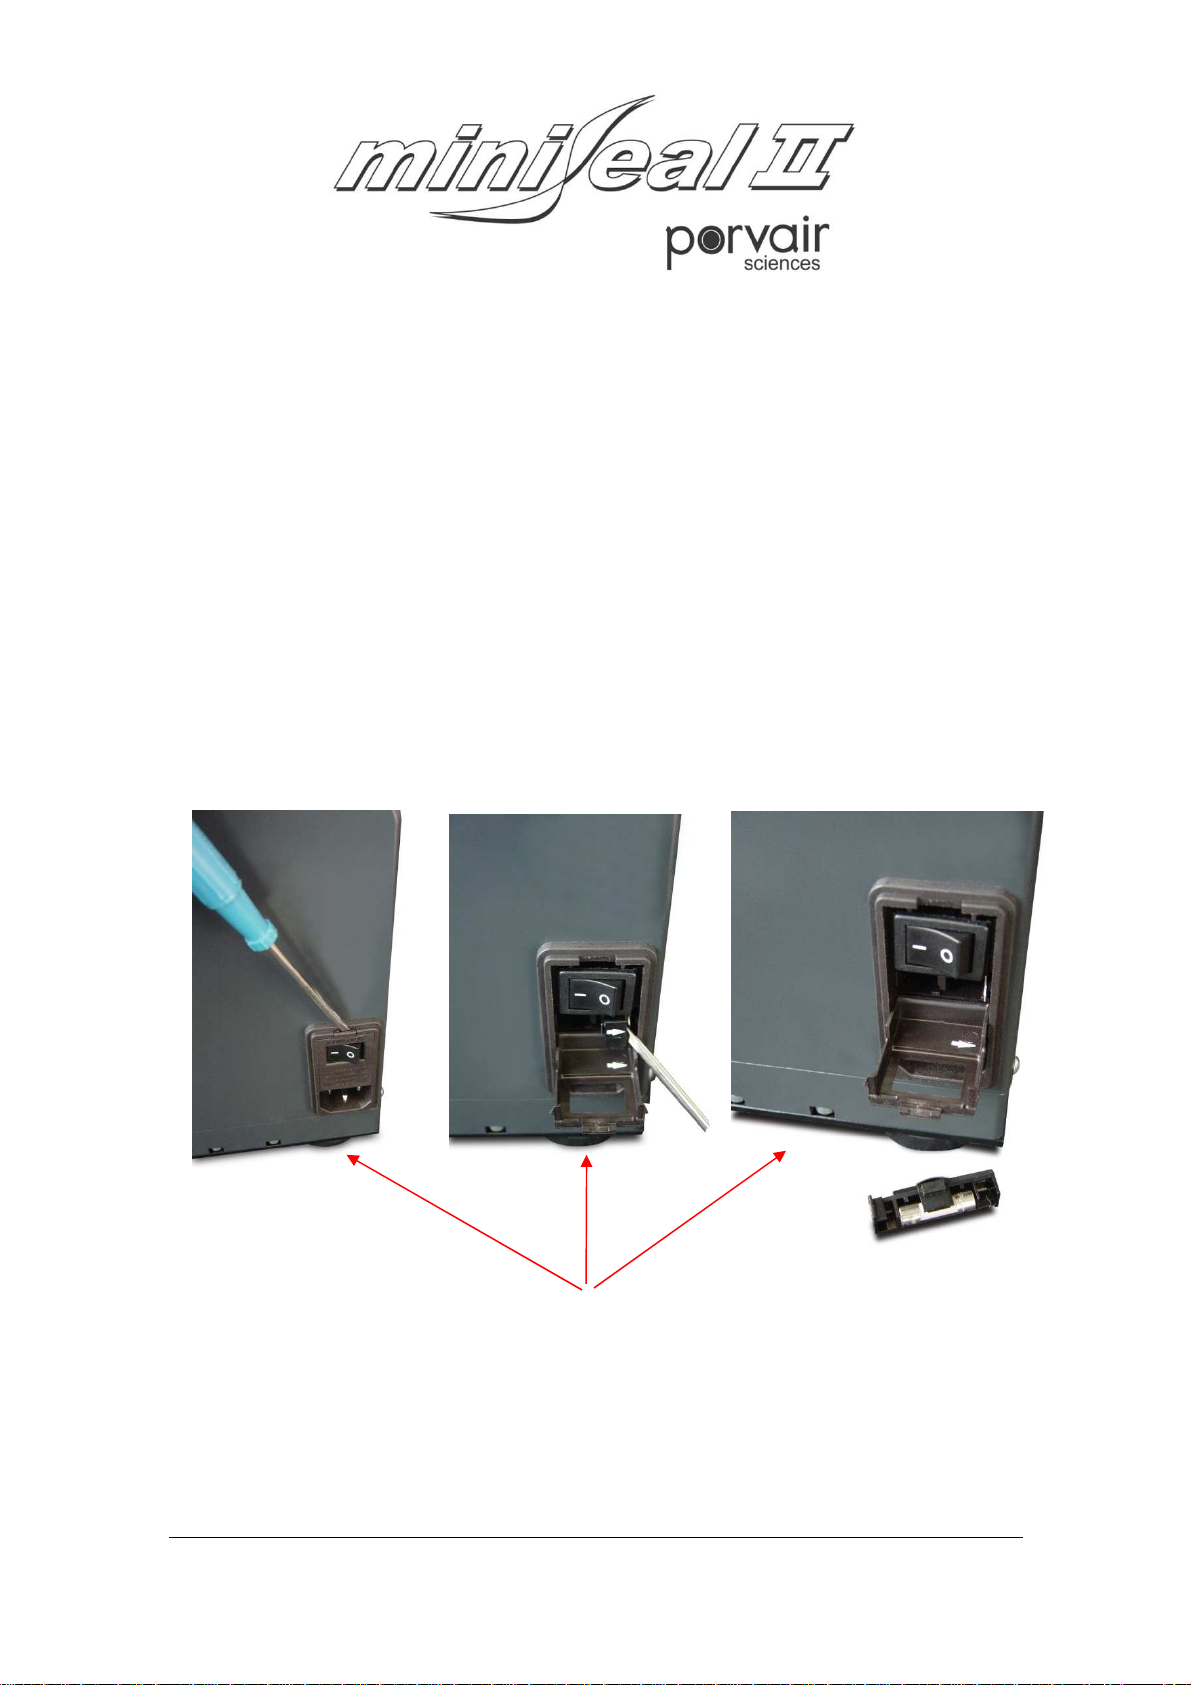
To Replace The Fuse
Follow the diagram below.
Connecting The Voltage Supply
To Replace Fuse:
Insert screwdriver to open door, remove the
fuse and replace, ensuring correct fused to
replacement
MiniSeal 2 Issue 1

When the MiniSeal 2 is switched on the control console screen will first show ‘MiniSeal 2 ’, then
the
sealing count.
The screen will then show time, heater set temperature and heater actual temperature.
When the heater has reached the required temperature, ‘Ready’ will appear on the screen.
Sealing Temperature
To edit press “Mode” button twice until the sealing temp flashes. Press either up or down buttons
to adjust.
Sealing Time
To edit press the “Mode” button once and the sealing time flashes. Press either up or down
buttons to adjust.
Use of the Control Screen
To Adjust Seal Temperature
To Adjust Seal Time
MiniSeal 2 Issue 1

The MiniSeal 2 utilises plate spacers to make the sealing process even quicker.
There are three plate spacers provided,
- 1 x Top plate spacer (10mm)
- 1 x 25mm spacer
- 1 x 15mm spacer
The Plate Spacers can be used in different combinations to give heights between 10mm to
51mm which allows for plates with heights between 8mm to 54mm to be sealed (see the table
below for more information on plate combinations).
How To Use The Plate Spacers
1. Select the spacers required and place them on the shuttle slide plate using the locating dowels
on each spacer.
2. Place the Shuttle Top Plate on the top of the Plate Spacers.
3. The Plate Spacers are now set up and the machine is ready to be used.
Notes On Using The Plate Spacers
* The Shuttle Top Plate MUST always be used
* The heater block has a maximum travel of 30mm, therefore the combined height of the Plate
Spacers and the microplate must be at least 30mm.
Plate Spacers
MiniSeal 2 Issue 1
Spacer/s Plate Height Range (Max to
Min)
Top plate spacer (10mm) 54mm to 34mm
Top plate spacer + 16mm spacer 38mm to 17mm
Top plate spacer + 25mm spacer 29mm to 9mm
Top plate spacer + 16mm spacer + 25mm spacer 12mm to 8mm

The MiniSeal 2 heat seals microplates by the following method:-
1. First set the temperature and sealing time of the unit (see page 9)
2. Next select the correct plate spacers for the plate you want to seal (see page 10 for help
on selecting the correct plate spacers).
3. Place the unsealed microplate on the top shuttle plate.
4. Place the cut length of film/foil on the microplate and place the foil loading tool on top of
the foil on the microplate. Ensure that side tab of the foil loading tool is pushed against
the side of the microplate.
Please note: Some sealing material may curl with heat and the foil loading tool will be
required to keep the seal flat before sealing and to prevent the plate from sticking to the
heater block. Two types of foil loading tool are supplied with each MiniSeal 2, one for
normal plates, fig.A, and one for plate with high rims and recessed wells, fig.B).
5. The sealing process is started by pushing the draw fully in to the unit. Once the draw is
pushed in it will auto latch and the screen will display a sealing message, you may now
release your grip on the handle.
6. When the seal has finished, the draw will auto open, presenting the plate for removal.
Note: Care MUST be taken when removing the foil loading tool because IT WILL BE HOT.
Always hold it by the specified tab as shown in the photograph below.
Method of Operation
MiniSeal 2 Issue 1
Handling tab
(Fig.A)
Handling tab
(Fig.B)

The MiniSeal 2 System has been designed to reliably seal plates of different heights and different
plastics, using a variety of films, to give a seal with varying properties. These components will
require different sealing conditions.
The quality and strength of the seal created between the sealing film will vary with different
conditions. In general, increasing either the sealing temperature or duration of seal, gives a
stronger, more complete seal. However over-sealing on a regular basis is not recommended, as
applying more heat can cause excessive damage to the plate being sealed. This in turn, would
reduce the number of times a particular plate can be resealed. Therefore a balance has to be
achieved, that gives an acceptable seal with the minimal plate damage or distortion.
Another optimisation factor to be taken into account, is the surface area of the plate.
A plate with thin raised rims around each well, will have a reduced surface area, compared to a
plate with wide raised rims. This would mean that less heat is needed to seal the thin rim plate in
comparison to the wide rim.
The pressure that the heater plate exerts during sealing, is pre-set and cannot be adjusted.
Plates that do not have any raised rims are not usually suitable for heat-sealing.
Temperature and Time Setting
The following table gives a guide line as to the sealing time and temperature for
different materials.
For Sealing PCR Plates- No Skirt, Half Skirt
An adaptor will be required to seal plates which have well bottoms protruding past the plate skirt.
This is available from Porvair Limited.
Commands, Indications and Warnings.
The MiniSeal 2 System is software controlled, employing micro processor control.
All commands, indications and warnings are effected via the control screen.
Optimisation
MiniSeal 2 Issue 1
Plate Material Temperature Setting (°C) Time Setting (Seconds)
Polystyrene 145 to 165 2 to 5
Polypropylene 150 to 175 2 to 5
Polyethylene 150 to 170 2 to 5
Cleaning The Heater Block
If you should require to clean the heater block, turn the power off and allow the block to
cool to ambient room temperature. You can now access the heater block and clean it.
Note:
PLEASE ENSURE THAT HEATER BLOCK IS AT AMBIENT TEMPERATURE
BEFORE CLEANING AND A SENIOR OPERATOR CARRIES OUT THE CLEANING.
MiniSeal 2 Issue 1
Before using any cleaning or decontamination method,
other than that recommended by the manufacturer, users
should check with the manufacturer that the proposed
method will not damage the unit.
Always remove the power supply before cleaning the unit.
Never turn on power supply before the unit is fully dry.
DO NOT USE ACETONE OR ABRASIVE CLEANERS.
!
!
!
!
Cleaning The MiniSeal 2
!

Fault Finding
Problem Action
MiniSeal 2 will not power up after switching
on.
Foil will not seal properly on a microplate.
Poor plate seal in middle of plate.
“Error up switch” is displayed on the screen
after a seal is run.
The unit fails to respond to commands
Check fuse
1) Check seal time and temperature
and reset if necessary.
2) Ensure the correct height of plate
spacers are being used.
Check if plate supports are required. If
required contact Porvair
Ensure the correct plate spacer/
combination is being used and restart
the machine.
Restart the machine.
MiniSeal 2 Issue 1
If the problem with the MiniSeal 2 unit persists after the above actions have been carried out ,
contact Porvair Ltd for further investigation (contact details listed below)
For all requirements for service and repairs please contact:
Porvair Limited
Tel: ++44 (0)1268 522431
Fax: ++44 (0)1268 270231
Email: [email protected]
Note: For any spare components please refer to the inventory list and contact Porvair for pricing
information.
Service and Repairs

EC Declaration of Conformity
•As detailed under the European Machinery Directive 89/392/EEC (amended by 91/368/EEC) and
under the UK legislation. The supply of Machinery (Safety) Regulations 1992 (SI 1992/3073).
•As detailed under The Electromagnetic Compatibility Directive 89/336/EEC (amended by
91/263/EEC and 92/31/EEC and the UK legislation, the Electromagnetic Compatibility Regulations
1992.
•As detailed under The European Low Voltage Directive 73/23/EEC (amended by 93/68/EEC) and
the UK legislation, The Electrical Equipment (Safety) Regulations 1994
The Declaration of Conformity is provided for the following equipment:-
Equipment MiniSeal 2
Serial Number To be included
Supplier into the EU Porvair Sciences
Dorset House
Regent Park
Leatherhead
KT22 7PL
Transposed Harmonised Standards
BSEN 12100-1 Safety machines: concepts
General: principles for design; basic terminology& methodology
BSEN 12100-2 Safety of machines: basic concepts, general principles for design; technical principles
BSEN 61010 Safety requirements for electrical Equipment for measurement, control & laboratory use
BSEN 60204 safety of Machinery; electrical equipment of machines (section 19)
BSEN 50081-2 Electromagnetic Compatibility; generic emission standard, industrial environment
BSEN 61000-6-2 Electromagnetic compatibility (EMC) Generic standard, immunity for industrial
environments
Other Standards
BS5378 safety signs & colours
MiniSeal 2 Issue 1

Name & Address of the Responsible Person within the EU
Name: Alan Shepherd
Address: Porvair Sciences
Dorset House
Regent Park
Leatherhead
KT22 7PL
Signature of the Responsible Person (or Person Empowered to Sign On his behalf)
Signature
Name
Date
EC Declaration of Conformity
MiniSeal 2 Issue 1

THE INFORMATION IN THIS INSTRUCTION MANUAL INCLUDING ANY APPARATUS,
METHODS, TECHNIQUES AND CONCEPTS DESCRIBED HEREIN, ARE THE PROPERTY OF
Porvair LTD OR ITS LISCENSEES AND MAY NOT BE COPIED, DISCLOSED OR USED FOR
ANY PURPOSES NOT EXPRESSLY AUTHORISED BY THE OWNERS THEREOF.
Porvair LTD RESERVES THE RIGHT TO MODIFY EQUIPMENT AND ANY RELEVANT
MANUALS WITHOUT PRIOR NOTICE.
Statement
MiniSeal 2 Issue 1

Notes
MiniSeal 2 Issue 1

Notes
MiniSeal 2 Issue 1

Table of contents


