Ciara-tech Discovery Q77M-XA User manual
User Guide
Discovery/Enterprise
Q77M-XA-XXXXX-XX-XXX
CIARA Discovery/Enterprise Q77M-XA-XXXXX-XX-XXX
- 2
9300 Trans-Canada Highway
Montreal, Quebec H4S 1K5
Tel : (514) 798-8880
Fax : (514) 798-8889
Microsoft, Windows 7, Windows 8, Windows Server 2008 and Windows Server 2008 R2
are registered trademarks of Microsoft Corporation
Intel, Core and Pentium are trademarks or registered trademarks of Intel Corporation
ASUS is a trademark of ASUS INC.
Novell and NetWare are registered trademarks of Novell Corporation
All other names, brands, and trademarks are trademarks of their respective companies
First printing September 2013
Printed in Canada

CIARA Discovery/Enterprise Q77M-XA-XXXXX-XX-XXX
- 3
Contents
ABOUT THIS GUIDE ...................................................................................................... 5
1.0 INSTALLING YOUR SYSTEM..................................................................................... 6
1.1 Unpacking your computer ................................................................................................................. 6
1.2 Choosing a site for the system .......................................................................................................... 7
1.2.1 A caution about viruses ................................................................................................................... 8
1.2.2 Windows........................................................................................................................................... 8
1.2.3 Windows Server 2008, 2008 R2, Novell NetWare and Linux .......................................................... 8
1.3 Peripheral installation ....................................................................................................................... 9
1.4 Troubleshooting your system after first install .............................................................................. 10
1.4.1 Helpful hints ................................................................................................................................... 10
1.4.2 Recovery from CIARA recovery DVD..............................................................................................11
1.4.3 Windows 8 Recovery from Startup Settings .................................................................................. 12
1.4.4 BIOS update.................................................................................................................................... 15
1.5 Solving general problems ................................................................................................................ 17
1.5.1 Solving power supply problems ..................................................................................................... 18
1.5.2 Solving hard drive problems ..........................................................................................................19
1.5.3 Solving display problems................................................................................................................20
1.5.4 Solving audio problems..................................................................................................................21
1.5.5 Solving printer problems................................................................................................................ 21
1.5.6 Solving keyboard and mouse problems.........................................................................................22
1.5.7 Solving hardware installation problems ........................................................................................ 23
1.5.8 Solving memory problems ............................................................................................................. 24
1.5.9 Solving processor problems ........................................................................................................... 25
1.5.10 Solving optical drive problems..................................................................................................... 26
1.6 Component installation guide ......................................................................................................... 27
1.6.1 Precautions against static electricity ............................................................................................. 27
1.6.2 Opening and accessing the chassis ................................................................................................ 27
1.6.3 Installing The CPU ..........................................................................................................................28
1.6.4 Installation of the memory modules .............................................................................................30
1.6.5 Installation of an Expansion Card ..................................................................................................32
1.6.6 Removal or installation of the optical drives using tool less options ............................................33
1.6.7 Replacing the system Battery ........................................................................................................34
1.6.8 Chassis Characteristics ...................................................................................................................35
1.7 Motherboard Specification .............................................................................................................37
1.7.1 LAN (RJ-45) port .............................................................................................................................37
1.7.2 Intel® vPro™ Technology................................................................................................................37
1.7.3 Intel® Active Management Technology......................................................................................... 38
1.7.4 Intel® Virtualization Technology (Intel® VT) .................................................................................. 38
1.7.5 Intel® Virtualisation Technology for Directed I/O (Intel® VT-d).................................................... 38
1.7.6 Intel® Trusted Execution Technology (Intel® TXT).........................................................................39
1.7.7 Intel® Identity Protection Technology ...........................................................................................39
1.7.8 Intel® Anti-Theft Technology .........................................................................................................39
1.7.9 Trusted Platform Module (TPM)....................................................................................................39
1.7.10 Motherboard component description.........................................................................................40
1.7.11 Motherboard schematic .............................................................................................................. 42

CIARA Discovery/Enterprise Q77M-XA-XXXXX-XX-XXX
- 4
2.0 CERTIFICATION AND DECLARATION...................................................................... 43
2.1 Radio interference precautions....................................................................................................... 43
2.2 Declaration of conformity ............................................................................................................... 44
2.3 FCC Information to User .................................................................................................................. 45
2.4 ENERGY STAR® .................................................................................................................................46
3.0 ONE YEAR LIMITED WARRANTY............................................................................ 47
3.1 Procedures to be followed for service during the warranty period: ............................................48
3.2 Limited Warranty ............................................................................................................................. 49
3.3 Documenting your computer .......................................................................................................... 50
3.3.1 Base System Details ....................................................................................................................... 50
4.0 KEYBOARD ........................................................................................................... 51
GLOSSARY.................................................................................................................. 52
NOTES :...................................................................................................................... 56

CIARA Discovery/Enterprise Q77M-XA-XXXXX-XX-XXX
- 5
ABOUT THIS GUIDE
Please read this User's Guide before using your CIARA Discovery/Enterprise Q77M-XA-XXXXX-XX-XX computer.
This User's Guide is divided into four chapters that provide information on Installation, trouble shooting, certification,
detailed description and a Glossary. Please remember to fill out the Equipment Log and keep a copy in a safe place.
With proper care and operating procedures your CIARA Discovery/Enterprise Q77M-XA-XXXXX-XX-XX will give you
many years of service and high performance computing.
NOTE
This User's guide uses Discovery/Enterprise designation where Enterprise refers to the tower model and Discovery refers
to the compact desktop model.

CIARA Discovery/Enterprise Q77M-XA-XXXXX-XX-XXX
- 6
1.0 Installing your system
1.1 Unpacking your computer
Your PC is packed with ecologic moulded boxboard on four sides to keep it in place during transit.
The keyboard is on the top of the box, the other accessories are completely underneath.
Carefully unpack your computer and be sure to save all boxboards for future shipping and transportation.
To repack the PC it may be easier to place the moulded cushioning on the ends of the PC, and then slide the box over the
PC together with the cushioning, rather than lifting the PC.

CIARA Discovery/Enterprise Q77M-XA-XXXXX-XX-XXX
- 7
1.2 Choosing a site for the system
All CIARA computers operate reliably in a typical office or home environment. Choose a location that is readily accessible
and meets the following requirements:
The socket-outlet shall be installed near the equipment and shall be easily accessible
Is clean and dust free
Is well-ventilated and lighted and away from sources of heat
Is isolated from strong electromagnetic fields produced by electrical devices
(I.e. air conditioners, large fans, large electric motors, radio and TV transmitters)
Has an appropriate table or desk that will allow you to work without physical discomfort and strain.
INPUT 120Vac, 60Hz, 10A
A few general precautions should always be observed:
Never connect any peripheral such as a monitor to the system unit if the power is turned "ON". Always shut down
the system first.
Never remove any internal adapter cards in the system unit if the power is turned "ON" as this will ruin the
Card/Computer and Void the Warranty.
Never install and connect more peripherals than available power supply plugs to avoid exceeding the maximum
power of the system.
NOTE The Enterprise model comes either with or without a power supply On/OFF switch. For those systems that do not
have a switch, make sure to shut down the system through Windows before proceeding to any repair or replacement work
inside the system.

CIARA Discovery/Enterprise Q77M-XA-XXXXX-XX-XXX
- 8
1.2.1 A caution about viruses
Due to the prevalence of computer viruses, we strongly recommend that you take precautions to protect your computer
from them. Purchase and use a reputable virus-checking program. Ensure that the program is kept up to date by
registering the program, and installing updates as they become available. Please be aware, however, that even the best
virus checking programs cannot be regarded as the perfect solution. It is possible for even the best program to fail,
particularly if it is not updated. Please contact your CIARA account representative for more information.
1.2.2 Windows
Windows is a Graphical User Interface (GUI) that provides a screen composed of icons. You select or ―click‖ on the icons
to run programs. As noted above, Windows has been installed on your computer. For further information about using
Windows, please consult the appropriate Microsoft software manual provided with your CIARA Discovery/Enterprise
Q77M-XA-XXXXX-XX-XX.
1.2.3 Windows Server 2008, 2008 R2, Novell NetWare and Linux
Windows Server 2008, Windows Server 2008 R2, Novell NetWare and Linux are operating systems that provide
sophisticated networking capabilities to Windows based computers. The onboard Network Interface Card (NIC) in the
computer allows the user to connect the CIARA Discovery/Enterprise Q77M-XA-XXXXX-XX-XX to a network server
computer running Windows 2008 Server, Novell NetWare or Linux.
Microsoft, Novell and Linux provide workstations on the network with access to files and applications stored on the file
server (a dedicated computer running the Windows Server 2008, Windows Server 2008 R2, NetWare or Linux operating
systems), as well as access to shared printers on the network. Sophisticated tools are built into the Windows Server 2008,
Windows Server 2008 R2, NetWare and Linux operating systems to manage the network, and to restrict access to
resources on the file server.
For further information about Windows Server 2008, Windows Server 2008 R2, Novell NetWare or Linux, please consult
the manuals provided with the network operating system (NOS), or speak to your service representative.
CIARA Discovery/Enterprise Q77M-XA-XXXXX-XX-XXX
- 9
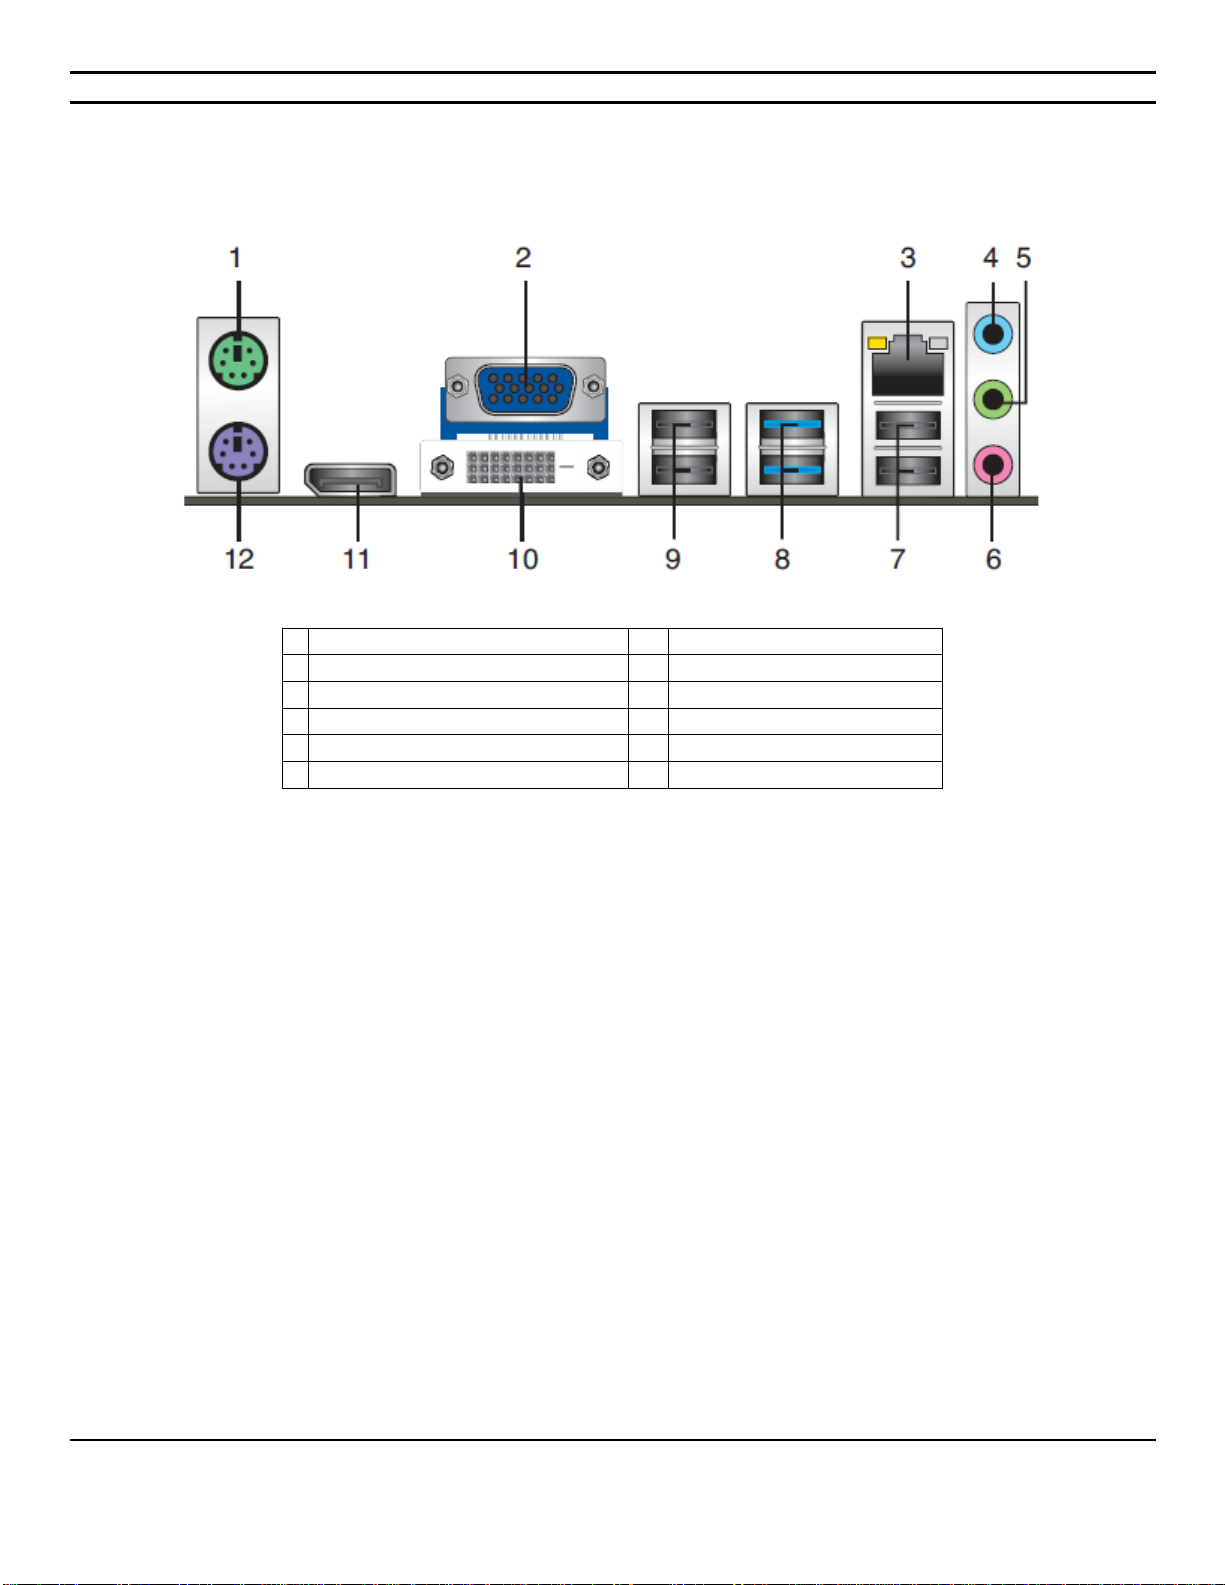
1.3 Peripheral installation
1
PS2 Mouse port
7
USB 2.0 ports 1&2
2
VGA port
8
USB 3,0 ports 1&2
3
LAN RJ45
9
USB 2,0 Ports 3&4
4
Line in port
10
DVI-D port
5
Line out port
11
DisplatPort
6
Microphone port
12
PS2 Keyboard port

CIARA Discovery/Enterprise Q77M-XA-XXXXX-XX-XXX
- 10
1.4 Troubleshooting your system after first install
1.4.1 Helpful hints
If you encounter some minor problems with the computer, monitor, or software, see the following list of general
suggestions before taking further action:
Check that the computer and monitor are plugged into a working electrical outlet.
When available check to see if power supply button is switched on
Check to see that the computer is turned on and the power light is on.
Check to see that the monitor is turned on and the monitor light is on.
Turn up the brightness and contrast controls of the monitor if the monitor is dim.
Press and hold any key. If the system beeps, then the keyboard should be operating correctly.
Check all cable connections for loose connections or incorrect connections.
Wake the computer by pressing any key on the keyboard or pressing the power button. If the system remains in
suspend mode, shut down the computer by pressing and holding the power button for at least four seconds then
press the power button again to restart the computer. If the system will not shut down, unplug the power cord,
wait a few seconds, and then plug it in again. The computer will restart if automatic start on power loss is set in
the BIOS. If it does not restart, press the power button to start the computer
Be sure that all the needed device drivers have been installed. For example, if you are using a printer, you need a
driver for that model of printer.
If you have installed an operating system other than the factory-installed operating system, check to be sure that it
is supported on the system.
If the system has multiple video sources (embedded and PCI Express x16 adapters) and a single monitor, the
monitor must be plugged into one of the three video connectors of the system, i.e. DVI-I, DVI-D or DisplayPort.
Your system can support two independent monitors using any of the three available video connectors. If a PCI
Express x16 video controller is added, then the system will support a third monitor connected to any of the ports
of the video controller. This type of configuration will require adjustments to the BIOS parameters..
When the power to the CIARA Discovery/Enterprise Q77M-XA-XXXXX-XX-XX is first turned on, the ASUS BIOS performs
various diagnostic tests. If an error occurs during these tests, then an error message will be displayed on the screen, or if
the error occurs before the display has been initialized, then the system will report the error with several beeps on the
speaker. The number of beeps and their duration characterizes the error.
Errors will either be FATAL, i.e. : the system will halt after reporting the error, or NON FATAL, i.e. : the system may be
able to boot after reporting the error, although it may not operate reliably or consistently. Please contact your service
representative if you have any questions.
CIARA Discovery/Enterprise Q77M-XA-XXXXX-XX-XXX
- 11
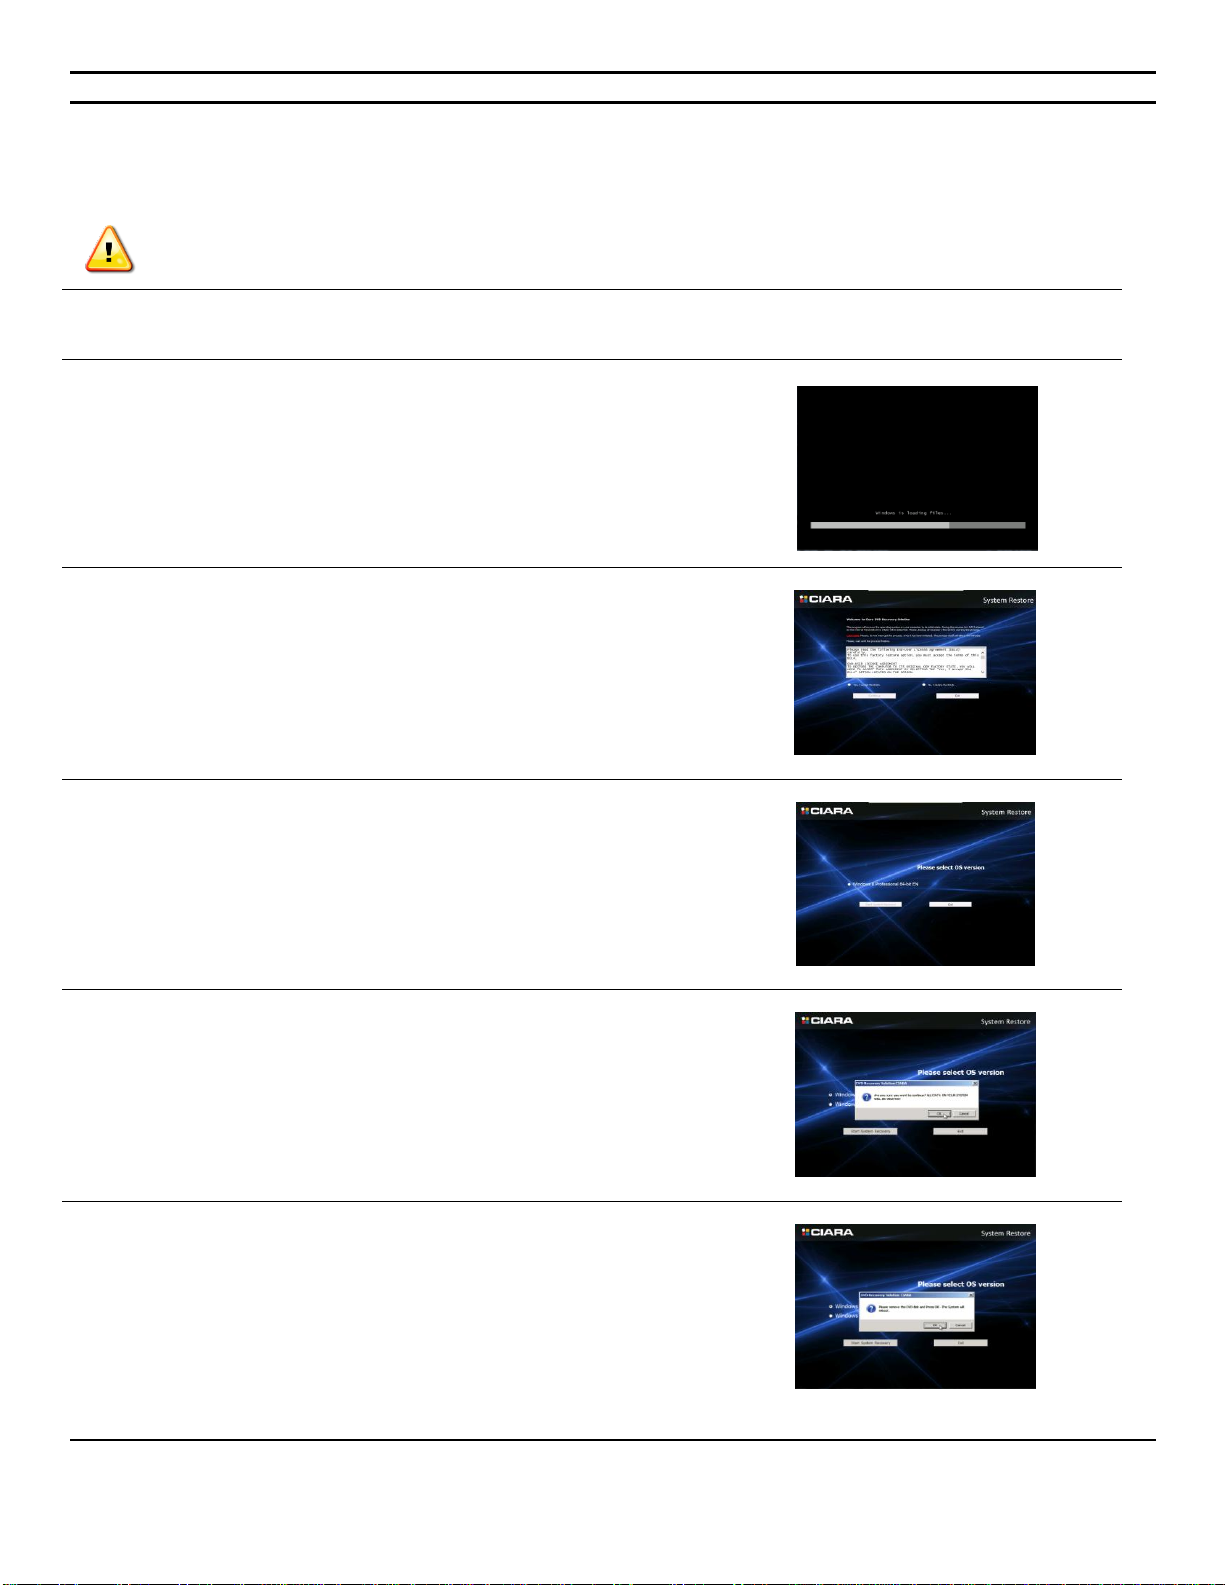
1.4.2 Recovery from CIARA recovery DVD
Before you start this procedure please back up all your important information, the recovery media will erase all
data on HDD before installation.
Insert the Recovery DVD and restart the system.
1- When prompted, press any key to boot from the DVD.
The recovery image will then start.
2- Accept the EULA and press on Continue.
3- Select 32 bit or 64 bit and press Start System Recovery
4- A pop up will then open warning you that all the data will be
lost.
If all your files are already saved, press OK.
5- The recovery will take around 30 minutes to complete. A
window will show you the process of the recovery, Once
completed Eject the DVD then press OK. The system will then
reboot.
NOTE: All drivers required for your system will be already installed
except for components that were not part of your original purchase
CIARA Discovery/Enterprise Q77M-XA-XXXXX-XX-XXX
- 12
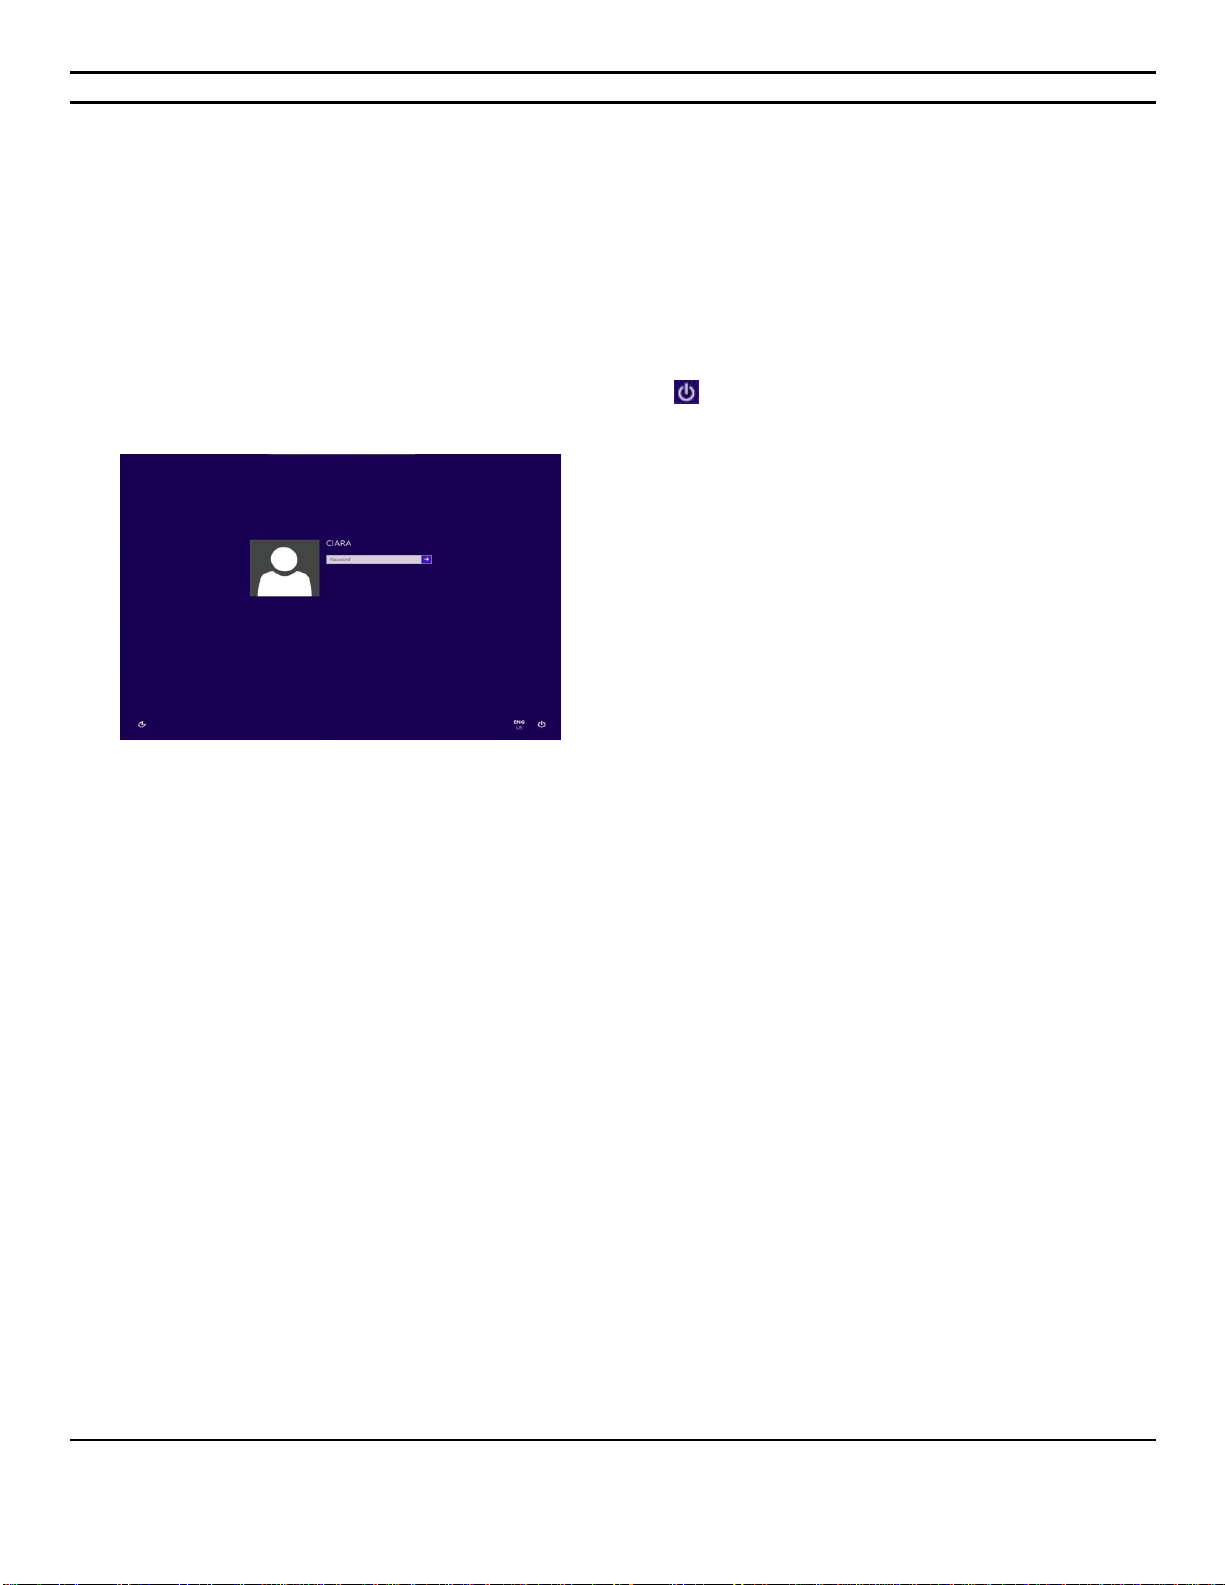
1.4.3 Windows 8 Recovery from Startup Settings
With the Windows Startup Settings screen (formerly advanced boot options) you can start Windows in different advanced
troubleshooting modes so you can find and fix problems on your PC. In previous versions of Windows, you could get to
this screen by pressing F8 before Windows started up. Windows 8 PCs start up quickly so there's not enough time to
press F8.
There are two ways to get to the Windows Startup Settings screen in Windows 8 :
If you're not signed in to Windows, tap or click the power icon from the sign-in screen, hold Shift, and then tap or
click Restart.
Or, if you're already signed in:
1. Swipe in from the right edge of the screen, tap Settings, and then tap Change PC settings.
(If you're using a mouse, point to the upper-right corner of the screen, move the mouse pointer down, click
Settings,
and then click Change PC settings.)
2. Under PC settings, tap or click General.
3. Under Advanced startup, tap or click Restart now.
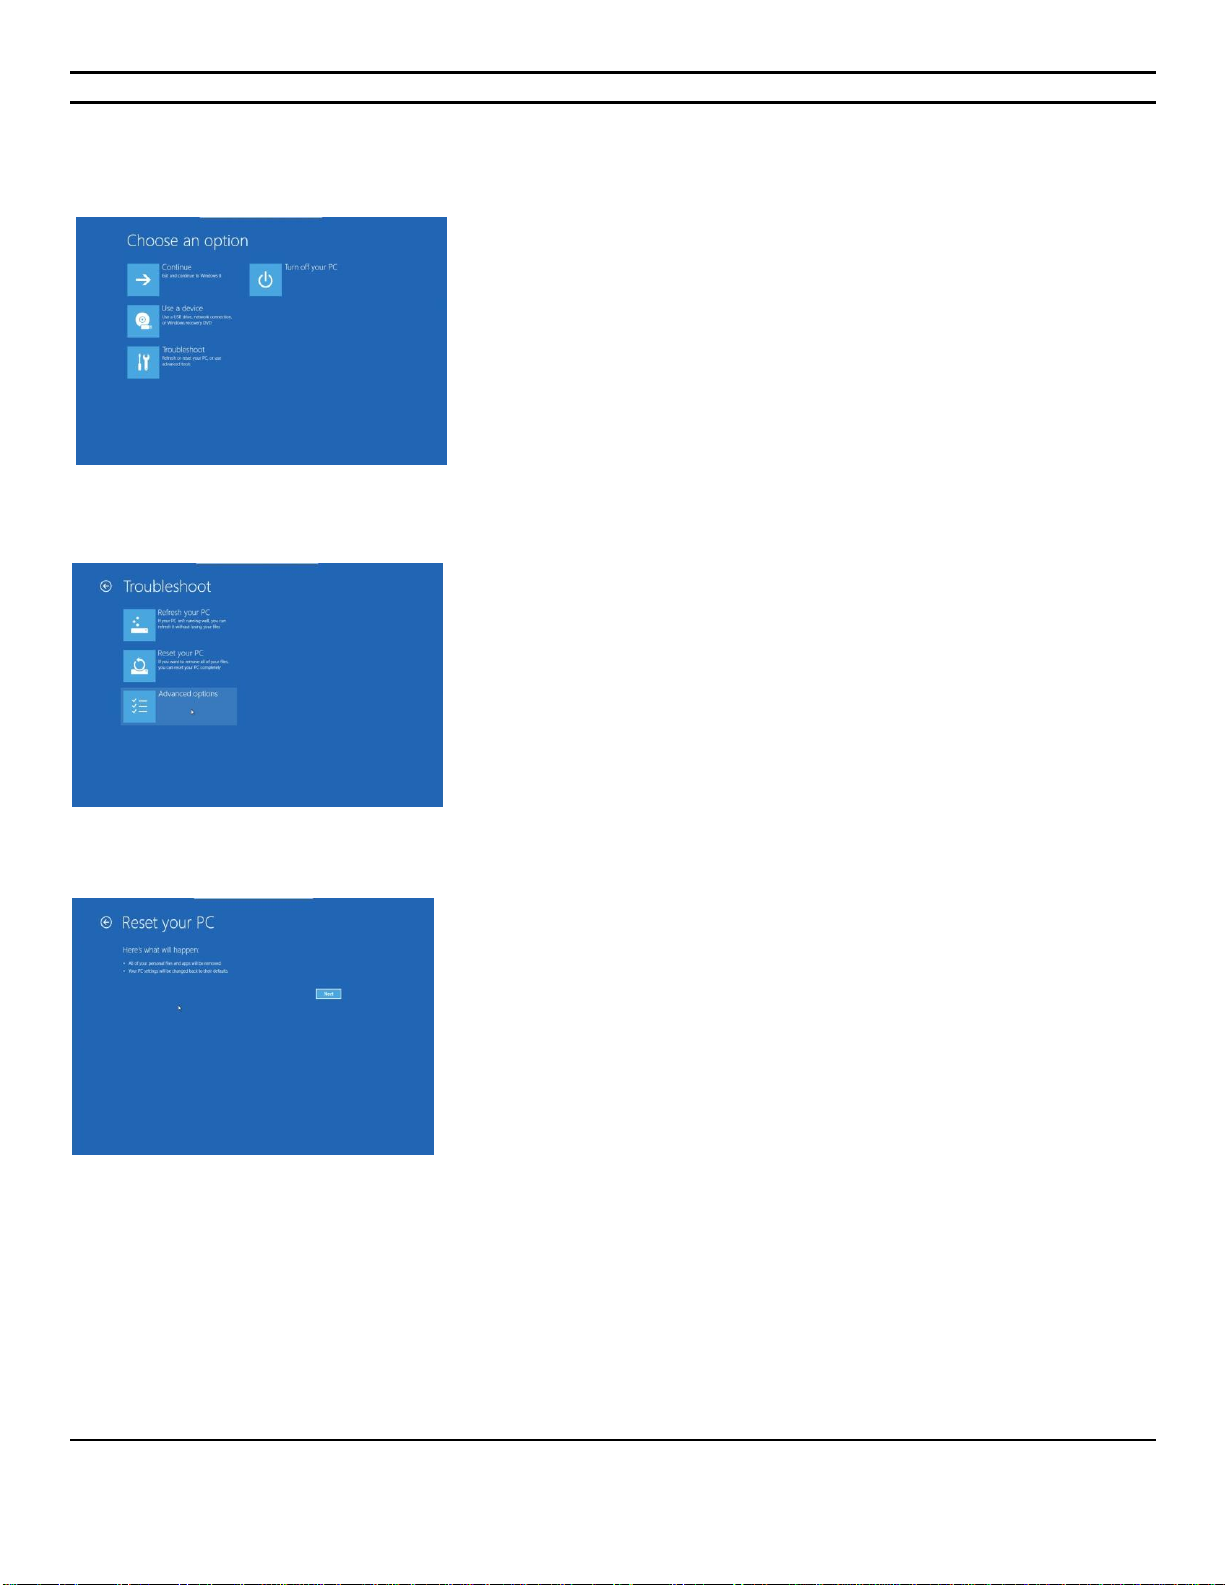
4. On the Choose an option screen, tap or click Troubleshoot.
5. Tap or click Startup Settings.
6. Tap or click Restart.
7. On the Startup Settings screen, choose the startup setting you want.
8. Sign in to your PC with a user account that has administrator rights.
CIARA Discovery/Enterprise Q77M-XA-XXXXX-XX-XXX
- 13
Choose Troubleshoot
Choose Reset your PC
Click Next

CIARA Discovery/Enterprise Q77M-XA-XXXXX-XX-XXX
- 14
Choose Fully clean the drive
Press Reset
Then follow the regular Windows 8 Installation process.
CIARA Discovery/Enterprise Q77M-XA-XXXXX-XX-XXX
- 15
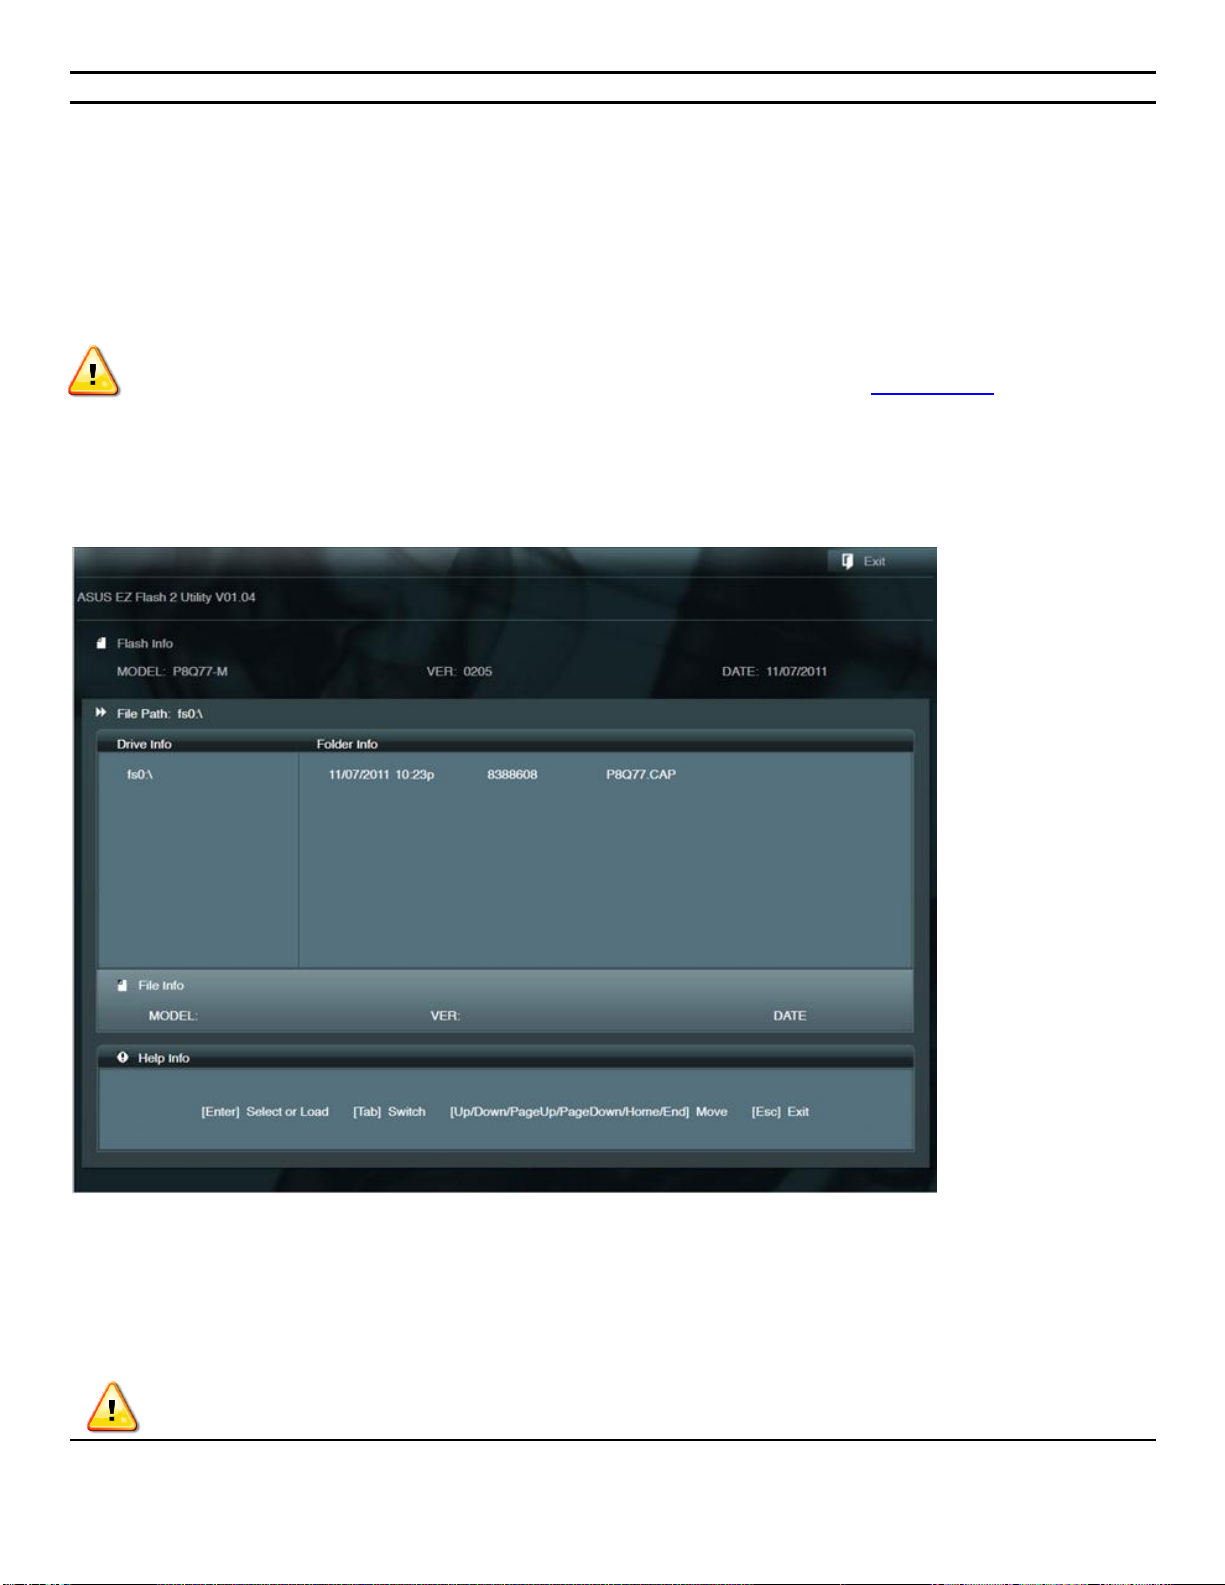
1.4.4 BIOS update
1.4.4.1 ASUS EZ Flash 2
The ASUS EZ Flash 2 feature allows you to update the BIOS without using an OS-based utility..
Before you start using this utility, download the latest BIOS file from the ASUS website at www.asus.com..
To update the BIOS using EZ Flash 2:
1. Insert the USB flash disk that contains the latest BIOS file to the USB port.
2. Enter the Advanced Mode of the BIOS setup program. Go to the Tool menu to select ASUS EZ Flash 2 Utility and press <Enter> to
enable it.
Press <Tab> to switch to the Drive field.
4. Press the Up/Down arrow keys to find the USB flash disk that contains the latest BIOS, and then press <Enter>.
5. Press <Tab> to switch to the Folder Info field.
6. Press the Up/Down arrow keys to find the BIOS file, and then press <Enter> to perform the BIOS update process. Reboot the
system when the update process is done.
• This function supports USB flash disks with FAT 32/16 format and single partition only.
• DO NOT shut down or reset the system while updating the BIOS to prevent system boot failure!
CIARA Discovery/Enterprise Q77M-XA-XXXXX-XX-XXX
- 16
1.4.4.2 ASUS Crash Free BIOS 3 utility
The ASUS Crash Free BIOS 3 is an auto recovery tool that allows you to restore the BIOS file when it fails or gets corrupted during the
updating process. You can restore a corrupted BIOS file using a USB flash drive that contains the updated BIOS
• Before using this utility, rename the BIOS file in the removable device into P8Q77.CAP.
•Download the latest BIOS file from the ASUS website at www.asus.com.
Recovering the BIOS
To recover the BIOS:
1. Turn on the system.
2. Insert the USB flash drive that contains the BIOS file to the USB port.
3. The utility automatically checks the devices for the BIOS file. When found, the utility reads the BIOS file and enters ASUS EZ Flash 2
utility automatically.
4. The system requires you to enter BIOS Setup to recover BIOS setting. To ensure system compatibility and stability, we reco mmend
that you press <F5> to load default BIOS values.
DO NOT shut down or reset the system while updating the BIOS! Doing so can cause system failure !

CIARA Discovery/Enterprise Q77M-XA-XXXXX-XX-XXX
- 17
1.5 Solving general problems
You should be able to easily resolve the general problems described in this section. If a problem persists and you
are unable to resolve it, or if you feel uncomfortable about performing the operation, contact CIARA at 1-877-242-
7272 and ask for the Customer Service department.
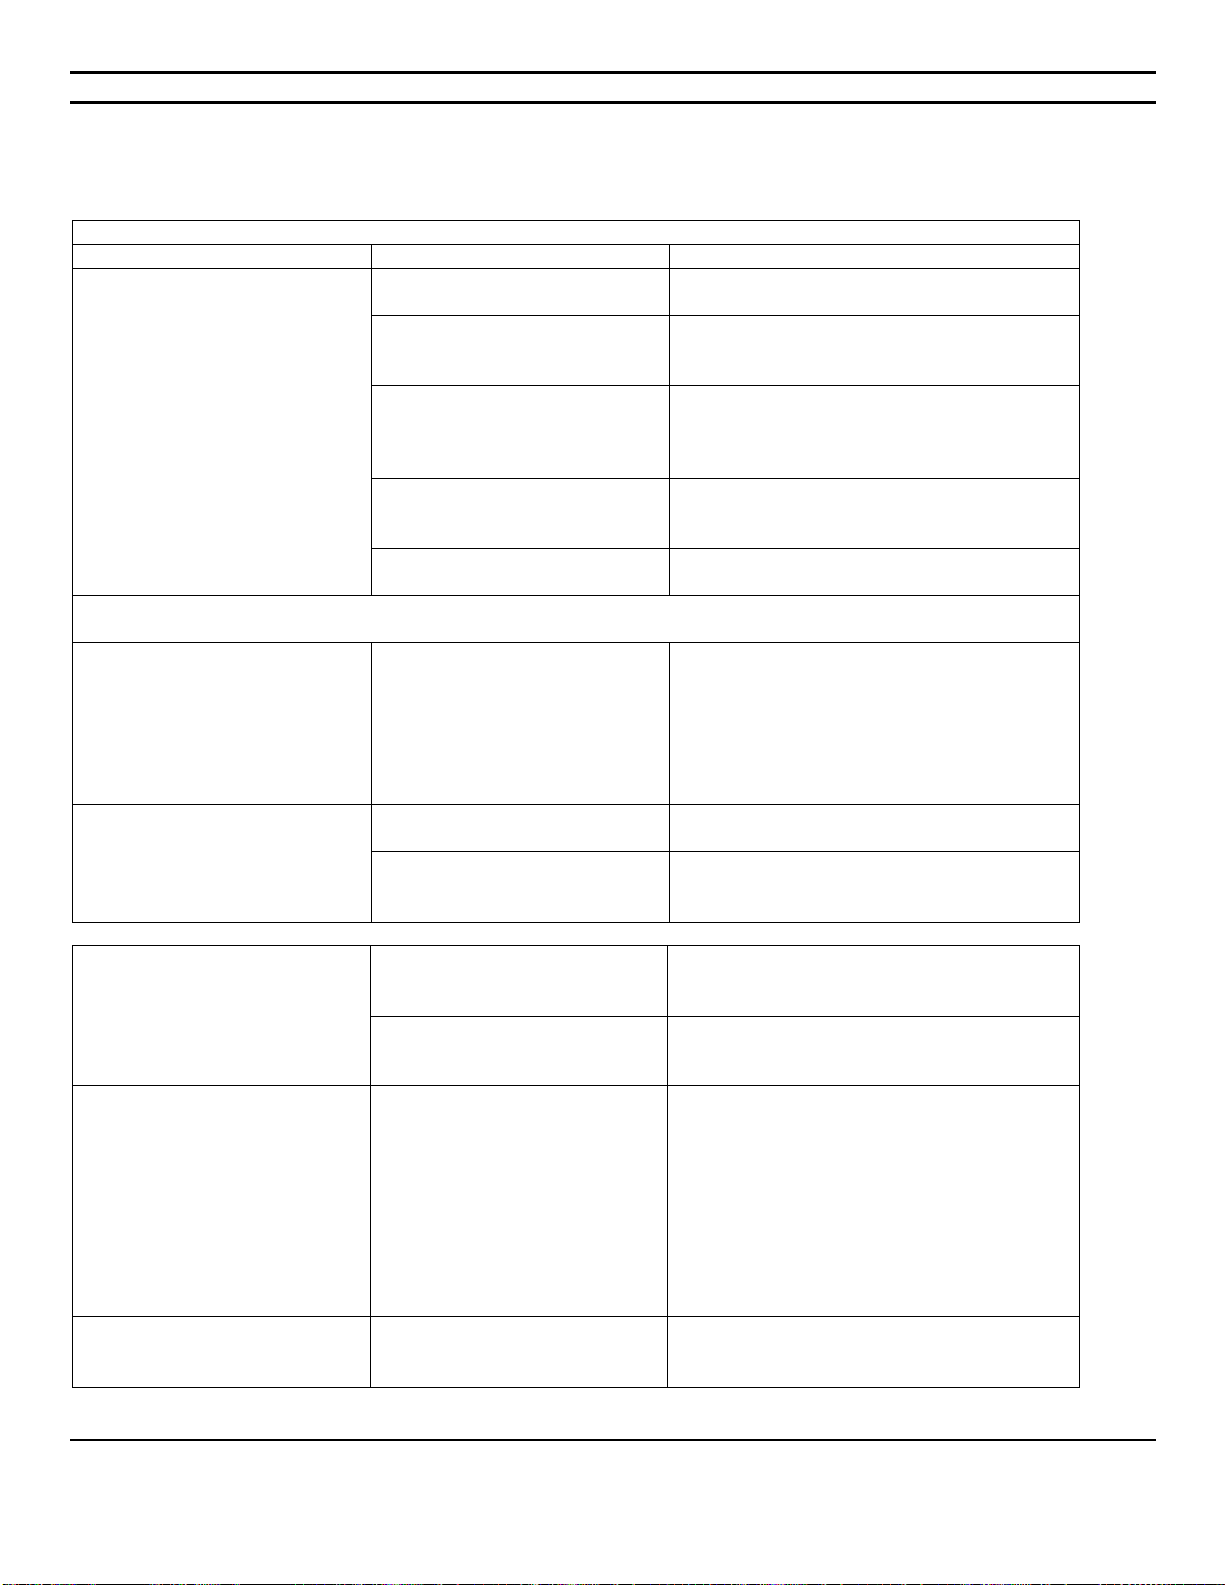
Solving general problems
Problem
Cause
Solution
Computer appears locked up
and will not turn off when the
power button is pressed
Software control of the power
switch is not functional.
Press and hold the power button for at least
four seconds until the computer turns off.
Computer will not respond to
USB keyboard or mouse.
Computer is in Last State
mode.
Press the power button to resume from Last
State mode.
CAUTION : When attempting to resume from Last State mode, do not hold down the power button for more
than four seconds. Otherwise, the computer will shut down and you will lose your data.
Computer date and time
display is incorrect.
RTC (real-time clock) battery
may need to be replaced.
►Connecting the computer
to a live AC outlet prolongs
the life of the RTC battery.
Reset the date and time under Control Panel
(Computer Setup can also be used to update
the RTC date and time). If the problem
persists, replace the RTC battery.
Cursor will not move using
the arrow keys on the
keypad.
The Num Lock key may be
on.
Press the Num Lock key. The Num Lock light
should not be on if you want to use the arrow
keys.
Poor performance is
experienced
Processor is hot.
1. Make sure the airflow to the computer is
not blocked.
2. Make sure the fans are connected and
working properly (some fans only operate
when needed)
3. Make sure the processor heat sink is
installed properly.
4. The system might be infected with a virus
and that it would need to be cleaned with
an antivirus software
Hard drive is full.
Transfer data from the hard drive to create
more space on the hard drive.

CIARA Discovery/Enterprise Q77M-XA-XXXXX-XX-XXX
- 18
1.5.1 Solving power supply problems
Solving power supply problems
Problem
Cause
Solution
Power supply shuts down
intermittently.
Power supply will not turn on
because of internal power
supply fault.
Contact CIARA for the replacement of the power supply.
Computer powered off
automatically and the Power LED
flashes two times, once every
second, followed by a two second
pause.
Processor thermal protection
activated : A fan may be
blocked or not turning.
OR
The heat sink/fan assembly is
not properly attached to the
processor.
Ensure that the computer air vents are not blocked and the
processor-cooling fan is running.
Open hood, press the power button, and see if the
processor fan spins. If the processor fan is not spinning,
make sure the fan's cable is plugged onto the system
board header. Ensure the fan is fully/properly seated or
installed.
If fan is plugged in and seated properly, but is not spinning,
then replace the processor fan. (See article 1.6.3 of this
Guide)
Reseat processor heat sink and verify that the fan
assembly is properly attached.
Power LED flashes, once every
two seconds.
OR
Power LED flashes four times,
once every second, followed by a
two second pause
Power failure (power supply
is overloaded)
Check the power supply voltage. Proper voltage setting
depends on your region. (See section 1.2)
Open the hood (See article 1.6.2) and ensure the 4-wire
power supply cable is seated into the connector on the
system board
Check if a device is causing the problem by removing ALL
attached devices (such as hard or optical drives, and
expansion cards). Power on the system. If the system
enters the POST, then power off and replace one device at
a time and repeat this procedure until failure occurs.
Replace the device that is causing the failure. Continue
adding devices one at a time to ensure all devices are
functioning properly.
If the problem persists, contact CIARA since the problem
may necessitate the replacement of the power supply or
the motherboard.
System does not power on and
LEDs are not flashing.
The system is unable to
power on.
Press and hold the power button for more than 4 seconds.
If the hard drive LED turns on, check if the voltage selector
located on the rear of the power supply, is set to the
appropriate voltage. Proper voltage setting depends on
your region.
OR
Press and hold the power button for less than 4 seconds. If
the hard drive LED does not turn on then :
1. Check that the unit is plugged into a working AC outlet.
2. Open hood and check that the power button harness is
properly connected to the system board.
3. Check that both power supply cables are properly
connected to the system board.
4. Ensure the 4-wire power supply cable is seated into
the connector on the system board.
5. If the problem persists, contact CIARA since the
problem may necessitate the replacement of the power
supply or the motherboard.

CIARA Discovery/Enterprise Q77M-XA-XXXXX-XX-XXX
- 19
1.5.2 Solving hard drive problems
Solving hard drive problems
Problem
Cause
Solution
Hard drive error occurs.
Hard disk has bad sectors or
has failed.
Use a utility to locate and block usage of
bad sectors. If necessary, reformat the hard
disk.
Disk transaction problem.
Either the directory structure is
bad or there is a problem with
a file.
In Windows, right-click Start, click Explore,
and select a drive. Select File > Properties
> Tools. Under Error-checking, click Check
Now.
Drive not found.
Cable could be loose.
Check cable connections.
System files missing or not
properly installed.
For Windows Vista and Windows 7, the
system will need to be booted with a
system DVD and the repair option selected
to try and fix problems.
Computer seems to be locked
up.
Program in use has stopped
responding to commands.
Attempt the normal Windows ―Shut Down‖
procedure. If this fails, press the power
button for four or more seconds to turn off
the power. To restart the computer, press
the power button again.
CIARA Discovery/Enterprise Q77M-XA-XXXXX-XX-XXX
- 20
1.5.3 Solving display problems
Solving display problems
Problem
Cause
Solution
Blank screen (no video).
Monitor is not turned on and
the monitor light is not on.
Turn on the monitor and check that the
monitor light is on.
The cable connections are not
correct.
Check the cable connection from the
monitor to the computer and to the
electrical outlet. See section 1.3.
You may have a screen
blanking utility installed or
energy saver features are
enabled.
Press any key or click the mouse button
and, if set, type your password.
You are using a fixed-sync
monitor and it will not sync at
the resolution chosen.
Be sure that the monitor can accept the
same horizontal scan rate as the resolution
chosen.
Computer is in Last State
mode.
Press the power button to resume from
Last State mode.
CAUTION : When attempting to resume from Last State mode, do not hold down the power button for more
than four seconds. Otherwise, the computer will shut down and you will lose your data.
Power LED flashes six times,
once every second, followed
by a two second pause, and
the computer beeps six times.
Pre-video graphics error.
For systems with a graphics card :
1. Reseat the graphics card. Power on the
system.
2. If the problem persists, contact CIARA
since the problem may necessitate the
replacement of the graphics card or the
motherboard.
Dim characters.
The brightness and contrast
controls are not set properly.
Adjust the monitor brightness and contrast
controls.
Cables are not properly
connected.
Check that the graphics cable is securely
connected to the graphics card and the
monitor. See section 1.3
Blurry video or requested
resolution cannot be set.
If the graphics controller was
upgraded, the correct graphics
drivers may not be loaded.
Install the video drivers included in the
upgrade kit.
Monitor is not capable of
displaying requested
resolution.
Change requested resolution.
The picture is broken up, or it
rolls, jitters, or flashes.
The monitor connections may
be incomplete or the monitor
may be incorrectly adjusted.
1. Be sure the monitor cable is securely
connected to the computer. See section
1.3
2. In a two-monitor system or if another
monitor is in close proximity, be sure
the monitors are not interfering with
each other’s electromagnetic field by
moving them apart.
3. 3. Fluorescent lights or fans may be too
close to the monitor.
High-pitched noise coming
from inside a flat panel
monitor.
Brightness and/or contrast
settings are too high.
Lower brightness and/or contrast settings.
This manual suits for next models
3
Table of contents
Other Ciara-tech Desktop manuals


