Cisco WVC54GCA User manual

USER GUIDE
Wireless-G Internet
Home Monitoring
Camera
Model: WVC54GCA

About This Guide
i
Wireless-G Internet Home Monitoring Camera
A
b
out T
h
i
s
Gu
i
de
Icon Descr
i
pt
i
on
s
W
h
i
l
e rea
d
ing t
h
roug
h
t
h
e User Gui
d
e you may see
various icons that call attention to speci
f
ic items. Below is
a description o
f
these icons:
N
O
TE
:
T
h
is c
h
ec
k
mar
k
in
d
icates t
h
at t
h
ere is
a note o
f
interest and is something that you
s
h
ou
ld
pay specia
l
attention to w
h
i
l
e using t
h
e
pro
d
uct
.
WARNIN
G
:T
h
is exc
l
amation point in
d
icates
t
h
at t
h
ere is a caution or warning an
d
it is
somet
h
ing t
h
at cou
ld
d
amage your property or
pro
d
uct
.
WE
B:
T
h
is g
l
o
b
e icon in
d
icates a notewort
h
y
we
b
site a
dd
ress or e-mai
l
a
dd
ress
.
On
l
ine Resource
s
We
b
site a
dd
resses in t
h
is
d
ocument are
l
iste
d
wit
h
out
h
ttp:/
/
in
f
ront o
f
the address because most current web
browsers do not require it. I
f
you use an older web browser,
you may
h
ave to a
dd
h
ttp:/
/
in
f
ront o
f
the web address
.
Resource Website
Lin
k
sy
s
www.
l
in
k
sys.co
m
Lin
k
sys Internationa
l
www.
l
in
k
sys.com/internationa
l
G
l
ossar
y
www.
l
in
k
sys.com/g
l
ossary
Networ
k
Securit
y
www.
l
in
k
sys.com/securit
y
Copyrig
h
t an
d
Tra
d
emar
ks
Speci
f
ications are subject to change without notice.
Linksys is a registered trademark or trademark o
f
Cisco
Systems, Inc. and/or its a
ff
iliates in the U.S. and certain
ot
h
er countries. Copyrig
h
t © 2007 Cisco Systems, Inc. A
ll
rig
h
ts reserve
d
. Ot
h
er
b
ran
d
s an
d
pro
d
uct names are
trademarks or registered trademarks o
f
their respective
h
o
ld
ers
.

Table of Contents
ii
Wireless-G Internet Home Monitoring Camera
Chapter 1: Product Overview 4
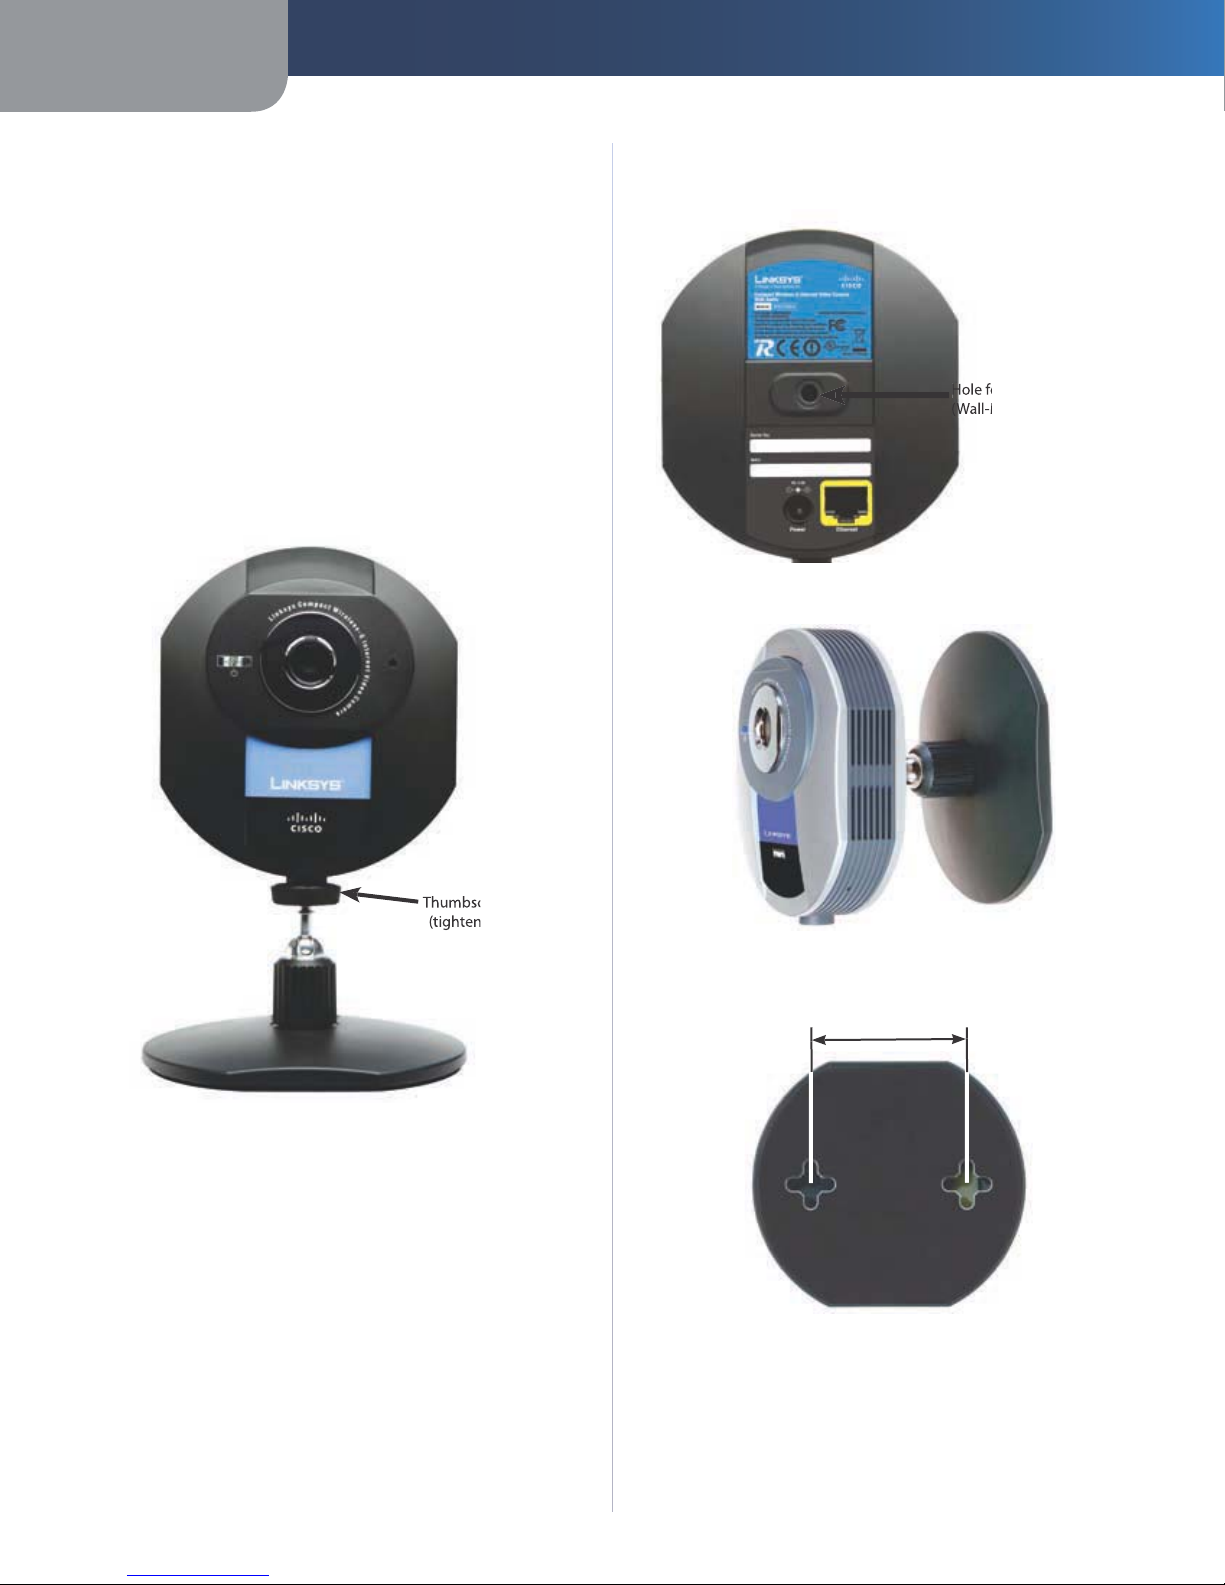
Front Panel.................................................. 4
Back Panel . . . . . . . . . . . . . . . . . . . . . . . . . . . . . . . . . . . . . . . . . . . . . . . . . . 4
Bottom Panel . . . . . . . . . . . . . . . . . . . . . . . . . . . . . . . . . . . . . . . . . . . . . . . . 4
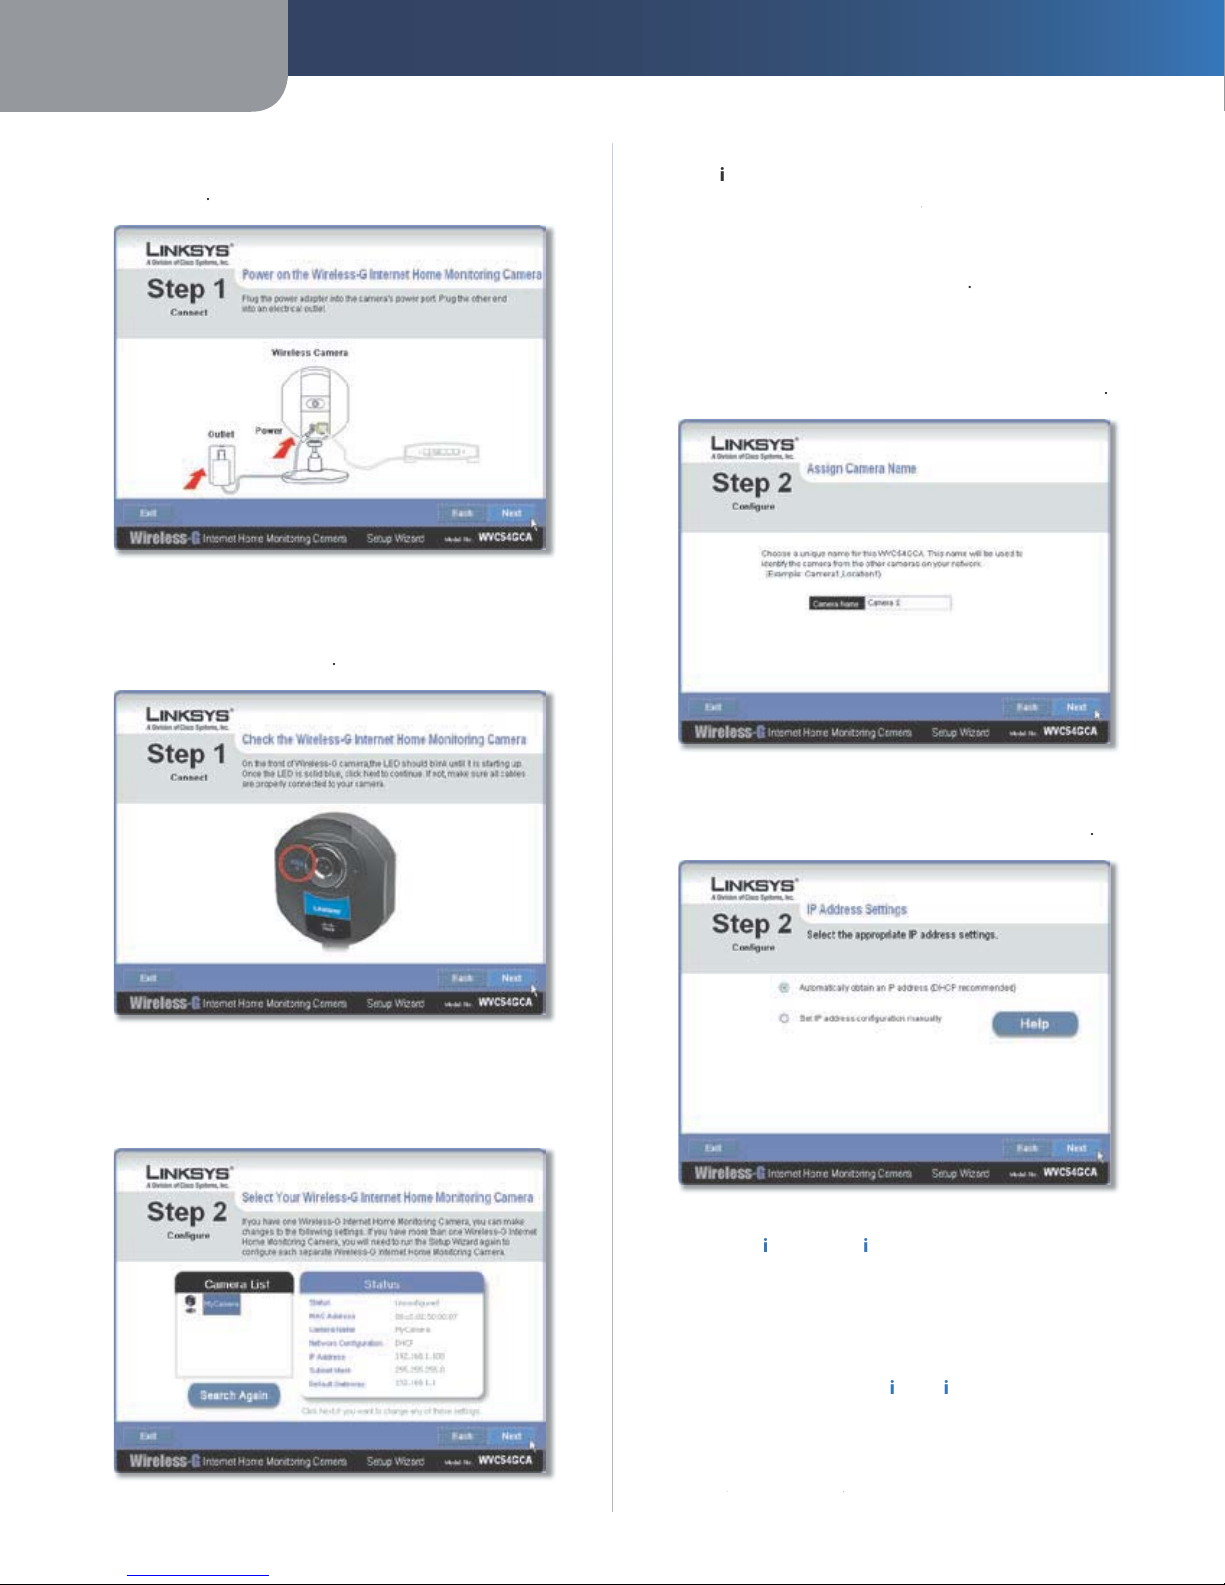
Chapter 2: Setting up and Mounting the Camera 5
Setup Wizard . . . . . . . . . . . . . . . . . . . . . . . . . . . . . . . . . . . . . . . . . . . . . . . . 5
Placement Options . . . . . . . . . . . . . . . . . . . . . . . . . . . . . . . . . . . . . . . . . . . . 9
Chapter 2: Installing and Using the Camera Utility 11
Overview...................................................11
Installing the Camera Utility .......................................11
Using the Camera Utility . . . . . . . . . . . . . . . . . . . . . . . . . . . . . . . . . . . . . . . . .13
Main Screen . . . . . . . . . . . . . . . . . . . . . . . . . . . . . . . . . . . . . . . . . . . . . . . . .13
Chapter 4: Advanced Conguration with the Web-based Utility 20
Overview...................................................20
How to Access the Web-based Utility . . . . . . . . . . . . . . . . . . . . . . . . . . . . . . . . .20
View Video ..................................................20
Setup > Basic . . . . . . . . . . . . . . . . . . . . . . . . . . . . . . . . . . . . . . . . . . . . . . . .21
Setup > Image . . . . . . . . . . . . . . . . . . . . . . . . . . . . . . . . . . . . . . . . . . . . . . .22
Setup > Maintenance . . . . . . . . . . . . . . . . . . . . . . . . . . . . . . . . . . . . . . . . . . .23
Setup > Users . . . . . . . . . . . . . . . . . . . . . . . . . . . . . . . . . . . . . . . . . . . . . . . .23
Setup > DDNS................................................24
Setup > FTP Upload . . . . . . . . . . . . . . . . . . . . . . . . . . . . . . . . . . . . . . . . . . . .25
Setup > Options . . . . . . . . . . . . . . . . . . . . . . . . . . . . . . . . . . . . . . . . . . . . . .26
Setup > Pan/Tilt . . . . . . . . . . . . . . . . . . . . . . . . . . . . . . . . . . . . . . . . . . . . . .27
Setup > Status . . . . . . . . . . . . . . . . . . . . . . . . . . . . . . . . . . . . . . . . . . . . . . .27
Help . . . . . . . . . . . . . . . . . . . . . . . . . . . . . . . . . . . . . . . . . . . . . . . . . . . . . .28
Appendix A: Troubleshooting 29
Common Problems and Solutions . . . . . . . . . . . . . . . . . . . . . . . . . . . . . . . . . . .29
Frequently Asked Questions.......................................30
Appendix B: Wireless Security Checklist 32
General Network Security Guidelines .................................32
Additional Security Tips . . . . . . . . . . . . . . . . . . . . . . . . . . . . . . . . . . . . . . . . .32
Appendix C: Specications 33
Appendix D: Warranty Information 34
Appendix E: Regulatory Information 35
FCC Statement . . . . . . . . . . . . . . . . . . . . . . . . . . . . . . . . . . . . . . . . . . . . . . .35
FCC Radiation Exposure Statement . . . . . . . . . . . . . . . . . . . . . . . . . . . . . . . . . .35
Safety Notices................................................35

Table of Contents
iii
Wireless-G Internet Home Monitoring Camera
Industry Canada Statement . . . . . . . . . . . . . . . . . . . . . . . . . . . . . . . . . . . . . . .35
Avis d’Industrie Canada..........................................36
Wireless Disclaimer . . . . . . . . . . . . . . . . . . . . . . . . . . . . . . . . . . . . . . . . . . . .36
Avis de non-responsabilité concernant les appareils sans l . . . . . . . . . . . . . . . . . .36
User Information for Consumer Products Covered by EU Directive 2002/96/EC on Waste
Electric and Electronic Equipment (WEEE) ..............................37

Chapter 1 Product Overview
4
Wireless-G Internet Home Monitoring Camera
C
h
apter 1:
Pro
d
uct Over
v
i
ew
Thank you
f
or choosing the Linksys Wireless-G Internet
Home Monitoring Camera. T
h
e Camera sen
d
s
l
ive vi
d
eo
t
h
roug
h
t
h
e Internet to a we
b
b
rowser anyw
h
ere in t
h
e
world! This compact, sel
f
-contained unit lets you keep an
eye on your
h
ome, your
k
i
d
s, your wor
k
p
l
ace—w
h
atever’s
i
mportant to you.
Front Pane
l
Power (B
l
ue) T
h
is LED
l
ig
h
ts up w
h
en t
h
e
Camera is powered on. It
f
lashes while the
Camera is
b
ooting up an
d
remains
l
it w
h
en t
h
e
Camera is ready
f
or use.
M
i
crop
h
on
e
T
h
e microp
h
one is use
d
to recor
d
t
h
e am
b
ient soun
d
.
Bac
k
Pane
l
P
owe
r
T
h
e Power port is w
h
ere you wi
ll
connect t
h
e power a
d
apter
.
Et
h
erne
t
T
h
e Et
h
ernet port is w
h
ere you
connect t
h
e Et
h
ernet networ
k
ca
bl
e.
Bottom Pane
l
R
ese
t
T
h
is
b
utton is use
d
to reset t
h
e Camera.
Insert a paper c
l
ip into t
h
e opening. T
h
en press
the button and hold it in
f
or
f
ive seconds.
WARNIN
G
:Resetting t
h
e Camera wi
ll
erase a
ll
o
f
y
our settings, such as encr
y
ption in
f
ormation,
and replace them with the
f
actory de
f
aults. Do
not reset the Camera i
f
you want to retain your
y
our sett
i
ngs
.
N
O
TE
:
The Camera’s
f
actory de
f
ault settings are.
de
f
ault IP address: 1
92
.16
8
.1.
1
00
user
name:
adm
i
n
passwor
d
:a
dm
i
n

Chapter 2 Setting Up and Mounting the Camera
5
Wireless-G Internet Home Monitoring Camera
C
h
apter 2:
S
et
t
i
ng up an
d
Moun
t
i
ng
t
h
e Camer
a
Setup Wizar
d
T
h
e Wire
l
ess-G Internet Home Monitoring Camera Setup
Wizar
d
wi
ll
gui
d
e you t
h
roug
h
t
h
e insta
ll
ation an
d
con
f
iguration procedure
.
Insert t
h
e Setup CD-ROM into your CD-ROM
d
rive.
T
h
e Setup Wizar
d
s
h
ou
ld
run automatica
ll
y, an
d
t
h
e
We
l
come screen should appear. I
f
not, clic
k
S
tar
t
,
se
l
ect
R
u
n
, and in the
f
ield provided, enter D:
\
wvc5
4
gca
.
e
x
e
(i
f
“D” is the letter o
f
your CD-ROM drive).
Setup Wizar
d
- We
l
come Scree
n
C
l
ic
k
C
l
i
c
k
Here to Star
t
to cont
i
nue
.
The Setup Wizard displays the
f
ollowing options.
Setup Camer
a
C
l
ic
k
t
h
is to
b
egin t
h
e insta
ll
ation
pro
c
ess.
Install Camera Utili
ty
C
l
ic
k
t
h
is to insta
ll
t
h
e Camera
Uti
l
ity on your PC
.
User
Gu
i
de
Click this to open the PDF
f
ile o
f
this User
Gui
d
e
.
Ex
i
t
C
l
ic
k
t
h
is to exit t
h
e Setup Wizar
d
.
To insta
ll
t
h
e Camera, c
l
ic
k
S
etup
C
amer
a
.
On t
h
e
End User License Agreement
screen, check the
t
b
ox next to I accept t
h
e agreement an
d
c
l
ic
k
N
ext
i
f
you agree and want to continue the installation, or
c
l
ic
k
Ex
i
t
to en
d
t
h
e insta
ll
ation
.
1.
2.
•
•
•
•
3.
En
d
User LIcense Agreemen
t
Connect t
h
e inc
l
u
d
e
d
networ
k
ca
bl
e to your networ
k
router or switc
h
. C
l
ic
k
N
ex
t
.
Connect Networ
k
Ca
bl
e to t
h
e Switc
h
or Route
r
Connect the other end o
f
the network cable to the
Camera’s Et
h
ernet port. C
l
ic
k
N
ex
t
.
Connect Networ
k
Ca
bl
e to t
h
e Camer
a
4.
5.

Chapter 2 Setting Up and Mounting the Camera
6
Wireless-G Internet Home Monitoring Camera
P
l
ug t
h
e inc
l
u
d
e
d
power a
d
apter into t
h
e Camera’s
Power port. P
l
ug t
h
e ot
h
er en
d
into an e
l
ectrica
l
out
l
et.
C
l
ic
k
N
ex
t
.
Power On t
h
e Camer
a
Make sure the LED is lit on the Camera’s
f
ront panel. I
f
it
is not
l
it, ma
k
e sure t
h
e ca
bl
es are proper
l
y connecte
d
to t
h
e Camera. C
l
ic
k
N
ex
t
.
C
h
ec
k
t
h
e LE
D
The Wizard searches
f
or the Wireless-G Internet Home
Monitoring Cameras on your networ
k
, t
h
en
d
isp
l
ays
the Camera
f
ound along with status in
f
ormation.
Camera Foun
d
on Networ
k
6.
7.
8.
I
f
the Camera
y
ou want is not displa
y
ed, clic
k
Searc
h
Aga
i
n
to
r
u
n
a
n
e
w
sea
r
c
h
fo
r
Ca
m
e
r
as.
Ot
h
erwise, in t
h
e Camera Lis
t
box, click the name of the
t
Camera
y
ou are current
ly
insta
ll
ing. Write
d
own t
h
e IP
address o
f
the Camera, so you can use it to access the
We
b
-
b
ase
d
Uti
l
ity
l
ater. C
l
ic
k
N
ex
t
.
Enter a name
f
or the Camera. Memora
bl
e names are
help
f
ul, especially i
f
you are using multiple Cameras
on t
h
e same networ
k
. It s
h
ou
ld
h
ave 15 c
h
aracters or
f
ewer
.
A
f
ter you have entered the name, clic
k
N
ex
t
.
Assign t
h
e Camera Nam
e
Select how to assign an IP Address to the Camera,
eit
h
er automatica
ll
y or manua
ll
y. T
h
en c
l
ic
k
N
ex
t
.
IP A
dd
ress Settin
gs
A
utoma
t
i
ca
ll
y o
b
t
a
i
n an IP A
dd
res
s
Se
l
ect t
h
is
option i
f
you want to automatically assign an IP address
to t
h
e Camera using DHCP
.
I
f
you are not sure which option to choose, Linksys
recommen
d
s t
h
is option
.
Set IP address con
f
i
gura
t
i
on manua
ll
ySe
l
ect
this option i
f
you want to manually assign a static IP
a
dd
ress to t
h
e Camera
.
I
f
you select this option,
f
ill in the IP A
dd
res
s
,
Su
b
ne
t
Mas
k
, and
k
Gateway
fields.
y
9.
1
0.
•
•

Chapter 2 Setting Up and Mounting the Camera
7
Wireless-G Internet Home Monitoring Camera
Enter t
h
e Static IP A
dd
res
s
I
f
you want to keep the Camera’s de
f
ault password
(
a
dm
i
n
), leave the
f
ields unchanged and clic
k
N
ex
t
.
I
f
you want to change the password, enter the new
password, re-enter to con
f
irm, then click
N
ex
t
.
Enter t
h
e Camera Passwor
d
The Wizard will search
f
or wireless networks, then list
the wireless networks
f
ound. I
f
the wireless network
you want to connect to is not
l
iste
d
, c
l
ic
k
Re
f
res
h
t
o
up
d
ate t
h
e
l
ist. Se
l
ect t
h
e wire
l
ess networ
k
t
h
at you
want to connect t
h
e Camera to, t
h
en c
l
ic
k
N
ex
t
.
Se
l
ect Wire
l
ess Networ
k
11.
1
2.
T
h
e Wizar
d
d
isp
l
ays t
h
e wire
l
ess security met
h
o
d
t
h
at
your networ
k
is using: WPA/WPA2-Persona
l
,
WE
P
(
128-
B
i
t
)
,
or
WEP
(6
4
-
B
i
t
)
. Fo
ll
ow t
h
e appropriate
instructions below. I
f
you are not using wireless
security, se
l
ect
D
i
sa
bl
e
d
an
d
go to step 14.
WPA/WPA2-Persona
l
Enter a passp
h
rase in t
h
e
Passp
h
ras
e
f
ield and clic
k
N
ex
t
. T
h
e passp
h
rase is case
-
sensitive and must be
f
rom 8 to 63 characters in length.
Security Settings - WPA/WPA2-Persona
l
WEP (64-Bit
)
or WEP
(
128-B
i
t
)
To generate t
h
e WEP
k
ey automatica
ll
y, enter a passp
h
rase in t
h
ePassp
h
ras
e
f
ieldandclic
k
N
ex
t
.T
h
epassp
h
raseiscase-sensitivean
d
s
h
ou
ld
not
b
e
l
onger t
h
an 16 c
h
aracters. It must matc
h
the passphrase o
f
your other wireless network devices
an
d
is compati
bl
e wit
h
Lin
k
sys wire
l
ess pro
d
ucts on
l
y.
(I
f
you have any non-Linksys wireless products, enter
t
h
e WEP
k
ey manua
ll
y on t
h
ose pro
d
ucts.)
To manua
ll
y enter a WEP
k
ey,
l
eave t
h
e Passp
h
ras
e
f
ield
bl
an
k
, c
l
ic
k
N
ex
t
, an
d
enter t
h
e WEP
k
ey on t
h
e next
screen. This WEP key must match the WEP key o
f
your
wire
l
ess networ
k
. For 64-
b
it WEP encryption, enter
exact
l
y 10
h
exa
d
ecima
l
c
h
aracters. For 128-
b
it WEP
encryption, enter exact
l
y 26
h
exa
d
ecima
l
c
h
aracters.
Va
l
i
d
h
exa
d
ecima
l
c
h
aracters are“0” to“9”an
d
“A”to“F”.
A
f
ter you have entered the WEP key, clic
k
N
ex
t
.
Security Settings - WEP
(
64-Bit
)
or WEP
(
128-Bit
)
1
3.
•
•

Chapter 2 Setting Up and Mounting the Camera
8
Wireless-G Internet Home Monitoring Camera
Review t
h
e Camera’s settings. To ma
k
e c
h
anges to t
h
e
settings, c
l
ic
k
Bac
k
to go back to the previous screen.
k
I
f
the settings are correct, clic
k
S
av
e
to cont
i
nue.
Save t
h
e Camera Setting
s
When the Wizard in
f
orms you that the new Camera
settings
h
ave
b
een save
d
, c
l
ic
k
C
on
t
i
n
u
e
.
Disconnect the power
f
rom the camera. Click
N
ex
t
.
Disconnect t
h
e Powe
r
Disconnect the network cable
f
rom the Camera and
f
rom your switch or router. Clic
k
N
ex
t
.
Disconnect t
h
e Networ
k
Ca
ble
14.
15.
1
6.
17.
Reconnect t
h
e power to t
h
e Camera. C
l
ic
k
N
ext
.
Reconnect t
h
e Powe
r
W
h
en t
h
e Setup Wizar
d
d
isp
l
ays Camera success
f
ully
connecte
d
to networ
k
, c
l
ic
k
Con
t
i
n
u
e
, t
h
en c
l
ic
k
N
ex
t
.
Reconnect t
h
e Powe
r
T
he
Con
g
ratu
l
ation
s
s
c
reen
appears
.
Insta
ll
Camera Utili
ty
C
l
ic
k
t
h
is to insta
ll
t
h
e Camera’s
Uti
l
ity
.
On
l
i
ne
R
e
g
i
stration C
l
ic
k
t
h
is to register your Camera
on
l
ine
.
Exi
t
C
l
ic
k
t
h
is to insta
ll
t
h
e Camera’s uti
l
ity
l
ater.
Go to t
h
e “P
l
acement Op
t
i
ons
”
sec
t
i
on.
1
8.
1
9.
20.
•
•
•

Chapter 2 Setting Up and Mounting the Camera
9
Wireless-G Internet Home Monitoring Camera
P
l
acement Option
s
The Camera can stand on a sur
f
ace or be mounted on a
wa
ll
. Depen
d
ing on t
h
e positioning you want, you attac
h
the Camera head to its stand at two di
ff
erent points.
Stan
d
Optio
n
Follow these steps to stand the Camera on a sur
f
ace.
Insert the screw end o
f
the stand into the hole on the
b
ottom pane
l.
Tig
h
ten t
h
e screw an
d
t
h
en t
h
e t
h
um
b
screw.
Place the Camera, and adjust the tilt o
f
its head
accor
d
ing
l
y, as
d
escri
b
e
d
b
e
l
ow in section “Camera
Hea
d
Ti
l
ting” v
.
c
rew
n
e
d)
Camera in Stan
d
ing Positio
n
Wa
ll
Mount Optio
n
You use t
h
e Camera’s stan
d
to mount t
h
e Camera on a
wa
ll
. T
h
e stan
d
h
as two wa
ll
-mount s
l
ots t
h
at are space
d
5
8
mm (2.28 inc
h
es) apart.
Insert the screw end o
f
the stand into the hole on the
b
ac
k
pane
l.
Tig
h
ten t
h
e screw en
d
an
d
t
h
en t
h
e t
h
um
b
screw.
Determine w
h
ere you want to mount t
h
e Camera.
Attac
h
two screws to t
h
e wa
ll
, so t
h
at t
h
e Camera’s
wa
ll
-mount s
l
ots
l
ine up wit
h
t
h
e two screws.
Maneuver t
h
e Camera so t
h
e screws are inserte
d
into
t
h
e two s
l
ots
.
1.
2.
3.
1.
2.
3.
4.
Adjust the tilt o
f
its head accordingly, as described
b
e
l
ow in section “Camera Hea
d
Ti
l
ting”.
o
r Attaching Stand
M
ount Option
)
Wa
ll
Mount Optio
n
Camera in Wa
ll
-Mounting Positio
n
5
8
m
m
(2.28 inc
h
es
)
v
Wa
ll
-Mount S
l
ot
s
Camera Hea
d
Ti
l
tin
g
A
f
ter the Camera is assembled, you can tilt the Camera
h
ea
d
on its
b
a
ll
joint using t
h
e
l
oc
k
nut on t
h
e camera
stan
d
. Loosen t
h
e
l
oc
k
nut, ti
l
t t
h
e camera
h
ea
d
as
d
esire
d
,
t
h
en tig
h
ten t
h
e
l
oc
k
nut to secure t
h
e position.
5.

Chapter 2 Setting Up and Mounting the Camera
10
Wireless-G Internet Home Monitoring Camera
Camera Ti
l
ting Feature wit
h
Stan
d
Optio
n
T
he
i
n
stallat
i
o
n
of
t
h
e
W
i
r
eless
-G In
te
rn
et
H
o
m
e
M
o
n
i
t
o
r
i
ng Camera
i
s comp
l
ete. Go to “C
h
apter 3:
Insta
ll
i
ng an
d
U
s
i
ng t
h
e Camera Ut
i
l
i
t
y
.
”
Fo
r
i
n
fo
rm
at
i
o
n
about
ad
v
a
n
ced
co
n
f
i
gura
t
i
on
us
i
ng
t
h
e Camera’s We
b
-
b
ase
d
Ut
i
l
i
ty, go to “C
h
apter
4
:
Advanced Con
f
i
gura
t
i
on
w
i
t
h
t
h
e We
b
-Base
d
Ut
i
l
i
ty.
”

Chapter 2 Installing and Using the Camera Utility
11
Wireless-G Internet Home Monitoring Camera
C
h
apter 2:
Insta
ll
i
ng an
d
U
s
i
ng t
h
e
C
amera U
t
i
l
i
ty
Overv
i
e
w
T
h
is c
h
apter wi
ll
instruct you on
h
ow to insta
ll
an
d
use t
h
e
Camera Uti
l
ity on your PC. T
h
e Uti
l
ity a
ll
ows you to easi
l
y
view an
d
recor
d
t
h
e Camera’s vi
d
eo
.
I
f
another Wireless-B or Wireless-G Internet Camera Utility
is a
l
rea
d
y insta
ll
e
d
on your PC, Lin
k
sys recommen
d
s t
h
at
you uninstall it be
f
ore installing this Camera Utility.
N
O
TE
:
To view vi
d
eo using a we
b
b
rowser, you
must use Internet Exp
l
orer version 5.5 or
h
ig
h
er.
The View Video
f
eature will not work with
other web browsers. I
f
you do not use Internet
Exp
l
orer v5.5, use t
h
e Camera Uti
l
ity instea
d
.
Insta
ll
ing t
h
e Camera Uti
l
it
y
On t
h
eWe
l
com
e
or
Congratu
l
ation
s
screen o
f
the Setup
Wizar
d
, c
l
ic
k
Insta
ll
Camera U
t
i
l
i
ty
.
Insta
ll
Viewer & Recor
d
er Uti
l
ity Scree
n
T
h
e Setup Wizar
d
b
egins to insta
ll
t
h
e Camera Uti
l
ity.
The progress o
f
the installation is displayed.
When the Setup Wizard in
f
orms you that the
insta
ll
ation is comp
l
ete, c
l
ic
k
C
on
t
i
n
u
e
. T
h
e Uti
l
ity wi
ll
automatica
ll
y start up
.
Camera Uti
l
ity Insta
ll
ation Comp
l
ete
d
1.
2.
3.
T
h
e Camera Uti
l
ity
d
isp
l
ays t
h
e
S
etup screen an
d
searches
f
or your Wireless-G Camera
.
Setup Screen - Searching
f
or Camer
a
Enter your User Name an
d
Passwor
d:
U
ser
N
ame
E
nter a
dm
i
n
in this
f
ield.
Passwor
d
I
f
you did NOT change the password
in Step 11 o
f
section “Setup Wizard” in “Chapter 2:
Setting Up an
d
Mounting t
h
e Camera,”enter a
dm
i
n
in this
f
ield. Otherwise, enter the new password
.
Aut
h
orization Scree
n
T
h
eSetup>Networ
k
Camerascreen appears.T
h
isscreen
displays the
f
ollowing in
f
ormation on the Camera:
Ena
ble
This is checked i
f
the Camera is enabled.
C
amera Name Displays the name o
f
the Camera.
IP A
dd
res
s
Disp
l
ays t
h
e Camera’s IP a
dd
ress
.
Port Num
b
e
r
Disp
l
ays t
h
e Camera’s port num
b
er
.
M
o
t
i
on
D
etec
t
i
on Recor
d
i
ng
Indicates i
f
motion
d
etectionrecor
d
ingisena
bl
e
d
or
d
isa
bl
e
d
usingt
h
e
Ena
bl
e Mo
t
i
on
D
etect
i
on Recor
d
i
ng
c
h
ec
kb
ox.
MAC A
dd
ress
Disp
l
ays t
h
e Camera’s MAC a
dd
ress
.
User Name an
d
Passwor
d
Disp
l
ays t
h
e user
name. T
h
e passwor
d
is
d
isp
l
aye
d
as “
•••••
“
f
or
secur
i
ty reasons
.
2.
3.
•
•
4.
•
•
•
•
•
•
•

Chapter 2 Installing and Using the Camera Utility
12
Wireless-G Internet Home Monitoring Camera
Setup > Networ
k
Camer
a
C
l
ic
k
S
av
e
, t
h
en
Y
e
s
to save t
h
e Camera’s settings.
To set up a Camera t
h
at is
l
ocate
d
on t
h
e Internet, c
l
ic
k
t
he
Internet
C
amer
a
ta
b.
S
etup > Internet
C
amer
a
To set up a recording schedule
f
or a Camera, click the
Recor
d
i
ng Sc
h
e
d
u
le
ta
b.
5.
6.
Setup > Recor
d
ing Sc
h
e
d
u
le
To con
f
igure the Camera’s pre
f
erence settings, click
t
he
Pre
f
erences ta
b.
S
etup > Internet
C
amer
a
To
l
earn
h
ow to use t
h
e Camera Ut
i
l
i
ty, go to
“
Us
i
ng
t
h
e Camera U
t
i
l
i
ty.
”
Advanced users: I
f
you want to use the Camera’s Web
-
b
ase
d
U
t
i
l
i
ty,goto“C
h
apter
4
:AdvancedCon
f
i
gura
t
i
on
w
i
t
h
t
h
e We
b
-Base
d
U
t
i
l
i
t
y.
”
7.

Chapter 2 Installing and Using the Camera Utility
13
Wireless-G Internet Home Monitoring Camera
Using t
h
e Camera Uti
l
it
y
A
f
ter the Camera Utility has been installed, its icon will be
d
isp
l
aye
d
in two
l
ocations, one on your
d
es
k
top an
d
one
in the system tray o
f
your desktop’s taskbar.
N
O
TE
:
T
h
is Camera Uti
l
ity is
b
ac
k
war
d-
compati
bl
e wit
h
t
h
e Wire
l
ess-B Internet Vi
d
eo
Camera, so you can use t
h
is Uti
l
ity to contro
l
Wire
l
ess-G an
d
Wire
l
ess-B Internet Vi
d
eo
Cameras on your networ
k.
T
h
ere are two ways to open t
h
e Camera Uti
l
ity:
Dou
bl
e-c
l
ic
k
t
h
e icon on your
d
es
k
top (t
h
e icon acts
as a s
h
ortcut)
Rig
h
t-c
l
ic
k
t
h
e icon in t
h
e system tray, an
d
t
h
en c
l
ic
k
Ma
i
n
P
rogra
m
.
Camera Uti
l
ity Icon on Des
k
to
p
M
ai
n Scree
n
A
f
ter you open the Utility, the Main screen is displayed. The
Main screen is
d
ivi
d
e
d
into t
h
ree sections,
C
amera
S
tatu
s
,
Camera
f
unctions, and viewin
g
windows
f
or Channels 1-8
o
f
the Utility. (To view di
ff
erent windows, use the scroll bar
on t
h
e rig
h
t
.
Camera
f
unctions include
f
inding or deleting Cameras,
c
h
anging Camera settings, sc
h
e
d
u
l
ing recor
d
ings,
accessing saved
f
iles, and con
f
iguring the motion
d
etection settings
.
To con
f
igure the Utility settings, clic
k
Ut
i
l
i
ty
S
et
t
i
ngs
.
T
o
get help in
f
ormation, click the
?
b
utton in t
h
e upper rig
h
t-
h
an
d
corner. To minimize t
h
e Uti
l
ity, c
l
ic
k
t
h
e
–
butto
n in
t
h
e upper rig
h
t-
h
an
d
corner. To exit t
h
e Uti
l
ity, c
l
ic
k
t
h
e
X
b
utton in t
h
e upper rig
h
t-
h
an
d
corner.
Main
S
cree
n
•
•
C
amera
S
tatu
s
This section o
f
the Main screen lists all o
f
the Cameras
the Utility has detected. To view the video o
f
a speci
f
ic
Camera, se
l
ect a Camera, t
h
en
d
rag-an
d
-
d
rop t
h
e Camera
to a viewing win
d
ow
.
CH
T
h
is is t
h
e C
h
anne
l
use
d
b
y t
h
e Camera wit
h
in t
h
e
Utility. (The Utility o
ff
ers up to eight channels.
)
C
amera Name T
h
is is t
h
e name you gave to t
h
e Camera.
AUDI
O
O
N
/O
FF T
h
e Compact Wire
l
ess-G Internet Vi
d
eo
Camera does not
f
eature audio; however, other Cameras
do. This displays he status o
f
their audio transmissions.
VIDE
O
O
N
/O
FF This indicates the status o
f
the Camera’s
vi
d
eo transmissions.
Main > A
dd
Camer
a
To a
dd
a Camera on your
l
oca
l
networ
k
or t
h
e Internet,
c
l
ic
k
A
dd
Camer
a
on t
h
e Main screen.
T
h
eA
dd
Camer
a
screen wi
ll
appear. T
h
ere wi
ll
b
e two ta
b
s
avai
l
a
bl
e, LAN an
d
Internet
.
LAN
T
h
e
LAN
screenshowstheCameras foundonyour localarea
N
network, along with each Camera’s status in
f
ormation.
Main > A
dd
Camera > LA
N
C
ameras on LA
N
The Utility will search
f
or Cameras on the local area
networ
k
an
d
d
isp
l
ay a
l
ist in t
h
e
Cameras on LAN
box. To
N
run a new searc
h
, c
l
ic
k
t
h
e Searc
h
b
utton.
C
amera Dat
a
For t
h
e Camera w
h
ose name is current
l
y se
l
ecte
d
in t
h
e
C
ameras on LA
N
box, the following information will be
N
d
isp
l
aye
d
in t
h
e
C
amera Dat
a
b
ox
:

Chapter 2 Installing and Using the Camera Utility
14
Wireless-G Internet Home Monitoring Camera
C
amera Name T
h
is is t
h
e name you gave to t
h
e Camera.
MA
C
Nam
e
Displayed here is the MAC address o
f
the
C
amera
.
D
esc
r
i
p
t
i
on
This is the in
f
ormation about the Camera
t
h
at you entere
d.
A
dd
res
s
S
h
own
h
ere is t
h
e Camera’s IP a
dd
ress
.
Port Num
b
e
r
T
h
is is t
h
e port num
b
er t
h
e Camera uses
f
or communication
.
L
o
g
i
n
I
f
you set up the Camera with a name and password,
t
h
en you wi
ll
nee
d
to enter t
h
em
h
ere in or
d
er to access
t
h
e Camera
.
N
am
e
Enter t
h
e
l
ogin Name
.
Passwor
d
Enter t
h
e
l
ogin Passwor
d.
To a
dd
a Camera to t
h
e Uti
l
ity’s
l
ist, se
l
ect t
h
e Camera you
wis
h
to a
dd
b
y c
l
ic
k
ing its name in t
h
e
C
ameras on LA
N
b
ox. T
h
en c
l
ic
k
t
h
e A
dd
button. You will be noti
f
ied when
t
h
e Camera
h
as
b
een a
dd
e
d
. C
l
ic
k
t
h
e
OK
button.
K
To c
l
ose t
h
is screen, c
l
ic
k
t
h
e
X
b
utton in t
h
e upper rig
h
t
-
h
an
d
corner
.
I
nterne
t
T
h
e
Internet
screen shows the Camera found on the
t
Internet, along with the Camera’s status in
f
ormation.
Main > A
dd
Camera > Interne
t
Test Resu
l
t
s
First, go to t
h
e Camera Data section. Enter t
h
e Camera’s IP
Address, Port Number, and login in
f
ormation (i
f
required).
T
h
en c
l
ic
k
t
h
e
C
onnect button to
f
ind the Camera. The
f
ollowing in
f
ormation will be displayed:
C
amera Dat
a
C
amera Name T
h
is is t
h
e name you gave to t
h
e Camera.
MA
C
Nam
e
Displayed here is the MAC address o
f
the
C
amera
.
D
esc
r
i
p
t
i
on
This is the in
f
ormation about the Camera
t
h
at you entere
d.
A
dd
res
s
S
h
own
h
ere is t
h
e Camera’s IP a
dd
ress or
So
l
oLin
k
DDNS a
dd
ress.
Port Num
b
e
r
T
h
is is t
h
e port num
b
er t
h
e Camera uses
f
or communication
.
L
o
g
i
n
I
f
you set up the Camera with a name and password,
t
h
en you wi
ll
nee
d
to enter t
h
em
h
ere in or
d
er to access
t
h
e Camera
.
Name Enter t
h
e
l
ogin Name
.
Passwor
d
Enter t
h
e
l
ogin Passwor
d.
To a
dd
t
h
e Camera to t
h
e Uti
l
ity’s
l
ist, c
l
ic
k
t
h
e A
dd
b
utton.
I
f
you wish to clear a Camera, click the C
l
ea
r
b
utton
.
To c
l
ose t
h
is screen
,
c
l
ic
k
t
h
e
X
b
utton in t
h
e upper rig
h
t
-
h
an
d
corner
.
View Vi
d
e
o
T
h
e
C
amera
S
tatu
s
section
l
ists a
ll
t
h
e Cameras
d
etecte
d
by the Utility. To view a speci
f
ic Camera’s video, select it
f
rom the list and drag-and-drop it on a Channel (viewing)
win
d
ow
.
Dou
bl
e-c
l
ic
k
t
h
e Camera’s viewing win
d
ow to
b
ring up
t
he
View Vi
d
eo screen. T
h
is screen
d
isp
l
ays t
h
e se
l
ecte
d
Camera’s video at
f
ull size, and provides icons that you
can use to recor
d
, p
l
ay, stop, ta
k
e pictures, zoom, a
d
just
t
h
e au
d
io, or
d
ou
bl
e t
h
e win
d
ow’s size. T
h
ese icons are
d
escri
b
e
d
b
e
l
ow
.
To c
l
ose t
h
e View VI
d
eo screen, c
l
ic
k
X
in t
h
e upper rig
h
t
-
h
an
d
corner
.
Main > View Vi
d
e
o

Chapter 2 Installing and Using the Camera Utility
15
Wireless-G Internet Home Monitoring Camera
Icon
F
unc
t
i
on
I
f
you want to record the current video,
c
l
ic
k
t
h
is icon
.
I
f
you want to play the current video,
c
l
ic
k
t
h
is icon
.
I
f
you want to
f
reeze the current
f
rame o
f
vi
d
eo or stop recor
d
ing, c
l
ic
k
t
h
is icon
.
To take a snapshot o
f
the current
f
rame
o
f
video, click this icon.
To zoom in on a section o
f
the window,
c
l
ic
k
t
h
is icon. T
h
en use
y
our mouse to
select the section to magni
f
y. Click the
icon again to disable the zoom
f
eature.
Click this icon to turn audio on or o
ff
.
C
l
ic
k
t
h
is
b
ar an
d
move its en
d
point to
raise or
l
ower t
h
e vo
l
ume
.
T
h
is
d
isp
l
ays t
h
e Camera’s C
h
anne
l
.
(T
h
is icon cannot
b
e use
d
to c
h
ange t
h
e
Camera’s C
h
anne
l
. To
d
o t
h
at,
y
ou must
g
o to t
h
e Main screen an
d
d
ra
g
an
d
d
rop
t
h
e Camera to t
h
e new c
h
anne
l
’s viewing
win
d
ow.
)
I
f
you want to make the viewing window
twice as
l
arge, c
l
ic
k
t
h
is icon
.
De
l
ete Camer
a
To
d
e
l
ete a Camera, se
l
ect its name in t
h
e
C
amera
S
tatus
section, an
d
c
l
ic
k
De
l
ete Camer
a
. W
h
en you are as
k
e
d
to
con
f
irm the deletion, click the
OK
button.
K
Main > De
l
ete Camer
a
Ma
i
n > Camera Sett
i
ng
s
To modi
f
y a Camera’s settings, select its name in the
C
amera
S
tatu
s
section o
f
the Ma
in
screen
,
an
d
c
l
ic
k
C
h
ange Set
t
i
ngs
. T
h
eC
h
ange Setting
s
s
c
reen
appears
.
Main > C
h
ange Setting
s
Test Resu
l
t
s
C
l
ic
k
t
h
e
T
est
b
utton to c
h
ec
k
t
h
e connection. T
h
e resu
l
ts
will be displayed. I
f
you need to change the Camera’s
network settings or login in
f
ormation, you can do so on
t
h
is screen
.
C
amera Dat
a
C
amera Name T
h
is is t
h
e name you gave to t
h
e Camera.
MA
C
Nam
e
Displayed here is the MAC address o
f
the
C
amera
.
Descrip
t
i
on
This is the in
f
ormation about the Camera
t
h
at you entere
d.
A
dd
res
s
Enter t
h
e Camera’s new IP a
dd
ress or So
l
oLin
k
DDNS a
dd
ress
.
Port Num
b
e
r
Enter t
h
e new port num
b
er t
h
at t
h
e Camera
uses
f
or communication
.
L
o
g
i
n
I
f
you set up the Camera with a name and password,
t
h
en you can c
h
ange t
h
em
h
ere
.
Name Enter t
h
e new
l
ogin Name.
Passwor
d
Enter t
h
e new
l
ogin Passwor
d
.
C
l
ic
k
S
av
e
to save t
h
e new settings
.
To c
l
ose t
h
is screen, c
l
ic
k
X
in t
h
e upper-rig
h
t corner
.

Chapter 2 Installing and Using the Camera Utility
16
Wireless-G Internet Home Monitoring Camera
Main > Sc
h
e
d
u
l
e
d
Recor
d
ing
s
To schedule recordings
f
or a Camera, select its name in
t
he
C
amera
S
tatu
s
section o
f
the Ma
in
screen
,
an
d
c
l
ic
k
Sc
h
e
d
u
l
e
d
Recor
d
i
ng
.
A list o
f
scheduled recordings will appear.
Main > Sc
h
e
d
u
l
e
d
Recor
d
ing
s
F
requenc
y
Deci
d
e w
h
ic
h
d
ays you want t
h
e Camera to
record. Select the appropriate Frequency
f
rom the drop-
d
own menu.
S
tart
T
i
me
Se
l
ect t
h
e time you want t
h
e recor
d
ing to
b
egin
.
Durati
on
Se
l
ect
h
ow
l
ong you want t
h
e recor
d
ing to
b
e
.
A
f
ter you have made your selections, click A
dd
to save t
h
e
new sc
h
e
d
u
l
e
d
recor
d
ing
.
To delete a scheduled recording, select the recording
f
rom
t
h
e
l
ist, an
d
c
l
ic
k
De
l
et
e
.
To c
l
ose t
h
is screen, c
l
ic
k
X
in t
h
e upper-rig
h
t corner
.
You may
f
ind it help
f
ul to know how much memory is
required to hold a video recording. The
f
ollowing table
lists estimated bit rates and
f
ile sizes
f
or a typical video
recor
d
ing at eac
h
avai
l
a
bl
e reso
l
ution an
d
vi
d
eo.
N
O
TE
:
In order
f
or the scheduled recordings
to occur, t
h
e Mu
l
ti-Camera Viewer & Recor
d
er
Uti
l
ity must
b
e running on a networ
k
e
d
PC.
E
s
t
i
mate
d
Har
d
-Dr
i
v
e Memory
S
pace Req
u
i
red
f
or
V
i
d
e
o
Recor
d
i
ng per
H
our
Reso
l
u
t
i
on
Qua
l
i
ty Leve
l
B
i
t
R
at
e
F
i
l
e
S
i
z
e
320
x
2
4
0
Very Hig
h
900
kb
p
s
430M
B
320
x
2
4
0
Hig
h
500
kb
p
s
330M
B
320
x
2
4
0
Norma
l
300
kb
p
s
240M
B
320
x
2
4
0
L
o
w
120
kb
p
s
230M
B
320
x
2
4
0
V
ery
L
o
w
40
kb
p
s
225M
B
16
0
x 1
20
Very Hig
h
800
kb
p
s
380M
B
16
0
x 1
20
Hig
h
400
kb
p
s
270M
B
16
0
x 1
20
Norma
l
200
kb
p
s
230M
B
16
0
x 1
20
L
o
w
100
kb
p
s
220M
B
16
0
x 1
20
V
ery
L
o
w
40
kb
p
s
210M
B
N
O
TE
:
The maximum length o
f
a recording
f
ile
is one hour. I
f
a recording is more than one hour
long, then multiple
f
iles will be saved.
Main > Save
d
Fi
l
e
s
To access the saved
f
iles o
f
a Camera, select its name in the
C
amera
S
tatu
s
section o
f
the Ma
in
screen, an
d
c
l
ic
k
Save
d
F
i
l
e
s
. You have three types o
f
f
iles available: Recorded
Vi
d
eos, Motion Detection Vi
d
eos, an
d
Snaps
h
ot Pictures.
M
a
in >
Sa
v
ed
Fi
les
To c
l
ose t
h
is screen, c
l
ic
k
X
in t
h
e upper-rig
h
t corner
.
Recor
d
e
d
Fi
l
e
s
C
l
ic
k
Recor
d
e
d
V
i
d
eo
s
, an
d
t
h
eRecor
d
e
d
Fi
l
e
s
s
c
reen
appears and displays a list o
f
f
iles, organized by Camera
Name, Fi
l
e Name, an
d
Start Time
.

Chapter 2 Installing and Using the Camera Utility
17
Wireless-G Internet Home Monitoring Camera
M
a
in >
Sa
v
ed
Fi
les
> R
eco
r
ded
Fi
les
C
amera Nam
e
This is the name o
f
the Camera that was
use
d.
F
i
l
e Nam
e
Displayed here is the name o
f
the
f
ile. I
f
it
was an instant recording, the
f
ilename
f
ormat is “LAN_
R_(date)_(end time)”. I
f
it was a scheduled recording, the
f
ilename
f
ormat is “LAN_(date)_(end time)”.
S
tart
T
i
m
e
T
h
is is t
h
e time t
h
e recor
d
ing
b
egan.
To play a recording, select the appropriate
f
ile and clic
k
P
l
a
y
. To delete a recording, select the appropriate
f
ile and
c
l
ic
k
De
l
ete. I
f
the recorded
f
ile you want is not listed, clic
k
Exp
l
or
e
to
f
ind it. To rename a recorded
f
ile, click Exp
l
or
e
.
A
f
ter you have
f
ound the
f
ile, you can rename it.
To c
l
ose t
h
is screen, c
l
ic
k
X
in t
h
e upper-rig
h
t corner
.
Motion Detection Fi
l
e
s
C
l
ic
k
M
o
t
i
on
D
etec
t
i
on
V
i
d
eos, an
d
t
h
eMotion
D
etection
Fi
l
e
s
screen appears and displays a list o
f
f
iles, organized by
Camera Name, File Name, and Start Time. (Do not con
f
use
t
h
is wit
h
t
h
eMa
in
screen
’
s
M
o
t
i
on
D
etec
t
i
on
opt
i
on,
w
h
ic
h
accesses t
h
e Motion Detection
S
ettings screen.
)
Main > Save
d
Fi
l
es > Motion Detection Fi
l
e
s
C
amera Nam
e
This is the name o
f
the Camera that was
use
d.
Fi
l
e Nam
e
Displayed here is the name o
f
the
f
ile.
S
tart
T
i
m
e
T
h
is is t
h
e time t
h
e recor
d
ing
b
egan.
To play a video, select the appropriate
f
ile and clic
k
P
l
a
y
.
To delete a
f
ile, select the appropriate
f
ile and click De
l
et
e
.
I
f
the
f
ile you want is not listed, clic
k
Exp
l
or
e
to
f
ind it. To
rename a
f
ile, clic
k
Exp
l
or
e
. A
f
ter you have
f
ound the
f
ile,
you can rename
i
t
.
To c
l
ose t
h
is screen, c
l
ic
k
X
in t
h
e upper-rig
h
t corner
.
N
O
TE
:
Use Win
d
ows Me
d
ia P
l
ayer 7 or
h
ig
h
er to
view your recor
d
ings
.
Snaps
h
ot
s
Cl
i
ck
Snaps
h
ot
P
i
ctu
r
es
, an
d
a Win
d
ows Exp
l
orer win
d
ow
appears and displays the available SnapShot
f
olders. The
name o
f
each
f
older is the MAC address o
f
the Camera that
took the snapshots in the
f
older. Double-click a
f
older to
see a list o
f
its images
.
Win
d
ow S
h
owing Snaps
h
ot Fo
ld
er
s
Ma
i
n > Mot
i
on Detect
i
o
n
You can
h
ave vi
d
eo recor
d
e
d
w
h
en t
h
e Uti
l
ity
d
etects
motion in a Camera’s
f
ield o
f
view. To con
f
igure these
settings, se
l
ect its name in t
h
e
C
amera
S
tatus section o
f
t
he
Ma
in
screen, an
d
c
l
ic
k
M
o
t
i
on
D
etec
t
i
on
.
A list o
f
scheduled motion detection recordings will
appear.
Main > Motion Detection
S
etting
s

Chapter 2 Installing and Using the Camera Utility
18
Wireless-G Internet Home Monitoring Camera
F
requenc
y
Deci
d
e w
h
ic
h
d
ays you want t
h
e Camera to
monitor its
f
ield o
f
view
f
or motion. Select the appropriate
Frequency
f
rom the drop-down menu.
S
tart
T
i
me
Deci
d
e w
h
at time you want t
h
e Camera to
begin monitoring
f
or motion. Select the time you want
t
h
e vi
d
eo recor
d
ing to
b
egin.
D
ura
t
i
on
Se
l
ect
h
ow
l
ong you want t
h
e Camera to
monitor
f
or motion
.
S
ens
i
t
i
v
i
ty Leve
l
You have a choice o
f
motion sensitivity
levels
f
or the Camera. Select the appropriate level
f
rom
t
h
e
d
rop-
d
own menu
.
3 x 3 (de
f
ault
)
By de
f
ault, the Camera’s
f
ield o
f
view is
split into nine sections (see the on-screen image). I
f
you
want it split into 16 sections, select 4 x 4. I
f
you want it split
into 25 sections, se
l
ect 5 x 5.
On the on-screen image depicting the Camera’s
f
ield o
f
view, c
l
ic
k
t
h
e sections you want monitore
d
. T
h
e se
l
ecte
d
sections will be marked by a crisscross pattern. I
f
you want
to se
l
ect a
ll
sections, c
l
ic
k
Se
l
ect A
ll
. I
f
you want to de-
se
l
ect a
ll
sections, c
l
ic
k
C
l
ear A
ll
.
To re
f
resh the current
image, c
l
ic
k
Re
f
resh Imag
e
.
A
f
ter you have made your selections, click A
dd
to save t
h
e
new sc
h
e
d
u
l
e
d
motion
d
etection vi
d
eo.
To
d
e
l
ete a sc
h
e
d
u
l
e
d
motion
d
etection vi
d
eo, se
l
ect t
h
e
video
f
rom the list, and click De
l
et
e
.
To c
l
ose t
h
is screen, c
l
ic
k
X
in t
h
e upper-rig
h
t corner.
N
O
TE: To speci
f
y the maximum length
f
or a
sing
l
e motion
d
etection vi
d
eo recor
d
ing, c
l
ic
k
Ut
i
l
i
t
y
S
et
t
i
ng
s
on t
h
eMa
in
s
c
reen.
N
O
TE: In order
f
or the motion detection
f
eature
an
d
its recor
d
ings to occur, t
h
e Mu
l
ti-Camera
Viewer & Recor
d
er Uti
l
ity must
b
e running on a
networ
k
e
d
PC.
Main > Uti
l
ity Setting
s
To con
f
igure the settings o
f
the Multi-Camera Viewer &
Recor
d
er Uti
l
ity, c
l
ic
k
Ut
i
l
i
ty
S
et
t
i
ng
s
on t
h
eMa
in
s
c
reen
.
T
h
eUti
l
ity Settings screen wi
ll
appear. You can c
h
ange
the Directory, Recording Time Frame, Disk Allocation
f
or
Recording, and Start In
f
o settings on this screen.
Main > Uti
l
ity Setting
s
D
irector
y
You can speci
f
y the directories where the recordings,
motion
d
etection vi
d
eos, an
d
snaps
h
ots wi
ll
b
e save
d
.
Recor
d
i
ng
D
i
rec
t
or
y
Instant an
d
sc
h
e
d
u
l
e
d
recor
d
ings
will be saved in this directory. The de
f
ault directory
is
C
:
\
Program
F
i
l
es\
L
i
n
k
sys\
W
i
re
l
ess-G Internet
V
i
d
eo Camera\Recor
d
. C
l
ic
k
...
to designate a di
ff
erent
d
irectory
.
M
o
t
i
o
n
D
etec
t
i
on
D
i
rec
t
or
y
Motion
d
etection vi
d
eo
recordings will be saved in this directory. The de
f
ault
is
C
:
\
Program
F
i
l
es\
L
i
n
k
sys\
W
i
re
l
ess-G Internet
V
i
d
eo Camera\Mo
t
i
on
. C
l
ic
k
...
to designate a di
ff
erent
d
irectory
.
Snaps
h
ot
D
i
rec
t
or
y
Snaps
h
ots wi
ll
b
e save
d
in t
h
is
directory. The de
f
ault directory is
C
:
\
Program
F
i
l
es
\
L
i
n
k
sys\
W
i
re
l
ess-G Internet
V
i
d
eo Camera\Snaps
h
o
t
.
C
l
ic
k
...
to designate a di
ff
erent directory
.
Recor
d
ing Time Fram
e
You can speci
f
y the maximum length o
f
motion detection
an
d
instant recor
d
ings.

Chapter 2 Installing and Using the Camera Utility
19
Wireless-G Internet Home Monitoring Camera
M
a
x
i
mum
t
i
me
f
rame
f
or Mo
t
i
on
D
etec
t
i
on
Recor
d
i
ng
This is the maximum length o
f
time the Utility
will record when motion is detected. (To con
f
igure the
Motion Detection settings, c
l
ic
k
Motion Detection on t
h
e
main menu.) The de
f
ault is 1 min. To change the de
f
ault,
select the maximum length o
f
time you want
f
rom the
d
rop-
d
own menu.
M
a
x
i
mum
t
i
me
f
rame
f
or Instant Record
i
ng
T
h
is is t
h
e
maximum length o
f
time the Utility will record when you
c
l
ic
k
t
h
e Instant Recor
d
ing icon on t
h
e viewing win
d
ow
o
f
a Camera. The de
f
ault is 10 min. To change the de
f
ault,
select the maximum length o
f
time you want
f
rom the
d
rop-
d
own menu.
Disk Allocation
f
or Recordin
g
You can
d
esignate
h
ow muc
h
h
ar
d
d
is
k
space you want to
use
f
or recording.
Tota
l
Spac
e
This is the total amount o
f
space available on
the hard drive o
f
the PC running this Utility.
Tota
l
Space an
d
Av
a
i
l
a
bl
e Space This is the amount o
f
space available
f
or recording
.
Ena
bl
e
D
i
s
k
space
l
i
m
i
t
I
f
you want to limit the amount
o
f
disk space available
f
or recording, click the checkbox.
Enter the maximum number o
f
megabytes in the Max
i
mu
m
f
ield.
O
f
the total amount o
f
disk space available
f
or recording,
you can designate the amount o
f
space available
f
or
motion
d
etection recor
d
ings. Enter t
h
e maximum num
b
er
o
f
megabytes in the Motion Detection Recor
d
ing Spac
e
f
ield
.
O
f
the total amount o
f
disk space available
f
or recording,
you can designate the amount o
f
space available
f
or
instant an
d
sc
h
e
d
u
l
e
d
recor
d
ings, enter t
h
e maximum
number o
f
megabytes in the Instant/Sc
h
e
d
u
l
e
d
Recor
d
ing
Sp
ac
e
f
ield
.
I
f
the hard drive runs out o
f
space, the Utility has two
options: it can overwrite the oldest
f
iles or stop recording.
Se
l
ect t
h
e option you want,
O
verw
r
i
te oldest
f
i
le
or
S
top
recor
d
i
ng
.
Start In
fo
You can
d
esignate w
h
en an
d
h
ow you want t
h
e Uti
l
ity to
l
aunc
h
.
Launc
h
V
i
ewer&Recor
d
eru
t
i
l
i
tyon
W
i
n
d
owsstartu
p
I
f
you want t
h
e Uti
l
ity to
l
aunc
h
w
h
en Win
d
ows starts up,
c
l
ic
k
t
h
e c
h
ec
kb
ox
.
A
uto start
v
i
d
eo strea
m
i
ng w
h
en u
t
i
l
i
t
y s
t
ar
ts
I
f
you
want vi
d
eo to automatica
ll
y
b
egin streaming w
h
en t
h
e
Uti
l
ity
l
aunc
h
es, c
l
ic
k
t
h
e c
h
ec
kb
ox
.
A
f
ter you have made your changes, clic
k
S
ave to save t
h
e
new sett
i
ngs
.
To cance
l
your c
h
anges, c
l
ic
k
Cance
l
.
To c
l
ose t
h
is screen, c
l
ic
k
X
in t
h
e upper-rig
h
t corner
.
Tosetupt
h
eL
i
n
k
sysSo
l
o
L
i
n
k
Ser
v
i
ce,go to“C
h
apter
3:
S
et
t
i
ng up t
h
e
L
i
n
k
sys So
l
o
L
i
n
k
DDNS Ser
v
i
ce.
”
I
f
you want to use the Camera’s Web-based Ut
i
l
i
t
y, go
to “C
h
apter
4
: Advanced Con
f
i
gura
t
i
on
w
i
t
h
t
h
e We
b-
Base
d
U
t
i
l
i
ty.
”
Other manuals for WVC54GCA
1
Table of contents
Other Cisco Webcam manuals

Cisco
Cisco TelePresence PrecisionHD Assembly instructions

Cisco
Cisco Linksys WVC54G Operator's manual

Cisco
Cisco PrecisionHD USB User manual

Cisco
Cisco WVC200 - Wireless-G PTZ Internet Camera Instruction Manual

Cisco
Cisco VT Camera III User manual

Cisco
Cisco LINKSYS WVC54GC User manual

Cisco
Cisco Webex User manual

Cisco
Cisco Webex Instruction Manual
Popular Webcam manuals by other brands

Philips
Philips SPC700NC/00 Quick install guide

Genius
Genius ISLIM 310 manual

D-Link
D-Link DSB-C320 Quick installation guide

Logitech
Logitech C100 Getting started guide

Logitech
Logitech 960-000309 - Quickcam 3000 For Business Web... quick start guide

LIGHTBOARD DEPOT
LIGHTBOARD DEPOT LBD4832-SS-A-1 DOCUMENTATION & INSTRUCTIONS